RF Create IBLPN
Before you begin to assign an inbound load to an outbound, create an LPN as shown in the following steps:
Steps:
- Login to WMS Mobile using your credentials.
- Create an LPN for the order. To do that, select the Create LPN transaction. After
invoking, create a new LPN and enter the LPN number. For example: LPN: SKLPN1504M.
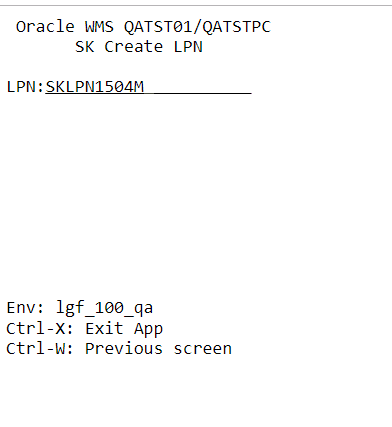
- From the next screen, enter the following information:
- LPN: Enter the LPN Number.
- Items: Enter the items that you created through the items UI.
- Qty: Enter the quantity.
- You can also check the LPN status in the IBLPN UI. Go to the IBLPN UI > Search for the LPN number > the status displays as “Received” when items are successfully consumed.
- After consuming all the items, press Ctrl-X to exit from the current page.
Capture Pallet Images During Create LPN
You can capture images in real time during the Mobile Create LPN transaction. The image is linked to the LPN created and can be used to review or validate container condition.
Before you start, ensure you have:
- Access to the Mobile Create LPN transaction.
- Camera access enabled on the mobile device.
- capture-lpn-image screen parameter configured.
To enable and capture images, do the following:
- Go to the Create LPN module.
- Open Parameter > Screen Parameter.
- Select capture-lpn-image. Set the value:
- Yes: Show image capture screen when ending the LPN.
- No/Blank: Continue normal Create LPN flow without image capture.
- Click Save.
- Now, open Mobile Create LPN and enter or scan the required LPN details.
- Press CTRL-E to end the LPN.
- On the Image Capture screen, capture the image.
- Upload or confirm the image.
Pallet Handling in Mobile Create LPN
The Create LPN pallet-handling enhancements enable warehouse operators to create several LPNs on one pallet as part of a single receiving workflow. Operators can capture pallet-condition images, print pallet labels, cross-dock palletized inventory, and apply facility-specific location controls. You can use in this feature in Mobile Create LPN and Create LPN from Active.
Before using pallet handling, ensure that:
- Users have access to the appropriate Mobile transaction.
- Valid pallet numbers, LPN numbers, items, quantities, and locations are available.
- A default printer and label configuration are available when pallet labels are required.
- Inbound LPN cross-dock processing is configured when palletized inventory must be cross-docked.
- Facility administrators can manage screen parameters and facility message settings.
Palletize LPNs During Create LPN
pallet-handling screen parameter. | Values | Behaviour |
|---|---|
| Blank | Uses the standard MOBILE Create LPN workflow with no palletization. |
| LPN as Physical Pallet | Retains the existing behaviour in which an LPN represents a physical pallet. |
| Palletize upfront | Prompts for a pallet number before the LPN number and enables multi-LPN palletization. |
pallet-handling for this
configuration. The standalone palletize-upfront and
lpn-as-physical-pallet parameters are removed. To palletize LPN during the Create LPN, do the following:
- Open Mobile Create LPN or Create LPN from Active.
- Scan or enter the pallet number.
- Scan or enter the LPN number.
- Enter the required item, quantity, and inventory attributes.
- Complete the LPN. The system returns to the LPN scan field and retains the pallet number. Continue creating LPNs until the pallet is complete.
- Select Ctrl+E: End Pallet to complete the pallet workflow.
The system clears the pallet number and records the pallet association for the LPNs created in the session. It also updates pallet history and activity records.
Capturing Pallet Images
Operators can capture visual evidence of pallet condition at the end of the palletization process. The captured images are stored with the pallet for later review. You can just,
- Set
capture-pallet-imageto Yes in the Mobile Create LPN screen configuration. - Set the parameter to No or leave it blank when image capture is not required.
To capture the pallet images, do the following:
- Create the required LPNs on the pallet.
- Select Ctrl+E: End Pallet.
- Capture one or more images when the image-capture screen opens.
- Select Next to continue.
The system associates each captured image with the pallet. Authorized users can view the images in the Pallet UI and MOBILE Pallet Inquiry.
Cross-Dock Palletized LPNs
You can perform cross-docking for inventory that is palletized during Create LPN. The system evaluates the pallet only when the operator ends the pallet, rather than when each LPN is completed. All you need to do it,
- Set
pallet-handlingto Palletize upfront. - Enable the required
xdock-iblpnoption:- Yes, and Prompt Destination Facility
- Yes, and Do Not Prompt Destination Facility
- Create one or more LPNs on a pallet.
- Select Ctrl+E: End Pallet.
- Enter the destination facility, if the selected cross-dock option requires it.
The system evaluates the palletized inventory against cross-dock order details. It cross-docks to an existing eligible order when the required pallet number, inventory, quantity, order type, and destination facility match.
If no order exists for the required pallet number, the system creates an order and cross-docks the palletized inventory. If an order exists but required details do not match, the system displays “No XDock order for Pallet”.
The system updates the outbound LPN with the pallet number. For serial-controlled inventory, the system also transfers serial-number associations to the outbound LPN.
Print Pallet Labels
You can print pallet label on ending a pallet in Create LPN. It supports both Label Rules Engine processing and label-template processing.
- Set
print-pallet-labelsto Yes. - Configure a default printer for the user or device.
- Configure Label Rules Engine rules or configure a label template when Label Rules Engine is not used.
- Set
print-pallet-labelsto No or leave it blank when pallet labels are not required. - Complete the palletized LPN workflow.
- If needed, use Ctrl+P to select or add a printer.
- Select Ctrl+E: End Pallet.
The system submits the pallet-label print request and records the event in Label Printing history. The mobile transaction displays a confirmation that printing was initiated.
Warning:If no default printer is configured, the system displays a printer warning. Configure a printer before ending the pallet to avoid a failed print request.
Enforce Location Scanning
You can facilities control over whether operators can complete or exit a Create LPN transaction without scanning a prompted location.
- Just set
prompt-locnto Yes when the workflow must prompt for a location. - In the facility message configuration, locate Location not Scanned. Proceed.
- Select the required message behaviour:
| Configuration | Behaviour |
| Warning | The operator can accept the warning and continue without a location, or reject it and return to the location prompt. |
| Auto-Reject enabled | The message behaves as an error. The operator must scan a valid location before completing or exiting the transaction. |
| Disabled | The system does not show the message and retains the previous behavior. |
The message applies when the operator attempts to end or exit a transaction without entering a required location.
Warning: Enable Auto-Reject when your facility requires a valid location for every transaction. A warning alone does not prevent the operator from proceeding.