OpenAPI Compatible REST APIs
What are OpenAPI Compatible REST APIs?
OpenAPI (version 2.0 or 3.0, in JSON or YAML format) is an industry standard for documenting RESTful APIs. It provides:
- Clear API Definition: Endpoints, HTTP methods, input/output parameters, authentication methods, and expected responses are all precisely described.
- Interoperability: APIs described in OpenAPI format are easily discovered, consumed, and integrated across platforms and tools.
Why are OpenAPI REST APIs important for Agent-Building platforms?
- Fast Integration: Instantly connect to external or third-party REST APIs by uploading their OpenAPI specification—even if direct integration via an MCP isn’t available.
- Reusable Agent Tools: Convert OpenAPI-defined APIs into agent tools that your knowledge or data analysis agents can invoke during conversations.
- Easy API Management: Upload your OpenAPI (v2.0/v3.0 JSON), review and test endpoints, update descriptions, and refine parameter details to guide agent interactions.
- Accelerated development: Automated import and configuration of APIs reduces manual effort, helps prevent errors, and speeds up the development of agent capabilities.
Current Support and Compatibility for Uploading REST APIs
When uploading REST APIs to the platform, the current compatibility is limited to OpenAPI specifications provided in JSON format only. Both OpenAPI v2.0 (Swagger 2.0) and OpenAPI v3.0 specifications are supported, as long as the document is valid and follows the respective standard structure.
At the moment, the platform supports importing endpoints that use only the GET and POST HTTP methods. For POST operations, the platform will include the endpoint only when the request body is defined as application/json. Any POST endpoint that does not declare application/json as its input content type will not be added to the data source during upload.
The platform supports the following authentication methods:
- OAuth2
- Basic authentication
- Bearer tokens (HTTP Bearer token)
- API key authentication
For OAuth2, supported flows are Client Credentials and Authorization Code for OpenAPI v3. For OpenAPI v2, the supported flows are Client Credentials and Access Code (also referred to as accessCode).
To ensure successful configuration, your specification should declare OAuth2 under the correct section for your OpenAPI version (v2 securityDefinitions or v3 components.securitySchemes) and include the appropriate token endpoints and scopes required by your API provider.
For Basic and Bearer, declare an HTTP security scheme (v3 type: http with scheme: basic or scheme: bearer; v2 type: basic for Basic).
Bearer is typically represented as an apiKey in the Authorization header in v2.
For API Key, declare an apiKey security scheme and specify where it is passed (header, query, or cookie in v3; header or query in v2).
Configure OAuth2 for your REST APIs
REST API Data sources support OAuth2. Add your preferred authentication method to use your REST APIs.
-
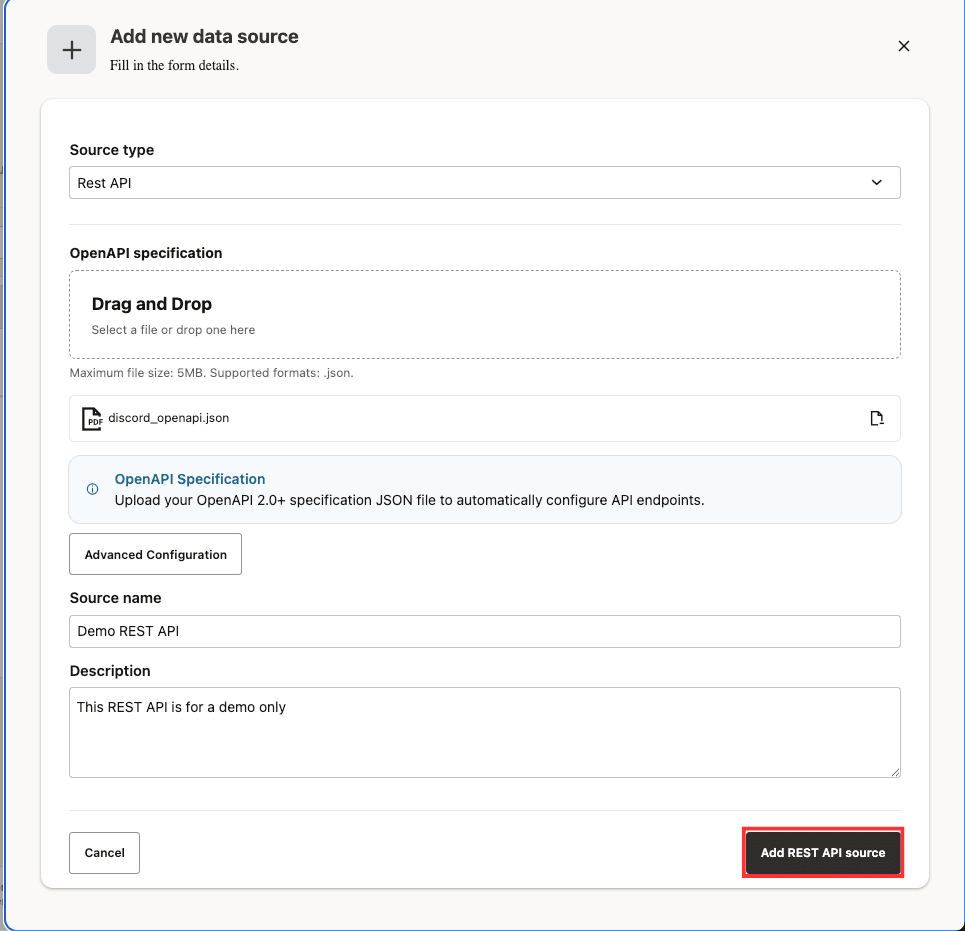
Select Data Sources in the left sidebar and select Add data source button.
-
Select REST API as the Source Type and optionally add a custom name and description for the data source under Advanced Configuration.
-
Upload your OpenAPI 2.0 or above specification JSON file to automatically configure API endpoints and select Add REST API source button.
-
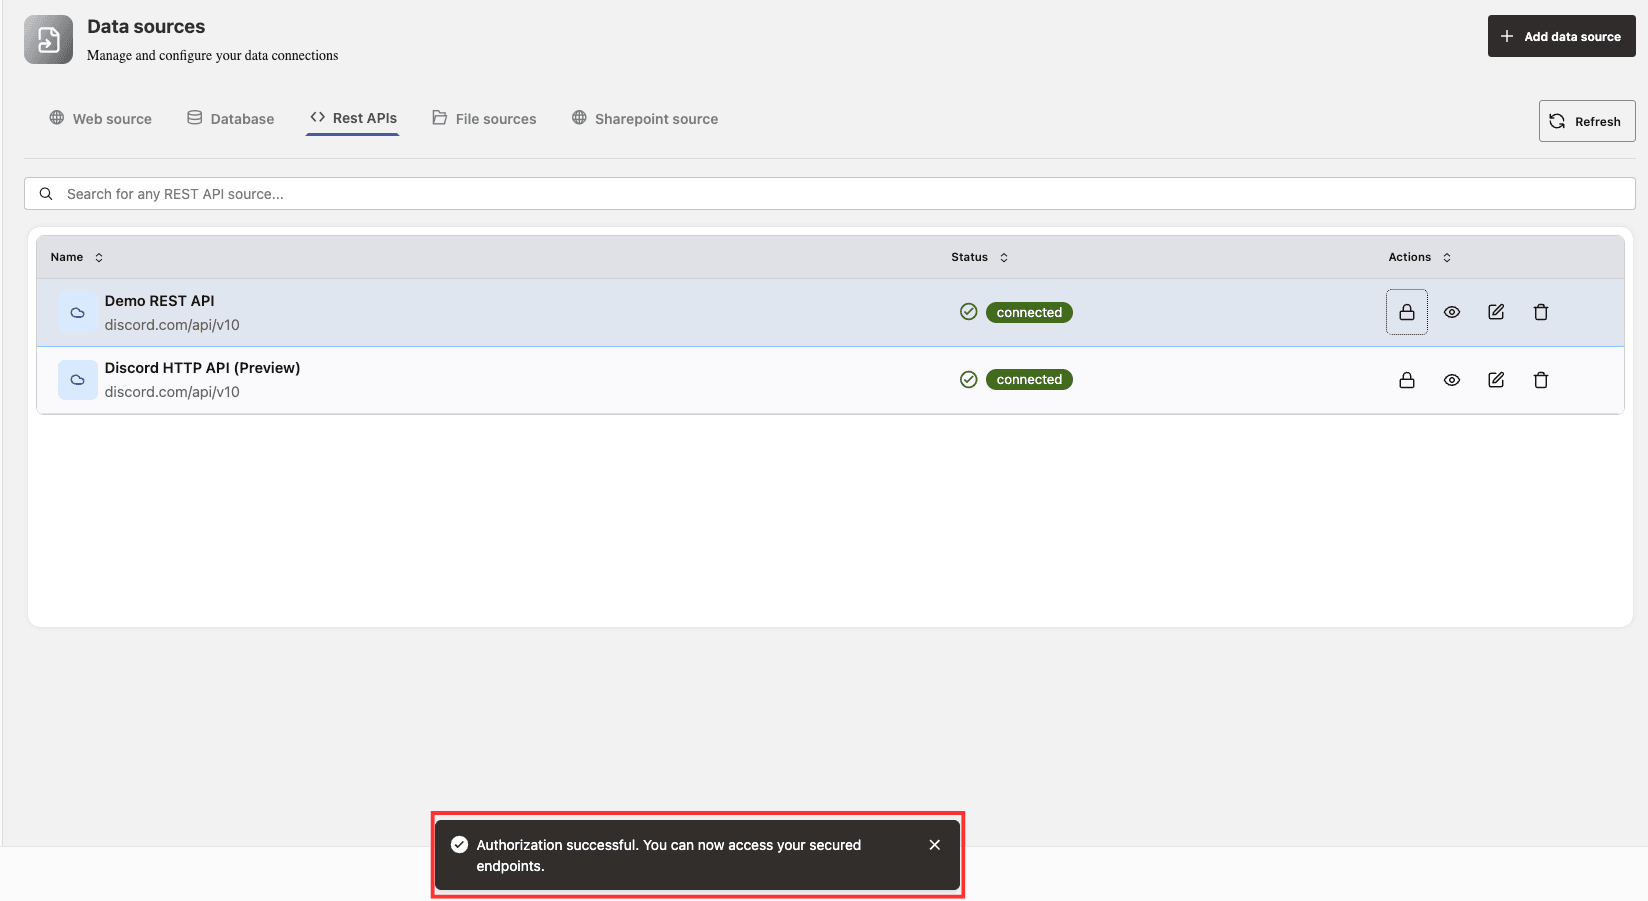
On the Data Sources dashboard, select the REST APIs tab, then click the lock icon in the Actions column for that data source.

-
Authorize the REST API access to this data source by entering Client ID, Client Secret and OAuth2 Flow Type. Based on the flow type selected, a new selector will be displayed where you can select the desired scopes.
-
Select Request authorization button.

-
For the ‘Authorization Code’ flow type, you will be redirected to a page to grant the necessary permissions. After approving access, you will be sent to a callback page that displays “Authorization complete.” You can then close this tab and return to Agent Factory. When you see the message “Authorization successful. You can now access your secured endpoints.”, it means your authentication settings have been saved and you can begin using the REST API in Agent Builder.
Important thing to consider when adding authentication to REST APIs:
When adding authentication to REST APIs, it is crucial to ensure your API specification correctly declares authentication mechanisms, especially when using OpenAPI standards. For OpenAPI v2 (Swagger 2.0), your JSON file must include a securityDefinitions field. While this field can be introduced as an empty dictionary, no authentication options will be available in configuration screens unless detailed definitions are provided within it. This field is where the OpenAPI v2 standard expects all authentication configurations, such as OAuth2, to be specified.
If you are replicating an existing API or designing a new one, including accurate security definition details is essential. For OAuth2, the currently supported flows are Authorization Code (also called accessCode) and client credentials. It is recommended to explicitly define the flow type, authorization and token URLs, and the appropriate scopes for your API.
{

"swagger": "2.0",

     "securityDefinitions": {

          "OAuth2": {

               "type": "oauth2",

               "flow": "accessCode",

               "authorizationUrl": "https://example.com/oauth/authorize",

               "tokenUrl": "https://example.com/oauth/token",

               "scopes": {

                     "read": "Read access",

                     "write": "Write access"

                }

           }

      }

}
Similarly, if you are using OpenAPI v3, authentication should be declared under the components.securitySchemes section. Again, specifying the correct OAuth2 flow and relevant endpoints and scopes is vital.
{
  "components": {
    "securitySchemes": {
      "OAuth2": {
        "type": "oauth2",
        "flows": {
          "authorizationCode": {
            "authorizationUrl": "https://example.com/oauth/authorize",
            "tokenUrl": "https://example.com/oauth/token",
            "scopes": {
              "read": "Read access",
              "write": "Write access" --these are just examples, in real cases you should specify the scopes according to your API provider--
            }
          }
        }
      }
    }
  }
}
Additionally, it is important to ensure all referenced tags within your API documentation are properly declared at the beginning of your specification, as missing declarations can prevent successful validation or upload of the API. Accurate configuration in your OpenAPI or Swagger specification not only ensures proper authentication handling but also enables smooth integration and easier consumption of your API by clients.