Configure LLM
Large Language Models (LLMs) are used for tasks like text generation, summarization, question answering, and supporting MCP server tools.
Agent Factory supports multiple LLM connection types. Use the LLM Management screen to set up and manage both generative models and embedding models within the application. See LLM Preferences for the preferred order of choosing generative and embedding models.
Model availability changes by provider, region, tenancy, and endpoint. Treat model IDs in this page as examples or release-validated recommendations, not as a complete provider catalog. Always click Test connection before saving a model configuration and before using it in a workflow.
Supported Connection Types
| Provider type | Authentication modes | Typical use |
|---|---|---|
| OCI Generative AI | API key or instance principals | Oracle Cloud-hosted generative and embedding models. |
| OpenAI | API key | OpenAI-hosted generative models. |
| Gemini | API key or Google service account, with compatibility limits noted below | Google-hosted generative and embedding models. |
| vLLM | Endpoint URL, port, optional API key depending on deployment | Self-hosted OpenAI-compatible model endpoints. |
| Ollama | Endpoint URL and port | Local or self-hosted models for development and controlled environments. |
| Local embedding model | No external provider credentials | Bundled embedding model for local retrieval use cases. |
What Test Connection Validates
The connection test validates that Agent Factory can reach the provider from the application container, authenticate, and run a small provider-specific request. A successful test does not guarantee that a model supports every advanced behavior, such as tool calling, structured output, or long context. Validate those behaviors in the target workflow.
Generative Models
OCI Generative AI
Agent Factory connects to OCI Generative AI by model ID. See OCI GenAI Pre-trained Models for current provider availability. For release 26.4, the following model IDs are commonly used with Agent Factory when they are available in your tenancy and region:
-
xai.grok-4 -
xai.grok-4-fast-reasoning -
xai.grok-4-fast-non-reasoning
Setup OCI Generative AI Service
Below are the steps to configure xai.grok-4-fast-reasoning pre-trained model from OCI Generative AI Service.
Prerequisites: Setup OCI Generative AI Service. See Getting Started with Generative AI.
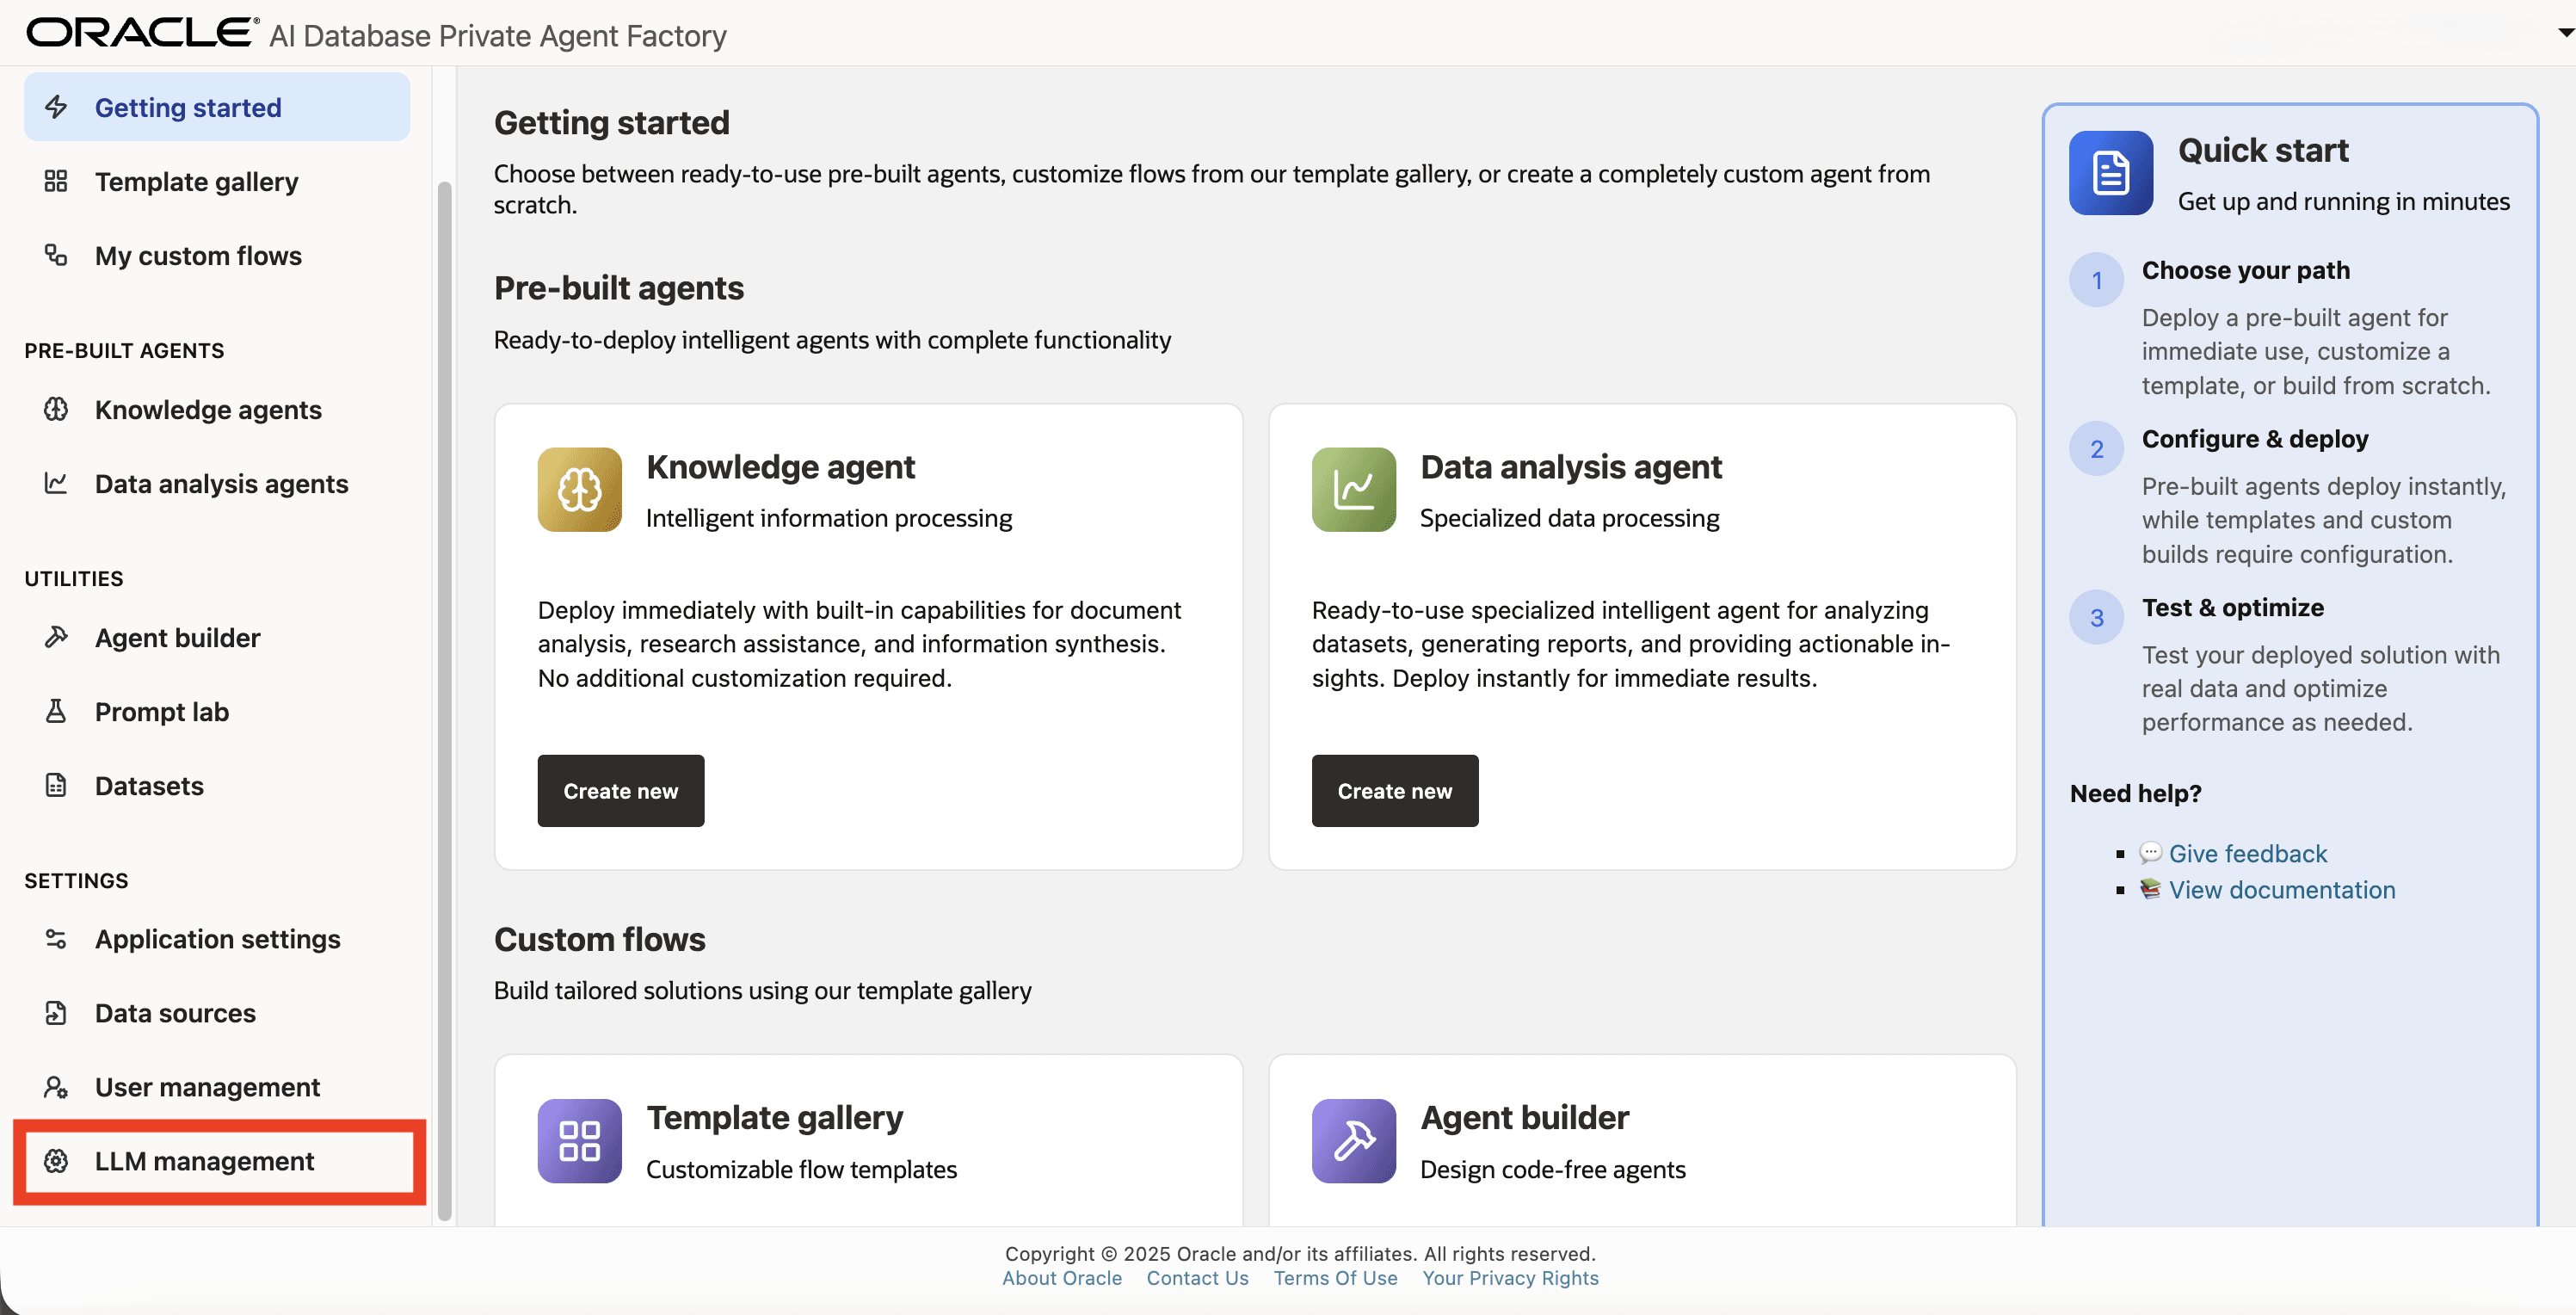
Step 1: Click on Model Management on the left side navigation menu.
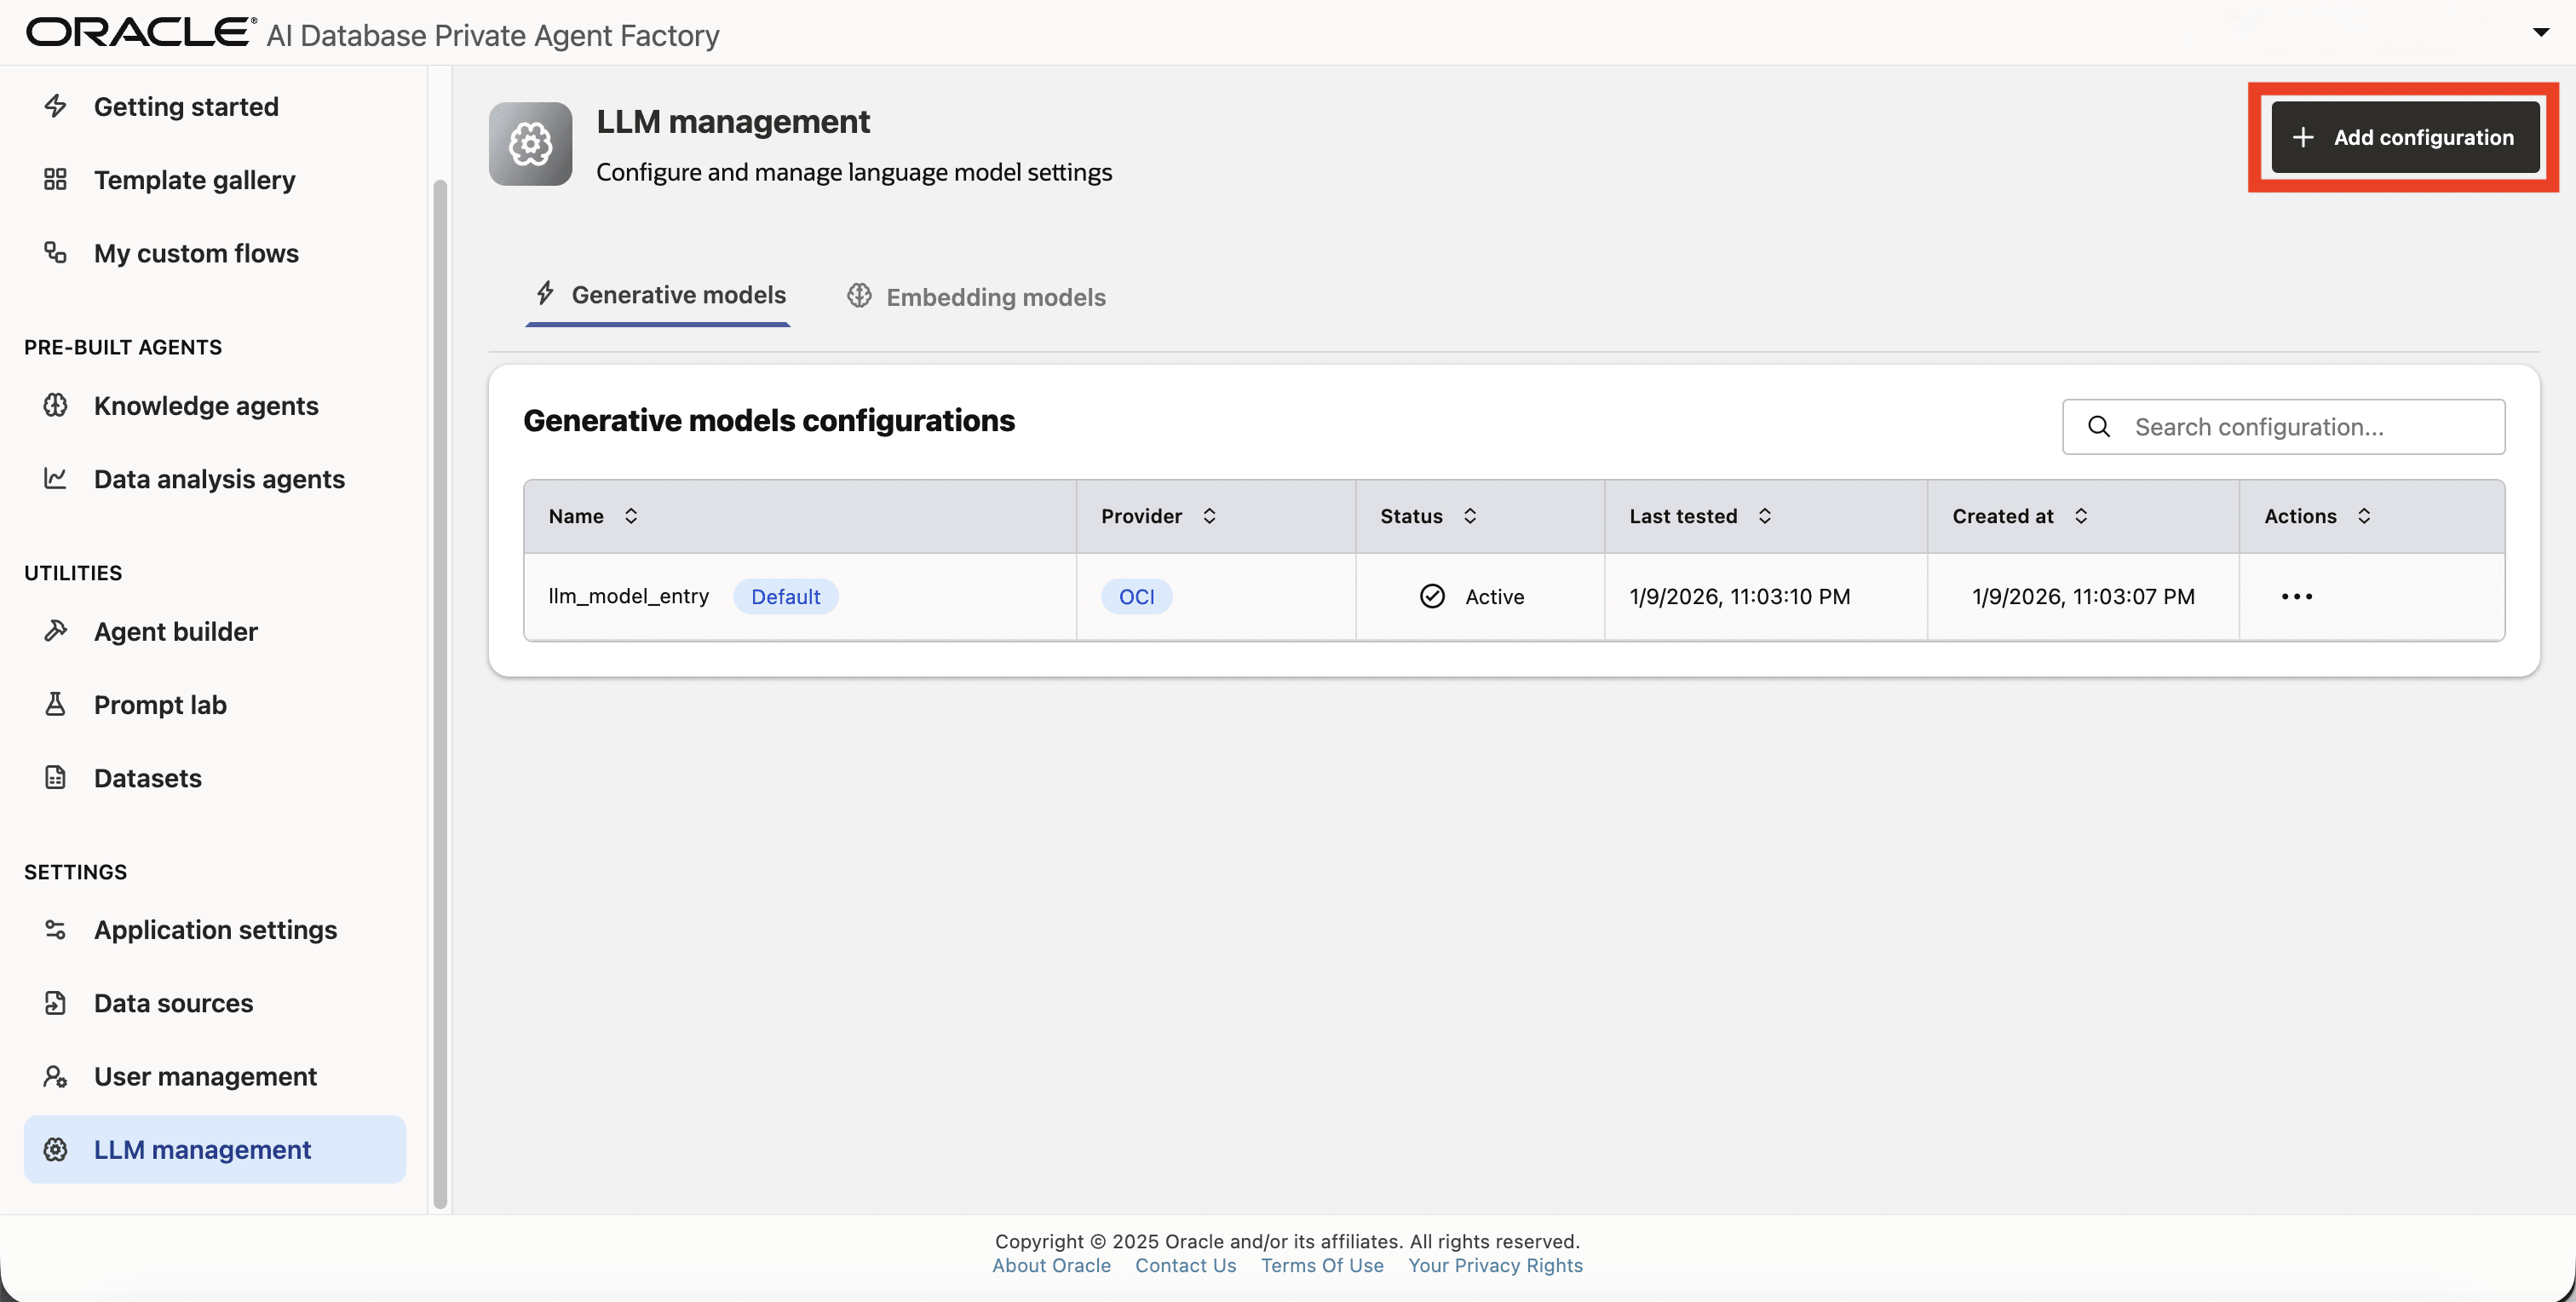
Step 2: Click on Add configuration button placed on the top-right corner.
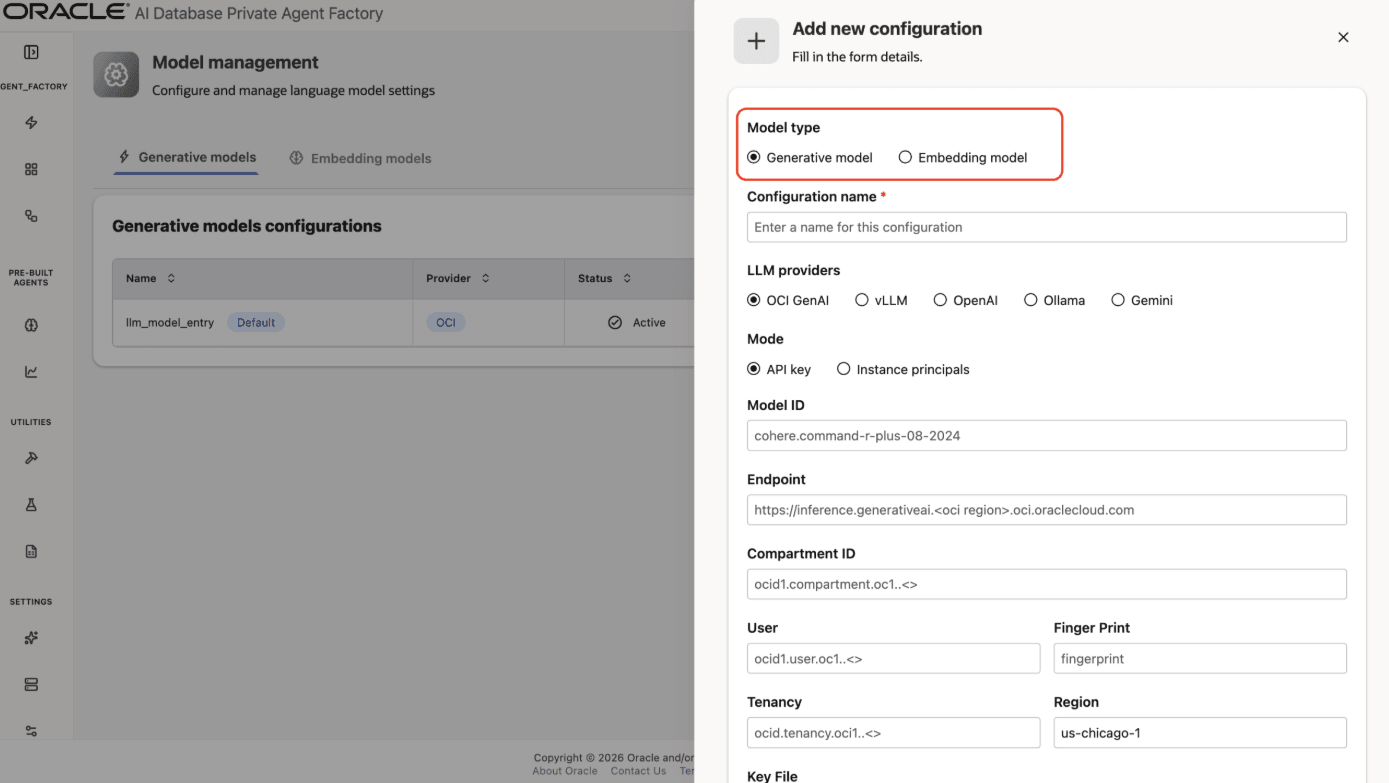
Step 3: A form will open, under Model type pick Generative model.
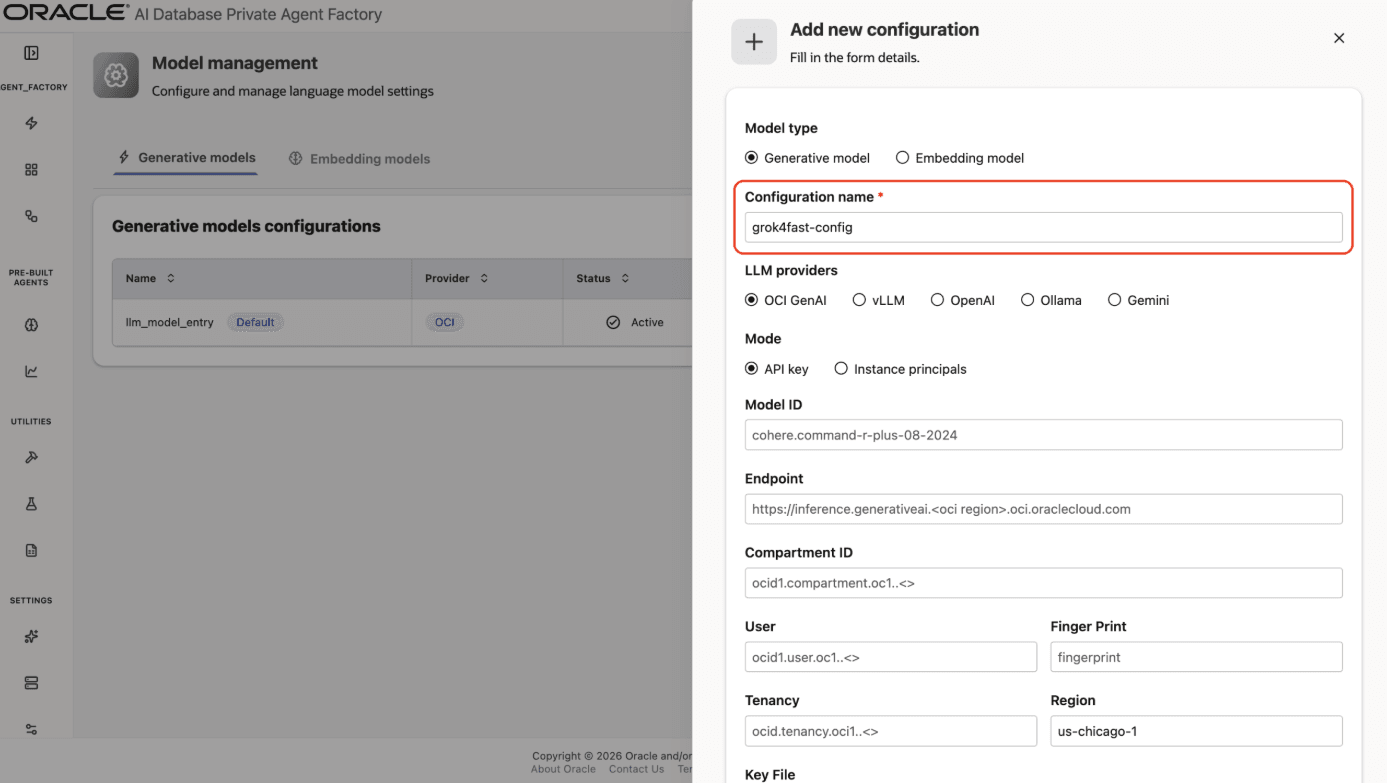
Step 4: Give your LLM configuration a preferred name under Configuration name, avoid whitespaces since they are not allowed.
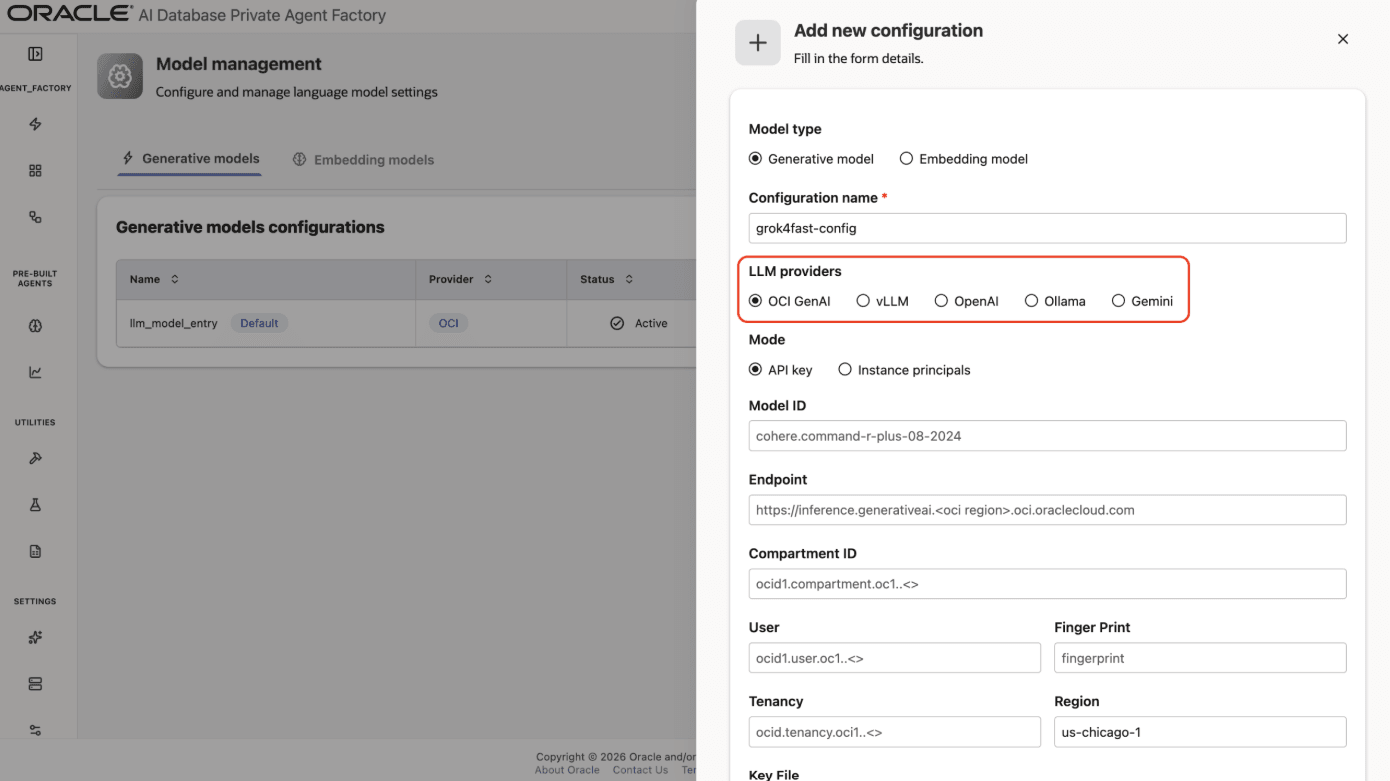
Step 5: From list of LLM providers pick OCI GenAI.
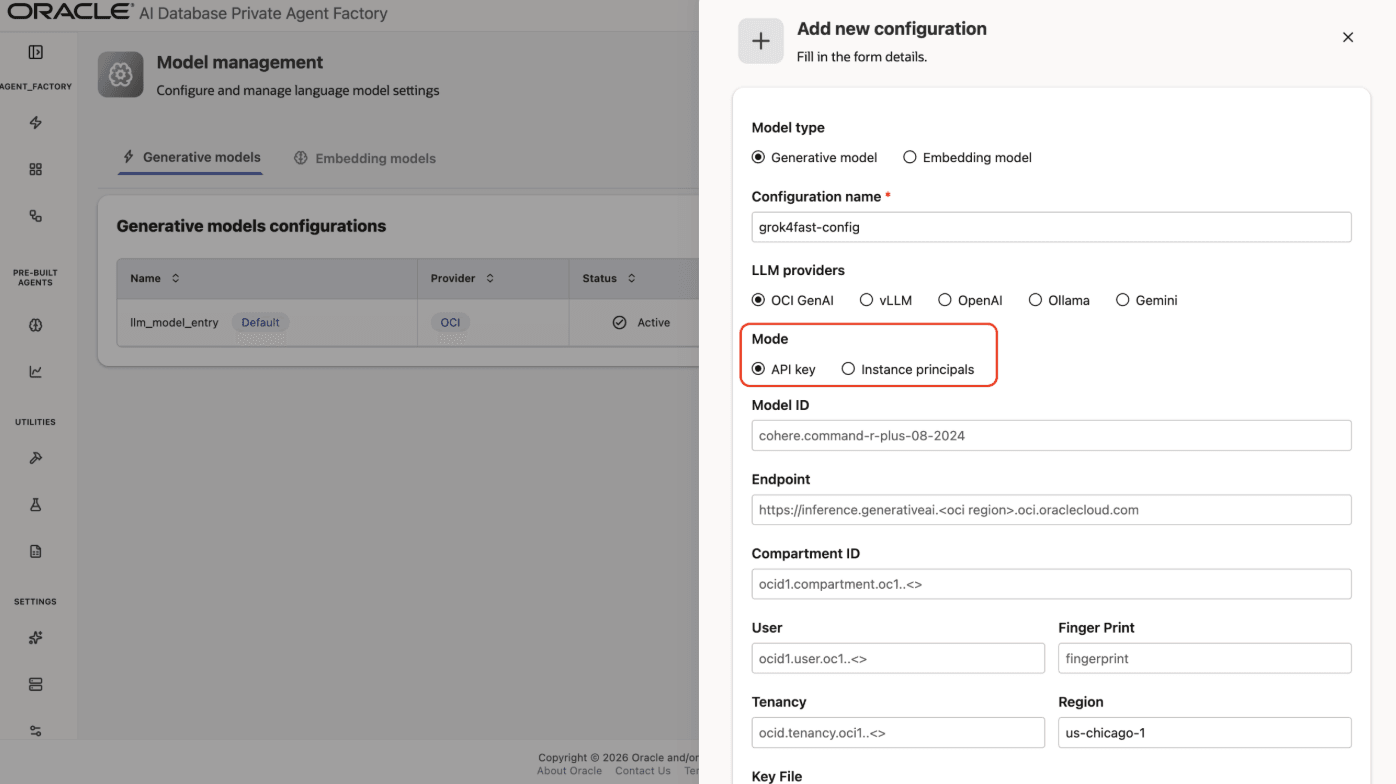
Step 6: For Mode, choose API Key if you have a secret token and want to use it to access the LLM. See API Keys. Choose Instance principals otherwise.
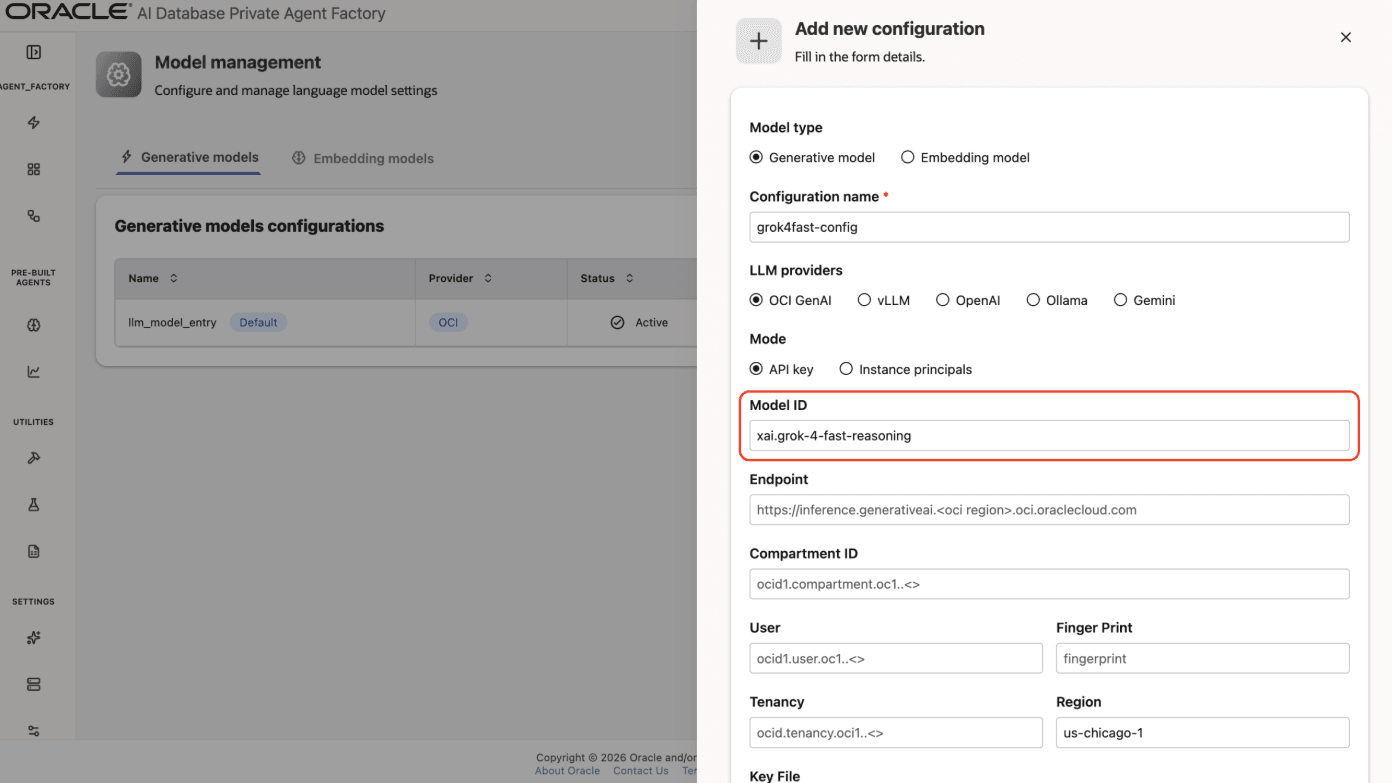
Step 7: In the Model ID field, enter xai.grok-4-fast-reasoning
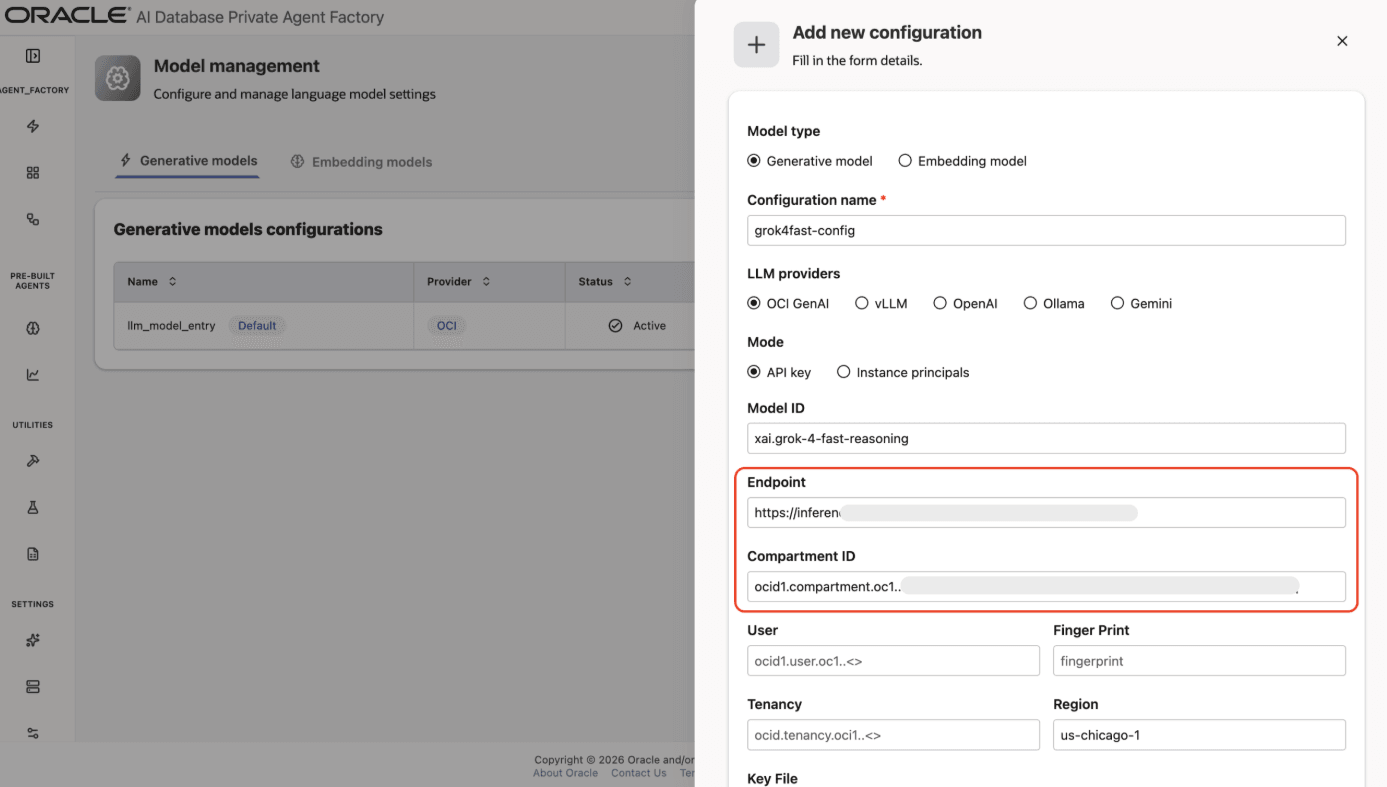
Step 8: Fill Endpoint and Compartment ID.
Step 9: If you chose API Key mode in Step 6, fill User, Tenancy, Finger Print, and Region fields with your own credentials from OCI Generative AI Service. Upload your private API key file under Key File. You can request it from your tenancy owner or by logging into your tenancy with your user. See Set Up API Authentication for OCI.
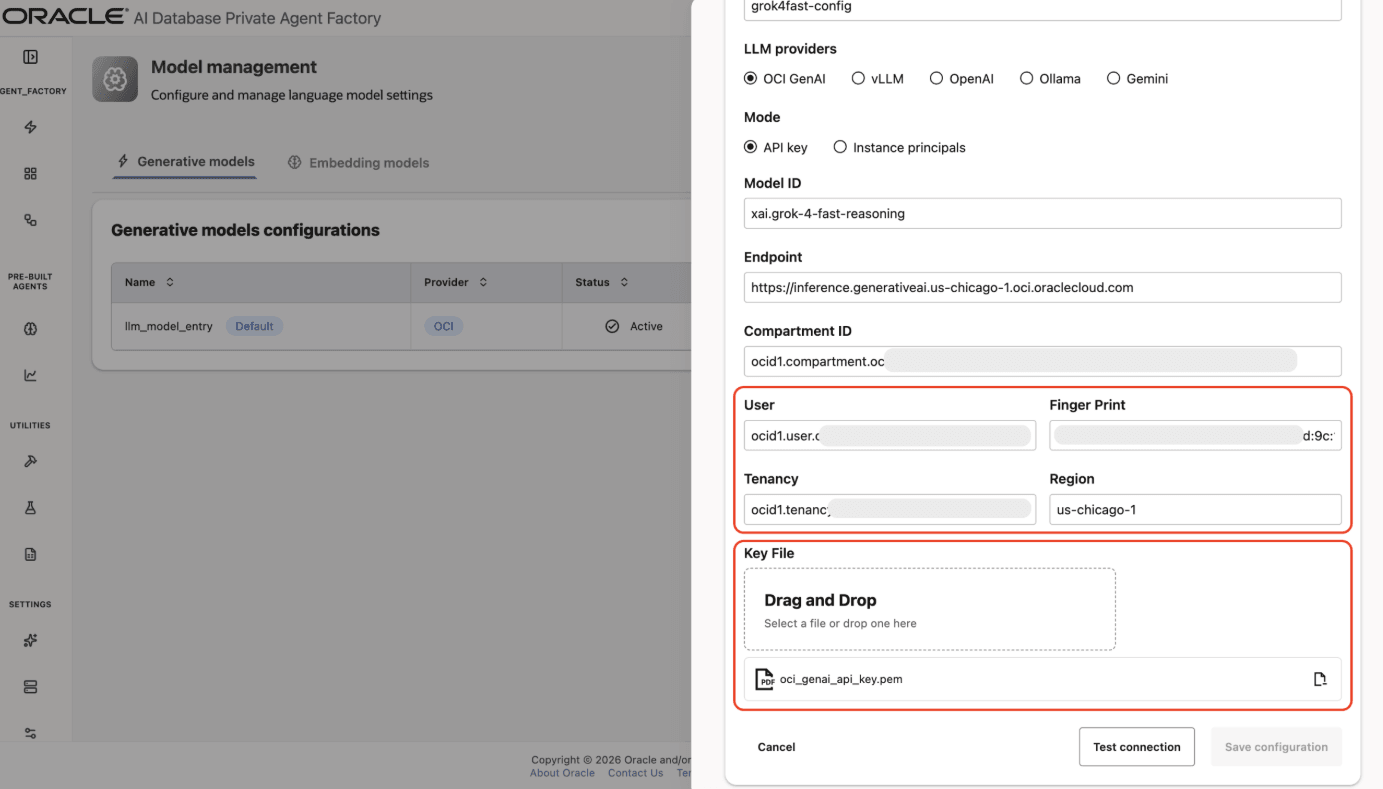
Step 10: Click on Test connection to validate the credentials are correct.
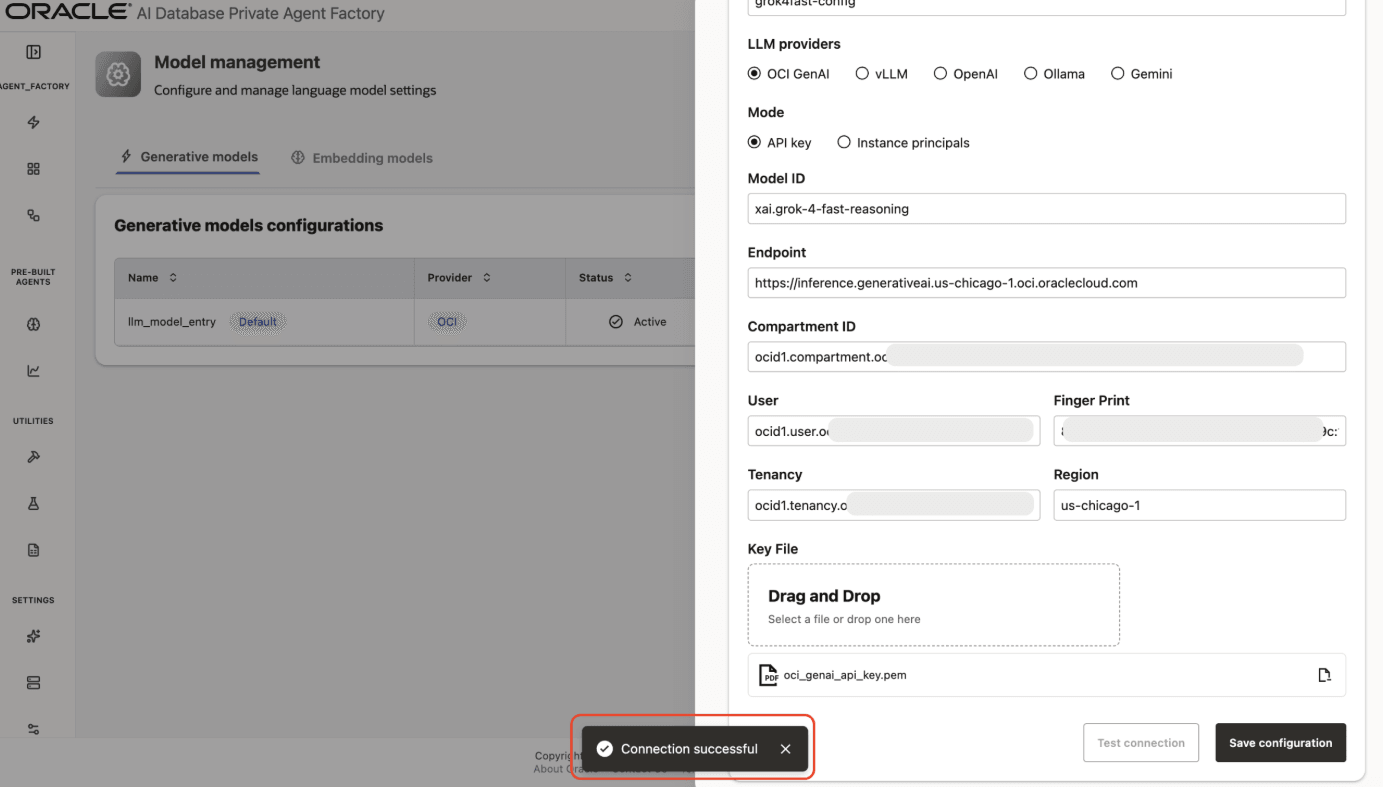
Step 11: A success message Connection successful will appear on screen and the Save Configuration button will be enabled, click on it to finalize the process.
Ollama
Agent Factory has support for Ollama so you can access the LLMs running locally on your machine.
Setup Ollama in Your Machine (Linux OCI VM)
Step 1: Open a terminal window in your system and start a new bash shell with root privileges.
sudo bashStep 2 (Optional): If you are working behind a proxy please set the appropriate proxies.
Step 3: Download and install ollama as instructed by the official site.
Step 4: Pull the llama3.2 model to your local machine.
ollama pull llama3.2Step 5: Edit the ollama service so Agent Factory’s container can access to it.
systemctl edit ollamaStep 6: Once the editor opens, paste the below two lines and close by using Ctrl + O, Enter, Ctrl + X
[Service]

Environment="OLLAMA_HOST=0.0.0.0:11434"
Step 7: Refresh systemd and restart ollama so the changes are visible.
systemctl daemon-reexecsystemctl daemon-reloadsystemctl restart ollamaStep 8 (Optional): In a separate terminal verify ollama service is running by running the following command:
ollama run llama3.2Adding Ollama Model to Agent Factory
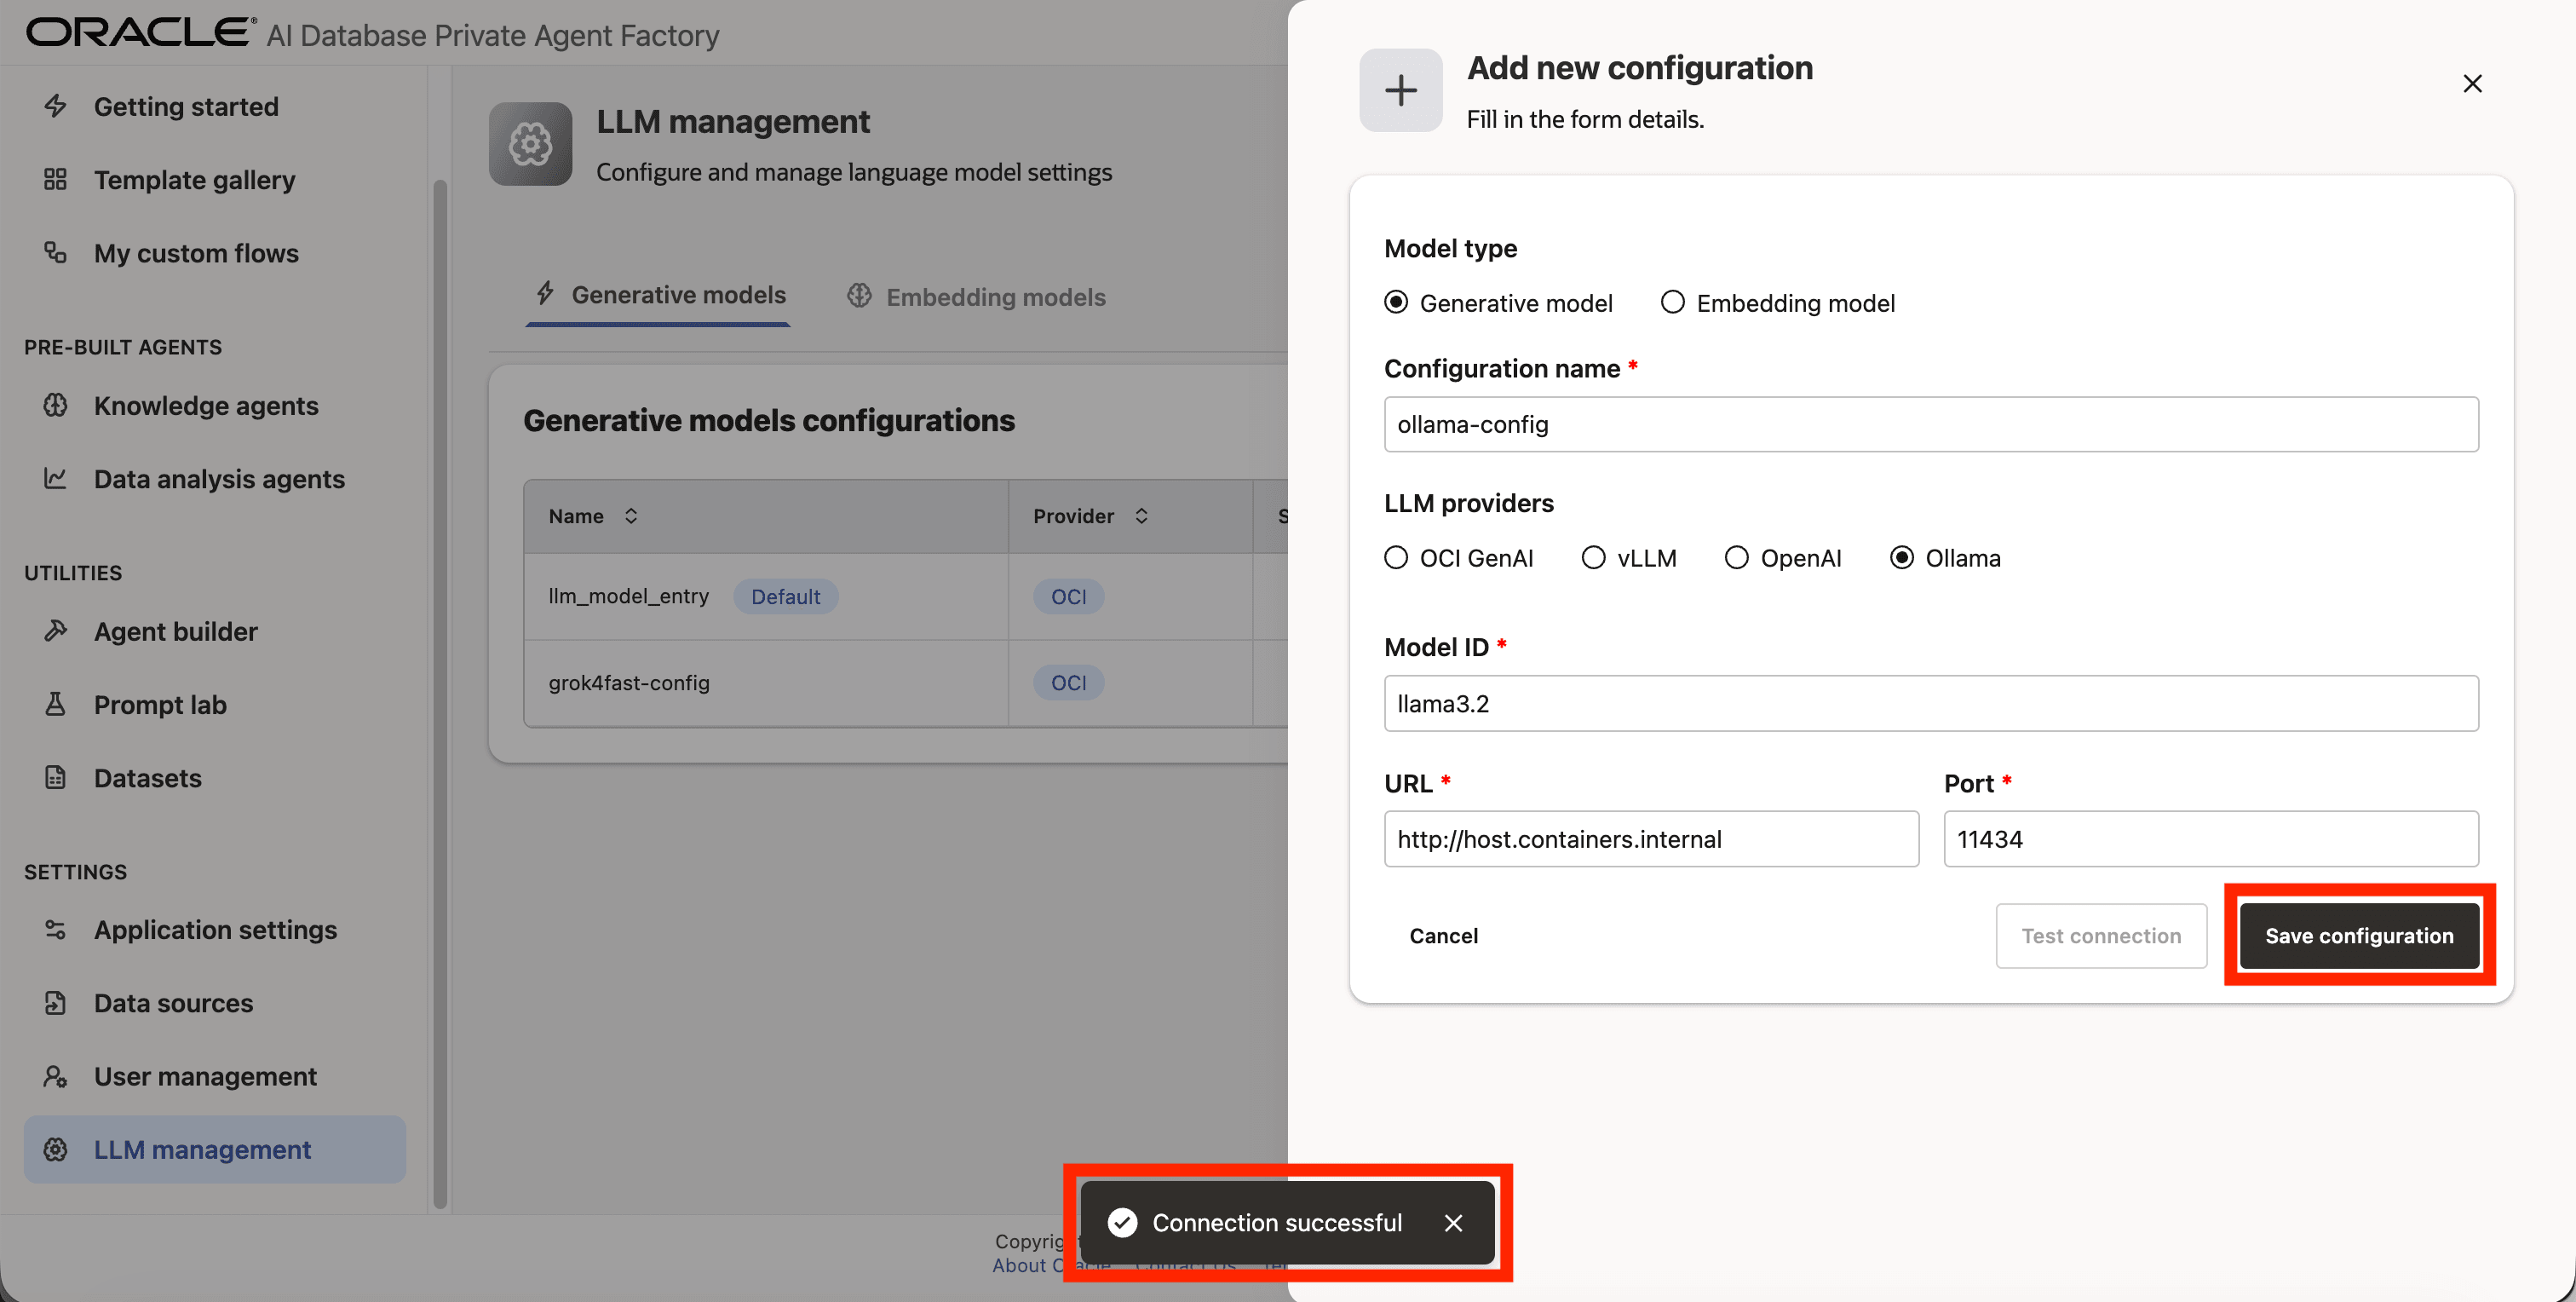
Below are the steps to configure the locally hosted Llama 3.2 model from Ollama that was set up in the previous section.
Step 1: Click LLM management on the left side navigation menu.
Step 2: Click Add configuration button placed on the top-right corner.
Step 3: A form will open, under Model type choose Generative model.
Step 4: Give your LLM configuration a preferred name under Configuration name, avoid whitespaces since they are not allowed.
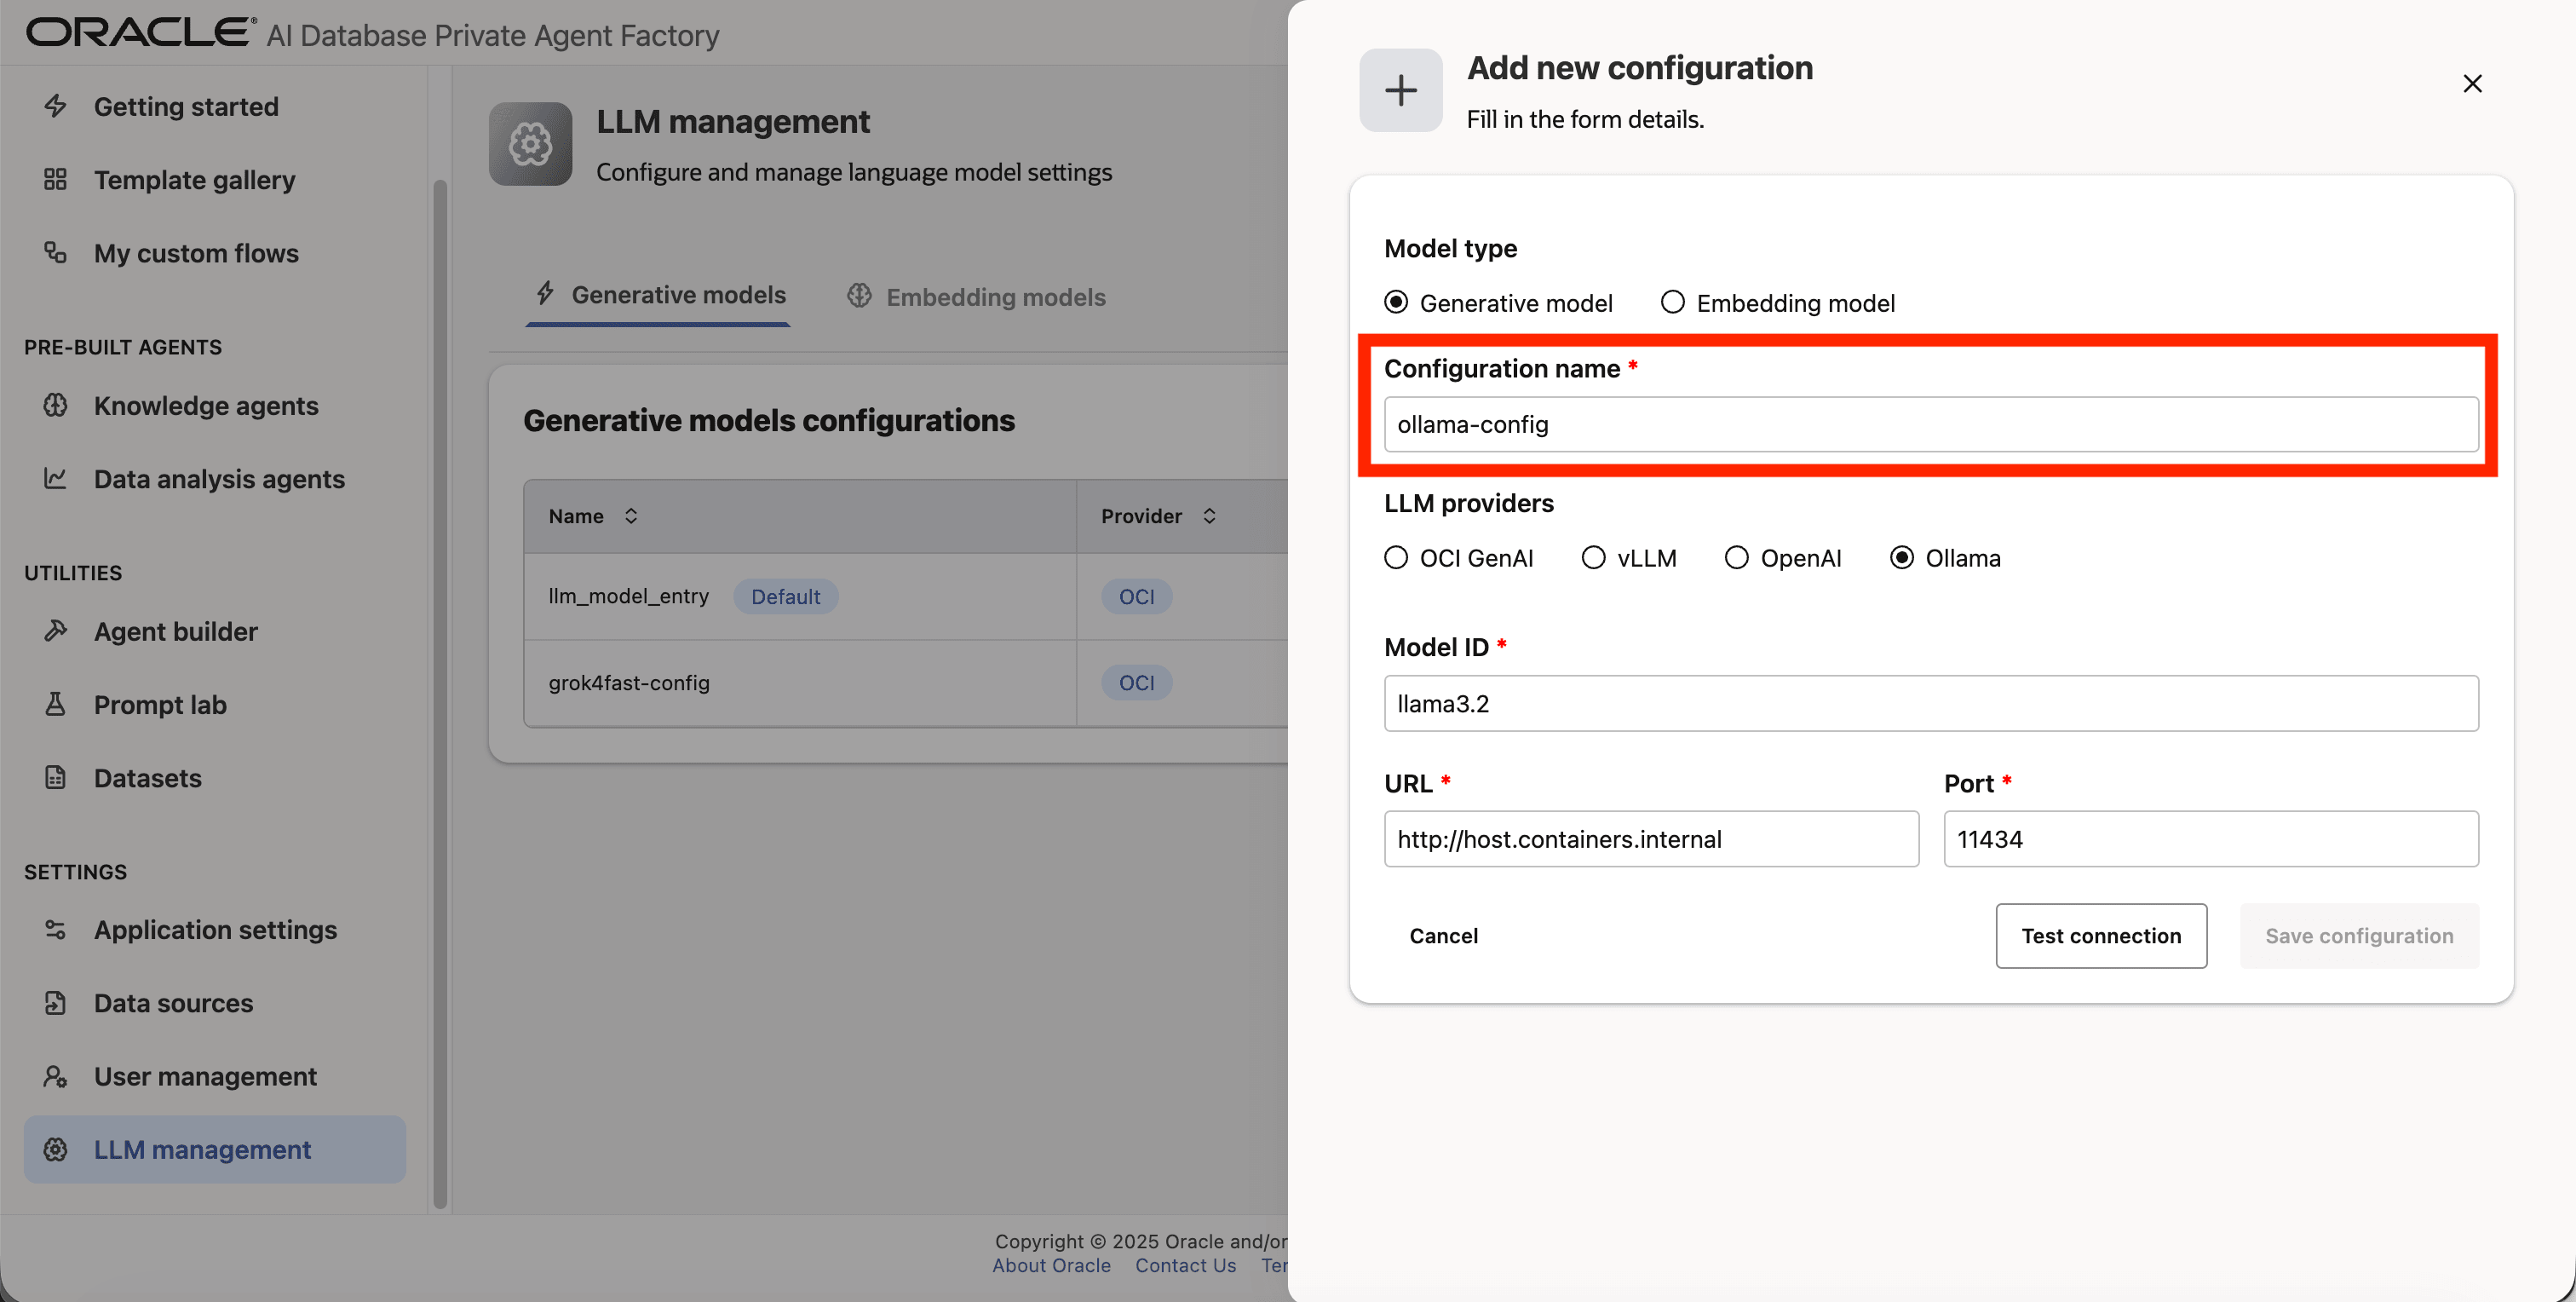
Step 5: From list of LLM providers pick Ollama.
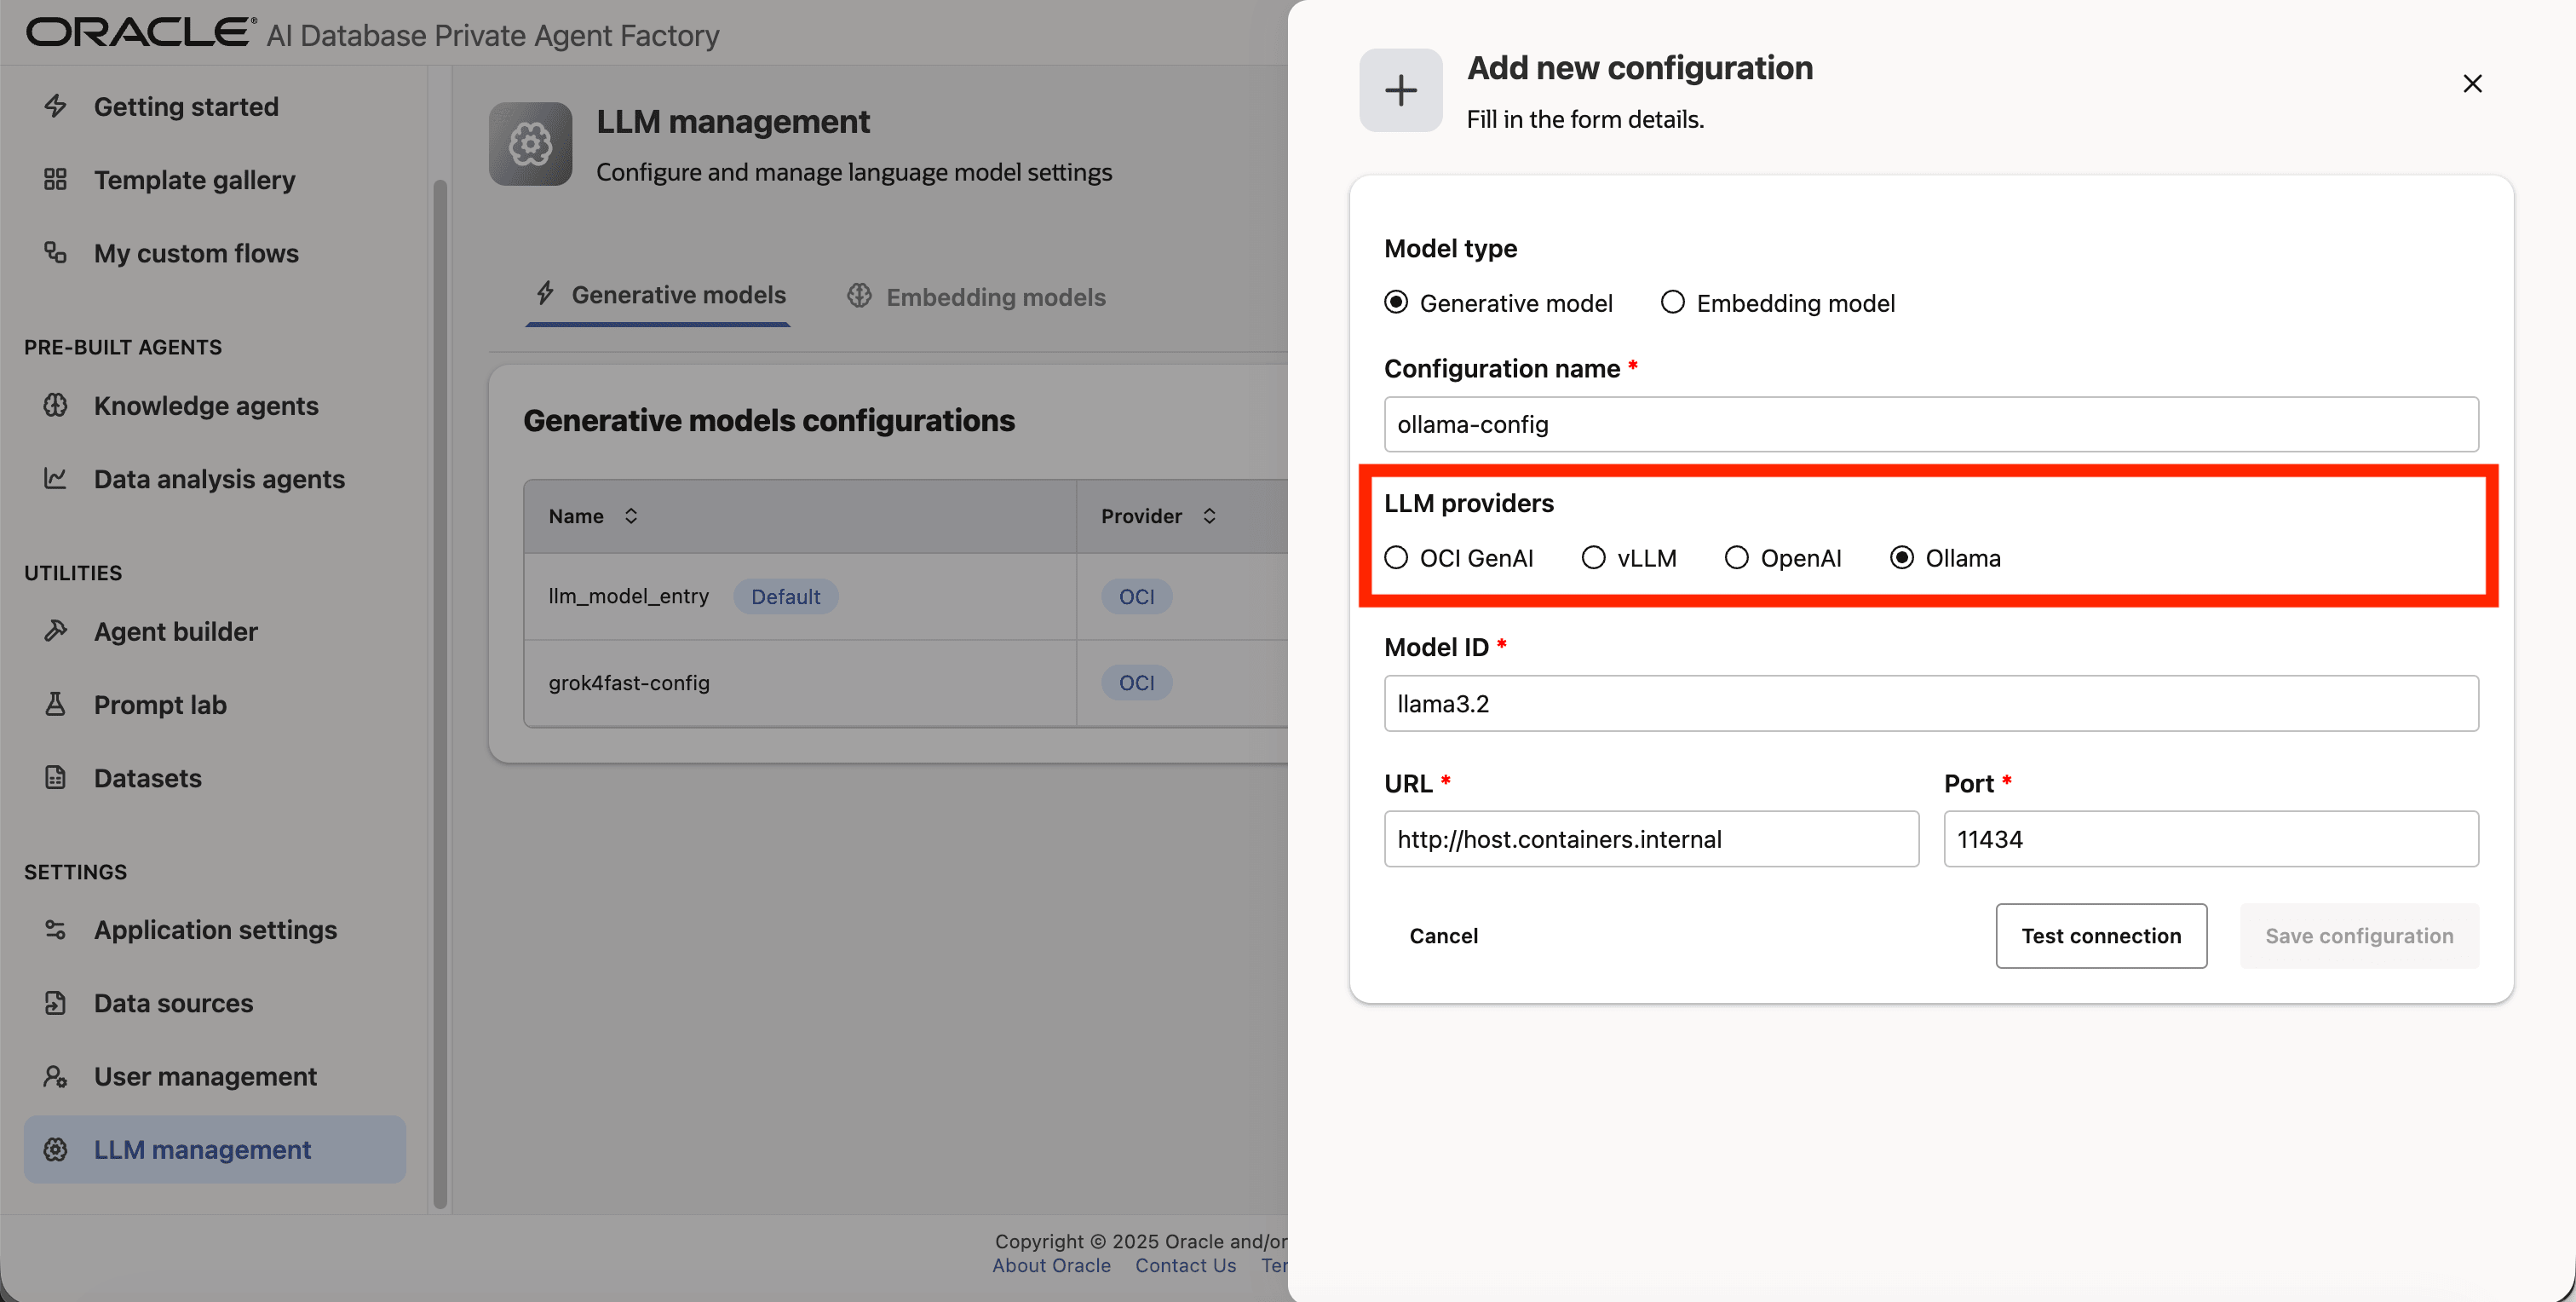
Step 6: Enter llama3.2 as Model ID.
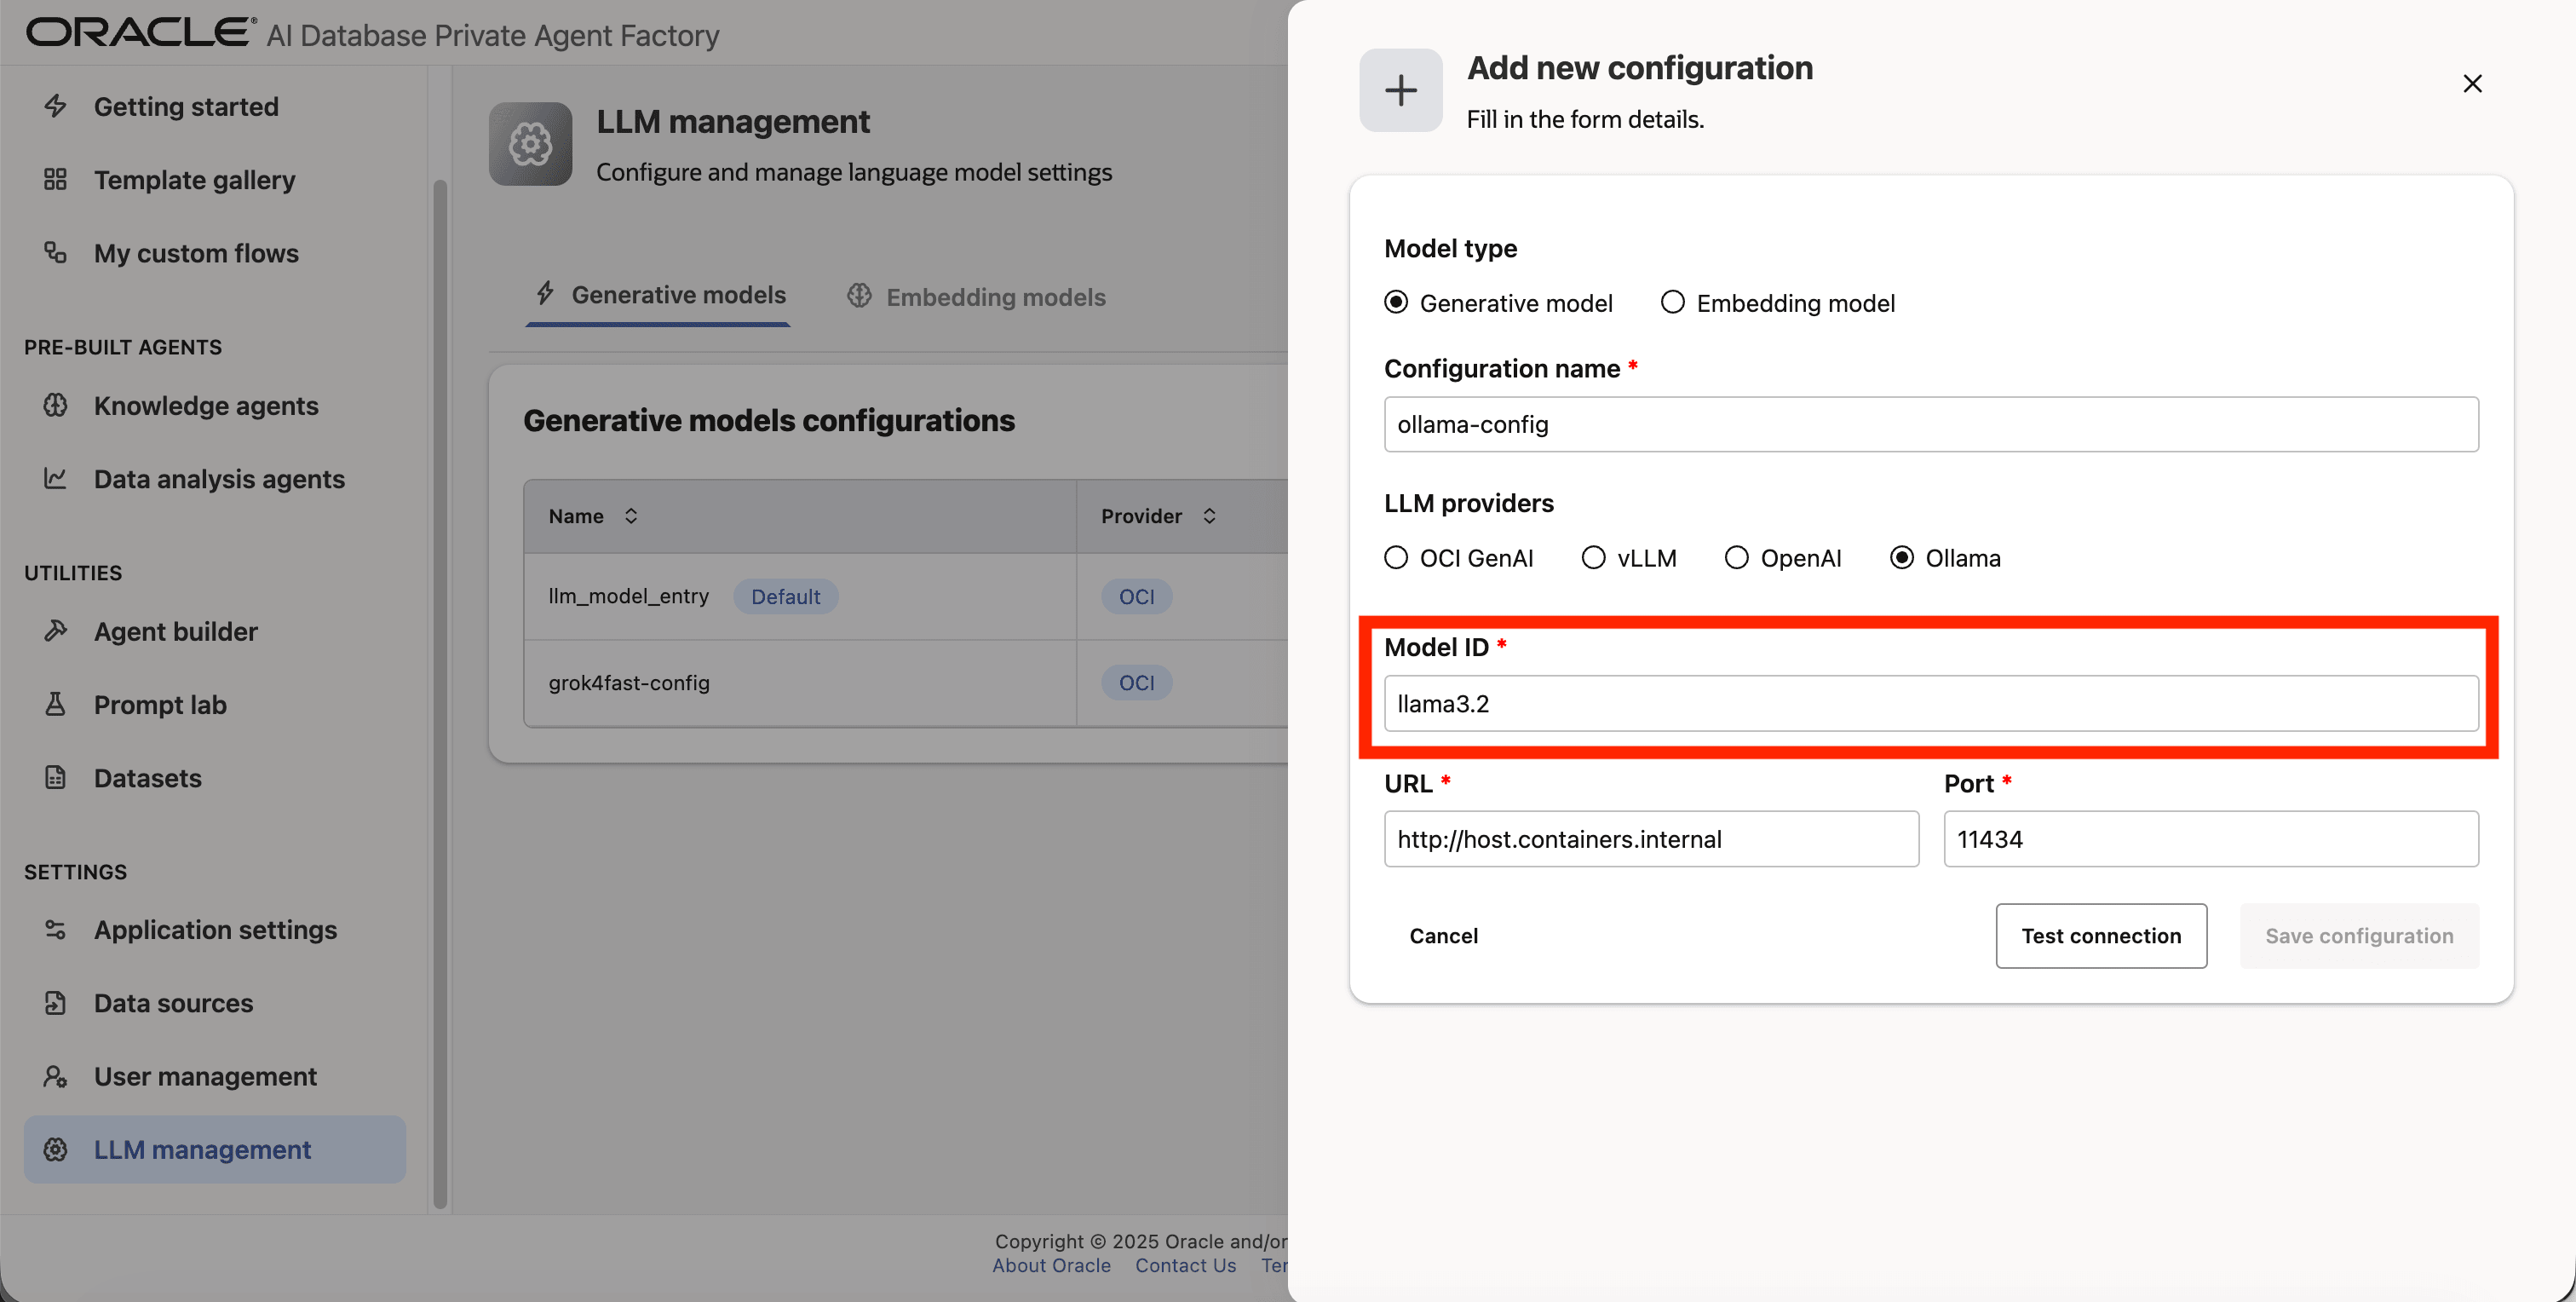
Step 7: Enter http://host.containers.internal as URL.
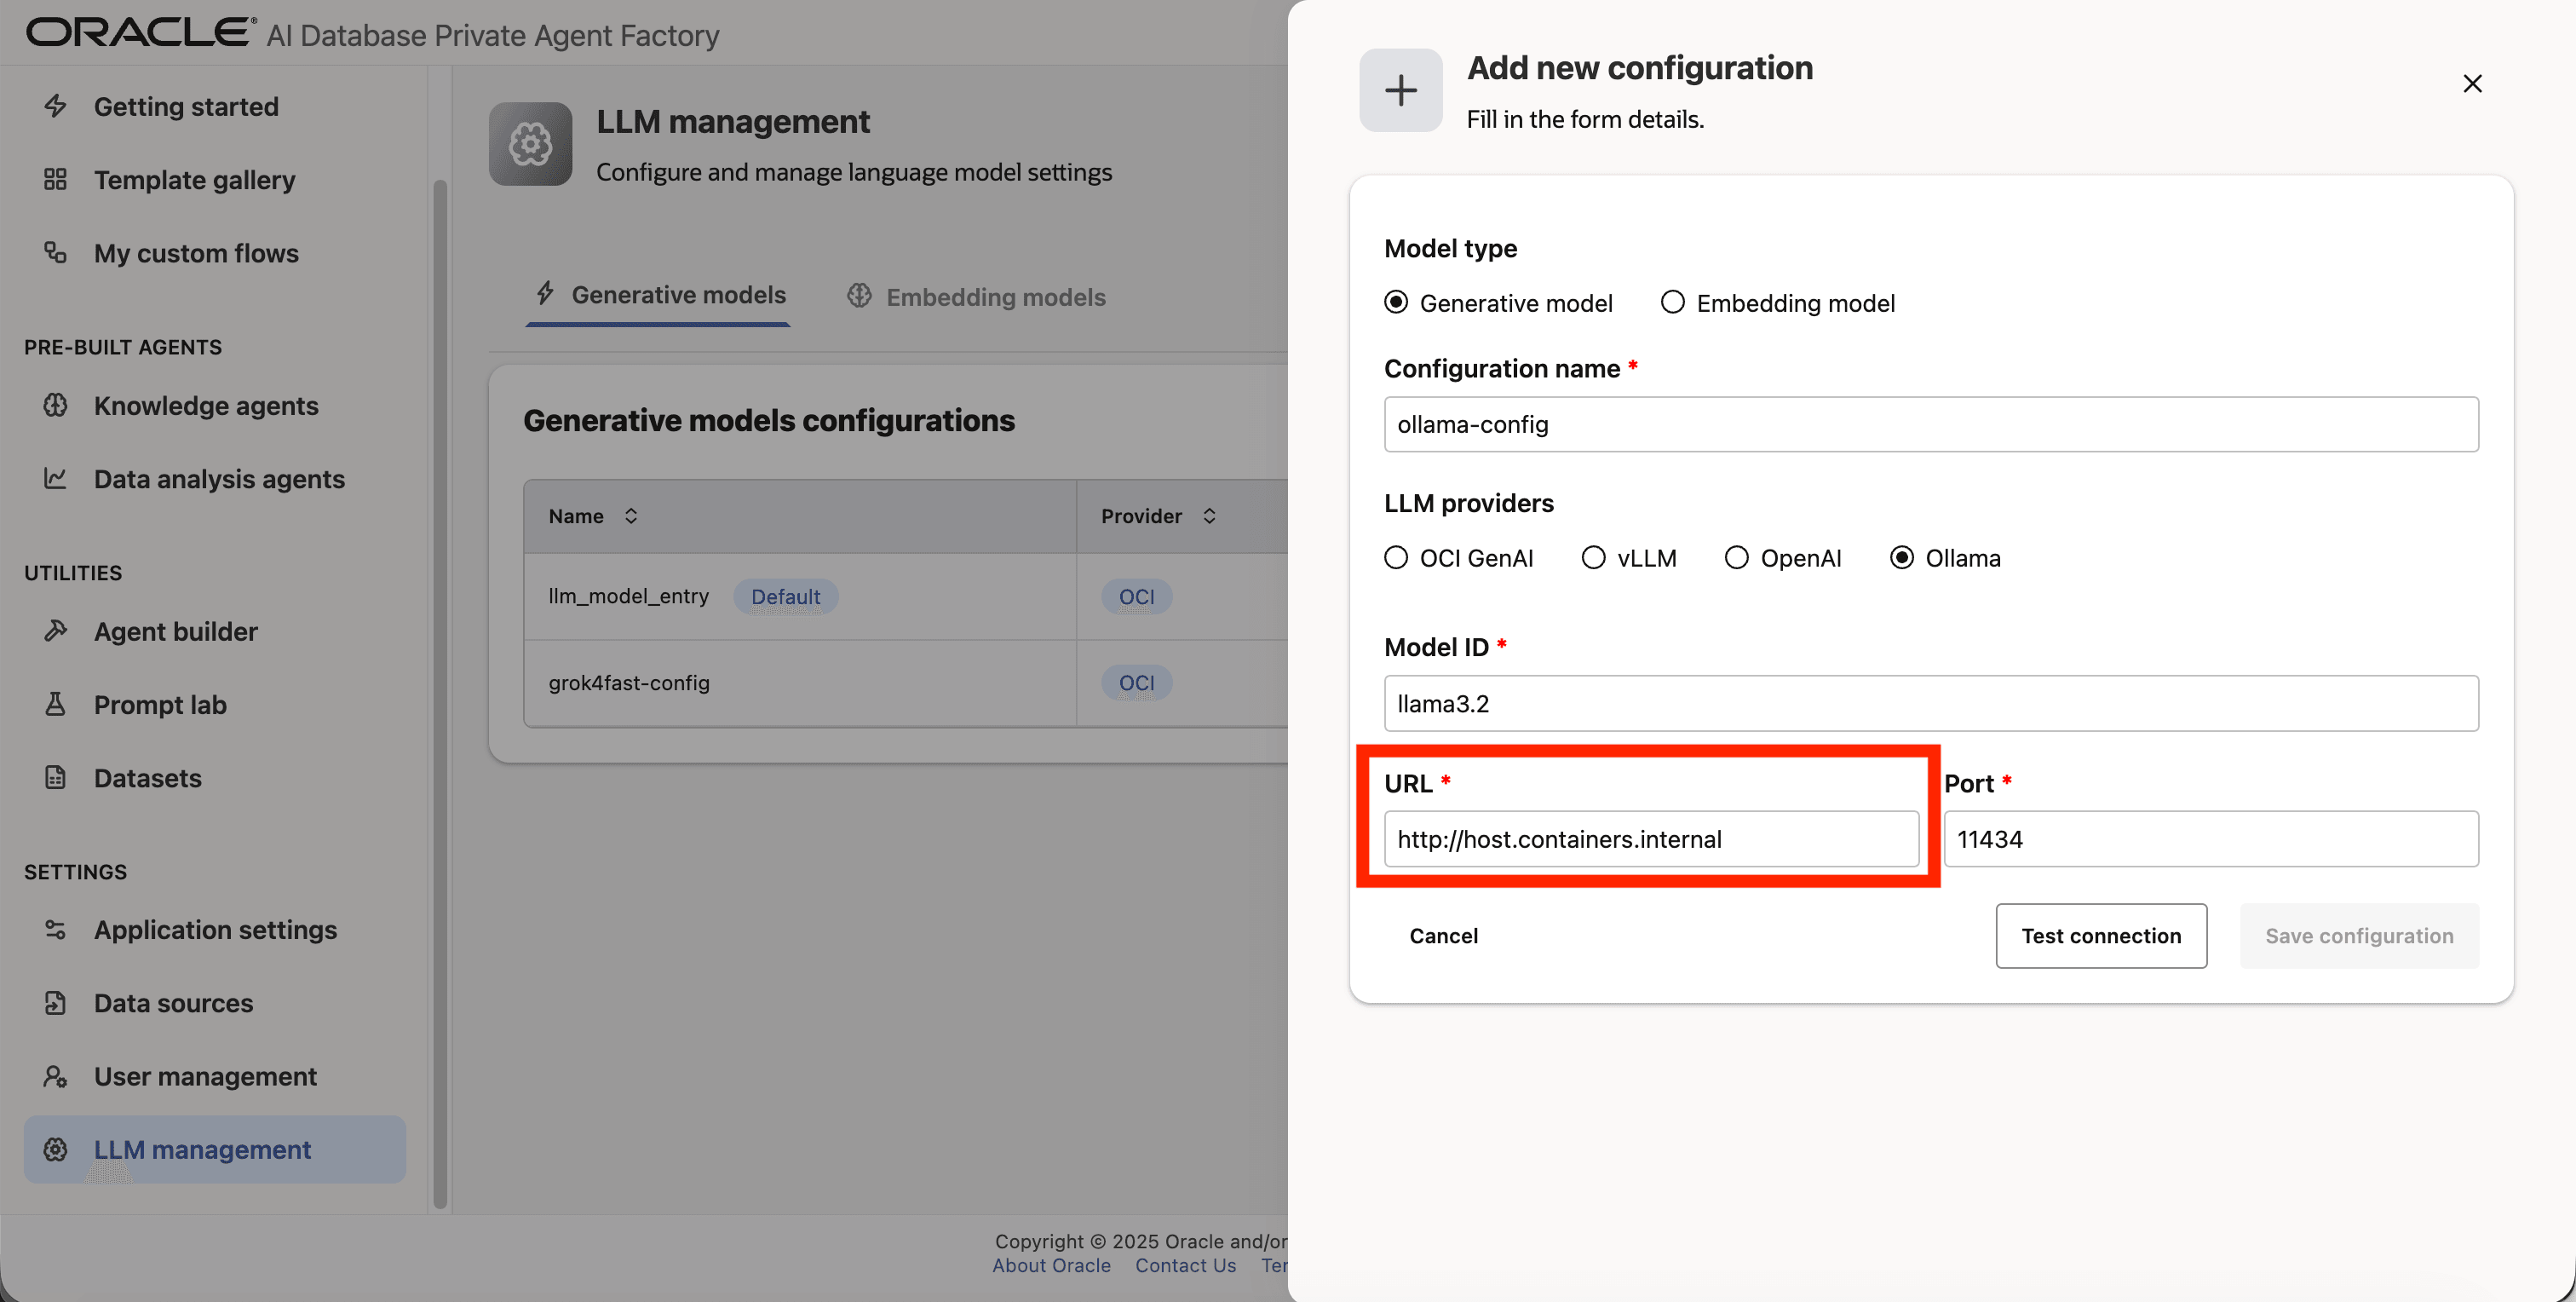
Step 8: Enter 11434 as Port.
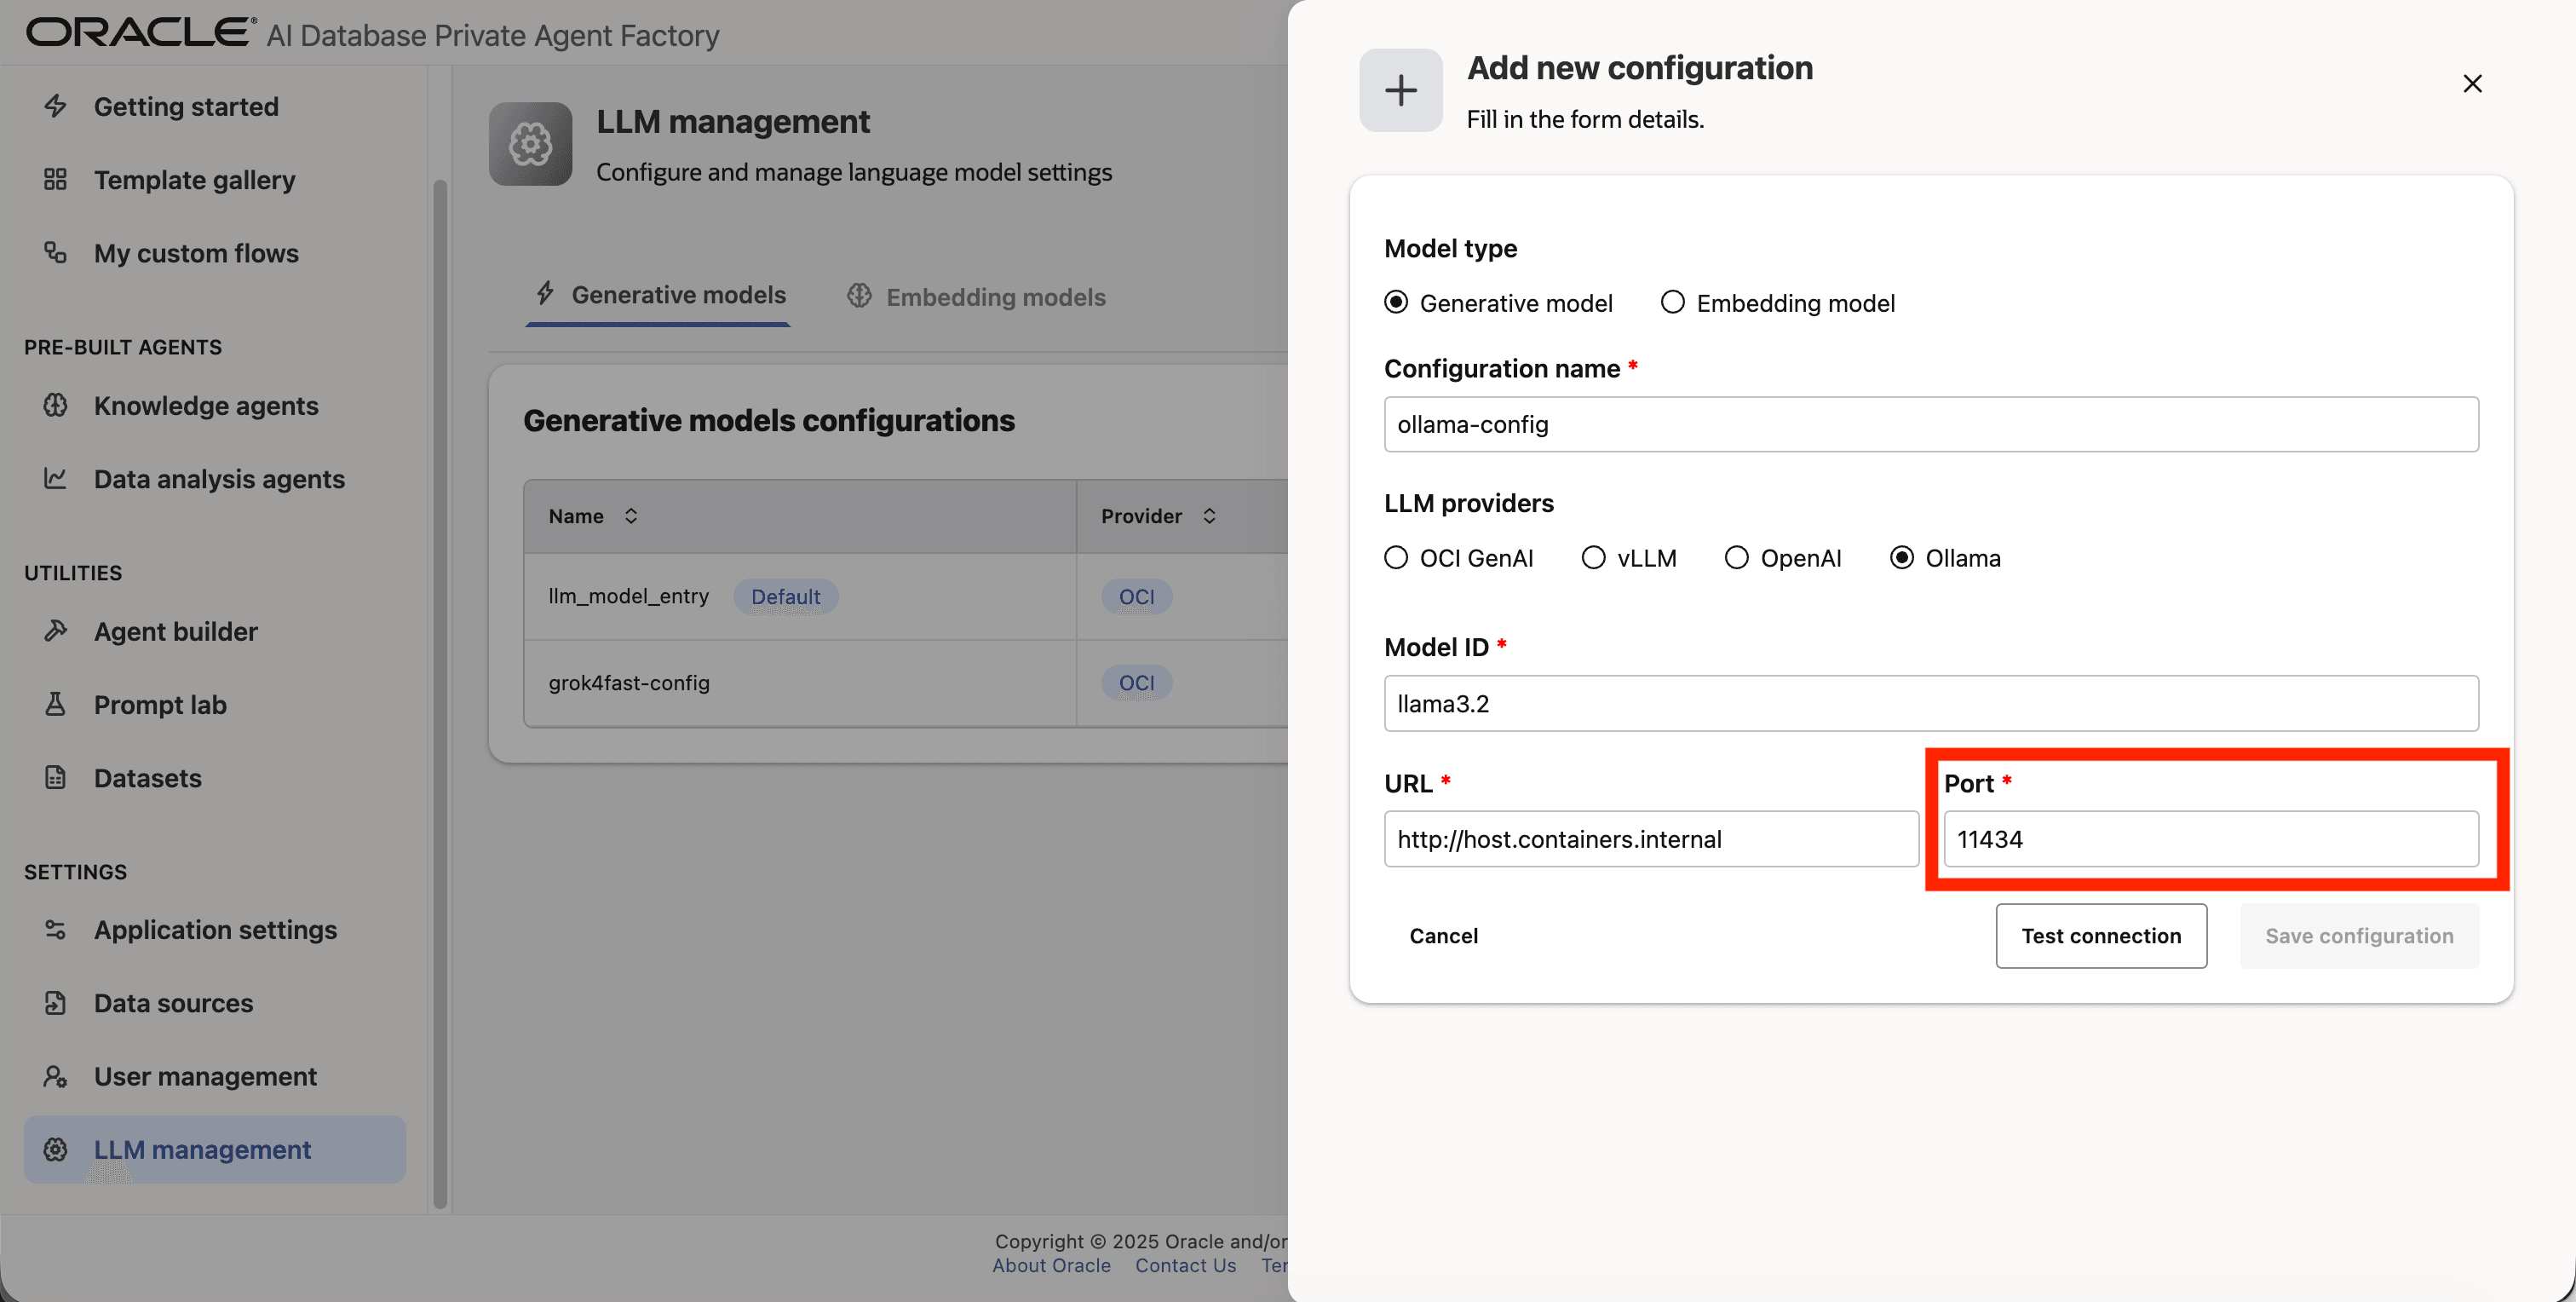
Step 9: Click on Test connection to validate the credentials are correct.
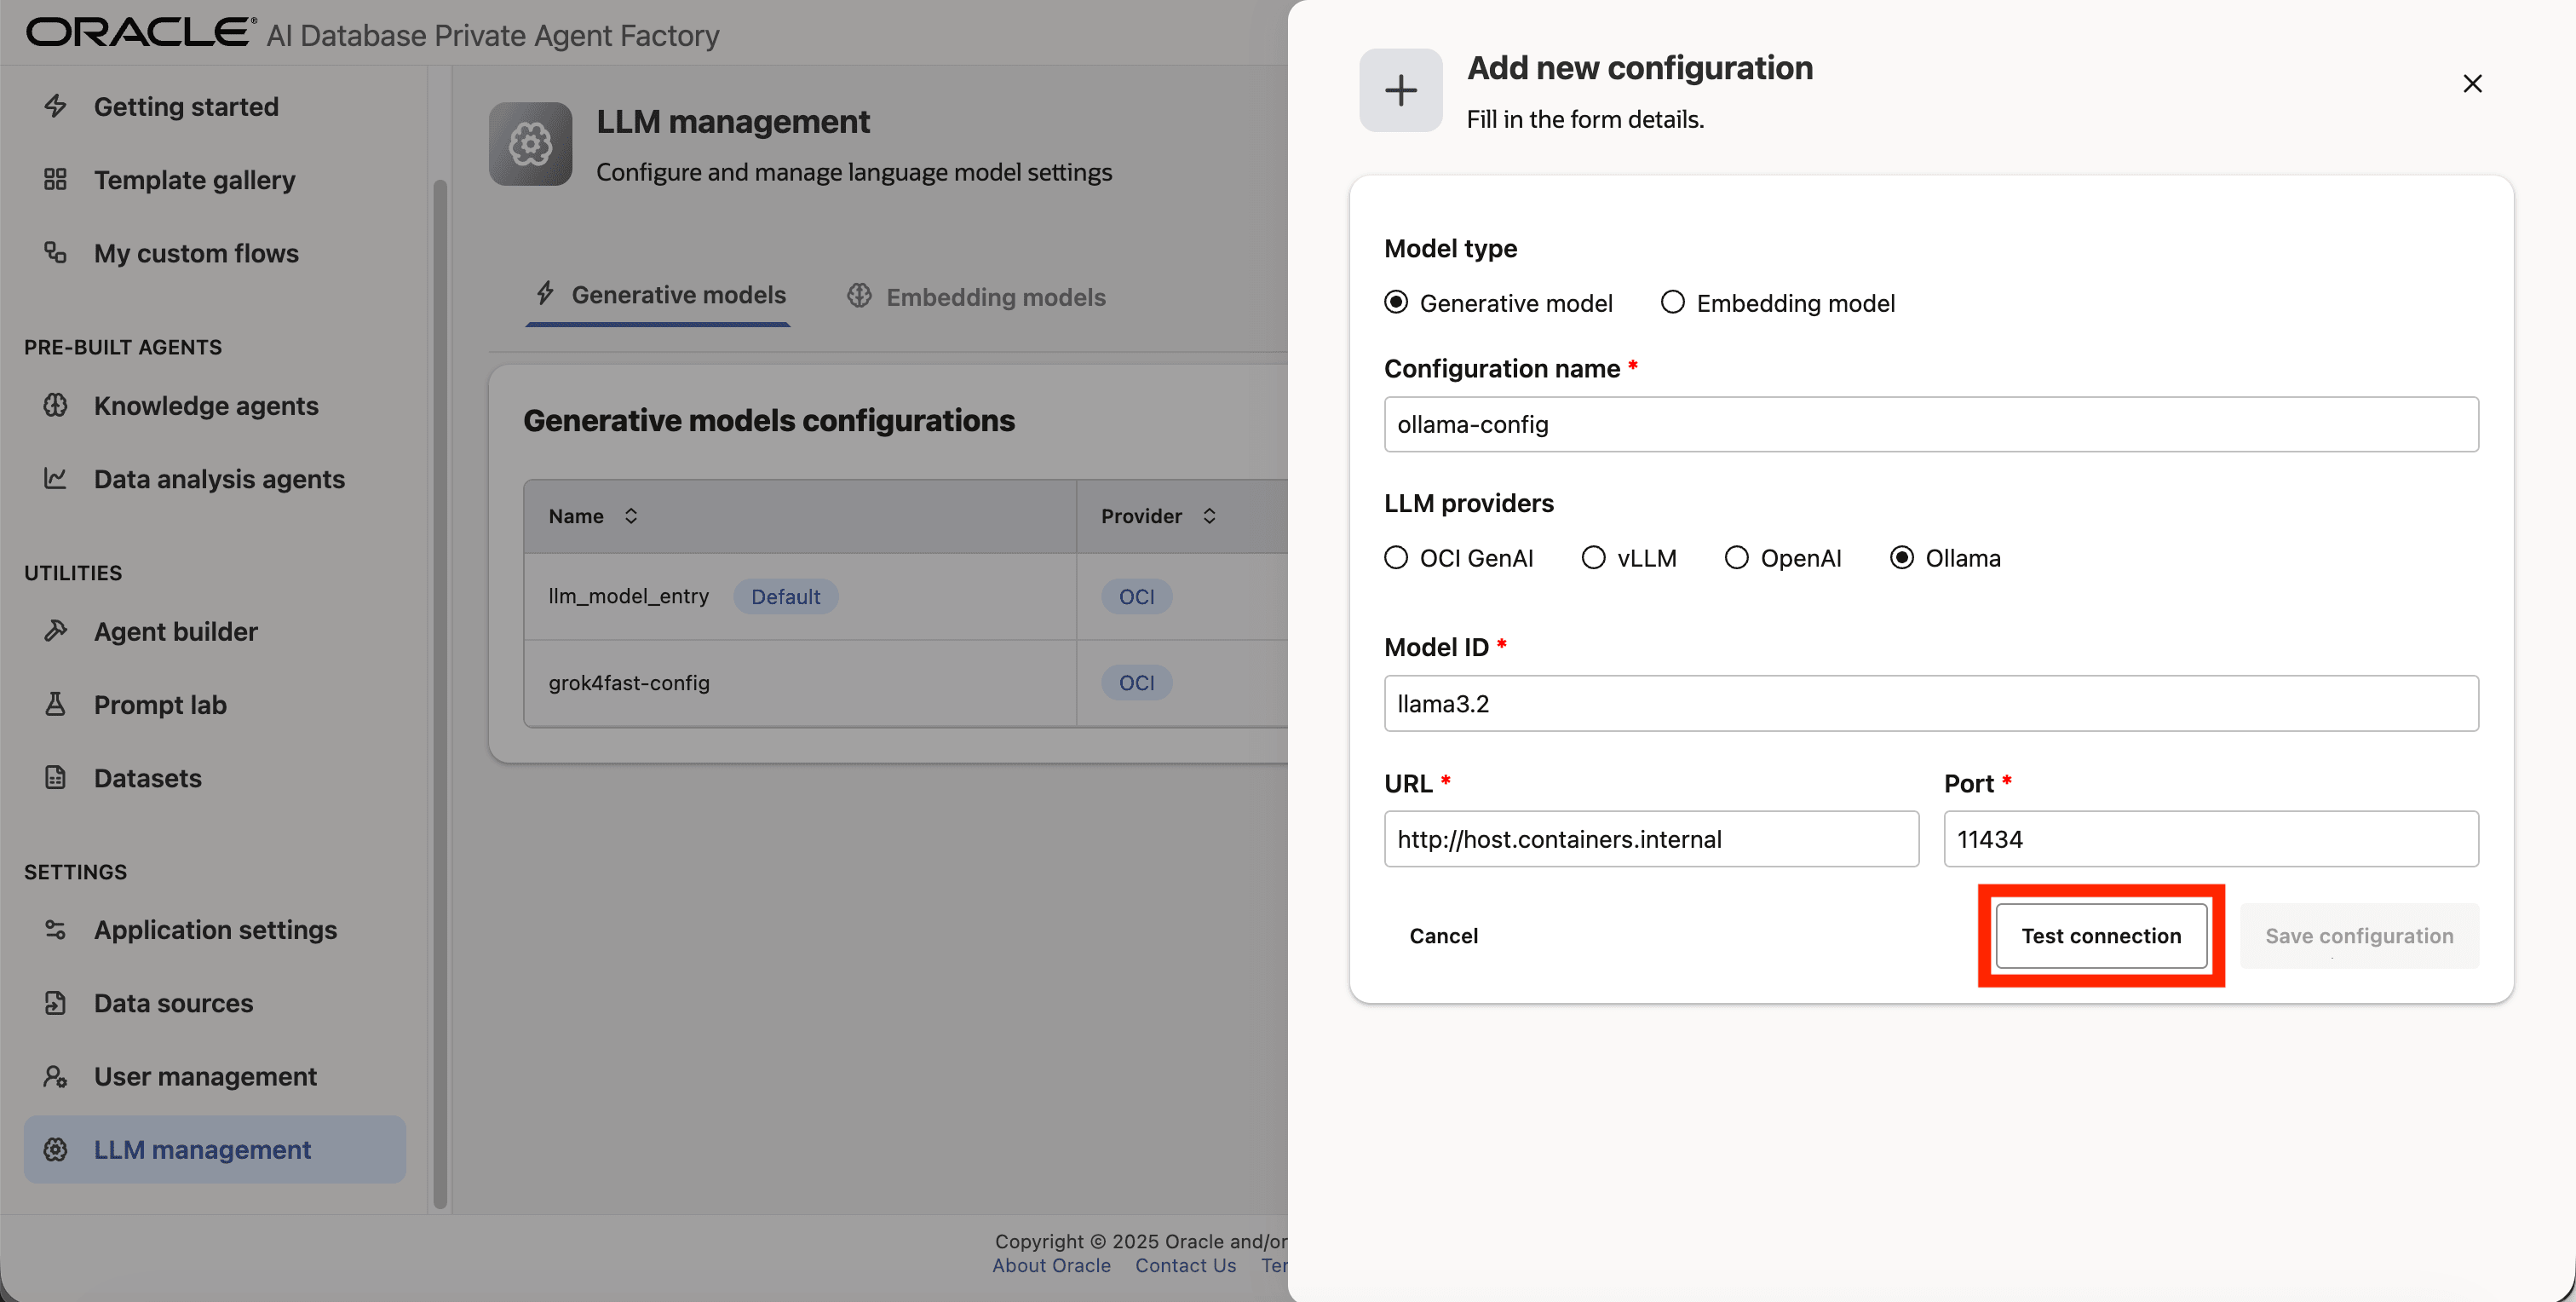
Step 10: A success message “Connection successful” will appear on screen and the Save Configuration button will be enabled, click on it to finalize the process.
OpenAI
The following model IDs are commonly used examples for OpenAI configurations:
gpt-4ogpt-4o-mini
Adding OpenAI Model to Agent Factory
Step 1: Click on LLM management on the left side navigation menu.
Step 2: Click on Add configuration button placed on the top-right corner.
Step 3: A form will open, under Model type pick Generative model.
Step 4: Give your LLM configuration a preferred name under Configuration name, avoid whitespaces since they are not allowed.
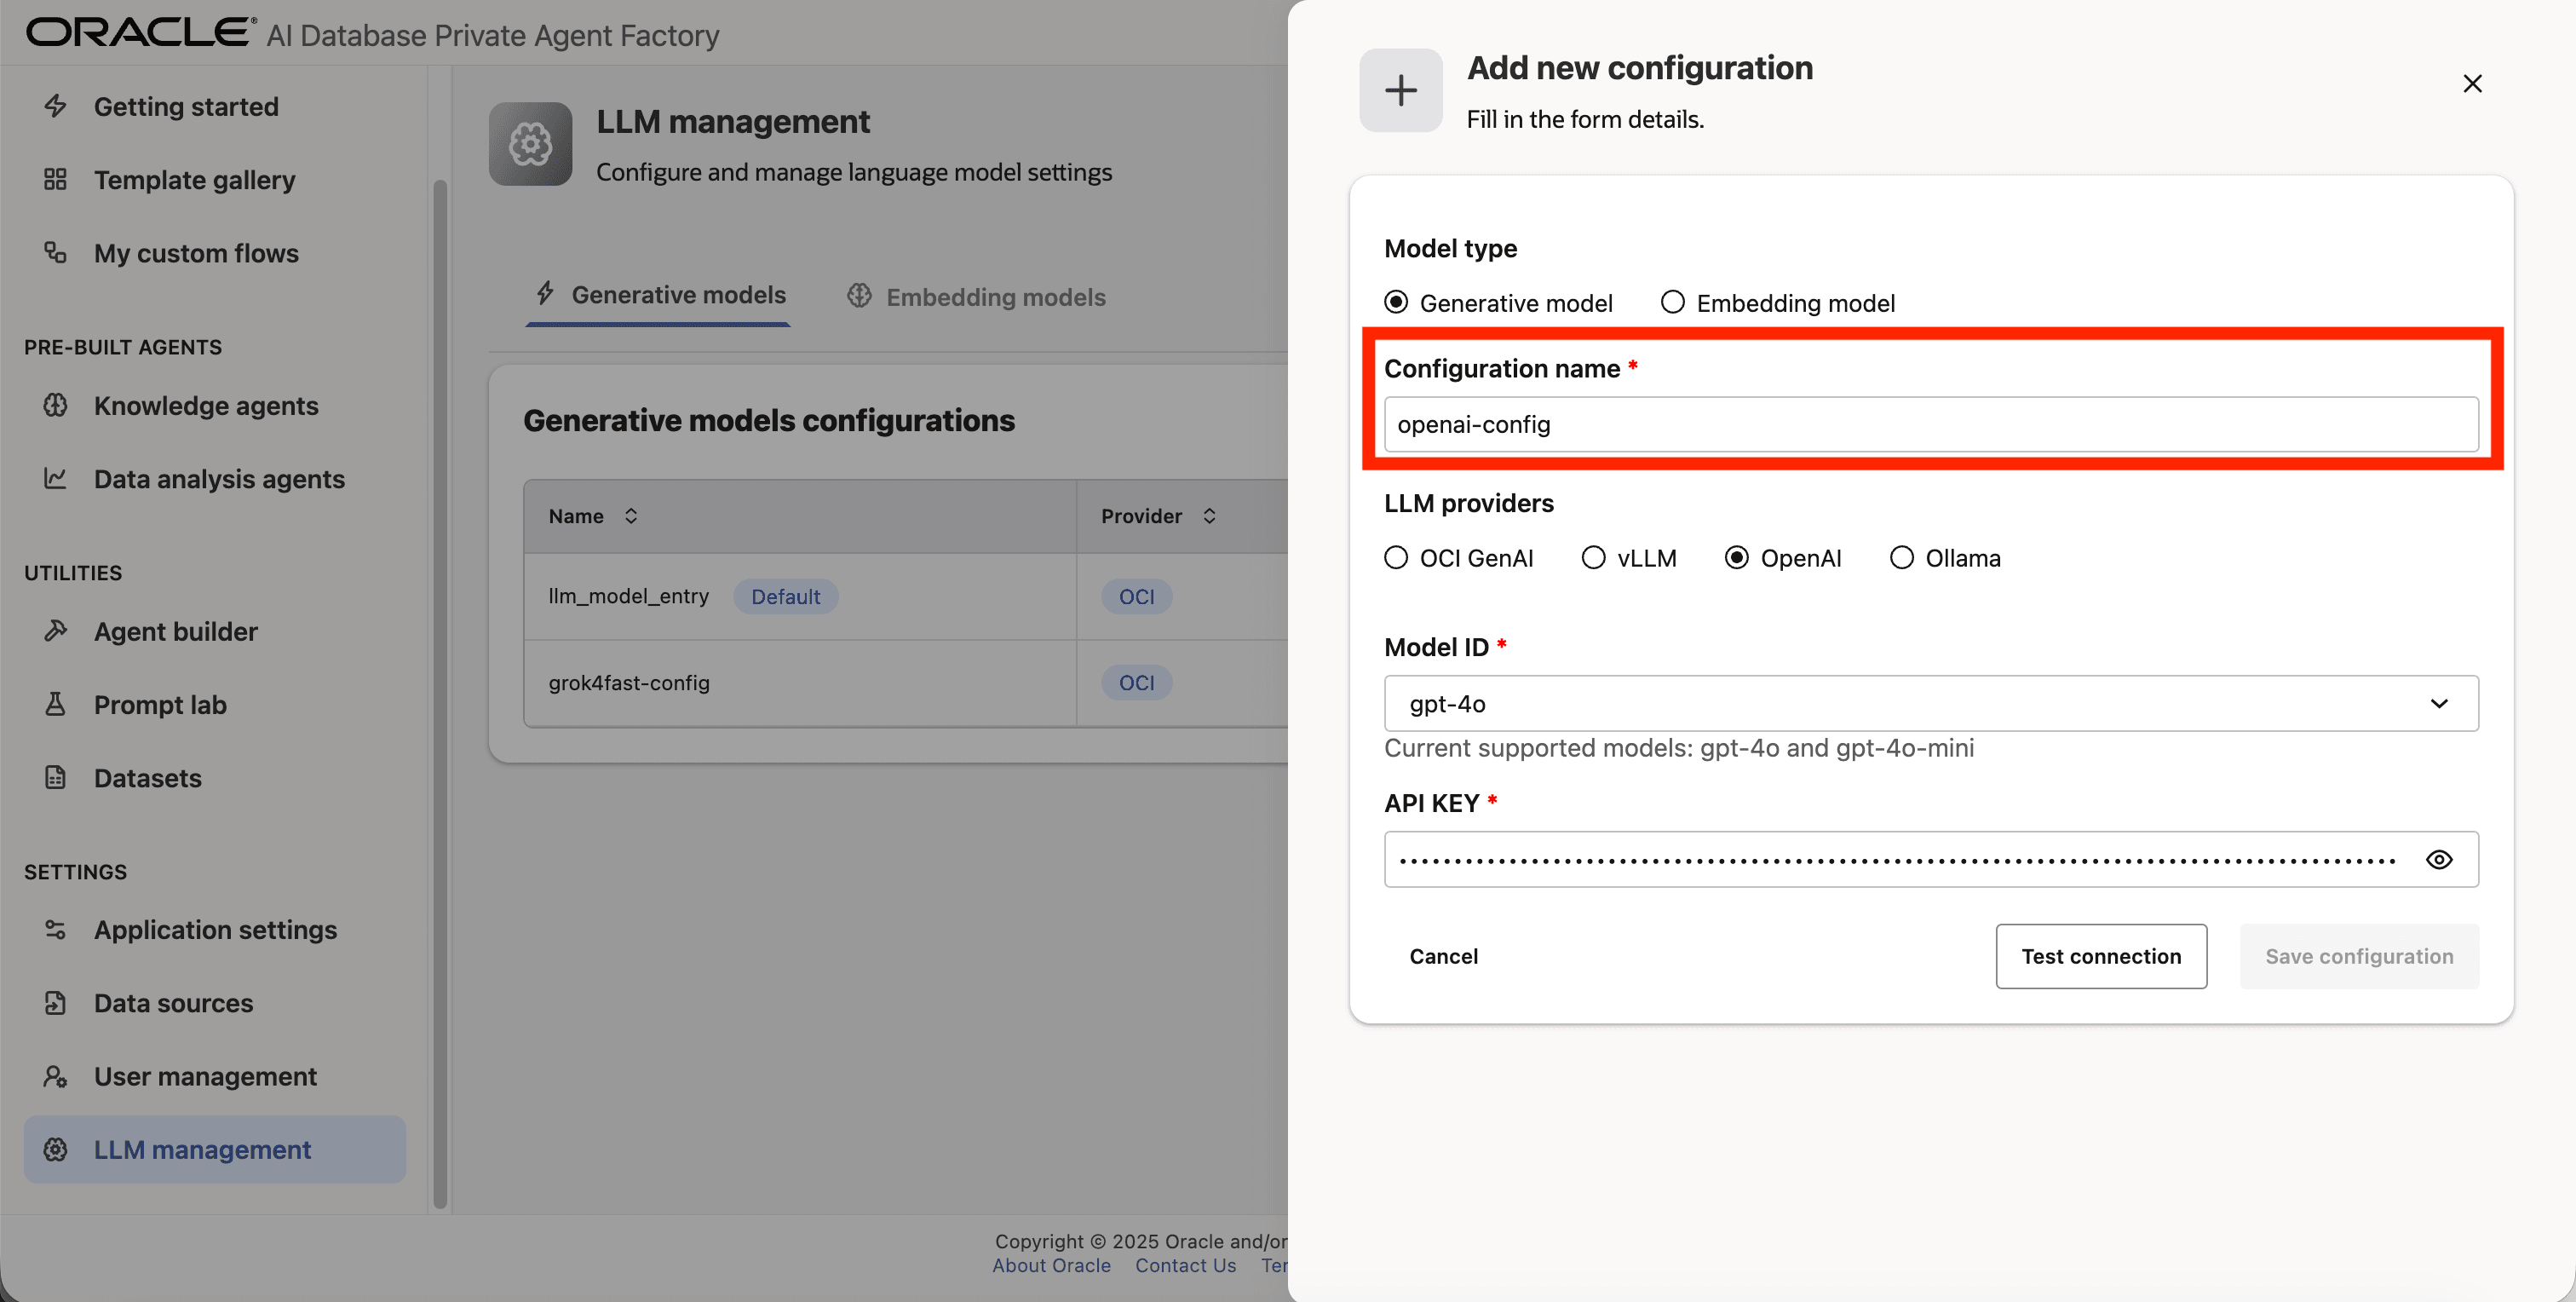
Step 5: From the list of LLM providers pick OpenAI.
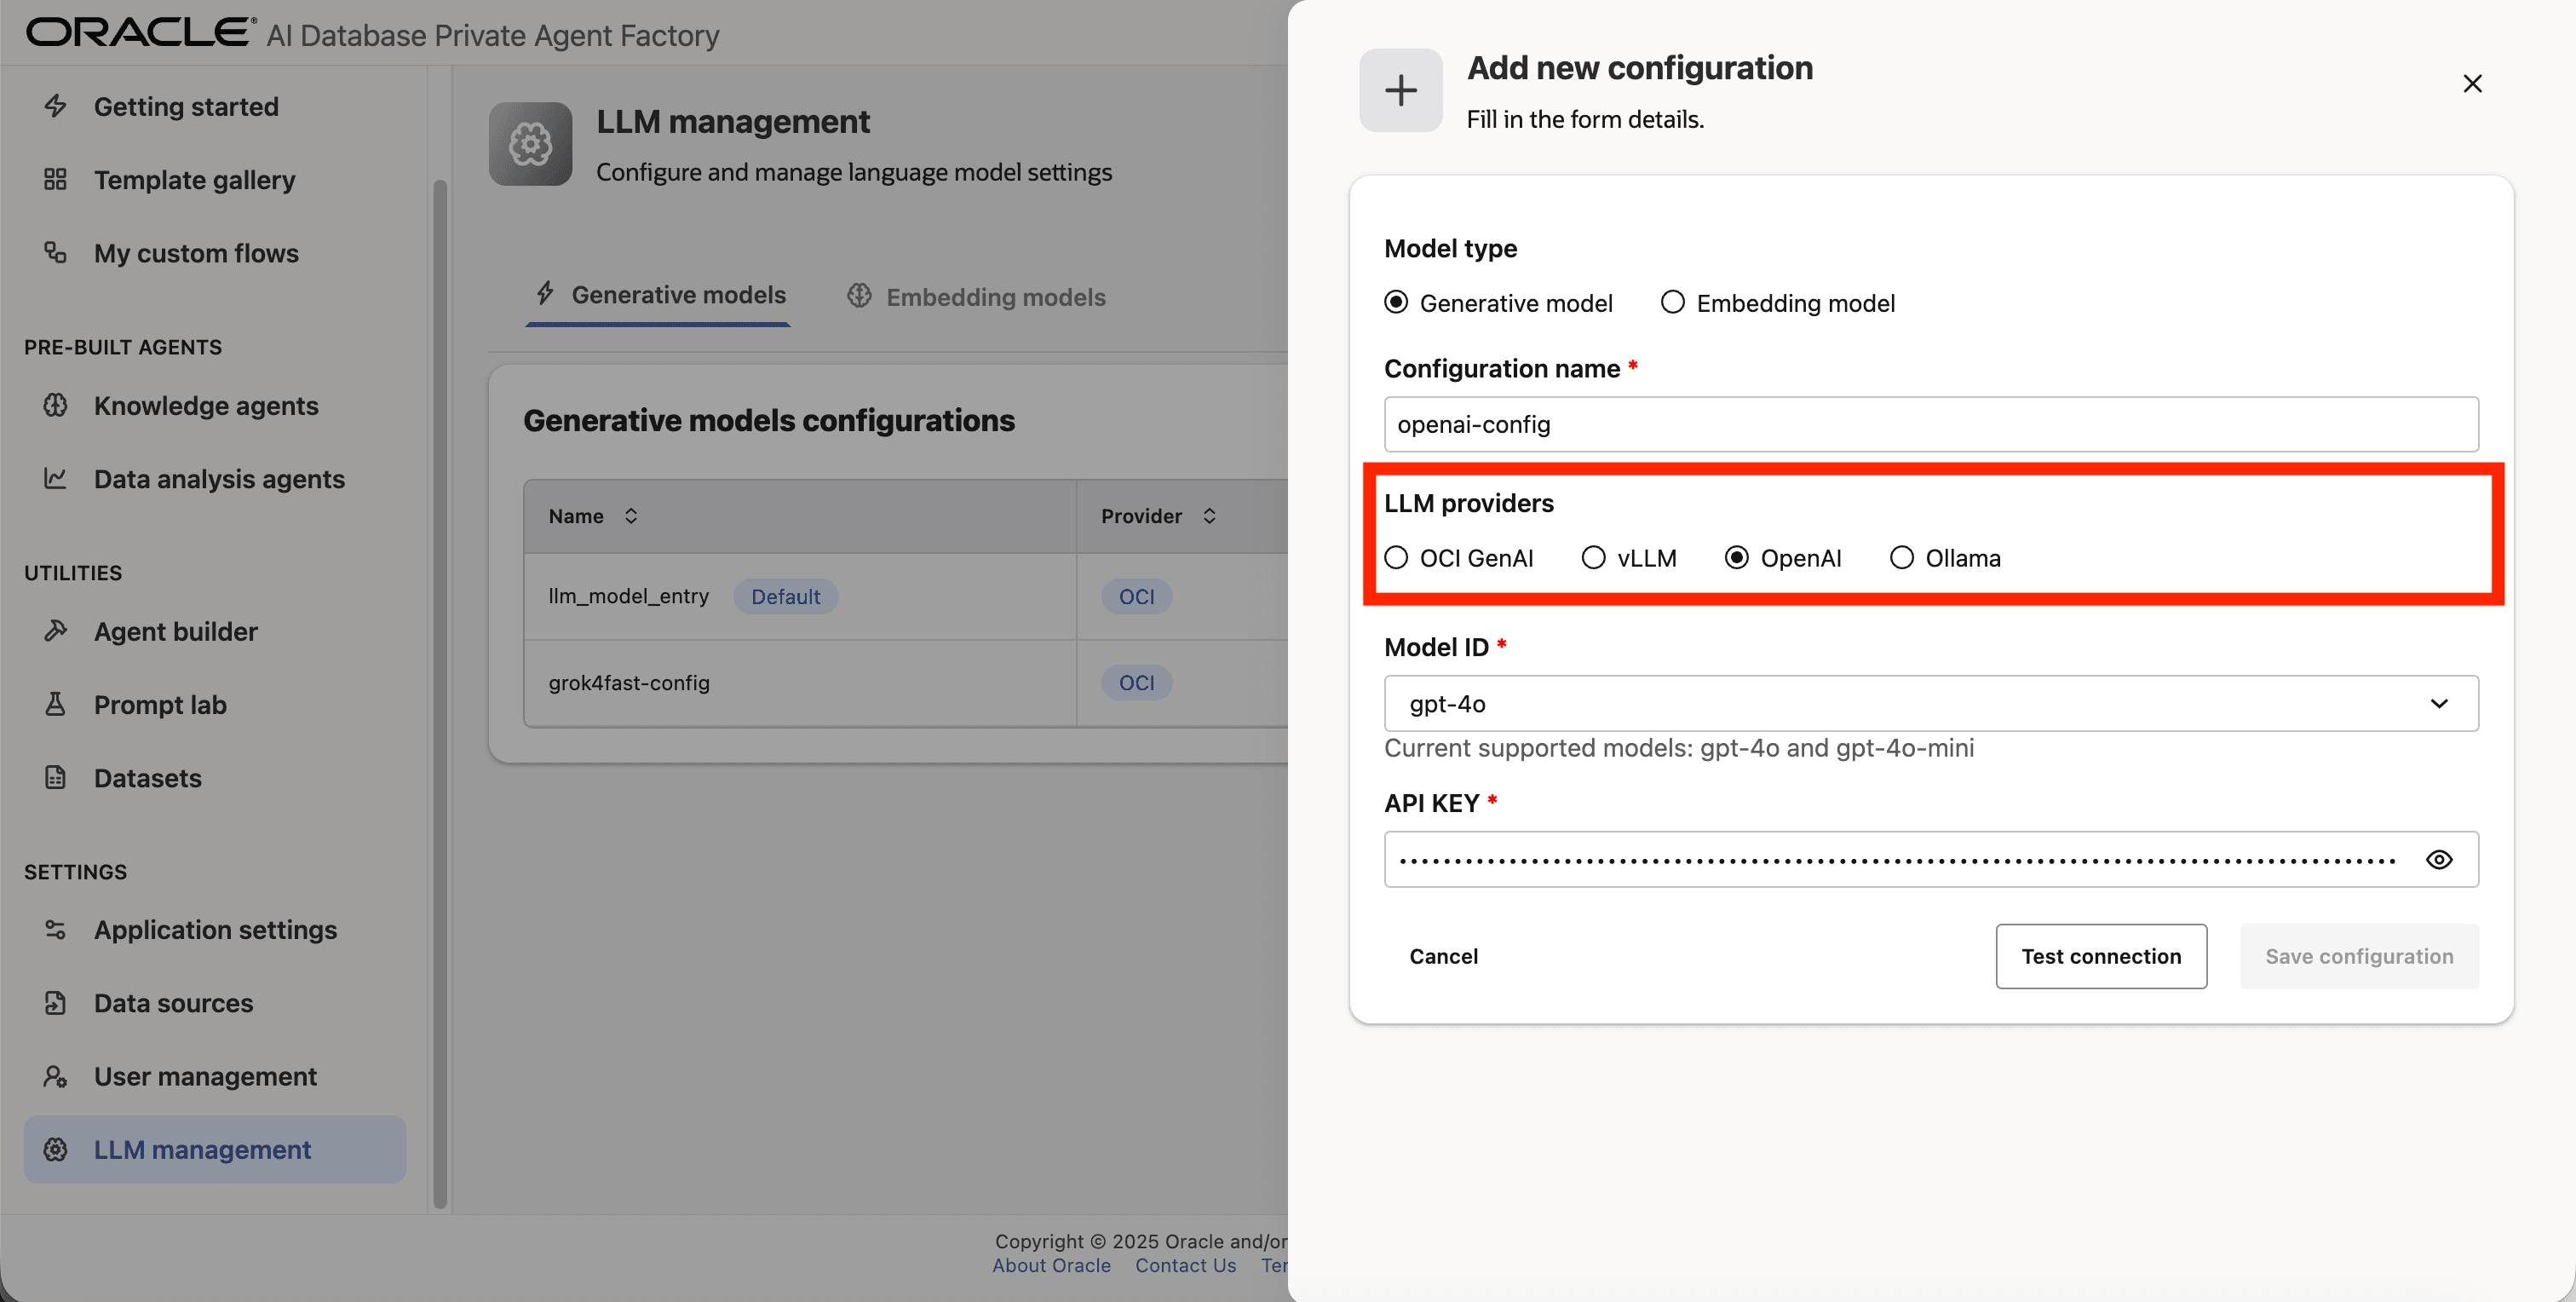
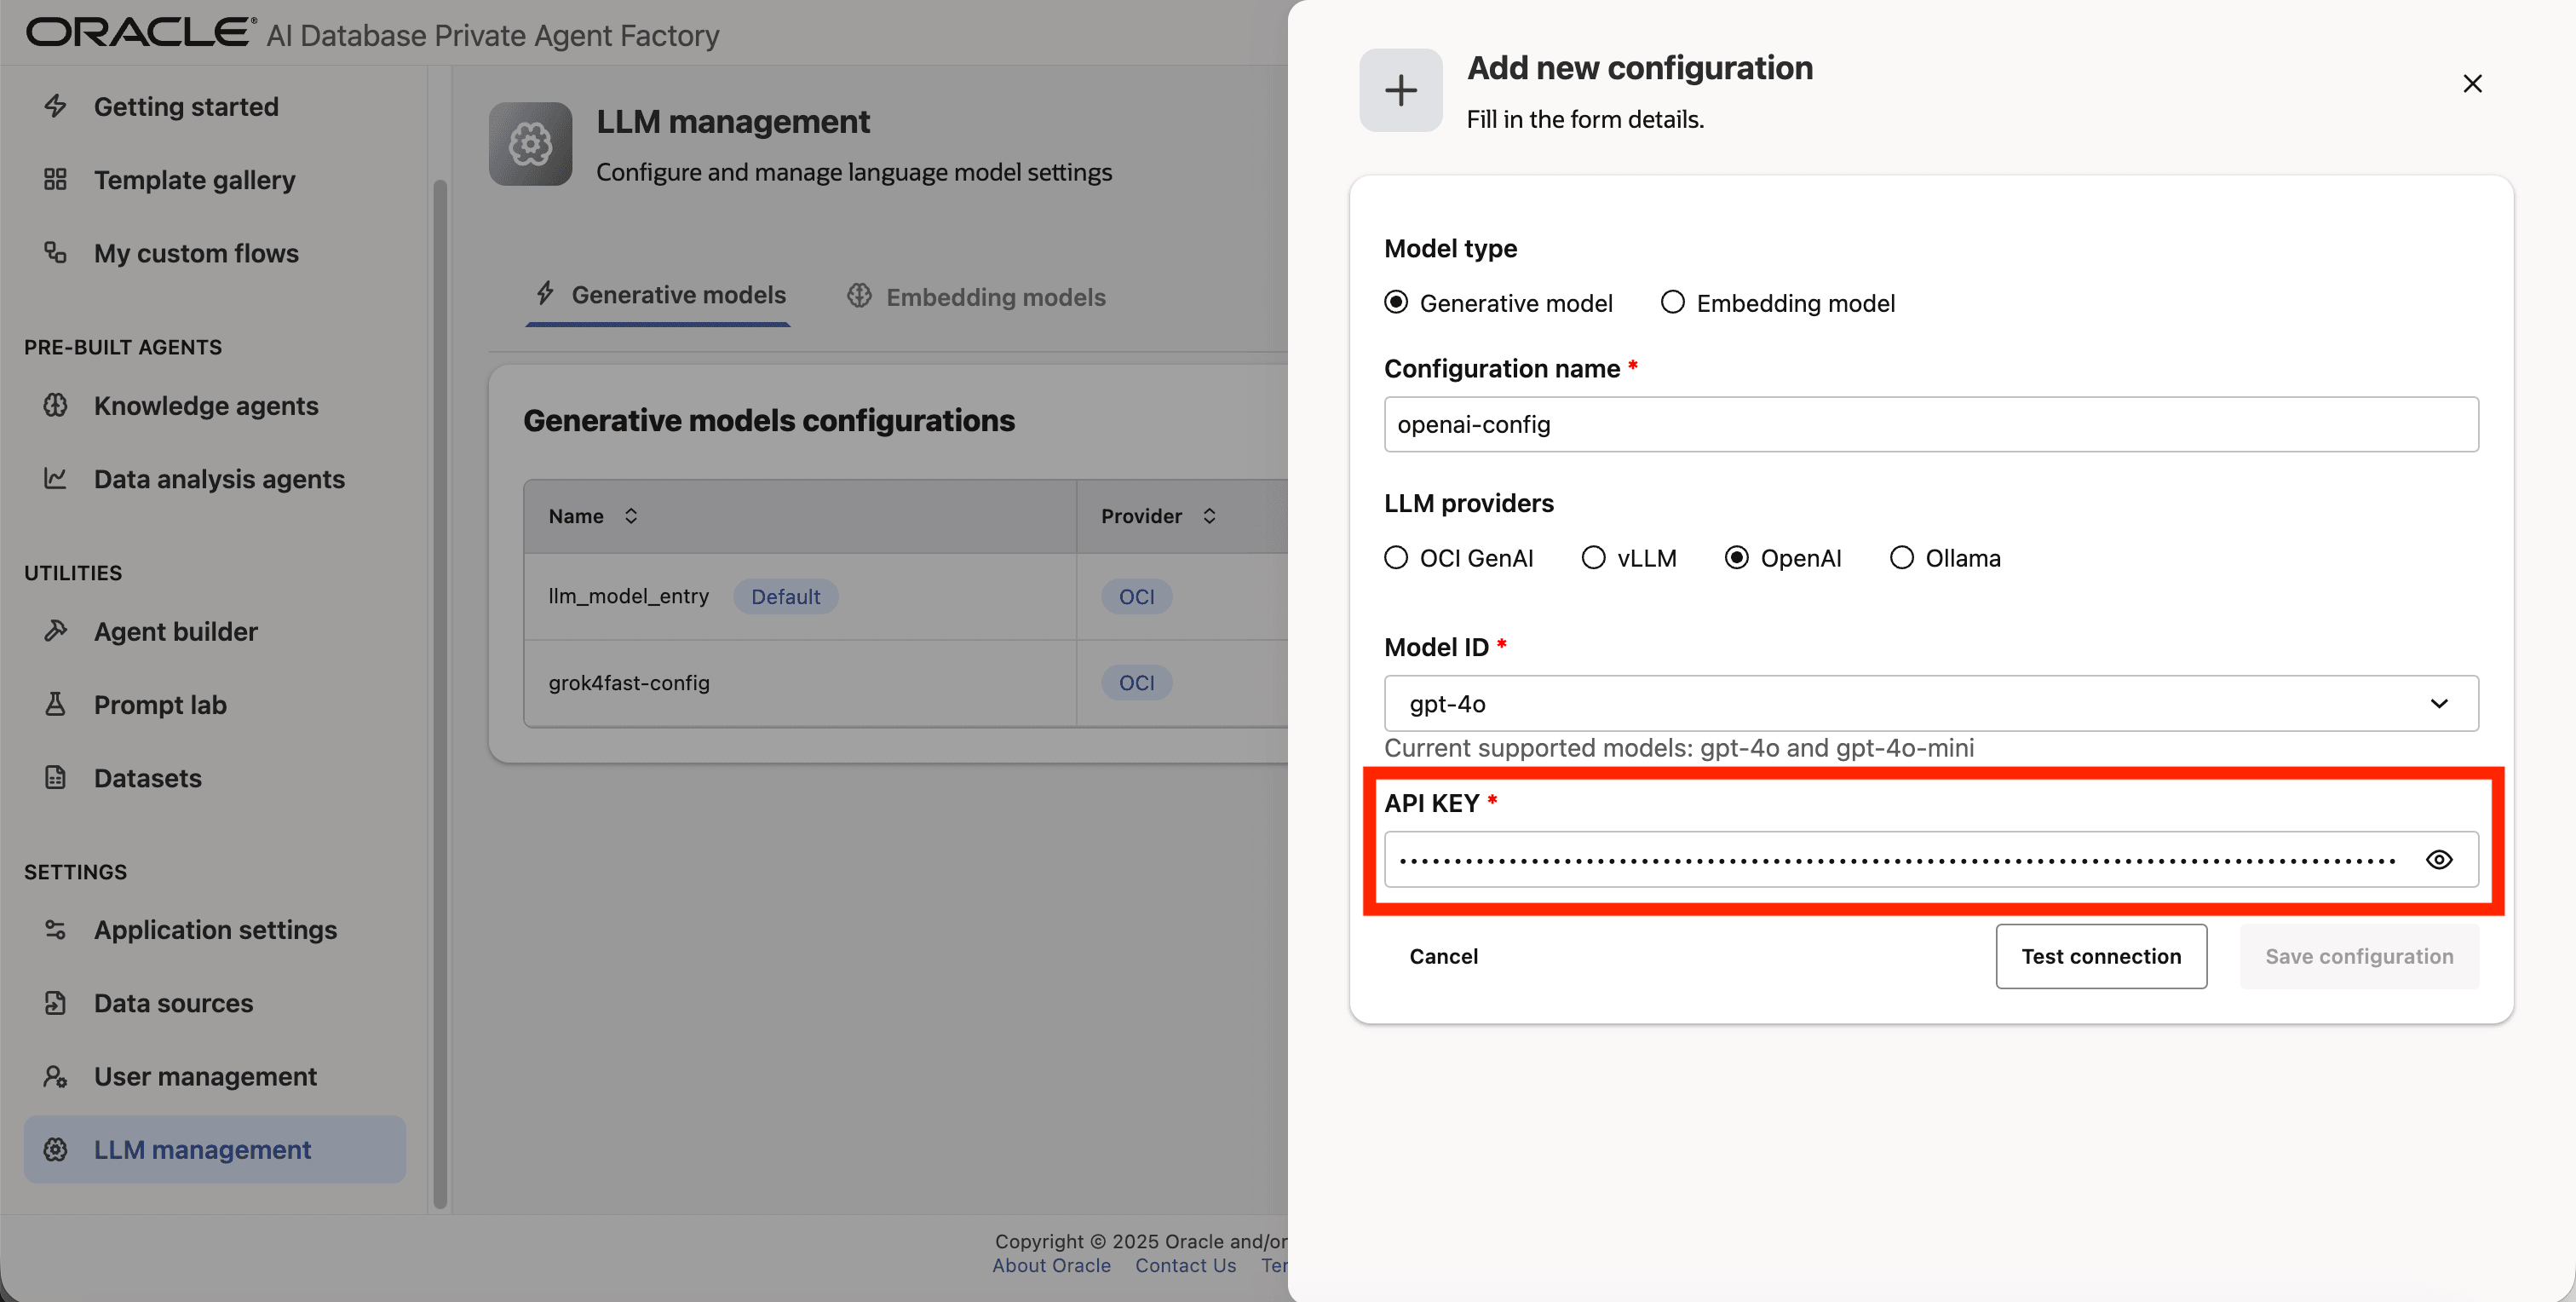
Step 6: Select gpt-4o as the Model ID
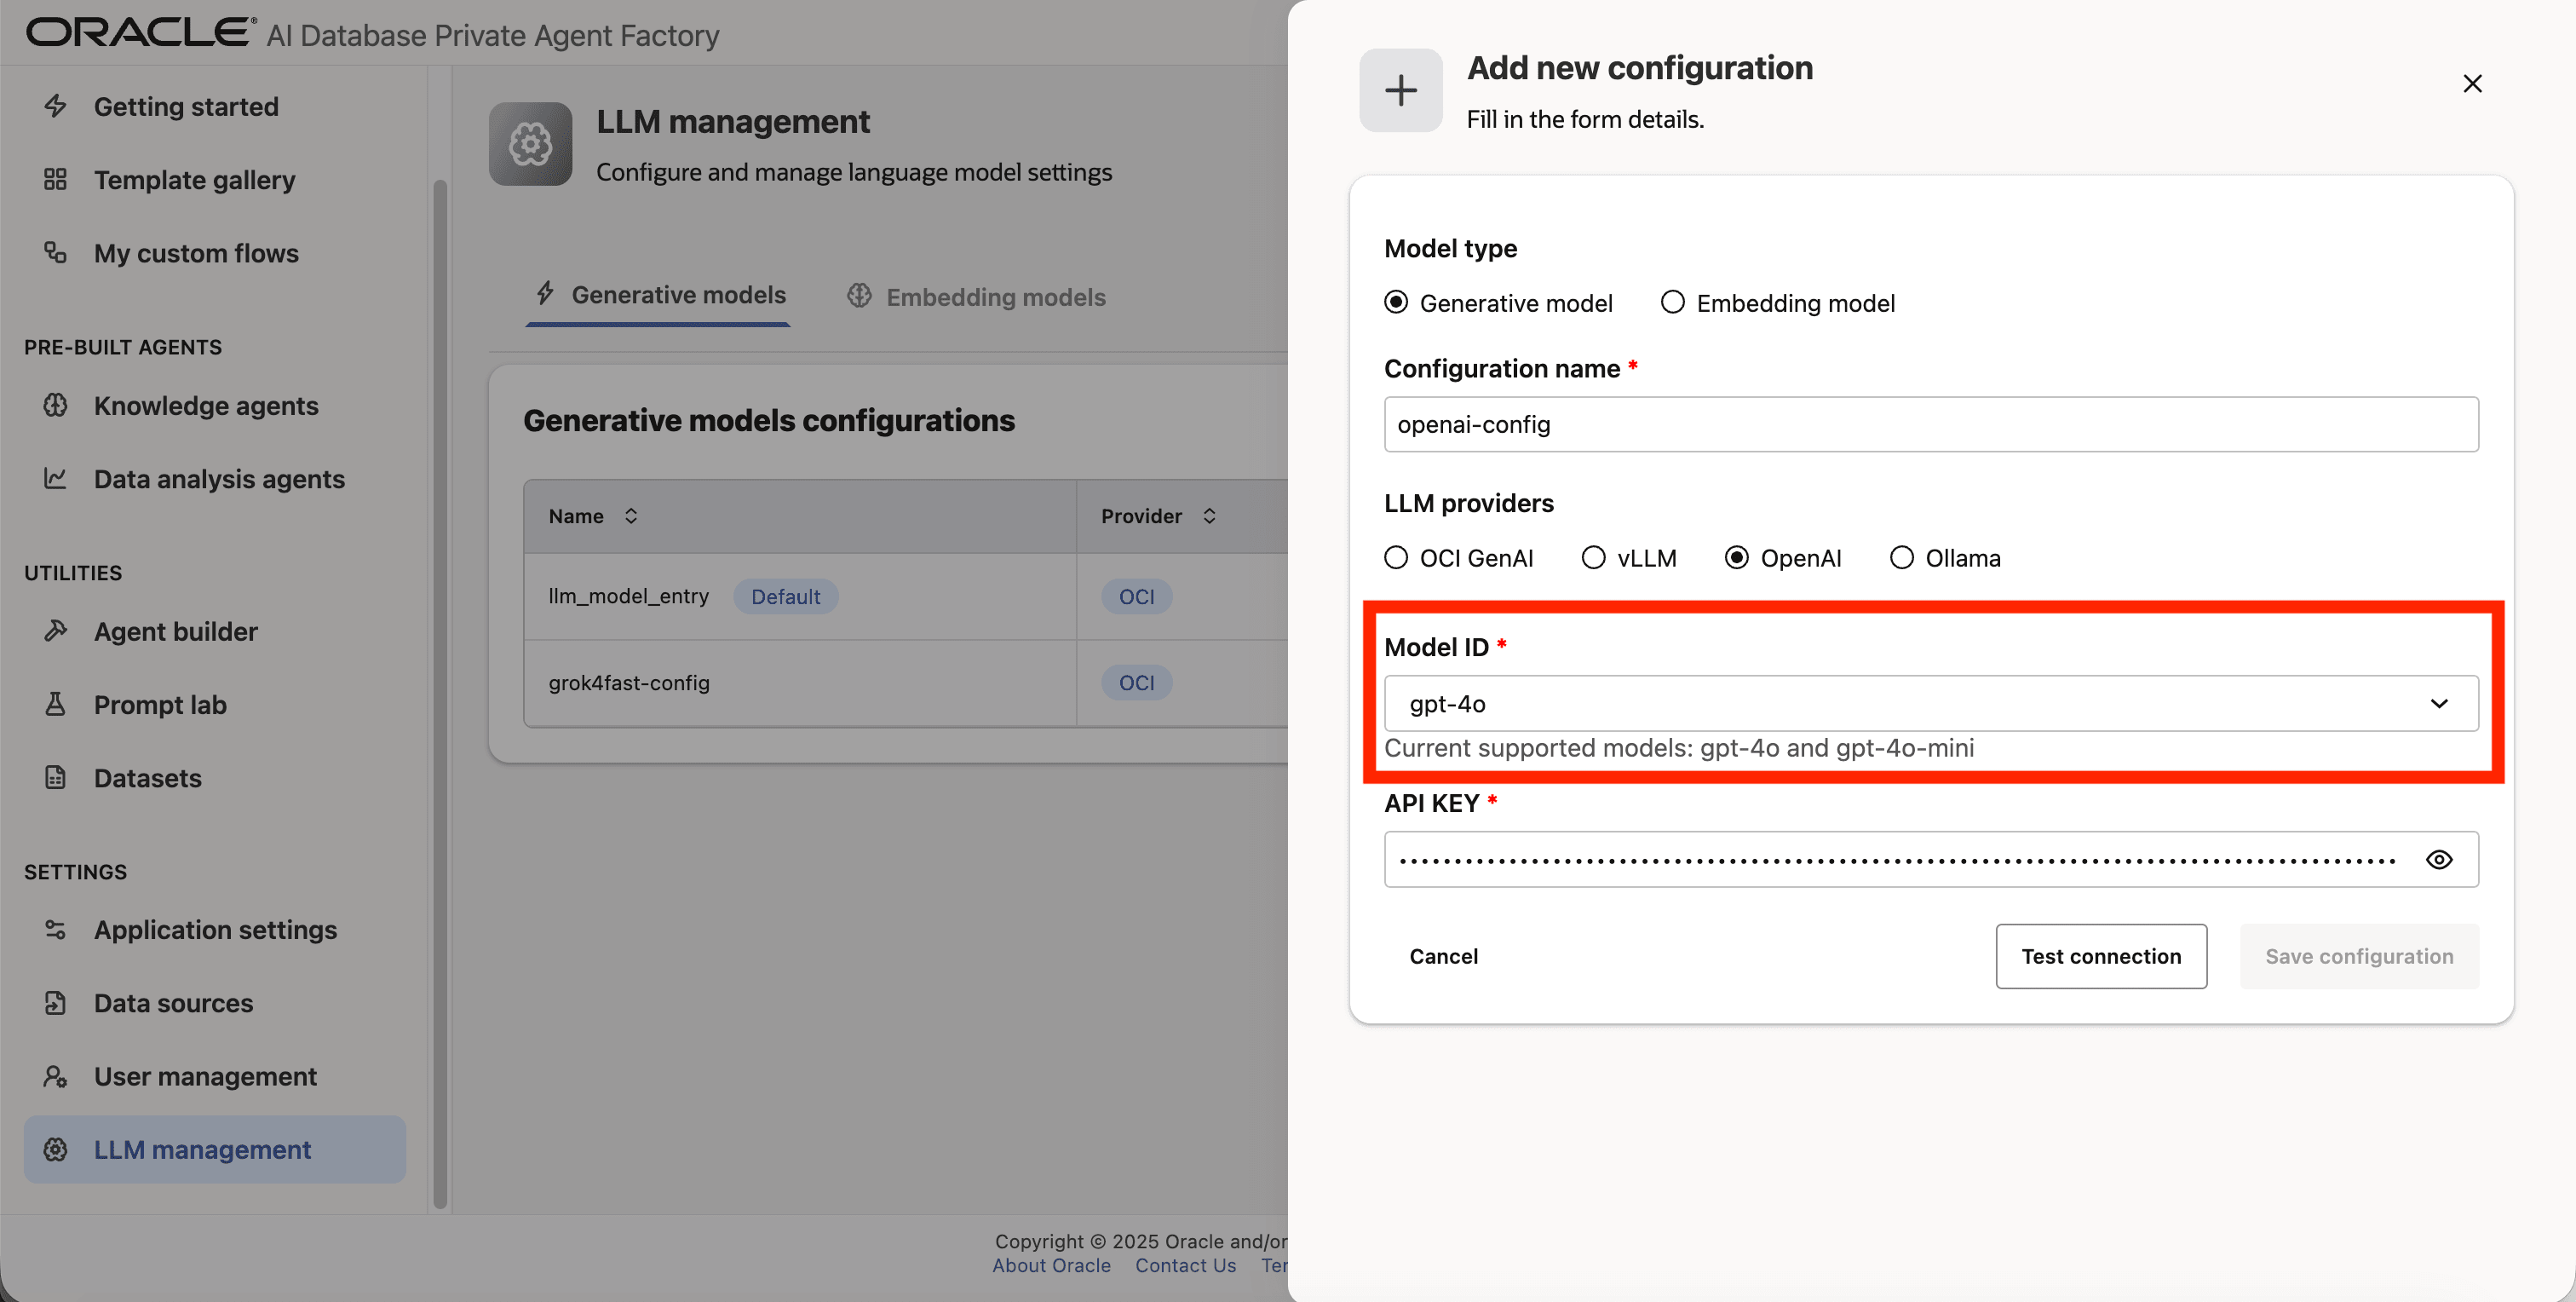
Step 7: Enter your API Key
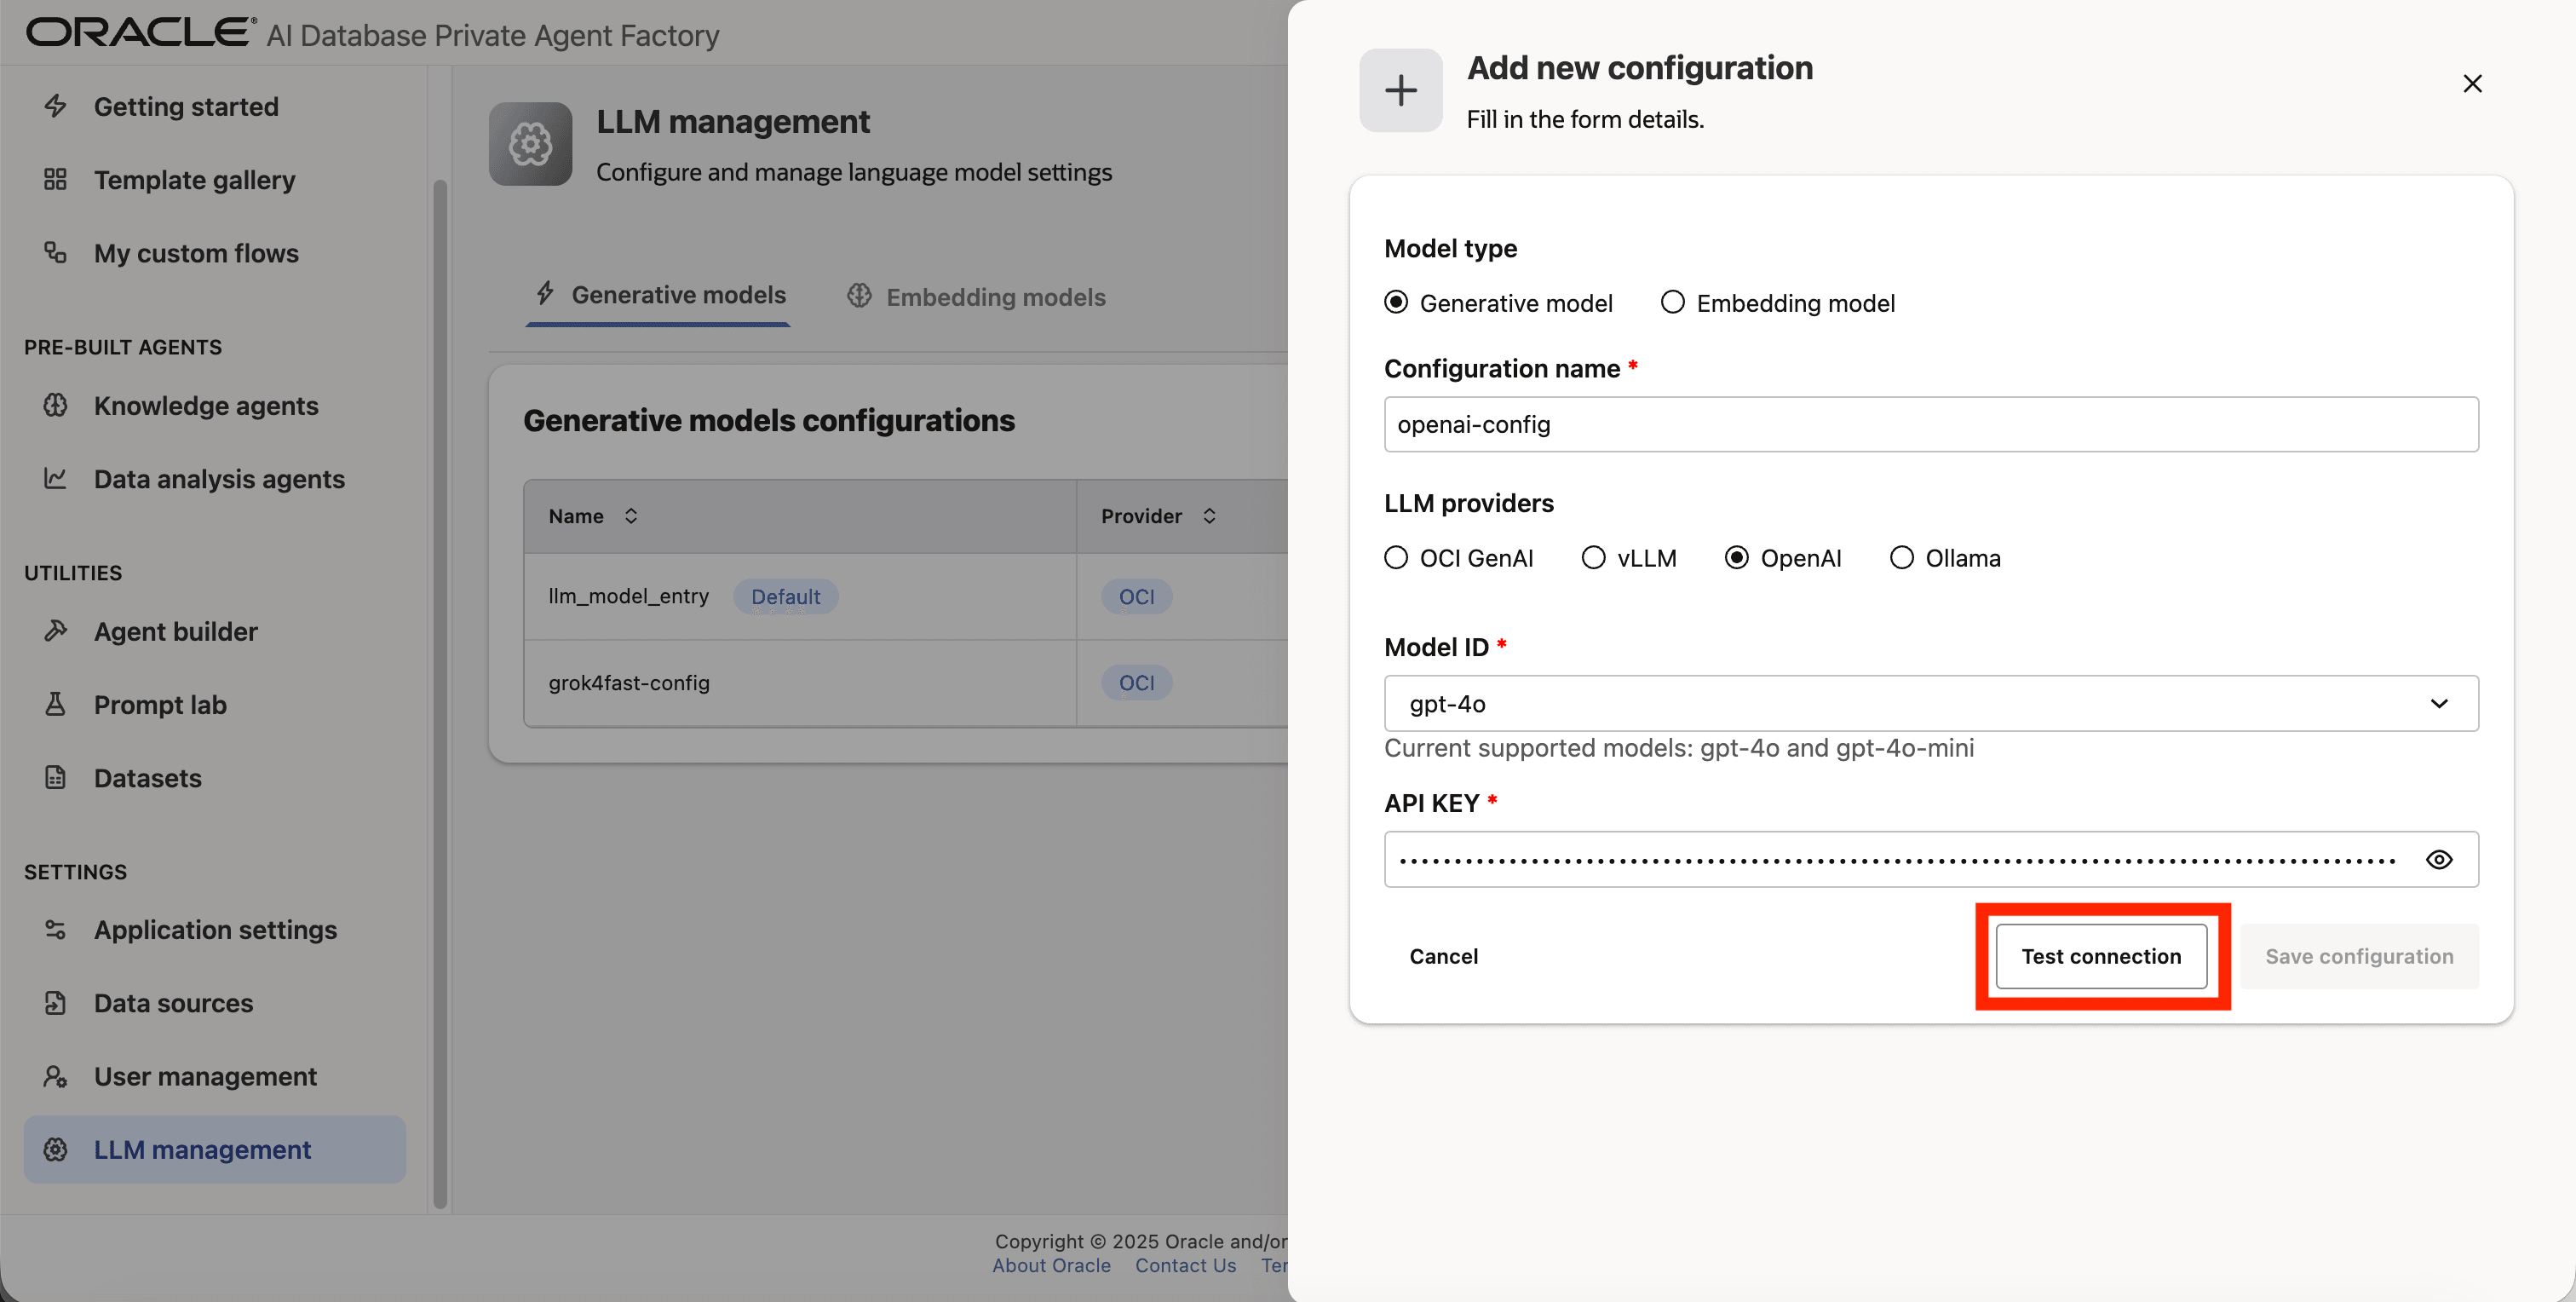
Step 8: Click on Test connection to validate the credentials are correct.
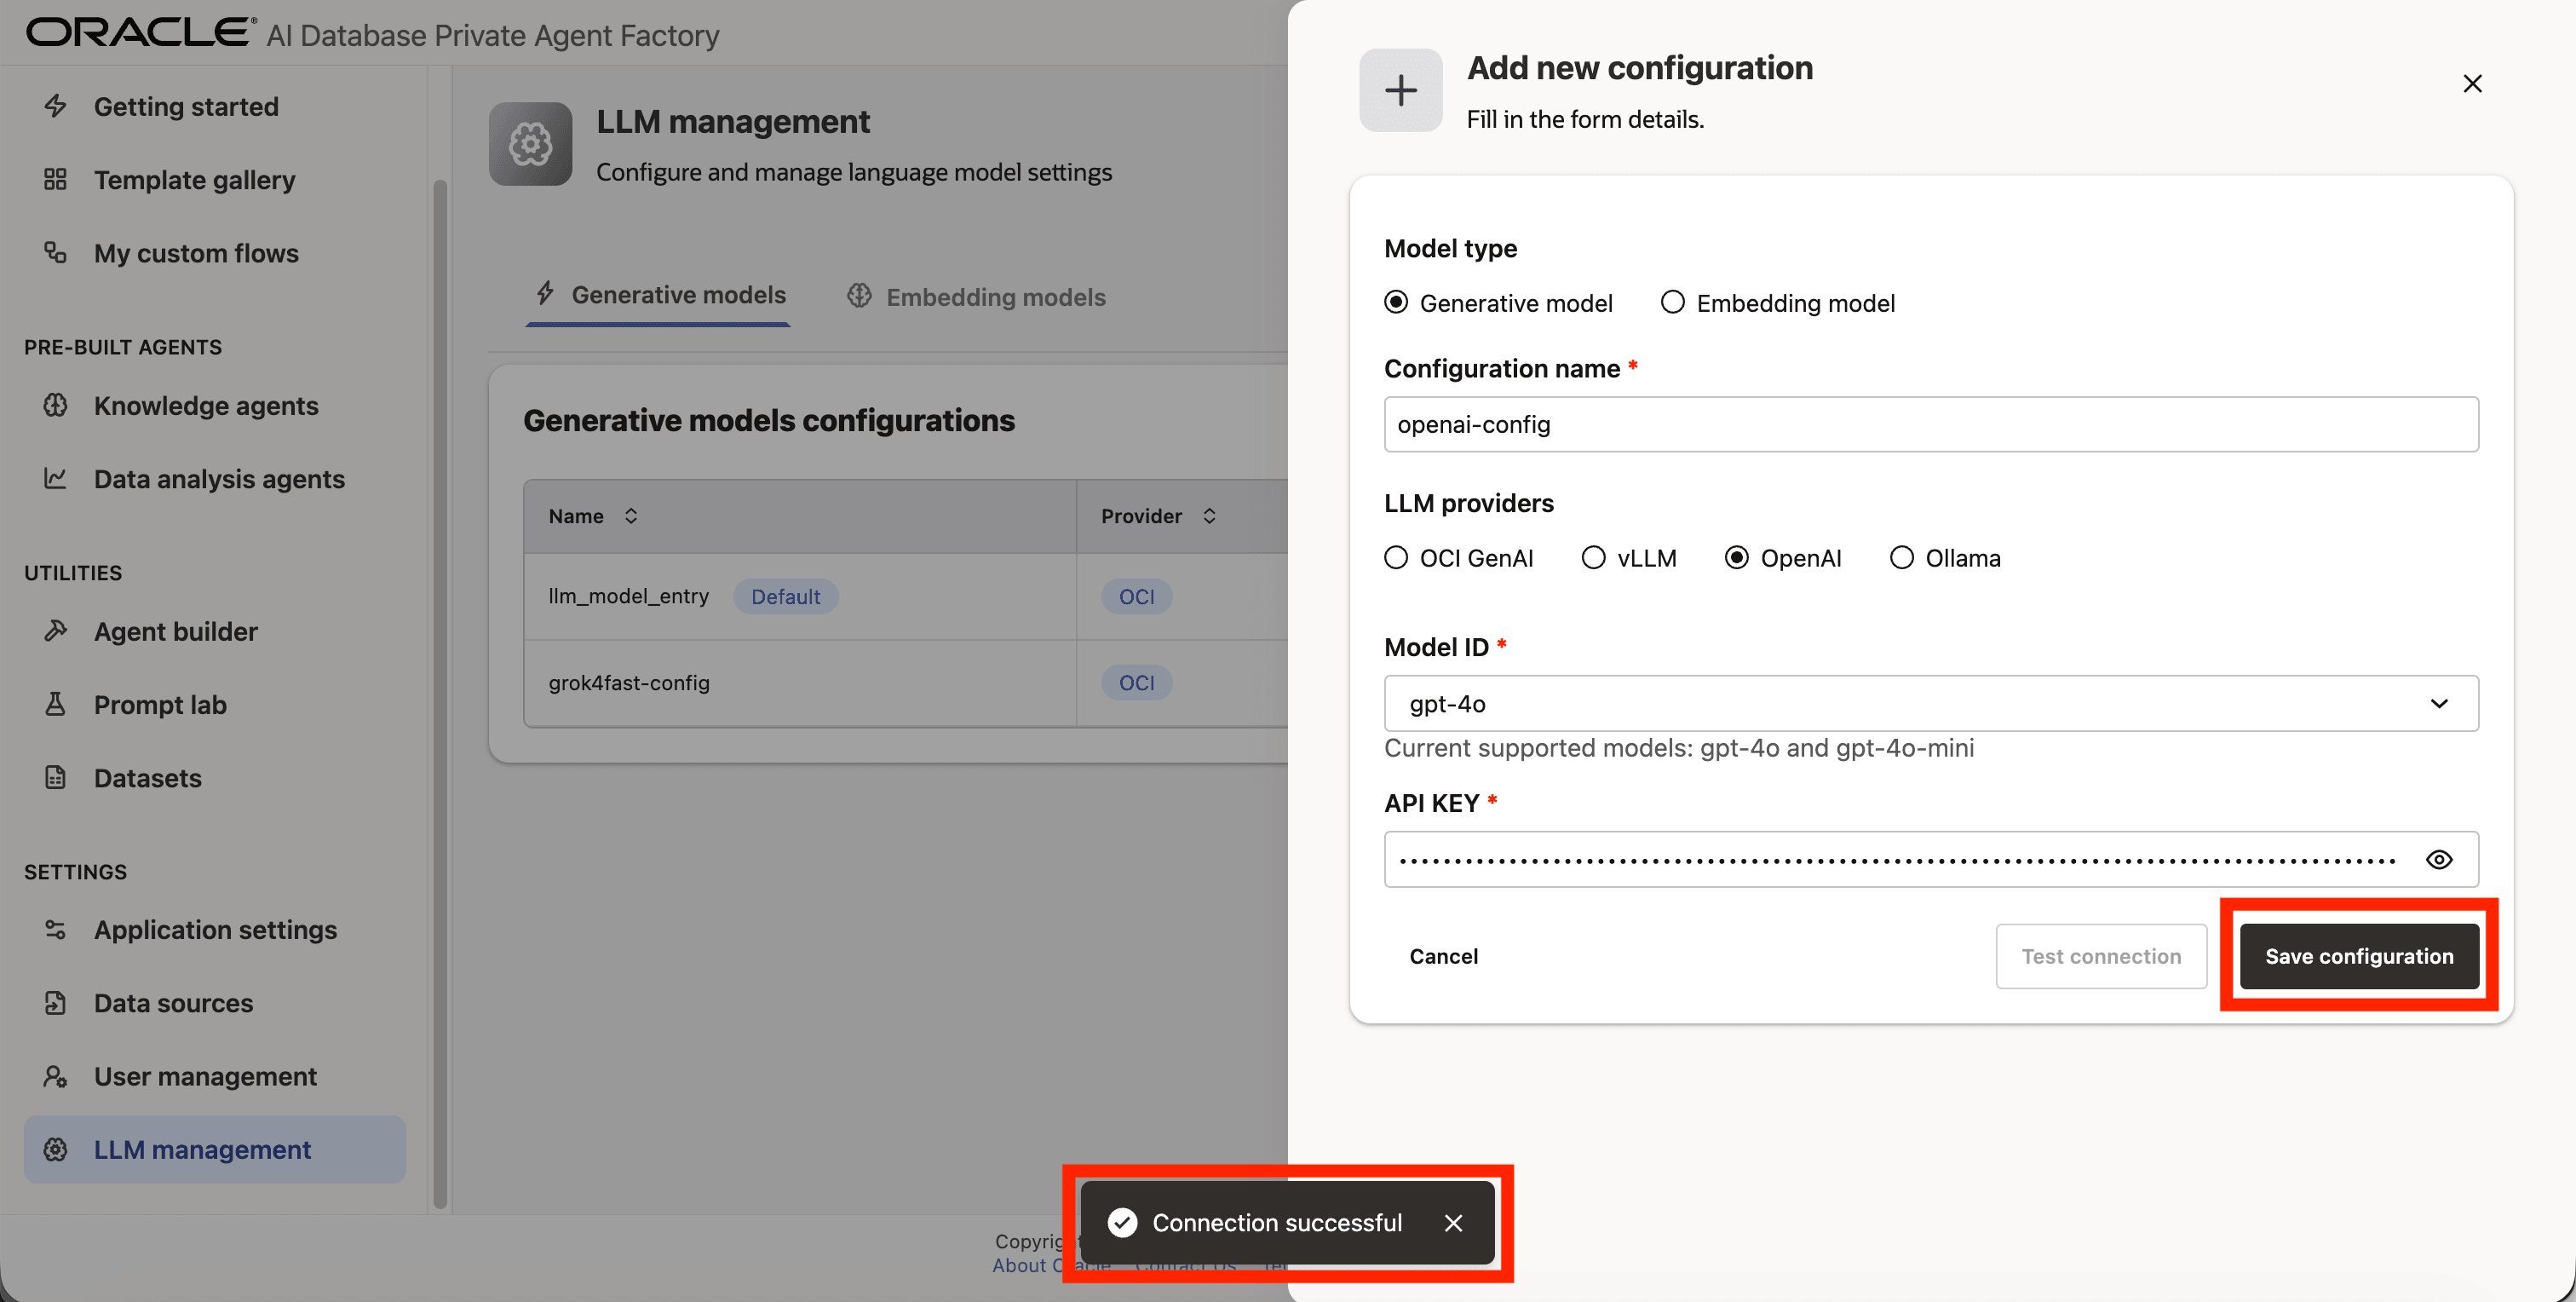
Step 9: A success message “Connection successful” will appear on screen and the Save Configuration button will be enabled, click on it to finalize the process.
vLLM
You can connect to any self-hosted model endpoint.
These are the required fields you need to configure a vLLM:
- Model ID: The model identifier/path that the vLLM server is serving (often a filesystem path or a registry-style name).
- URL: Host/DNS clients use to reach the server.
- Port: The port where the HTTP service is exposed.
Gemini
The following Gemini model IDs are examples commonly used with Agent Factory when available in your Google project and region:
gemini-3.1-pro-previewgemini-3-pro-previewgemini-3-flash-previewgemini-2.5-progemini-2.5-flashgemini-2.5-flash-litegemini-2.0-flashgemini-2.0-flash-lite
Adding Gemini Model to Agent Factory
You can configure Gemini LLM in Agent Factory using the following authentication methods:
- Google Service Account Authentication
- API Key authentication
Authentication Compatibility Notice: Knowledge Agent supports both Gemini authentication methods: Service Account (JSON) and API key authentication. However, Agent Builder and other prebuilt agents currently support only Gemini API key authentication. If you plan to use Agent Builder or any prebuilt agents, please ensure your Gemini configuration is created using the API key authentication method.
Configuring Gemini LLM (Google Service Account Authentication)
Prerequisites:
Before creating a Gemini configuration ensure:
- A Google Cloud Project exists.
- Gemini (Vertex AI) API is enabled in that project.
- A Service Account has been created.
- A JSON key file has been generated and downloaded securely.
See Google Cloud Service Account Setup Guide for detailed instructions on how to create and configure a Service Account.
Steps to Create a Gemini LLM Configuration Using Service Account Authentication:
Step 1: Go to Model Management from the left navigation menu.
Step 2: Click on Add configuration button placed on the top-right corner.
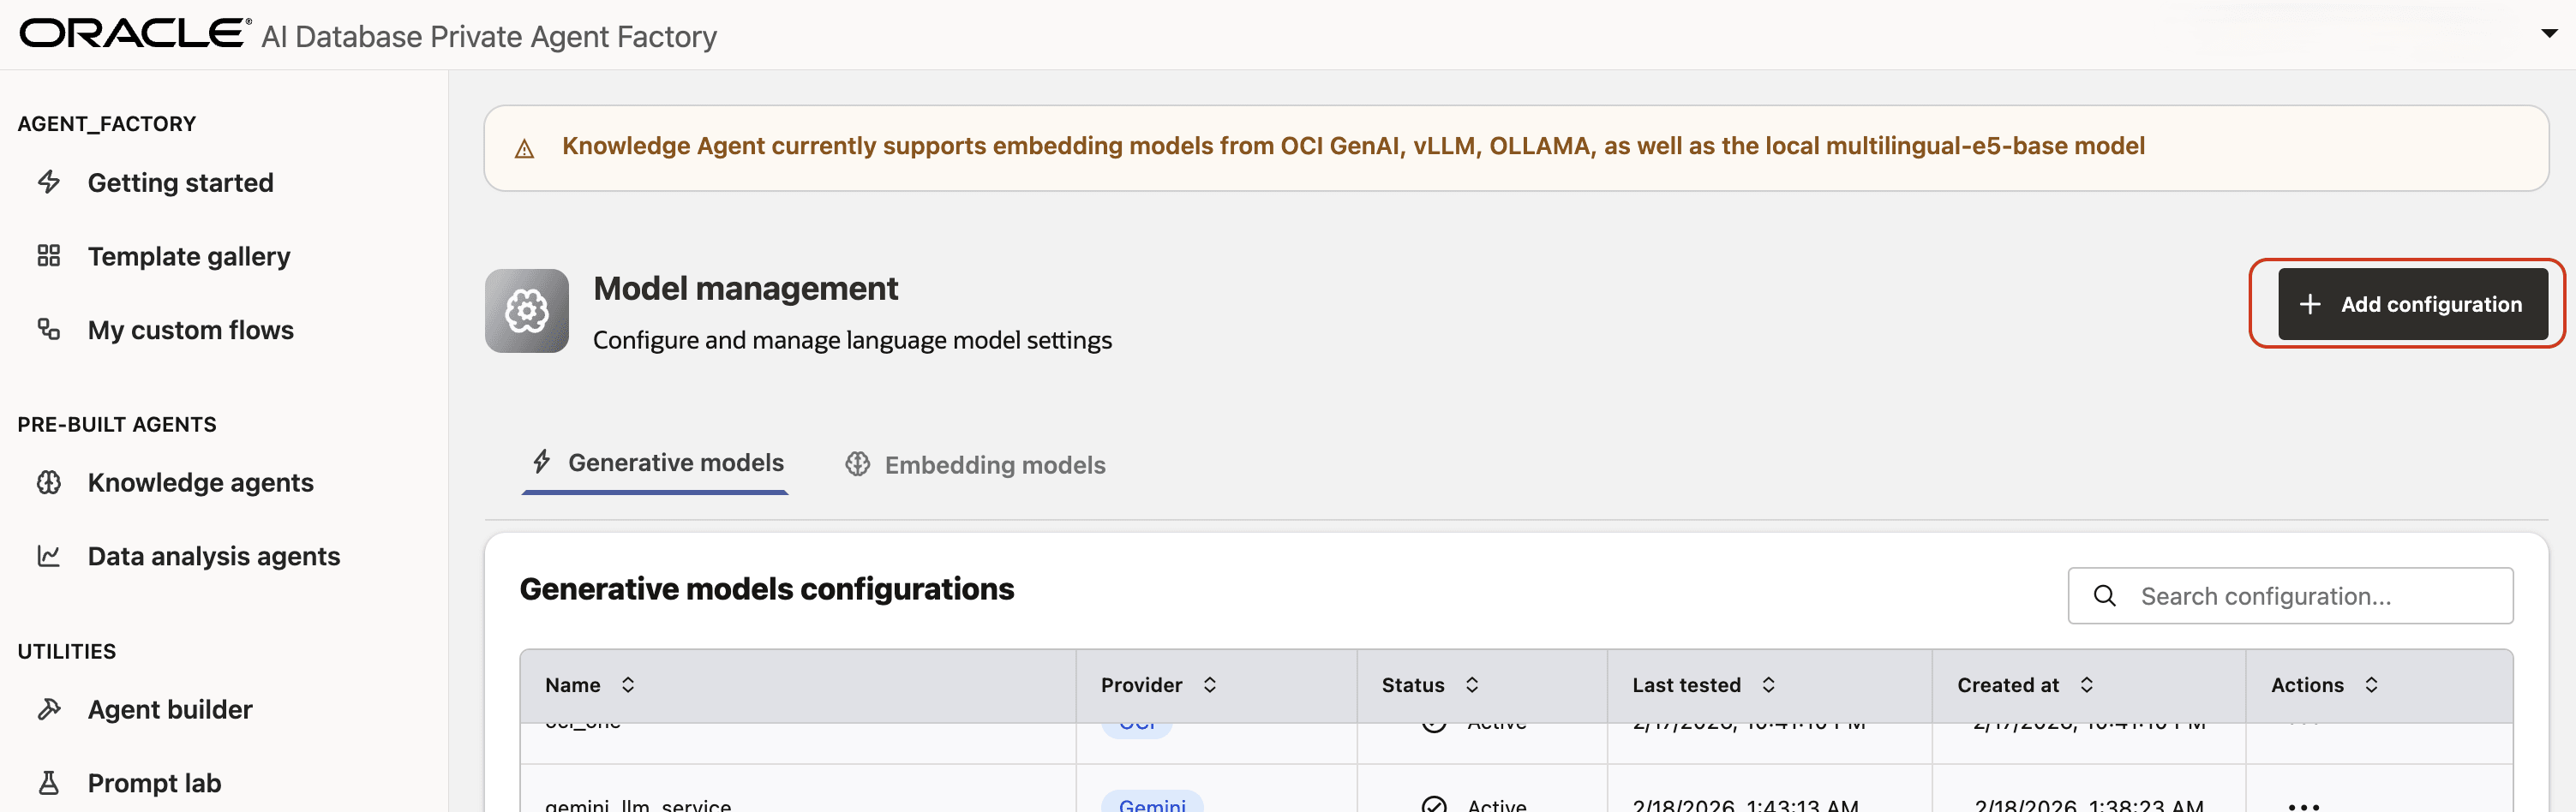
Step 3: A form will open, under Model type pick Generative model.
Step 4: Give your LLM configuration a preferred name under Configuration name, avoid whitespaces since they are not allowed.
Step 5: From list of LLM providers pick Gemini.
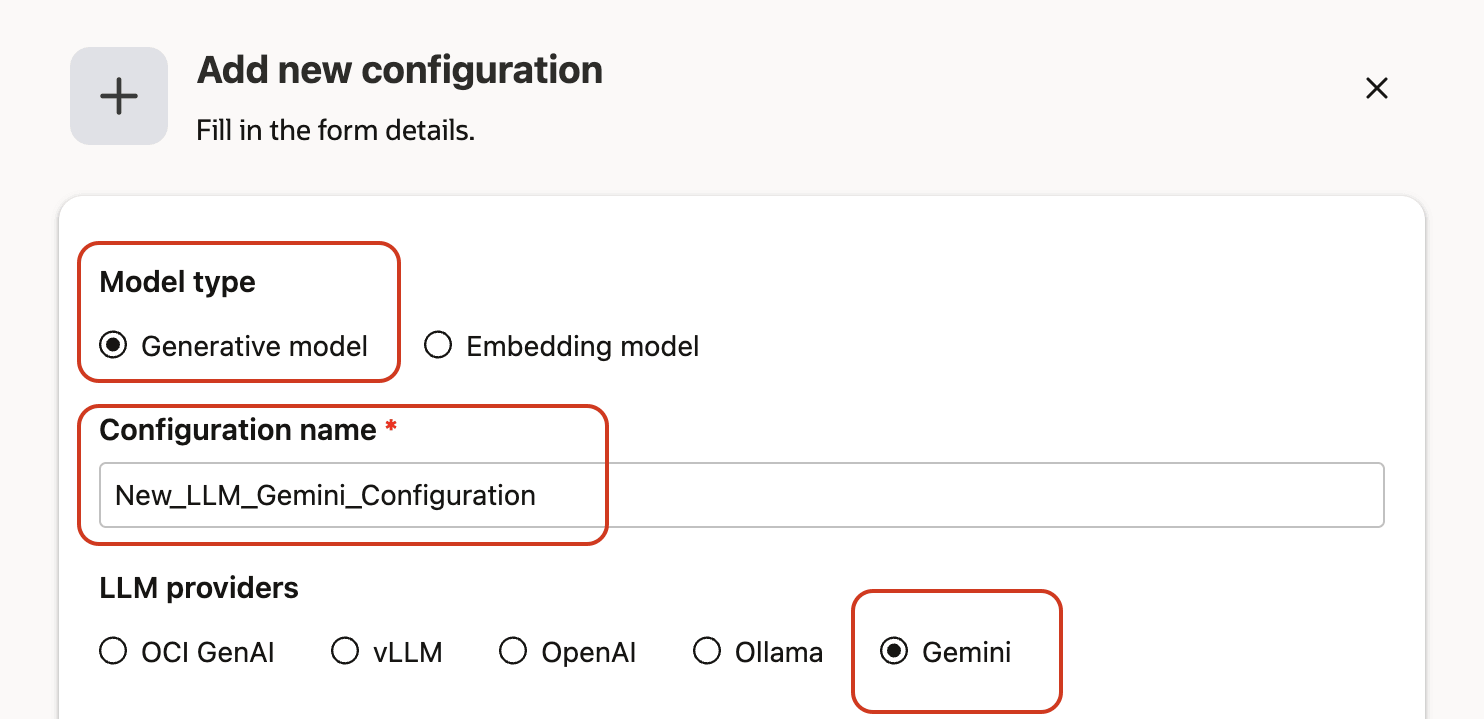
Step 6: Select from authentication method the Service account option.
Step 7: Enter the Model ID.
Recommended commonly used Gemini LLM models:
gemini-2.5-flash-litegemini-2.5-flashgemini-flash-latest
Step 8: Enter the Region.
Most commonly used regions:
- us-central1
- us-east1
- europe-west4
Step 9: Upload the Google Service Account JSON file.
Upload the JSON file by:
- Clicking on the Upload file component
- Or drag and drop the file into the dashed upload area
Note: The Service Account must belong to a project where Vertex AI (Gemini) is enabled.
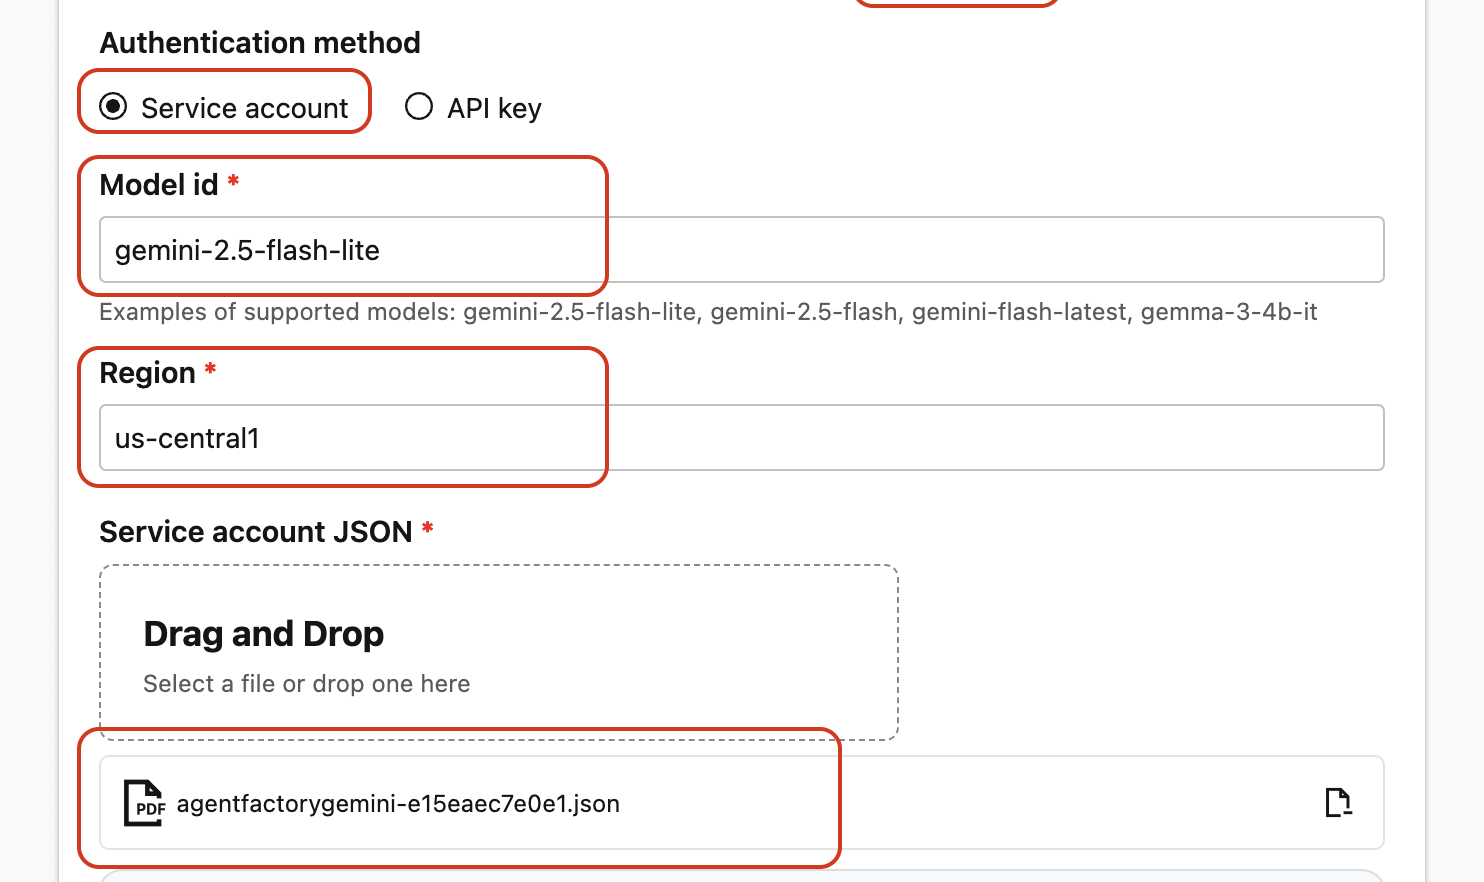
Step 10: Click on Test connection to validate the credentials are correct and connection is possible. Wait a few seconds while a validation request is sent to the Gemini LLM.
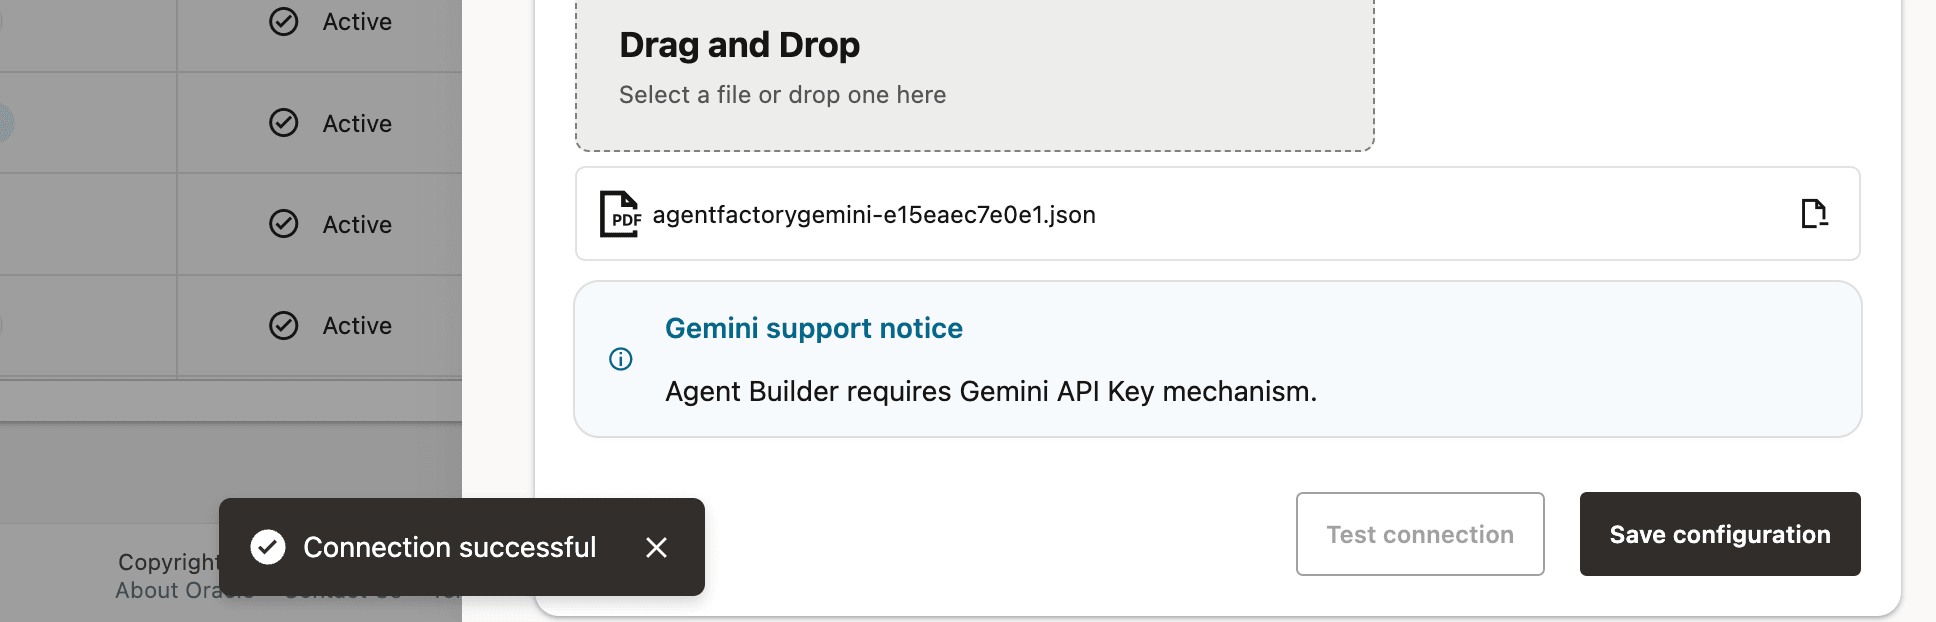
Step 11: A success message Connection successful will appear on screen and the Save Configuration button will be enabled; click on it to finalize the process.
Once completed, the new configuration will appear in the LLM Configurations table.
Configuring Gemini LLM (API Key Authentication)
Prerequisites:
Before configuring Gemini using API key authentication:
- A Gemini API key must be created using either:
- Google AI Studio, or
- Google Cloud Console
- The API key must belong to a Google Cloud project.
- Vertex AI (Gemini) API must be enabled for that project.
Ensure the API key is not restricted in a way that blocks requests from Agent Factory.
Steps to Create a Gemini LLM Configuration Using API Key Authentication:
Step 1: Go to Model Management from the left navigation menu.
Step 2: Click on Add configuration button placed on the top-right corner.
Step 3: A form will open, under Model type pick Generative model.
Step 4: Give your LLM configuration a preferred name under Configuration name, avoid whitespaces since they are not allowed.
Step 5: From list of LLM providers pick Gemini.
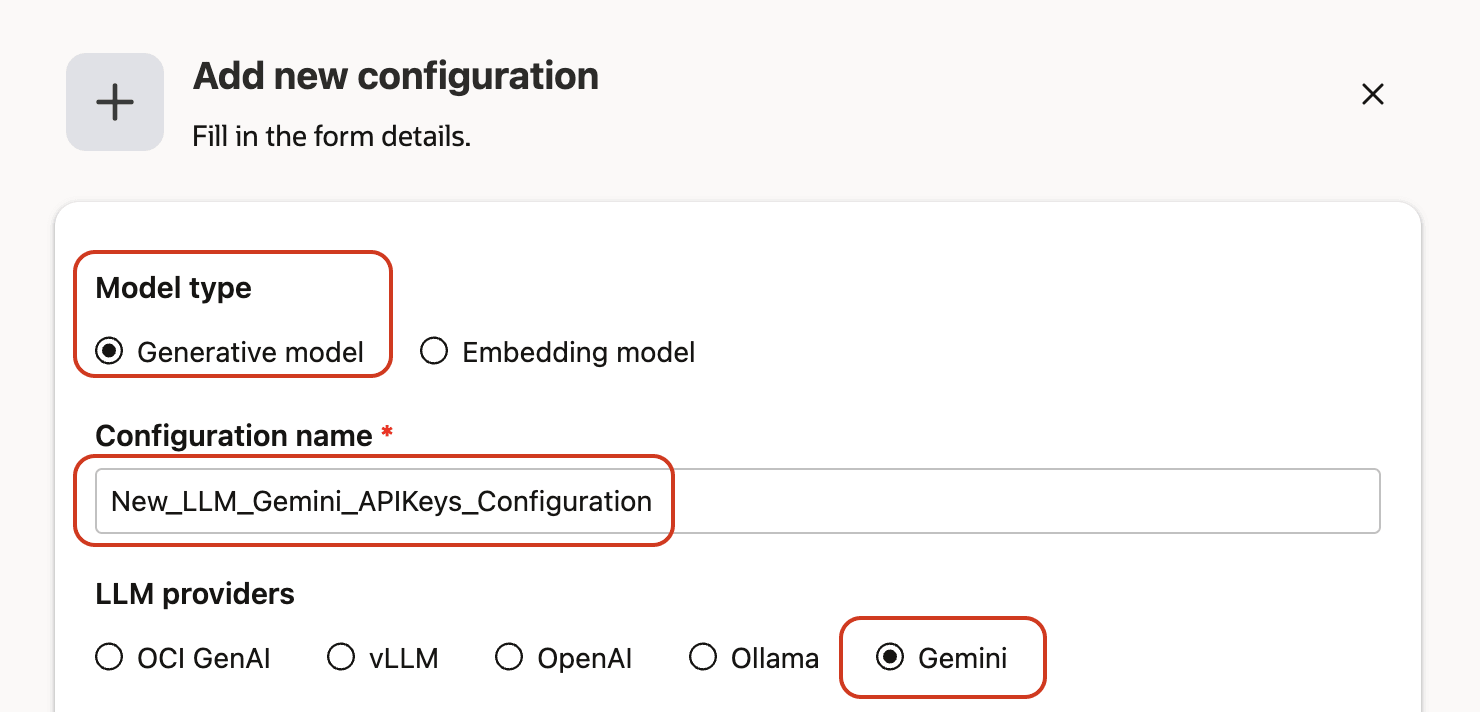
Step 6: Select from authentication method the API Key option.
Step 7: Enter the Model ID
Recommended commonly used Gemini LLM models:
gemini-2.5-flash-litegemini-2.5-flashgemini-flash-latest
Step 8: Paste your Gemini API key into the field provided.
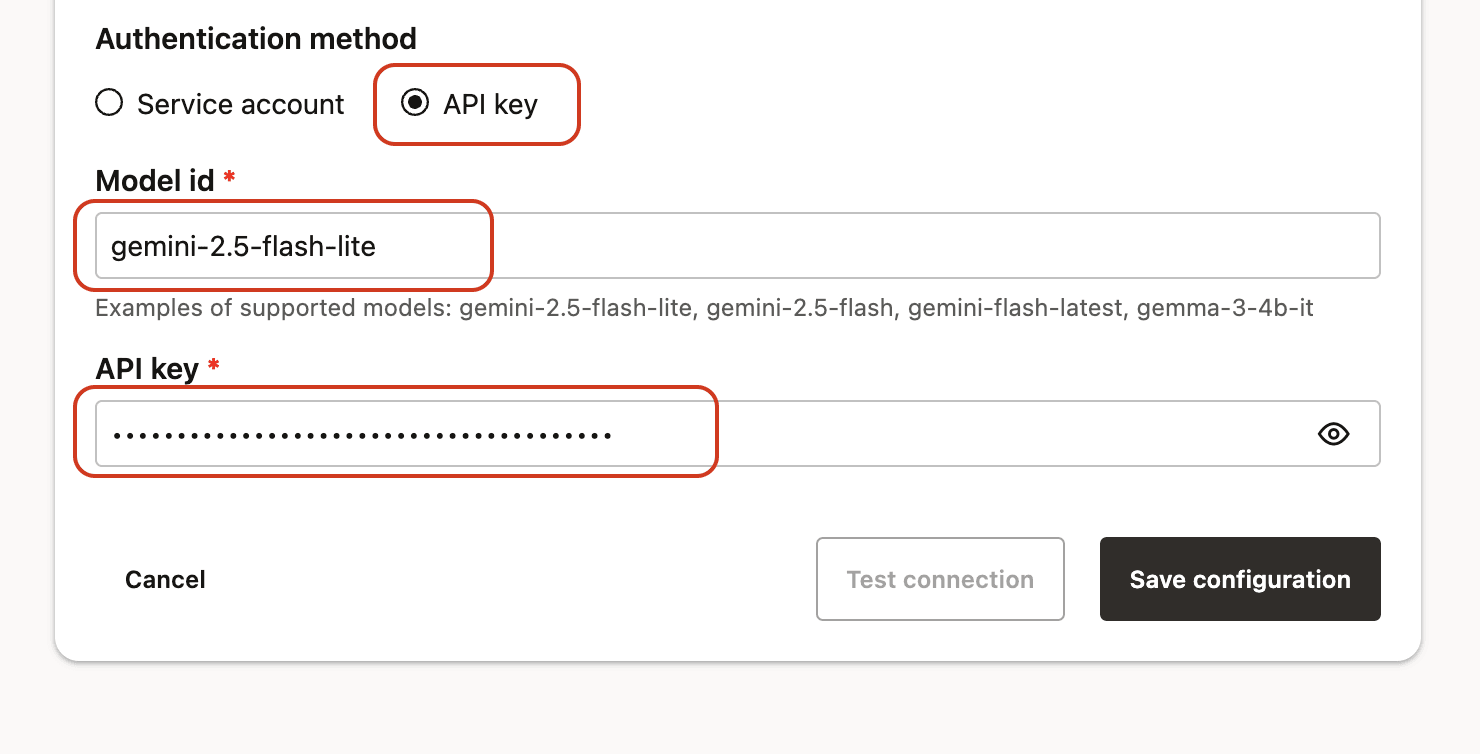
Step 9: Click on Test connection to validate the credentials are correct and connection is possible.
Wait a few seconds while a validation request is sent to the Gemini LLM.
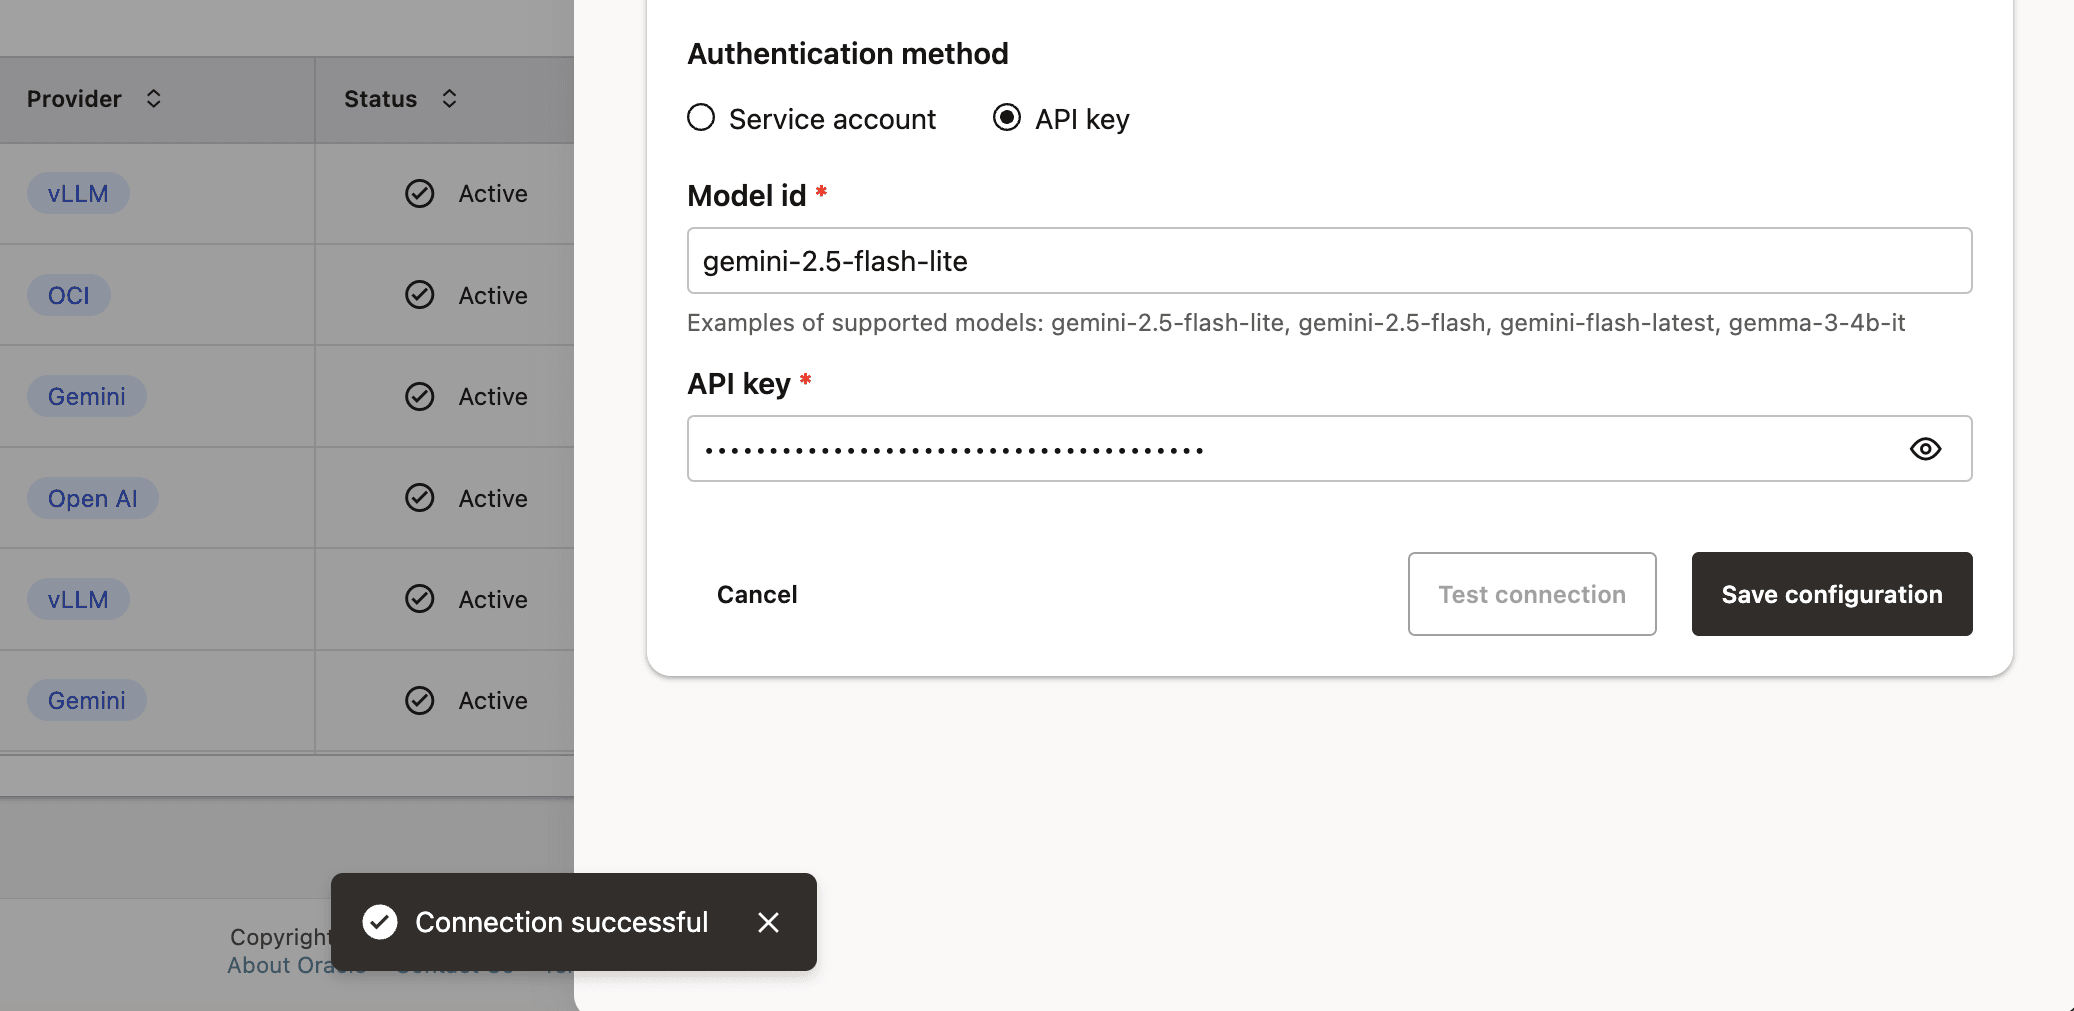
Step 10: A success message Connection successful will appear on screen and the Save Configuration button will be enabled, click on it to finalize the process.
Once completed, the new configuration will appear in the LLM Configurations table.
Embedding Models
Agent Factory supports the following embedding models. Use these models for transforming text into numerical vectors, enabling semantic search, and retrieval-augmented generation (RAG). Agent Factory include out-of-the-box support for several high-performing embedding models, while also allowing you to bring your preferred models hosted on the OCI Generative AI service, or served via Ollama or vLLM endpoints.
Local Models
The following pre-trained sentence transformer model is bundled with the application and run locally.
multilingual-e5-base(768 dimensions)
Configure a Local Embedding Model
Below are the steps to configure a local embedding model multilingual-e5-base, which is available in Agent Factory out of the box.
Note: If you plan to use local embedding models, ensure the machine running the application has access to GPUs. Otherwise, embedding-related processes—such as Knowledge Agent ingestion—may take a significant amount of time.
Step 1: Click on LLM management on the left side navigation menu.
Step 2: Click on Add configuration button placed on the top-right corner.
Step 3: A form will open, under Model type choose Embedding model.
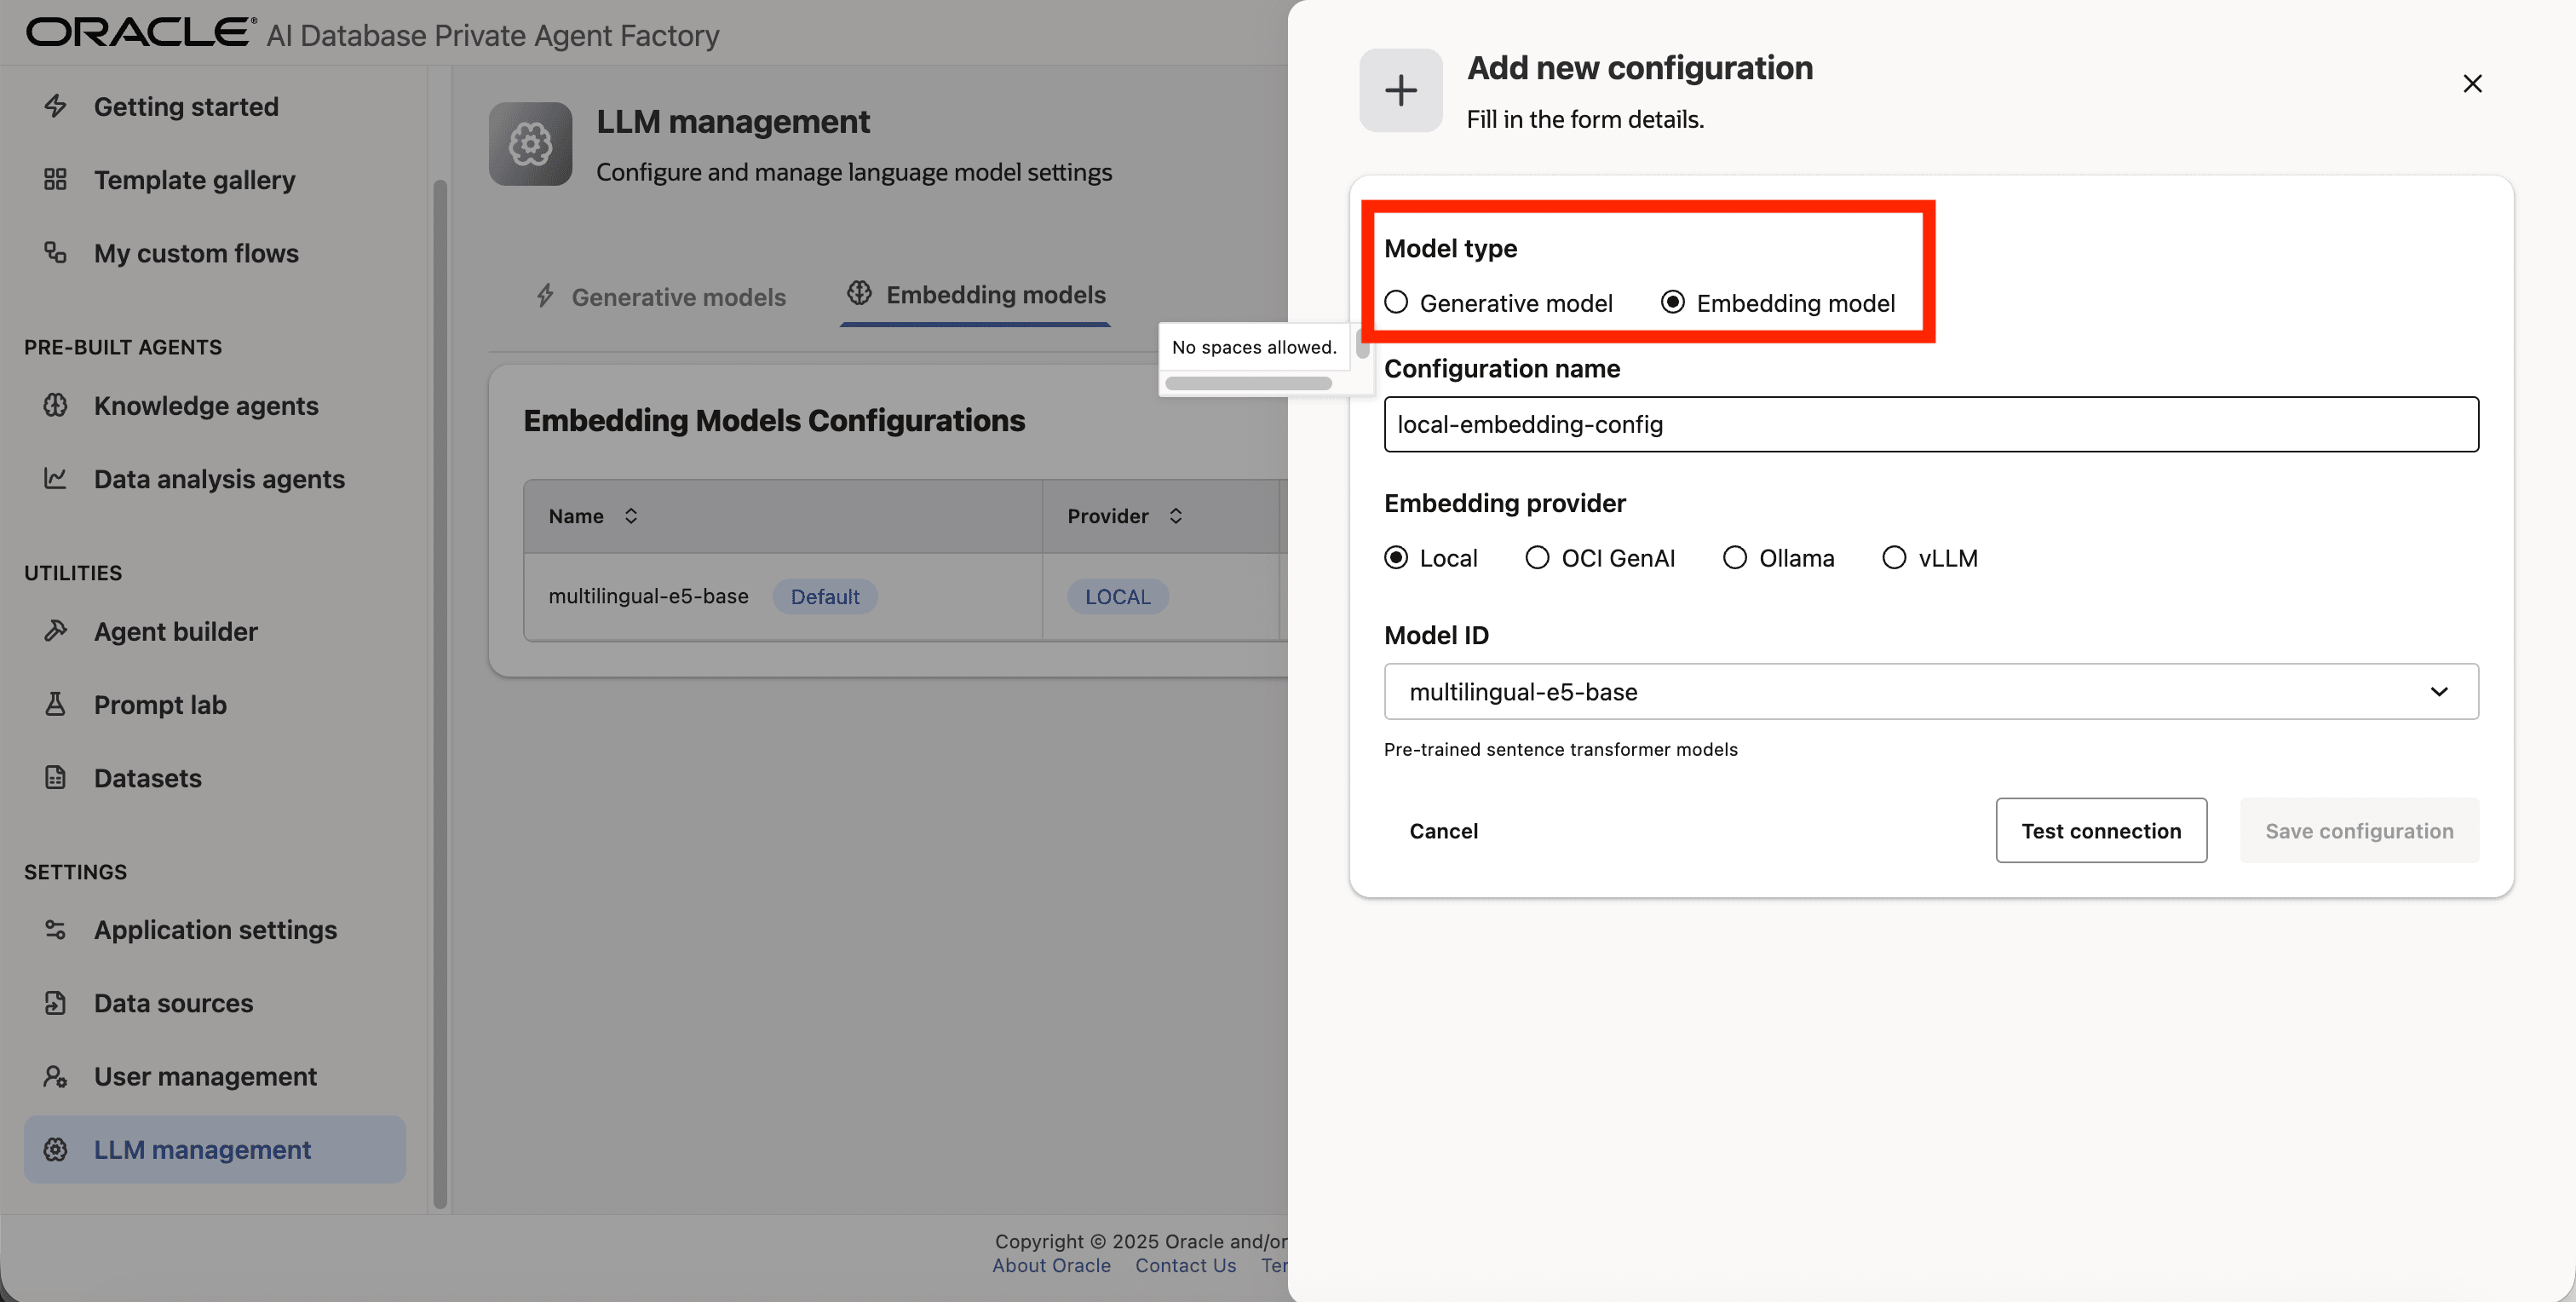
Step 4: Give your configuration a name, avoid using whitespaces since they are not allowed.
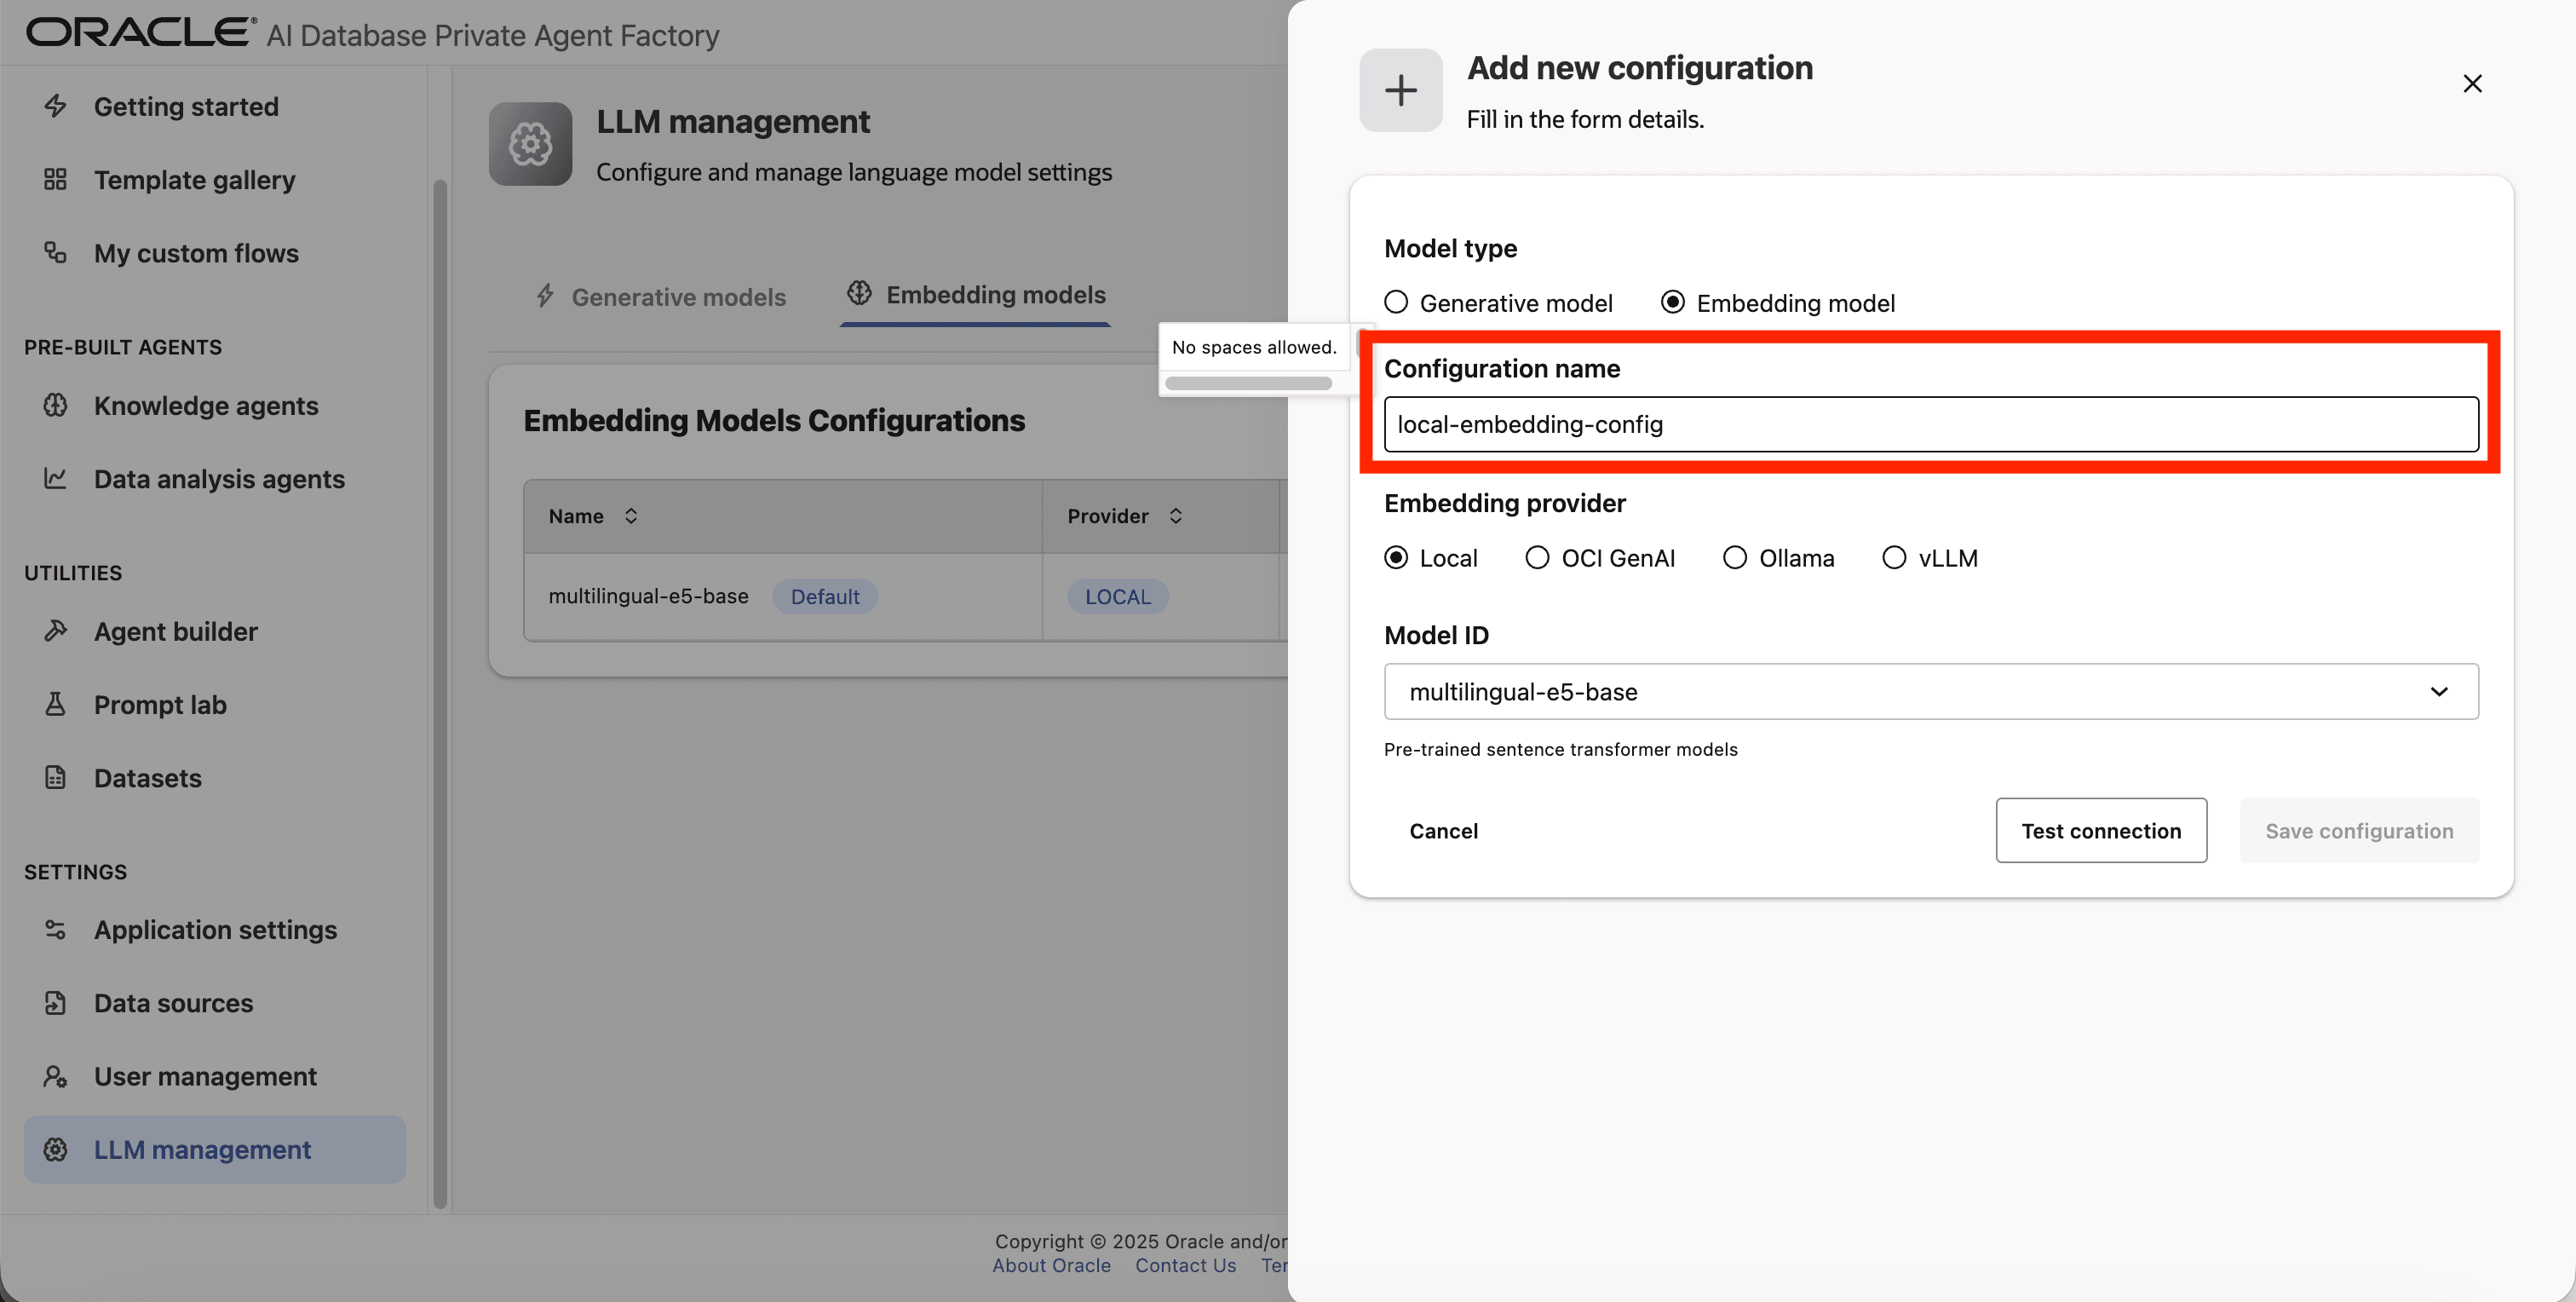
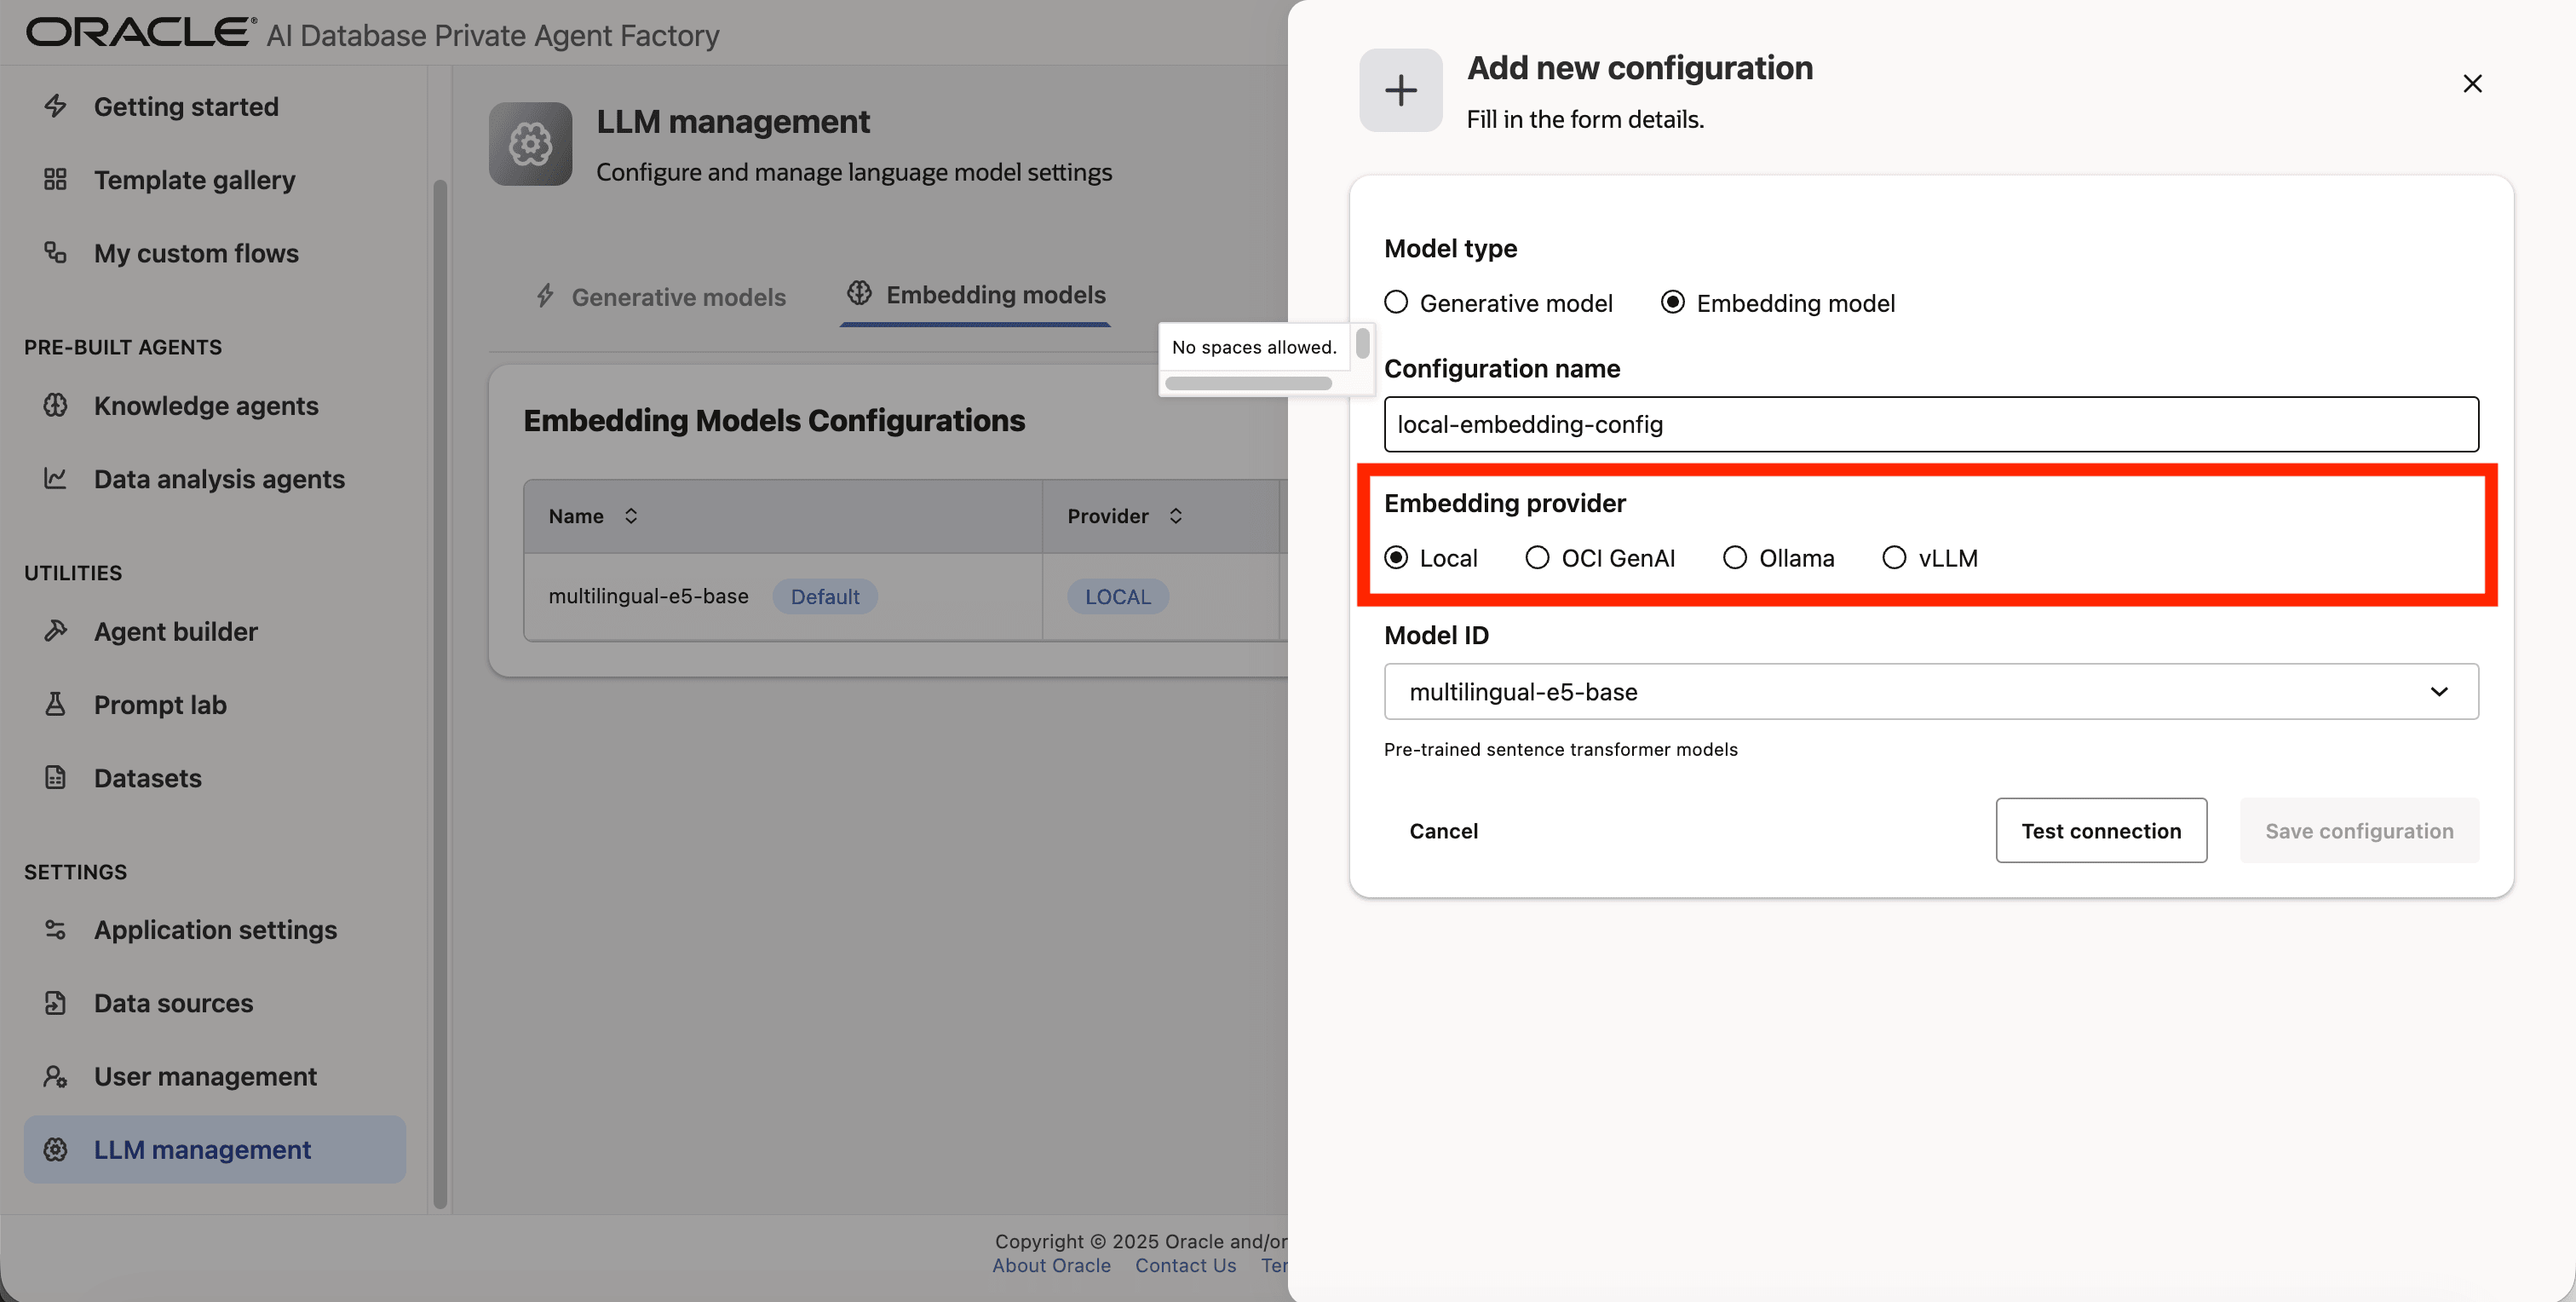
Step 5: For Embedding provider pick Local.
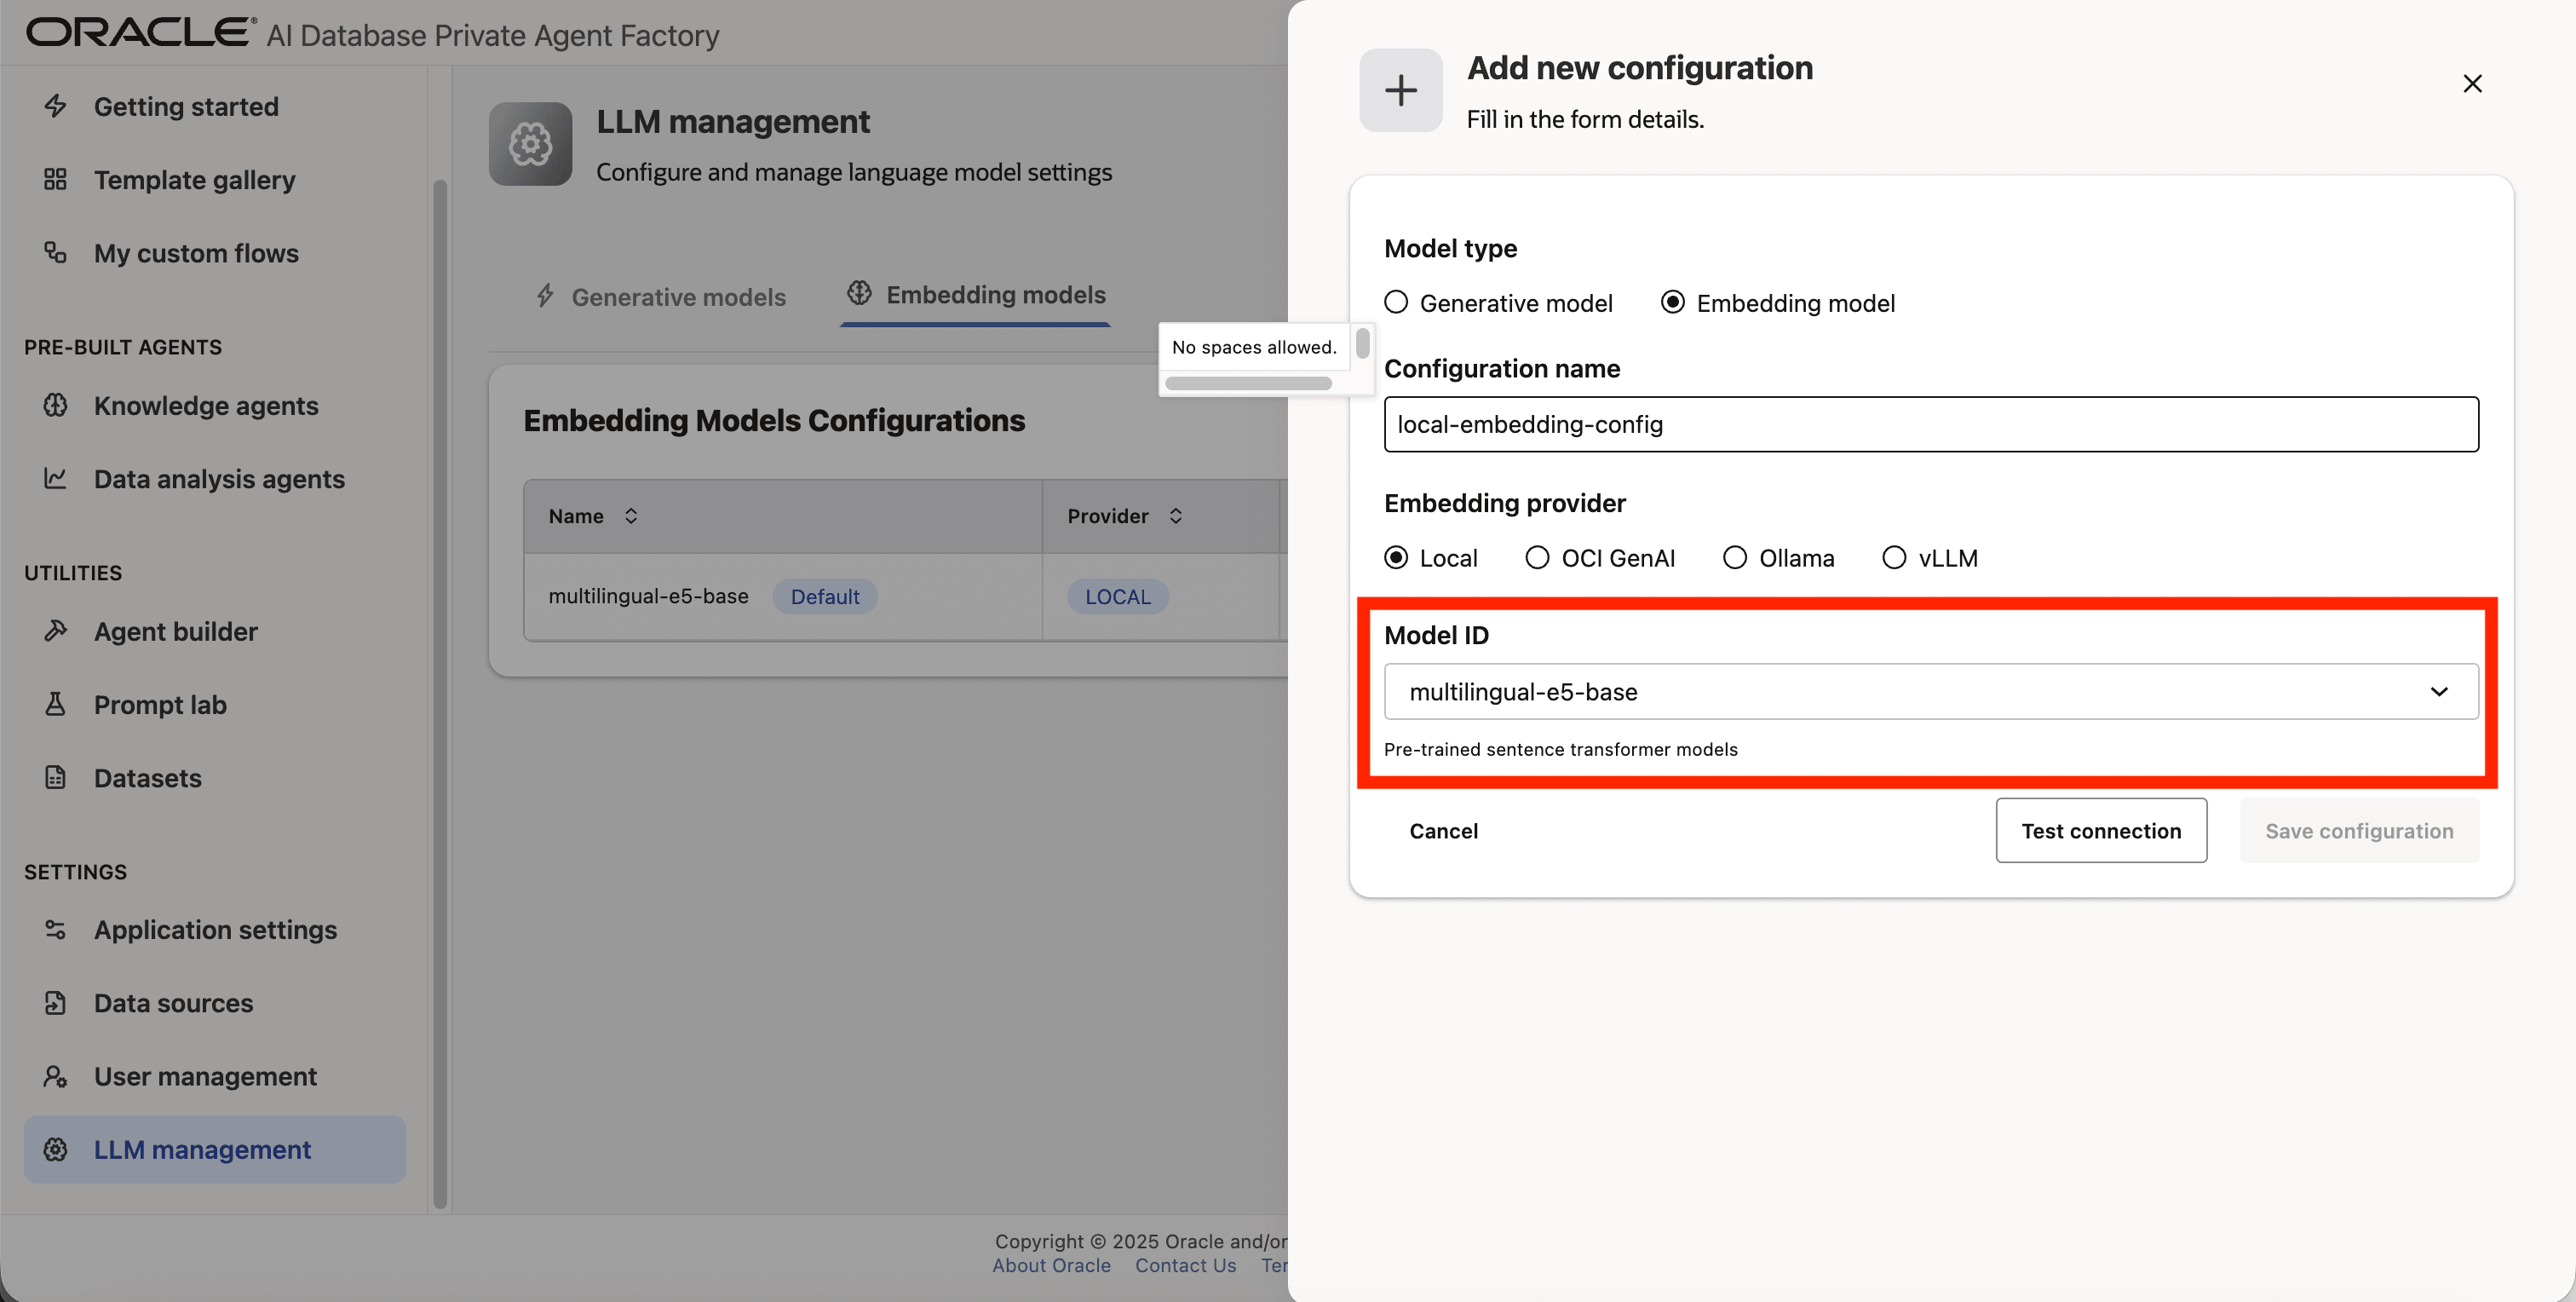
Step 6: Click on Model ID and pick multilingual-e5-base from the list.
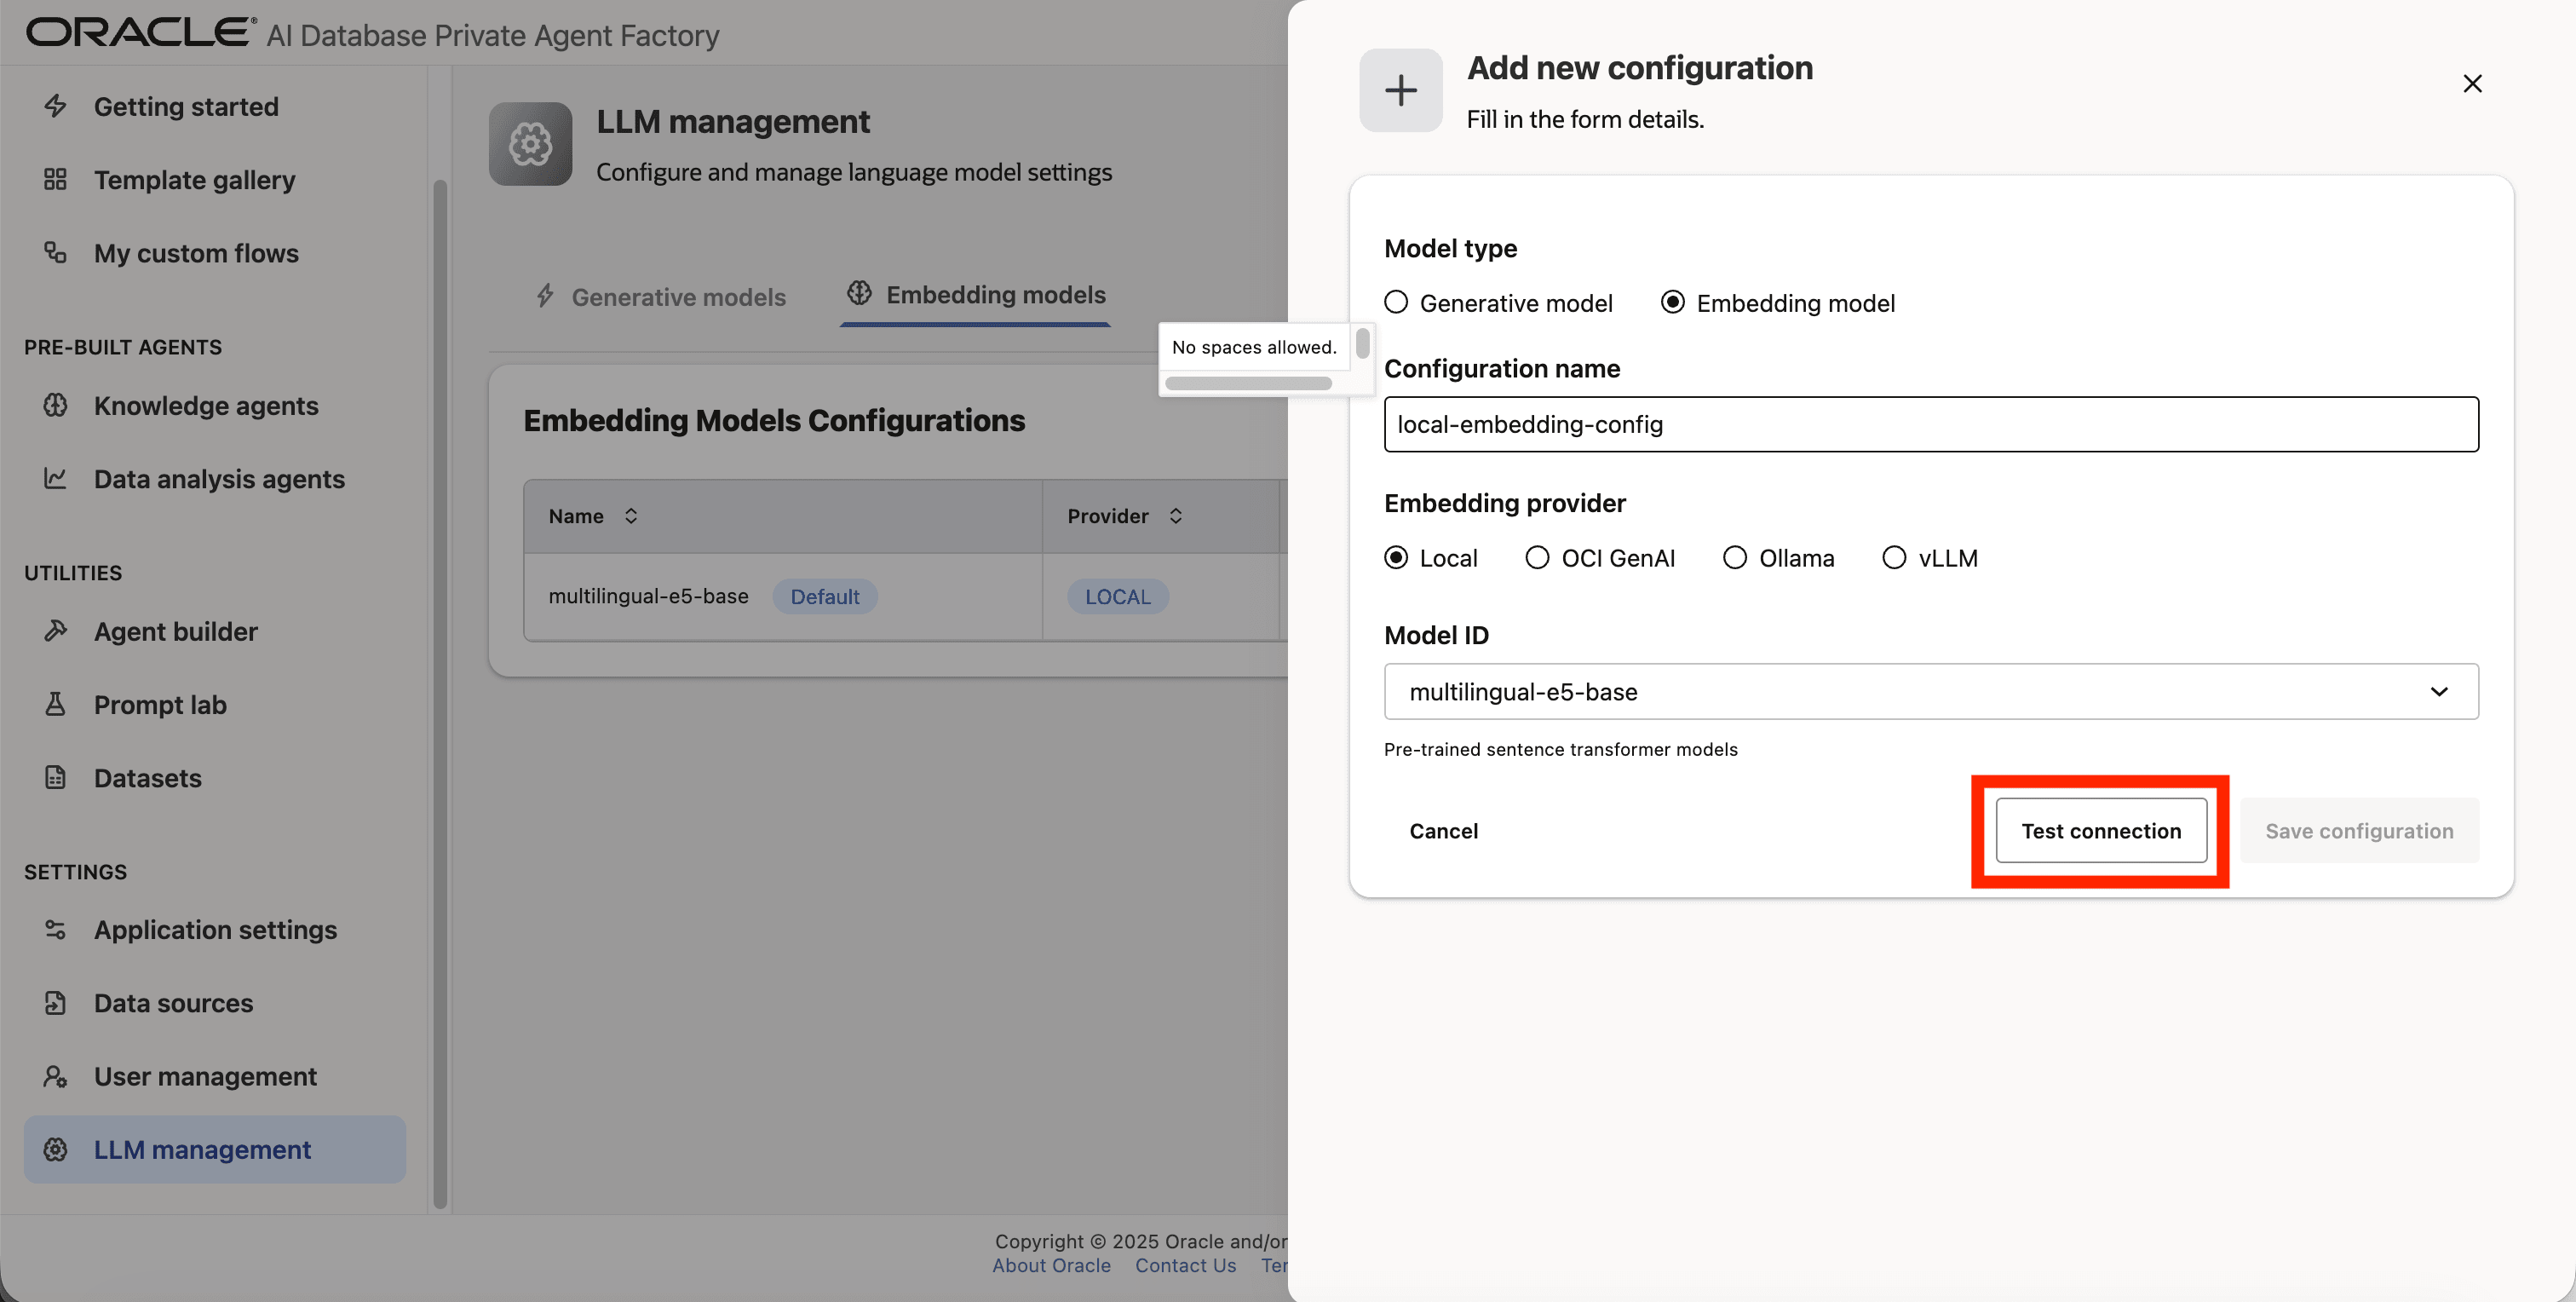
Step 7: Verify the connection by clicking on Test connection.
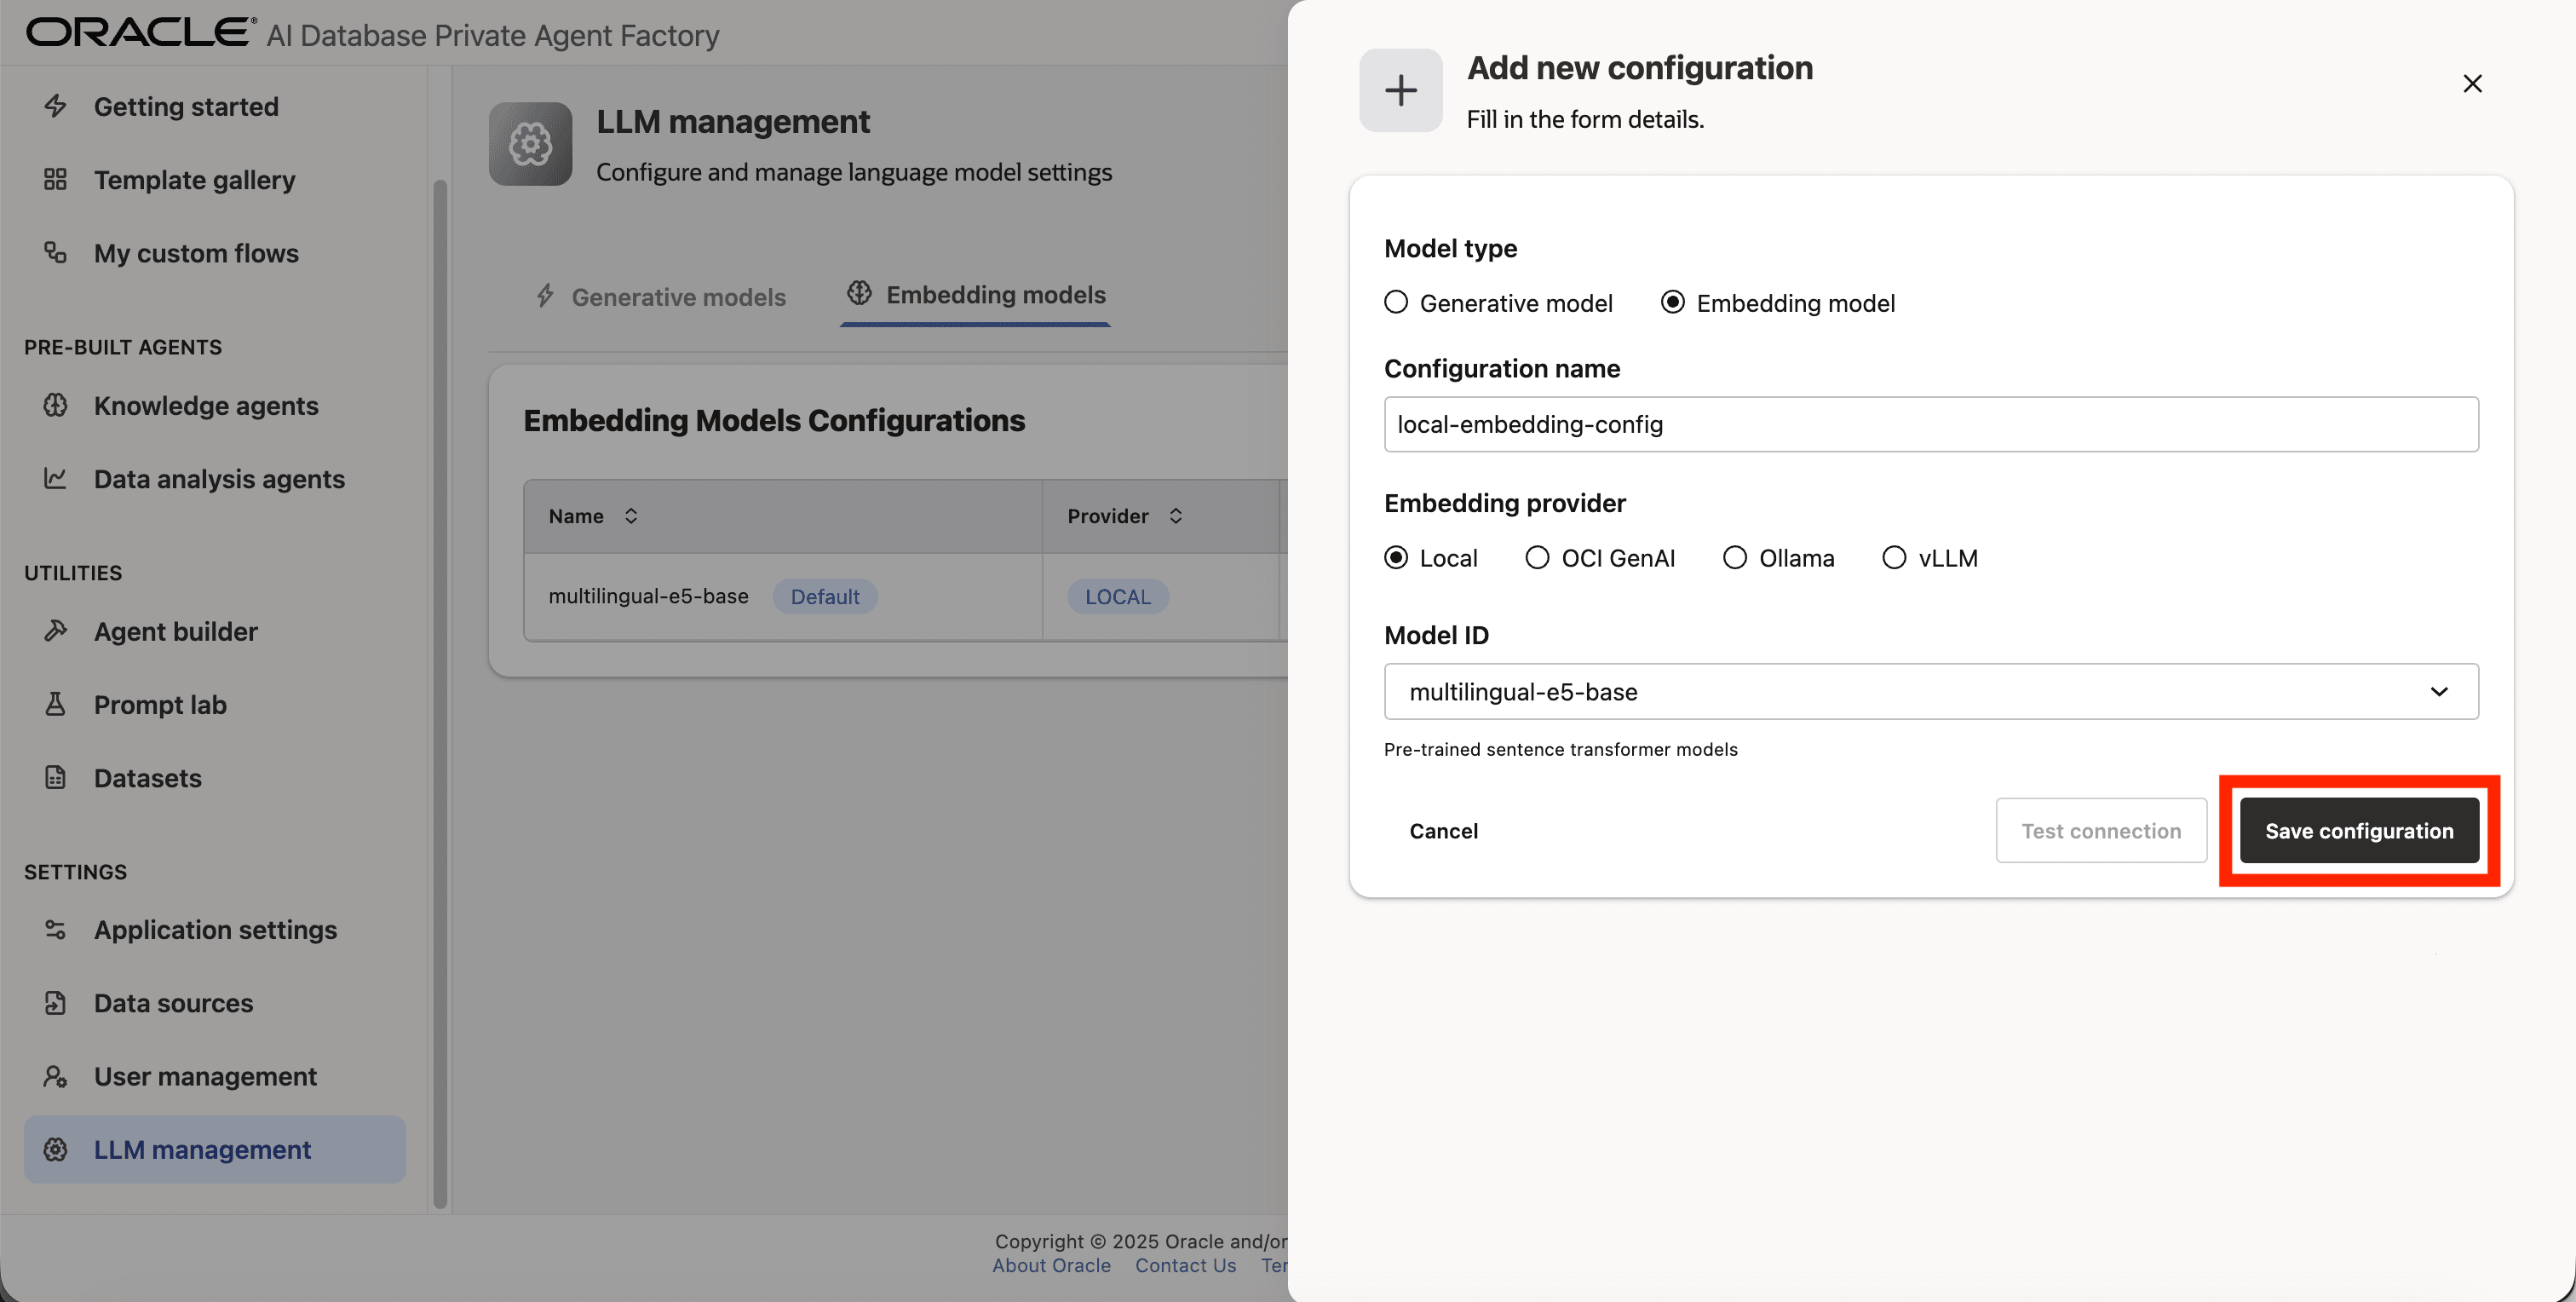
Step 8: Save the new configuration.
OCI Generative AI
The following Cohere embedding model IDs from OCI Generative AI are commonly used examples:
cohere.embed-v4.0cohere.embed-multilingual-v3.0cohere.embed-multilingual-light-v3.0cohere.embed-english-v3.0
Configure an OCI Generative AI embedding model
Below are the steps to configure a local embedding model cohere.embed-v4.0 which is available through OCI Generative AI service using a Fingerprint based authentication.
Step 1: Click on LLM management on the left side navigation menu.
Step 2: Click on Add configuration button placed on the top-right corner.
Step 3: A form will open, under Model type pick Embedding model.
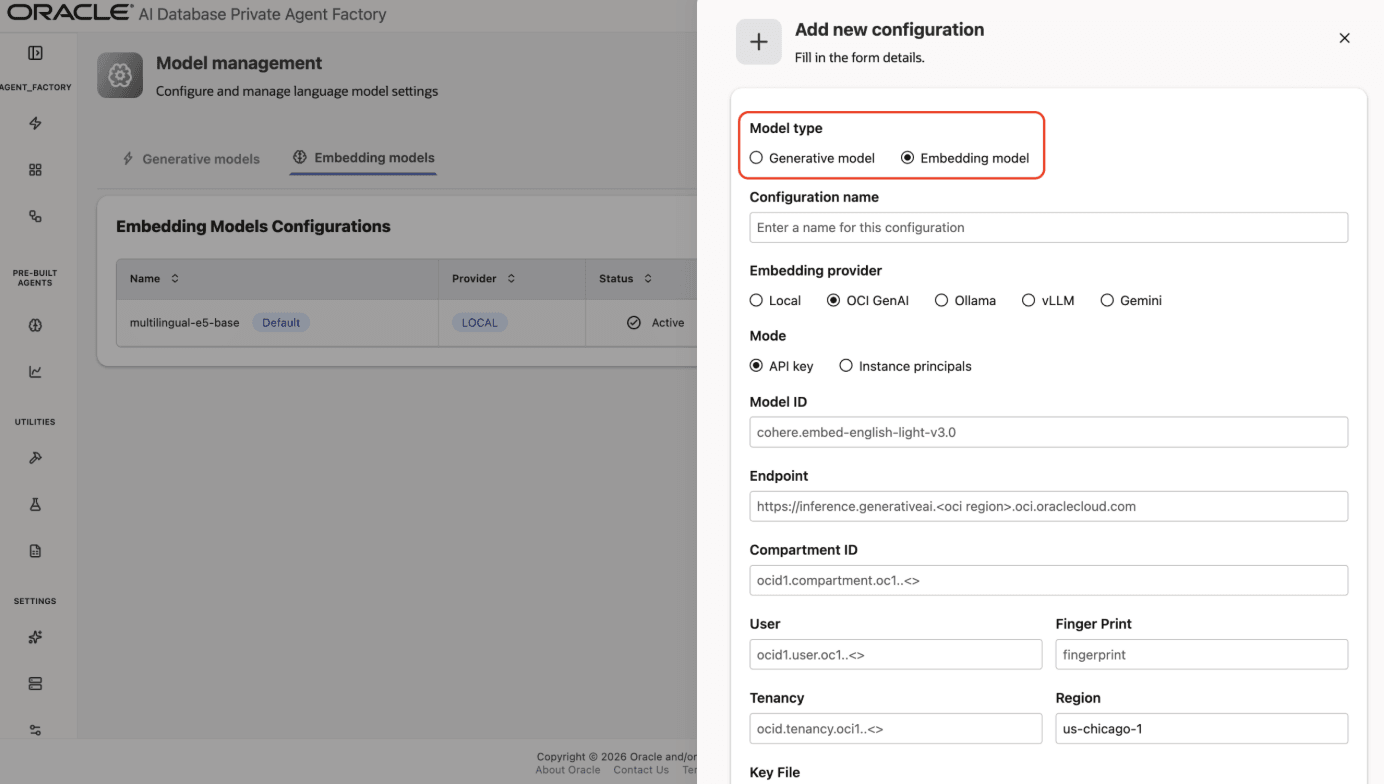
Step 4: Give your configuration a name, avoid using whitespaces since they are not allowed.
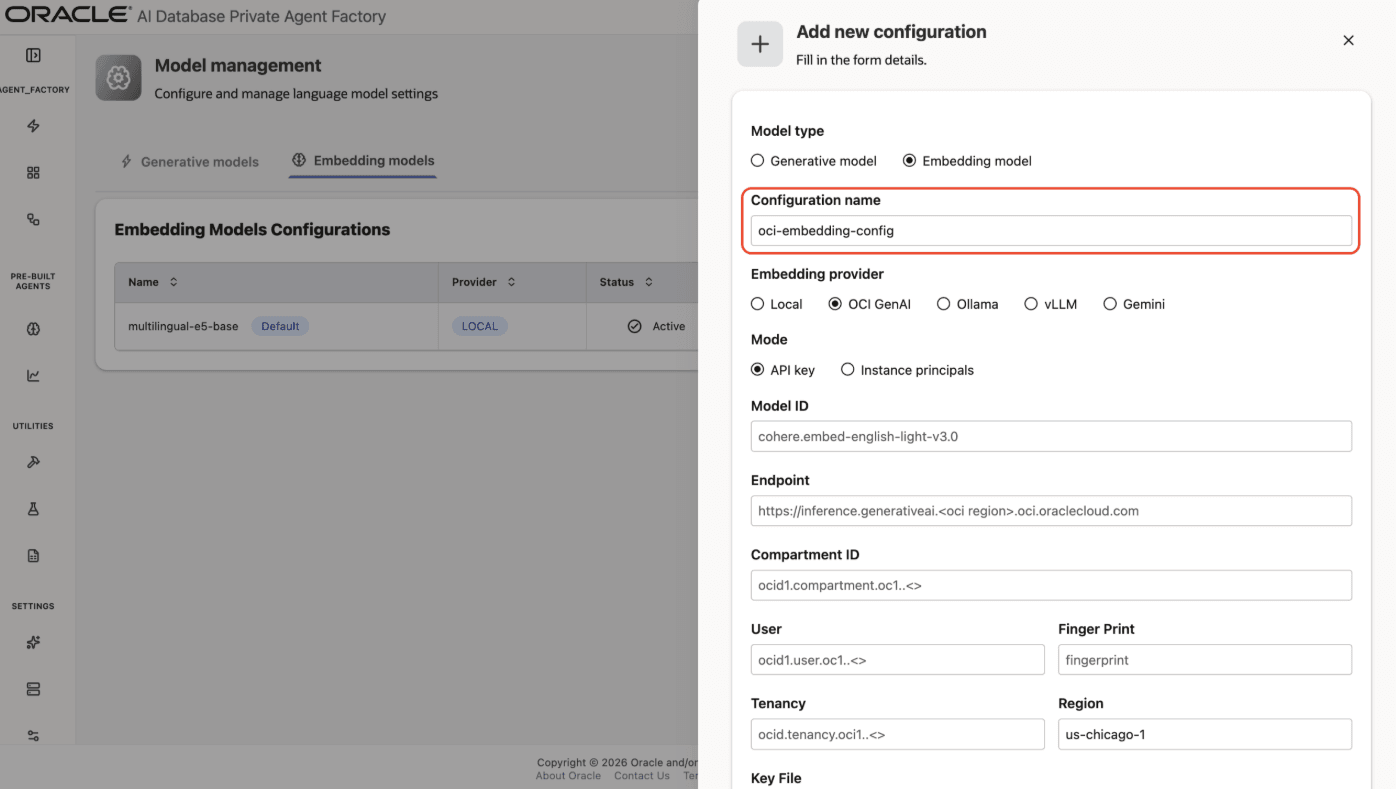
Step 5: Pick OCI GenAI as Embedding provider.
Step 6: For Mode, choose API Key if you have a secret token and want to use it to access the LLM. See API Keys. Choose Instance principals otherwise.
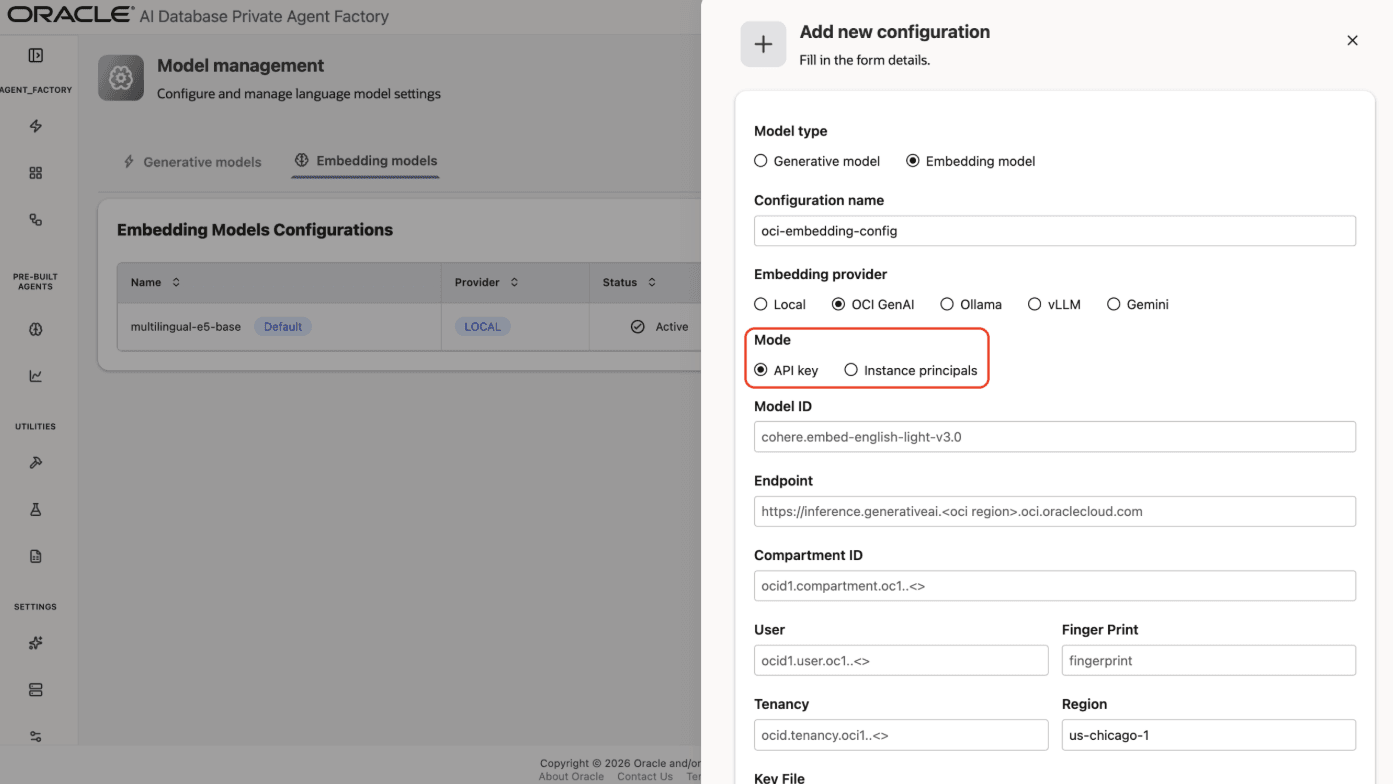
Step 7: Enter cohere.embed-v4.0 as Model ID.
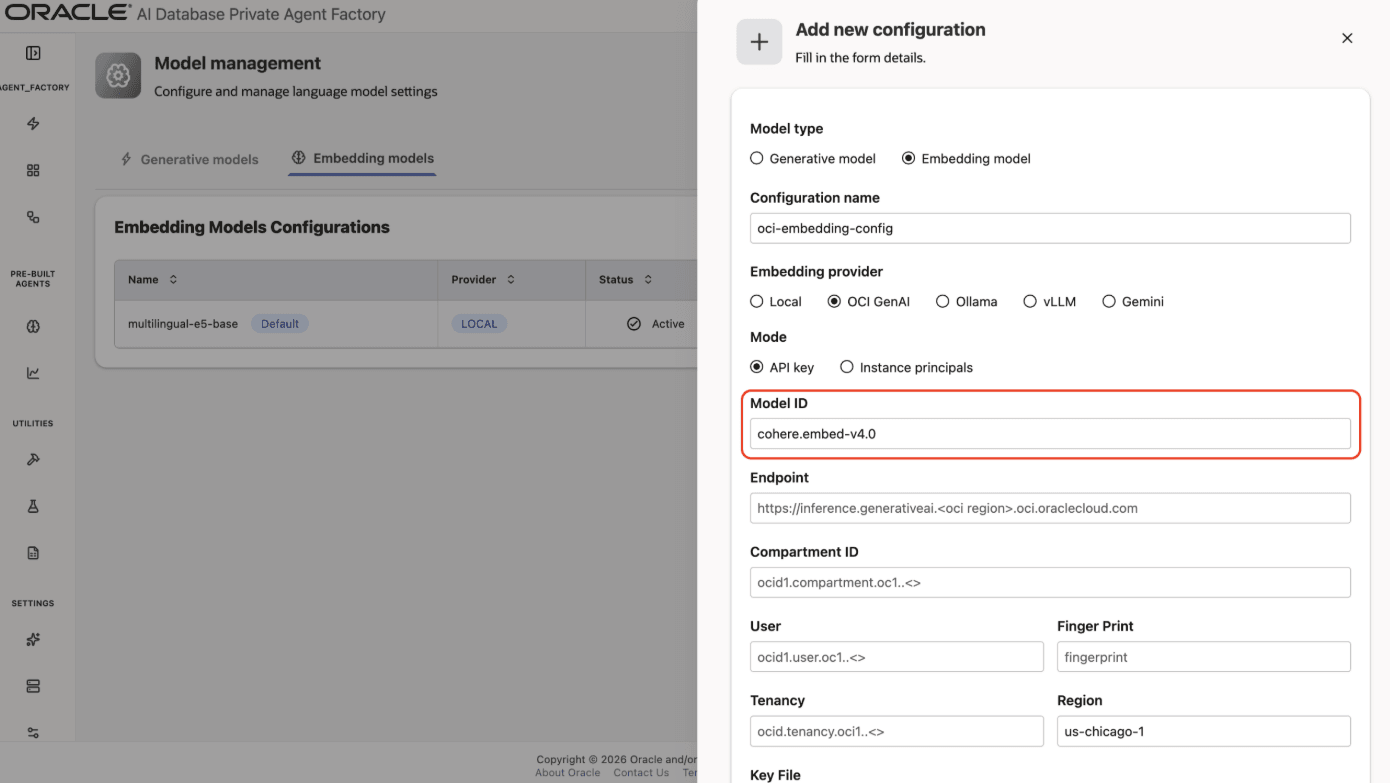
Step 8: Fill in Endpoint and Compartment ID.
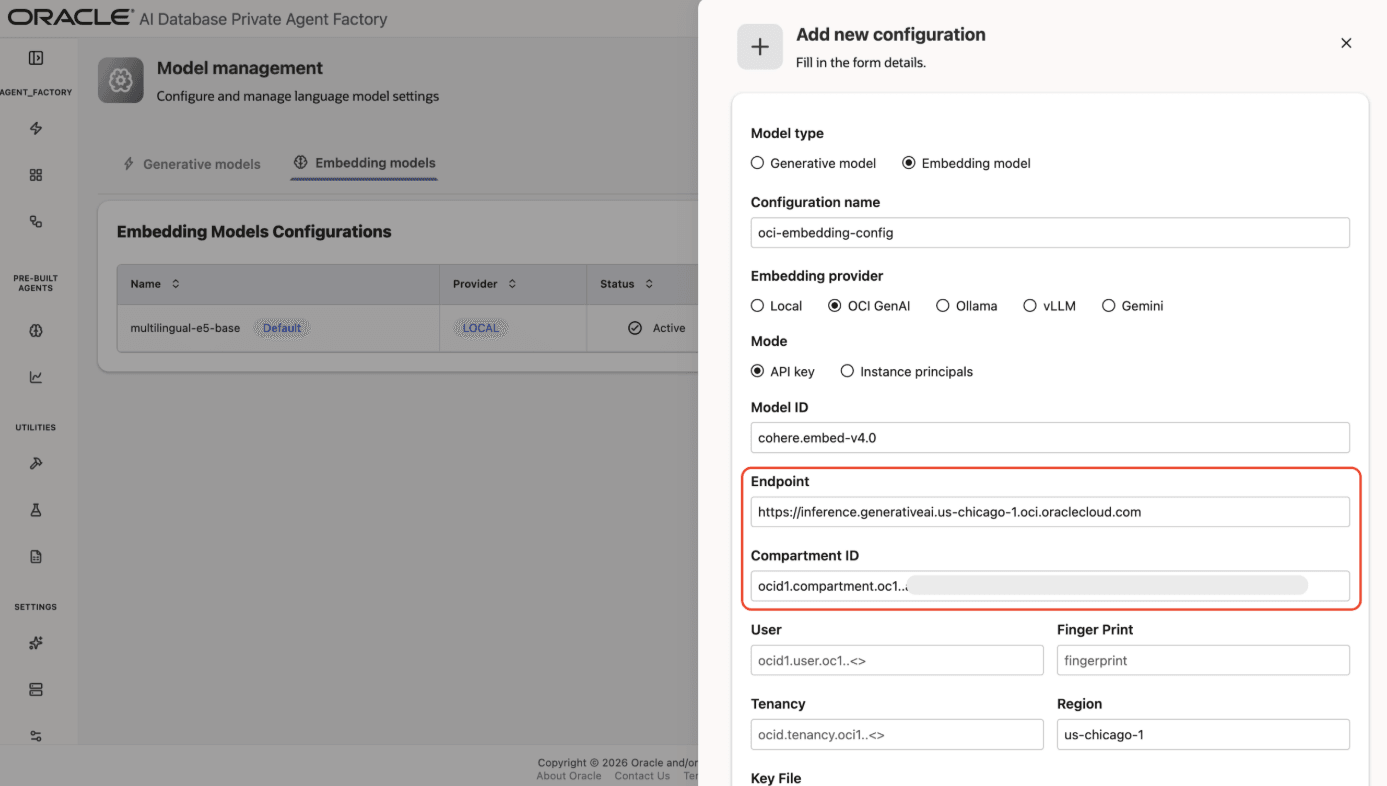
Step 9: If you chose API Key mode in Step 6, fill User, Tenancy, Finger Print, and Region fields with your own credentials from OCI Generative AI Service. Upload your private API key file under Key File. You can request it from your tenancy owner or by logging into your tenancy with your user. See Set Up API Authentication for OCI.
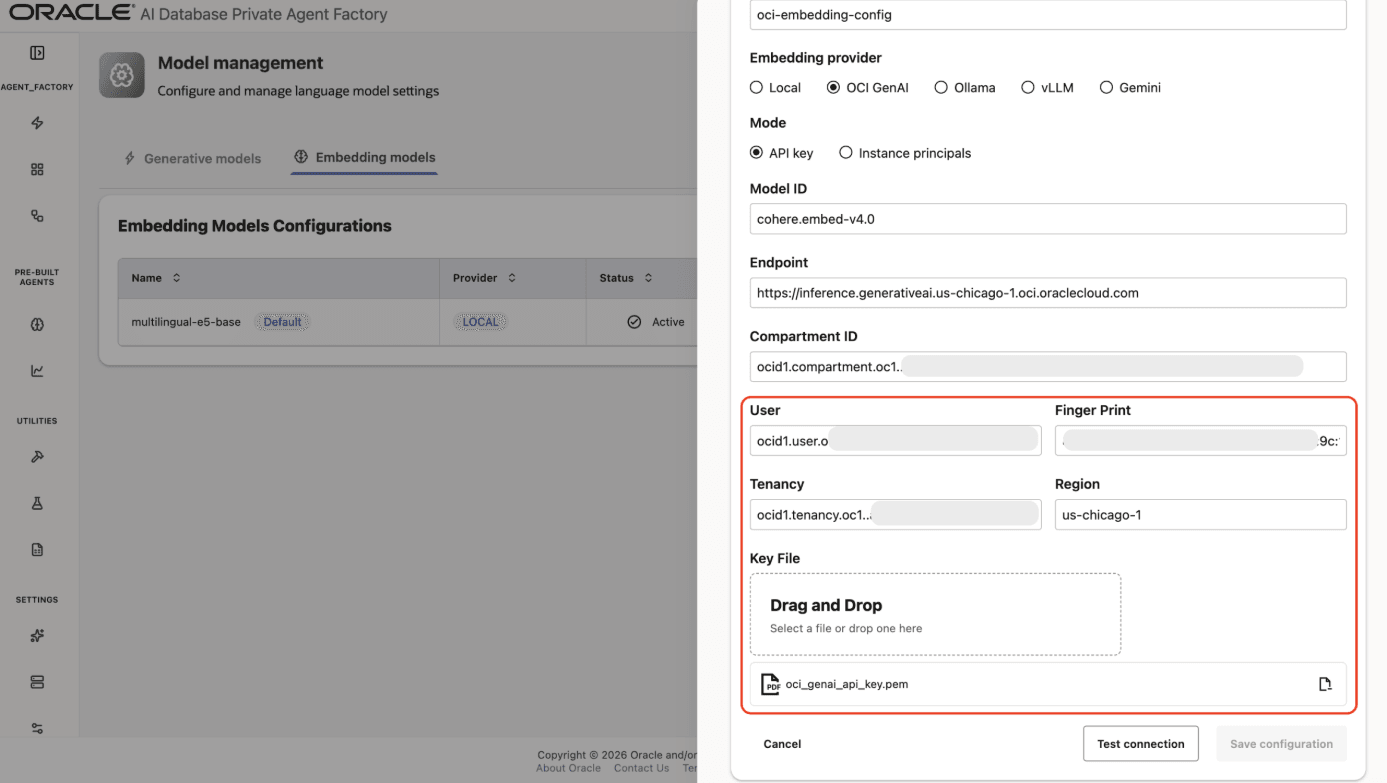
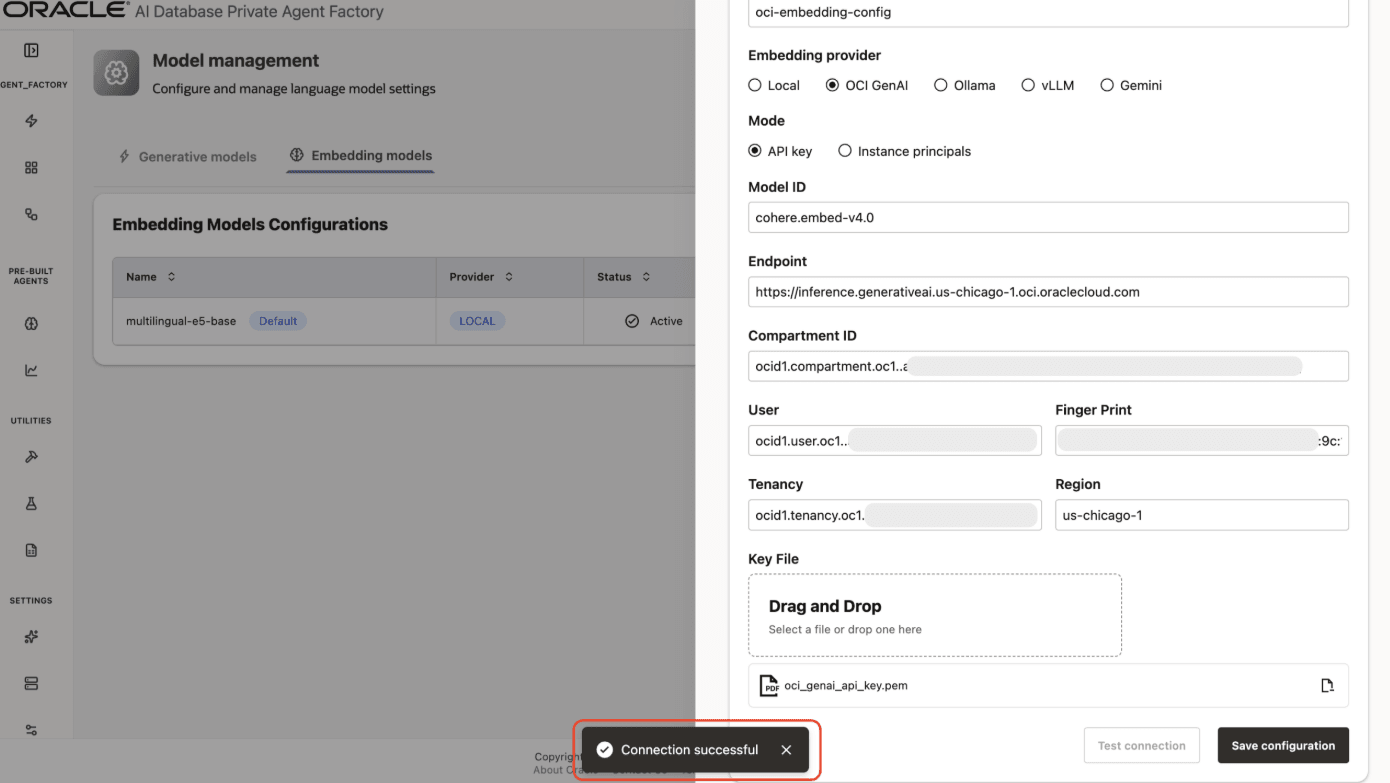
Step 10: Click on Test connection to validate the credentials are correct.
Step 11: A success message “Connection successful” will appear on screen and the Save Configuration button will be enabled, click on it to finalize the process.
vLLM/Ollama
You can connect to any self-hosted model endpoint.
These are the required fields you need to configure a vLLM:
- Model ID: The model identifier/path that the vLLM server is serving (often a filesystem path or a registry-style name).
- URL: Host/DNS clients use to reach the server.
- Port: The port where the HTTP service is exposed.
Gemini
The following Gemini embedding model IDs are examples commonly used with Agent Factory when available in your Google project and region:
gemini-embedding-001text-embedding-004text-multilingual-embedding-002text-embedding-005textembedding-gecko@003textembedding-gecko-multilingual@001
Adding Gemini Embedding Model to Agent Factory
You can configure Gemini Embedding Model in Agent Factory using the following authentication methods:
- Google Service Account Authentication
- API Key authentication
Authentication Compatibility Notice: Knowledge Agent supports both Gemini authentication methods: Service Account (JSON) and API key authentication. However, Agent Builder and other prebuilt agents currently support only Gemini API key authentication. If you plan to use Agent Builder or any prebuilt agents, please ensure your Gemini configuration is created using the API key authentication method.
Configuring Gemini Embedding Model (Google Service Account Authentication)
Prerequisites:
Before creating a Gemini configuration ensure:
- A Google Cloud Project exists.
- Gemini (Vertex AI) API is enabled in that project.
- A Service Account has been created.
- A JSON key file has been generated and downloaded securely.
See Google Cloud Service Account Setup Guide for detailed instructions on how to create and configure a Service Account.
Steps to Create a Gemini Embedding Configuration Using Service Account Authentication:
Step 1: Go to Model Management from the left navigation menu.
Step 2: Click on Add configuration button placed on the top-right corner.
Step 3: A form will open, under Model type pick Embedding model.
Step 4: Give your LLM configuration a preferred name under Configuration name, avoid whitespaces since they are not allowed.
Step 5: From list of LLM providers pick Gemini.
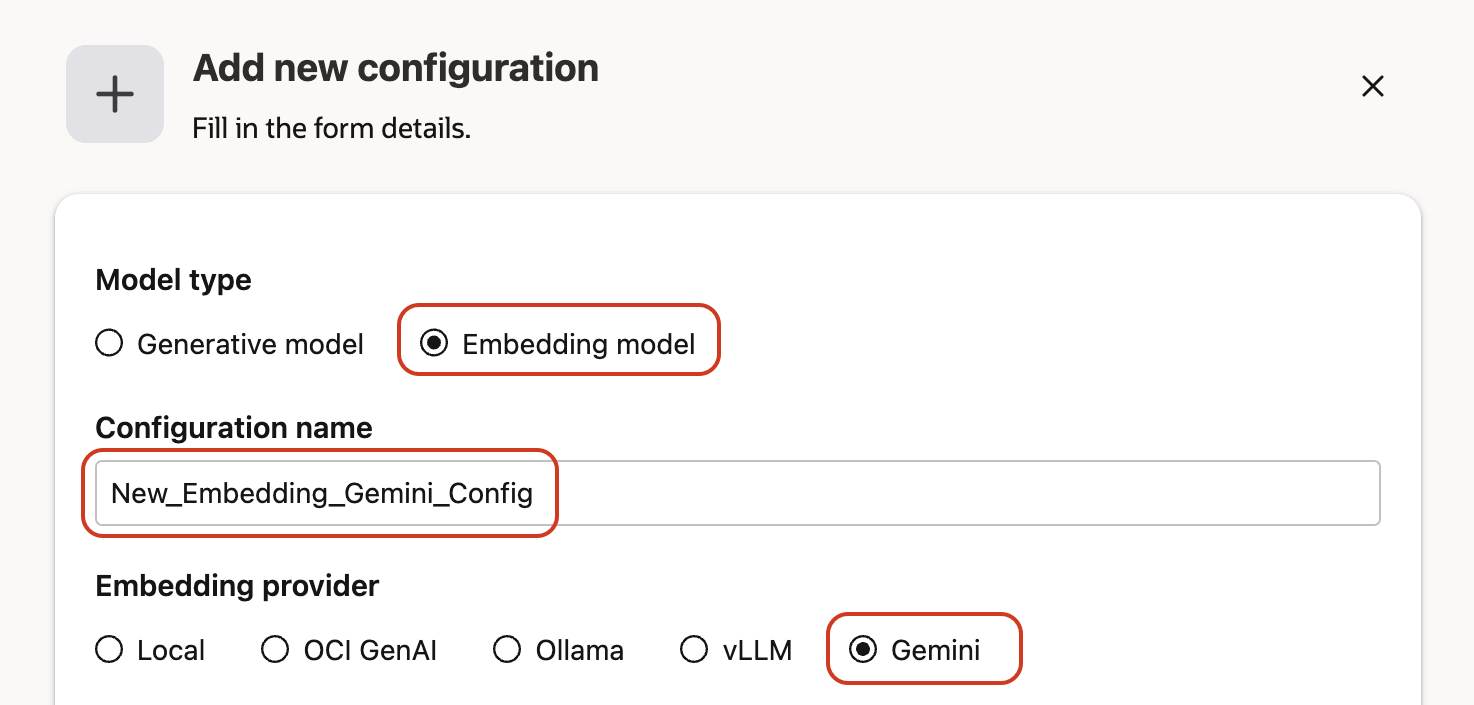
Step 6: Select from authentication method the Service account option.
Step 7: Enter the Model ID.
Recommended Gemini embedding models:
gemini-embedding-001text-embedding-004text-multilingual-embedding-002text-embedding-005
Step 8: Enter the Region.
Most commonly used regions:
- us-central1
- us-east1
- europe-west4
Step 9: Upload the Google Service Account JSON file.
Upload the JSON file by:
- Clicking on the Upload file component
- Or drag and drop the file into the dashed upload area
Note: The Service Account must belong to a project where Vertex AI (Gemini) is enabled.
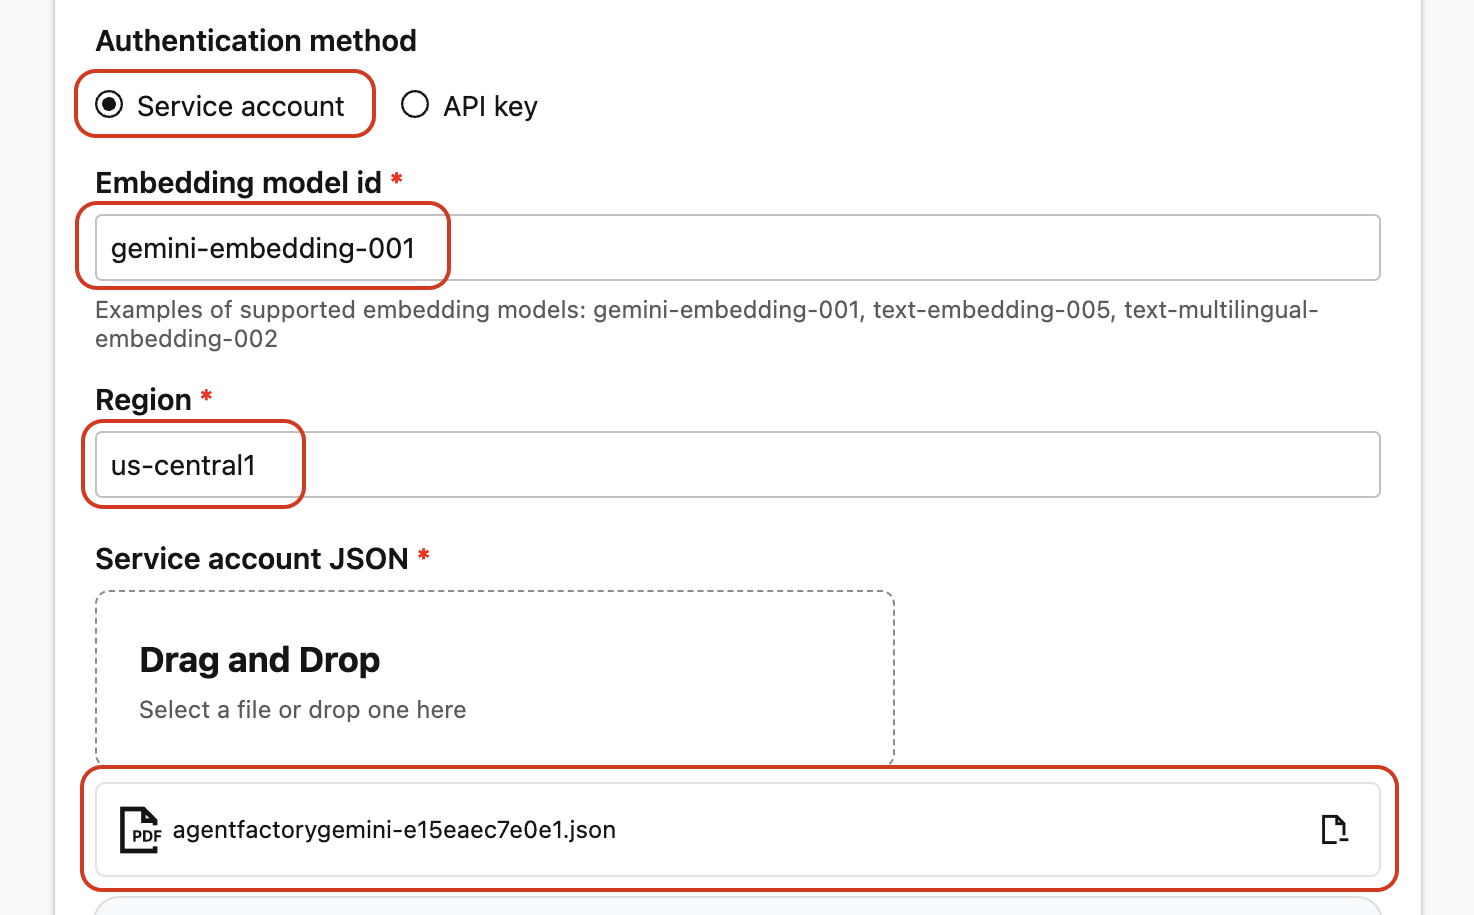
Step 10: Click on Test connection to validate the credentials are correct and connection is possible. Wait a few seconds while a validation request is sent to the Gemini LLM.
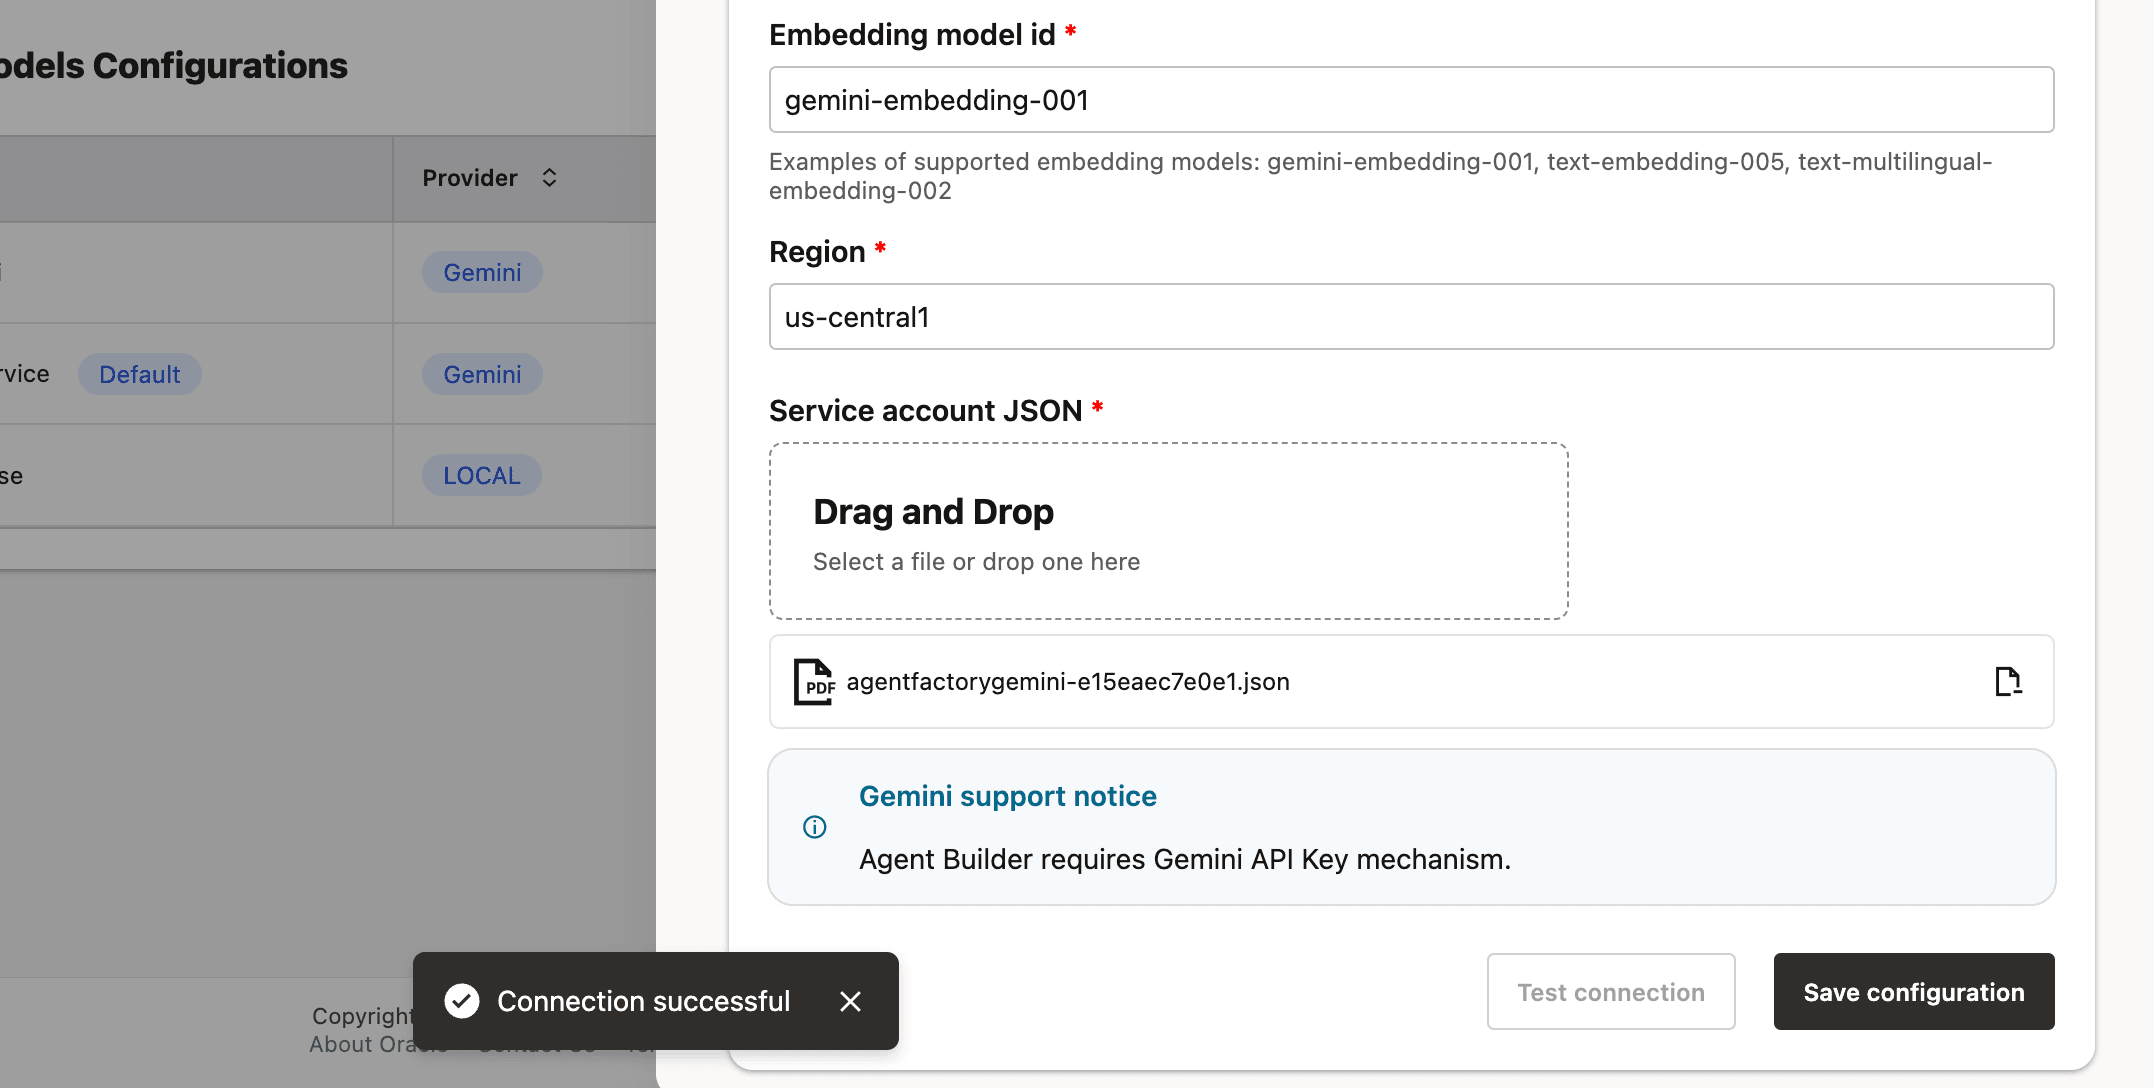
Step 11: A success message Connection successful will appear on screen and the Save Configuration button will be enabled; click on it to finalize the process.
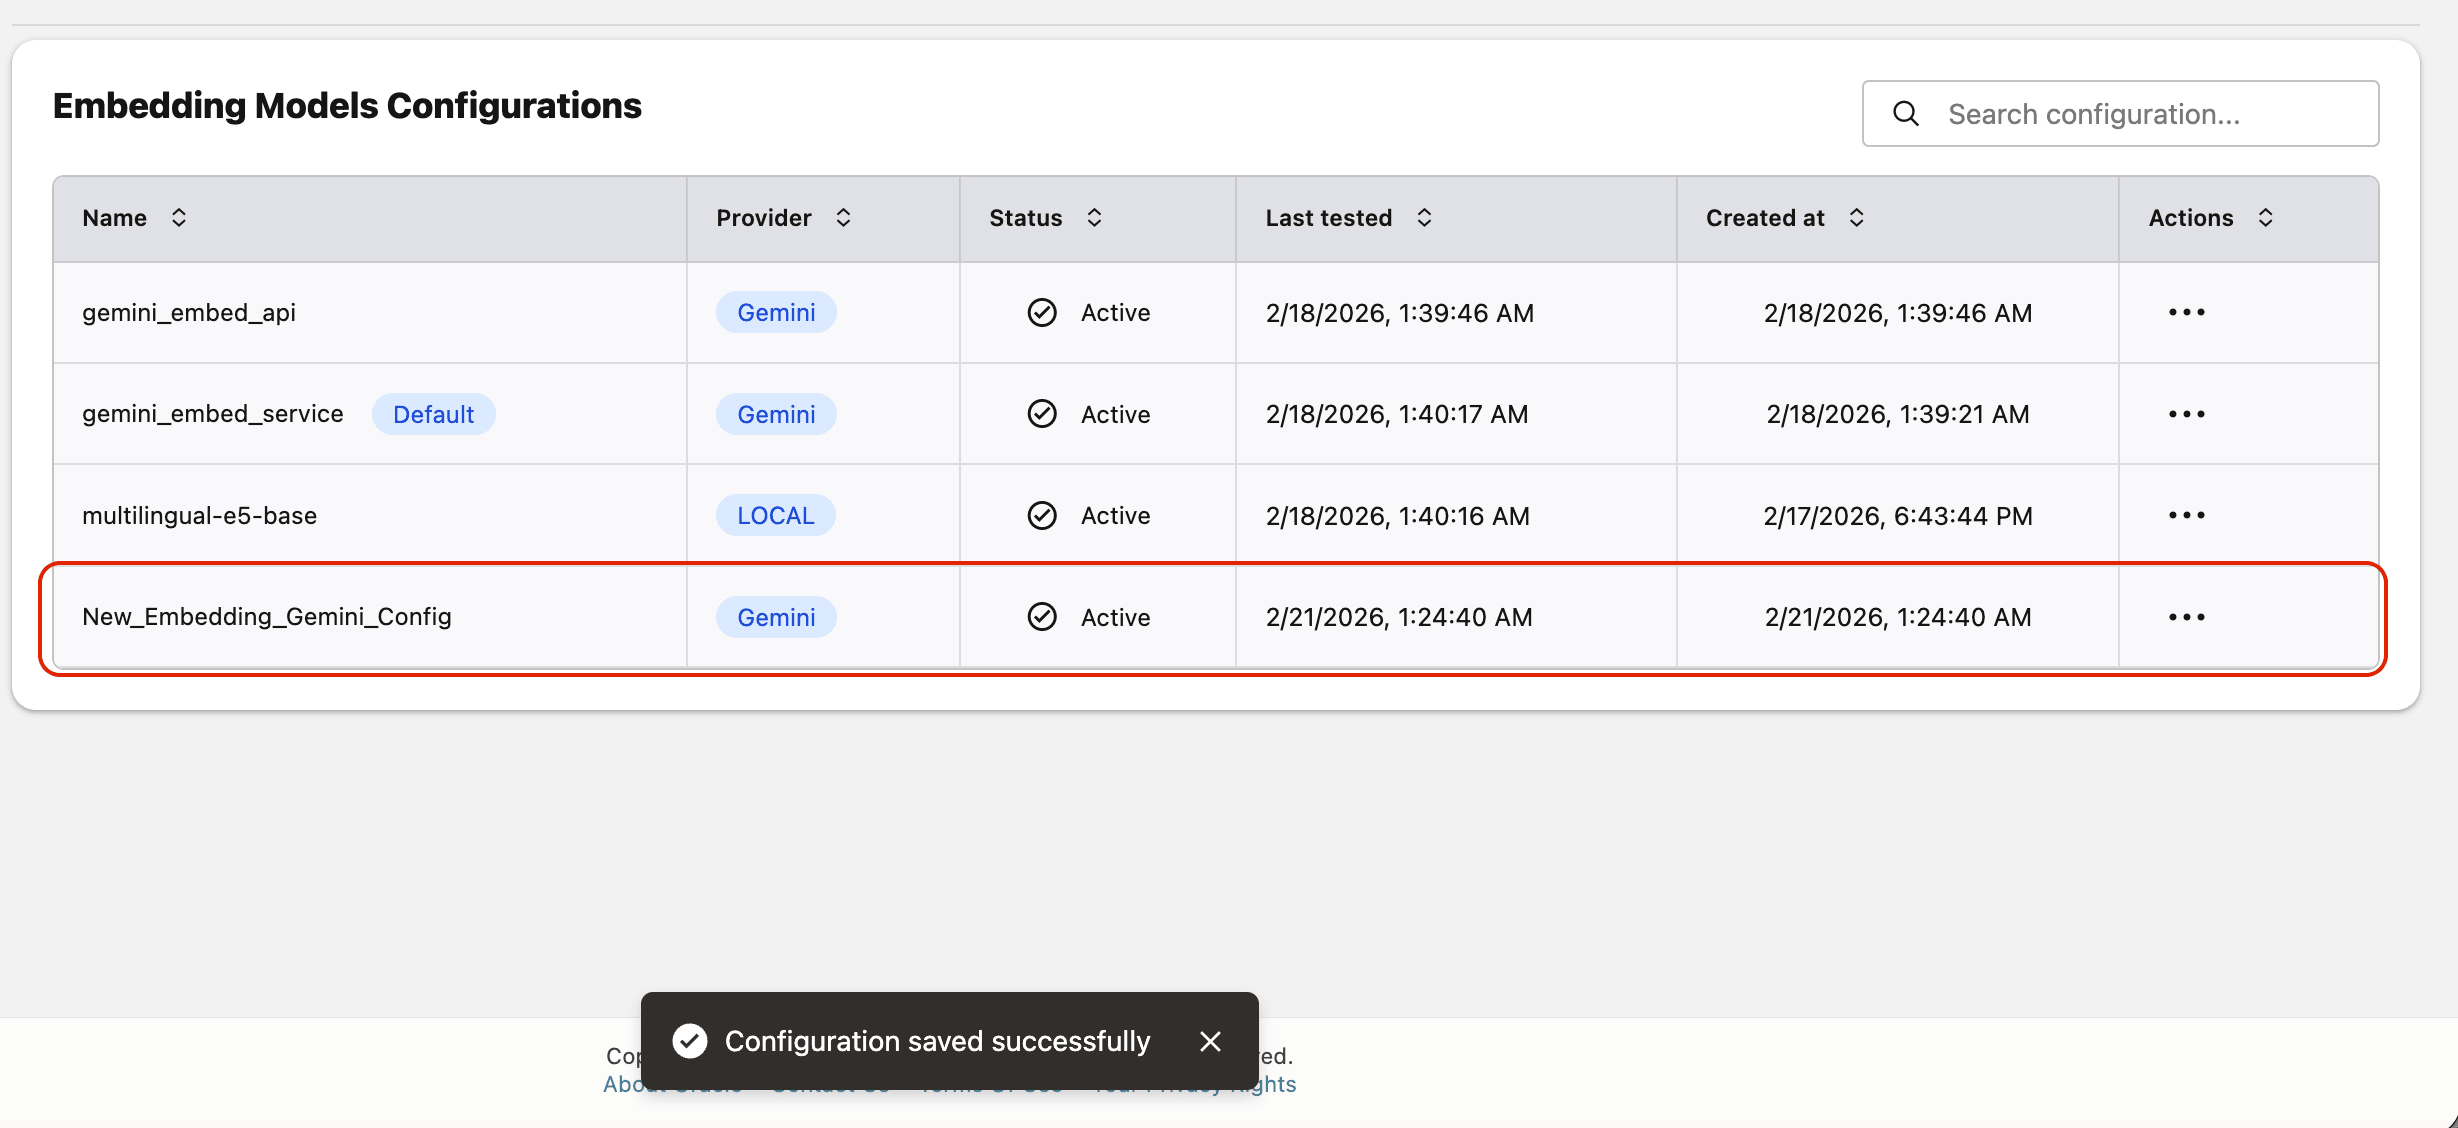
Once completed, the new configuration will appear in the LLM Configurations table.
Configuring Gemini Embedding Model (API Key Authentication)
Prerequisites:
Before configuring Gemini using API key authentication:
- A Gemini API key must be created using either:
- Google AI Studio, or
- Google Cloud Console
- The API key must belong to a Google Cloud project.
- Vertex AI (Gemini) API must be enabled for that project.
Ensure the API key is not restricted in a way that blocks requests from Agent Factory.
Steps to Create a Gemini Embedding Configuration Using API Key Authentication:
Step 1: Go to Model Management from the left navigation menu.
Step 2: Click on Add configuration button placed on the top-right corner.
Step 3: A form will open, under Model type pick Embedding model.
Step 4: Give your LLM configuration a preferred name under Configuration name, avoid whitespaces since they are not allowed.
Step 5: From list of LLM providers pick Gemini.
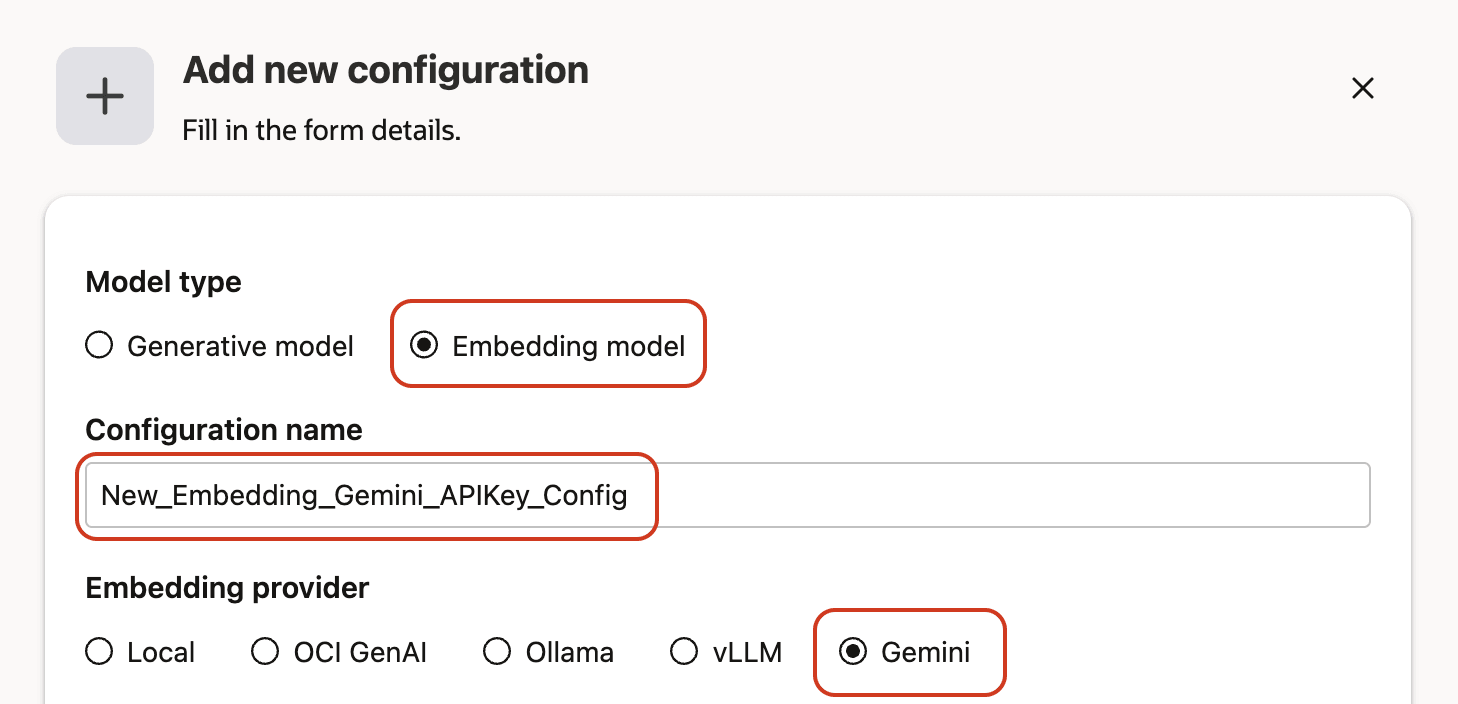
Step 6: Select from authentication method the API Key option.
Step 7: Enter the Model ID
Recommended Gemini embedding models:
gemini-embedding-001text-embedding-005text-multilingual-embedding-002text-embedding-005
Step 8: Paste your Gemini API key into the field provided.
Step 9: Click on Test connection to validate the credentials are correct and request runs embedding.
Wait a few seconds while embedding validation request runs.
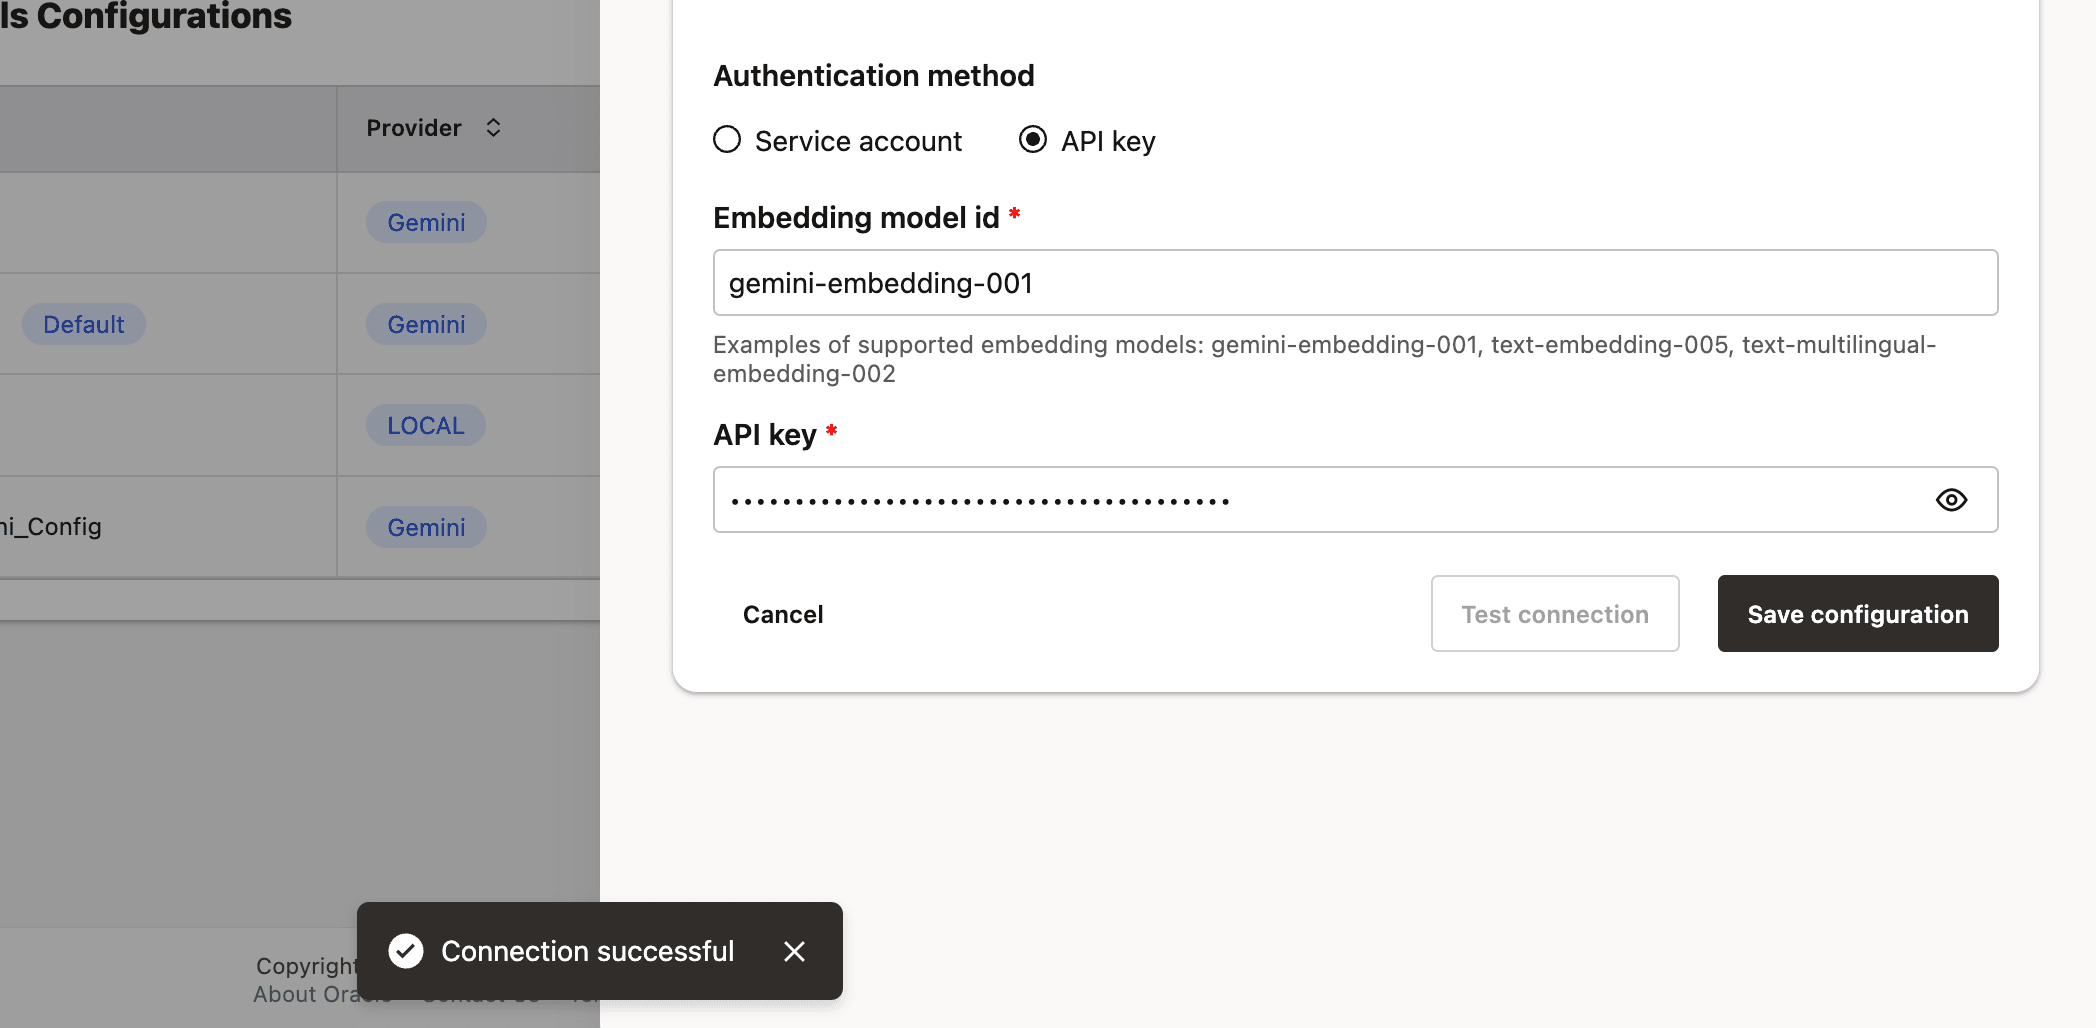
Step 10: A success message Connection successful will appear on screen and the Save Configuration button will be enabled, click on it to finalize the process.
Once completed, the new configuration will appear in the Embedding Configurations table.