- App Builder User's Guide
- Developing Reports
- Managing Cards
- Using Actions to Link from a Cards Page
8.5.6 Using Actions to Link from a Cards Page
Create actions to link from a cards page.
To create an action:
- View the Cards page in Page Designer:
- On the Workspace home page, click the App Builder icon.
- Select an application.
- Select the Cards page.
Page Designer appears. - Add an action:
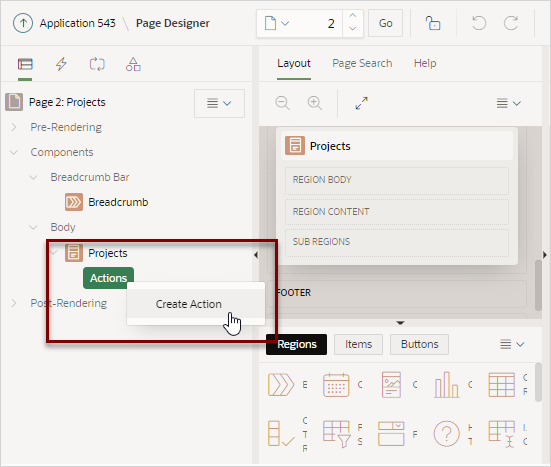
- In the Rendering tab under Content Body, locate the cards region.
- Under the cards region, right-click Actions and
select Create Action.
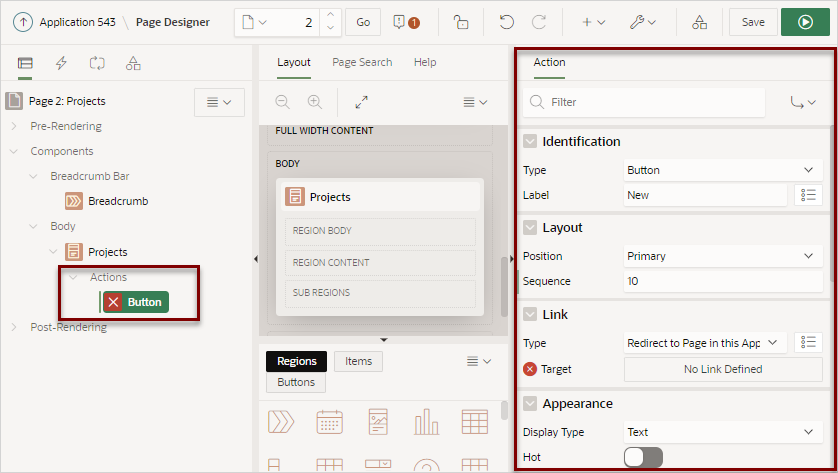
A new Action appears and the Action tab displays in Property Editor.
Edit the action in the Property Editor (right pane).
- Identification, Type - Select the type of action to add to the card:
- Button - Adds button to the card.
- Full Card - Adds link to the full card.
- Title - Adds link to the card title.
- Subtitle - Adds link to the card subtitle.
- Media - Adds link to the card media.
You can define multiple actions of the same type. However, only button actions are rendered multiple times. For all other action types, the first TRUE display condition gets rendered, and the rest are ignored. If defining multiple action, add a display condition based on the column value and set it to check for each row. - Identification, Label - (Button only) Enter the text to display on the button. If button display type is icon, this text becomes the ALT text for the icon image.
- Define the Link:
- Link, Type - Select the action to be performed when the specified
action type is clicked. Options include:
- Redirect to Page in this Application - Redirect to a page in the current application, with optional additional attributes for resetting pagination, setting the request value, clearing cache and setting item values, on the target page.
- Redirect to Page in a different Application - Redirect to a page in a different application, with optional additional attributes for resetting pagination, setting the request value, clearing cache and setting item values, on the target page.
Tip:
Redirecting to a page in different application relies on deep linking being enabled in the target application. To enable deep linking, go to the application's Security attributes and enable Deep Linking. See Configuring Security Attributes.
- Redirect to URL - Redirect to the target URL you specify.
- Link, Target - Click No Link Defined.The Link Builder Target dialog appears. The attributes that display differs depending upon the Link Type. When redirecting to a page, the following attributes appear:
- Target, Page - Enter a page number or page alias, or select the page number from the select list.
- Set Items, Name - Enter or select page items (for example,
P3_ID), application items (for example,LAST_PAGE) or interactive report filters (for example,IR_EMPNO) to be set into session state. - Set Items, Value - Enter or select a report column (for example
,&ID.), enter an application or page item (for example,&P2_EMPNO.), or enter a static value (for example,2). - Clears/Reset, Clear Cache - Enter a comma-delimited list of page numbers (for example,
2,3), items (for example,P3_EMPNO,LAST_PAGE), and report settings to be cleared. To reset pagination for a report enterRP. To clear or reset interactive report settings enterCRorRR. -
Action - Select None, Clear Regions, Reset Regions, or Reset Pagination.
Reset Pagination resets the pagination back to the first set of records, for reports on the target page. This has the same affect as passing RP in Clear Cache.
- Advanced: Request - Enter the request to be used.
- Click OK to save your changes and exit the dialog.
- Link, Type - Select the action to be performed when the specified
action type is clicked. Options include:
- Server Side Condition, Type - Select a condition type that must be met in order
for this component to be rendered or processed.
If you refer to Columns in your condition, you must specify For Each Row in order for the condition to be evaluated for each card. Otherwise, set to Once to evaluate the validations one time for the region.
- Click Save or Save and Run
Page.The Cards page loads.
- Click a project to view the Maintain Project form.
Parent topic: Managing Cards

