Managing Pivot Reports
Pivot reports transpose rows into columns to generate results in a crosstab format.
Select pivot columns and rows and then provide the functions to be represented in the pivot report. Once created, pivot reports display a new icon in the search bar.
Creating a Pivot Report
Create a pivot report by opening the Pivot dialog from the Actions menu.
To create a pivot report:
-
Click the Actions menu and select Pivot.
The Pivot dialog appears.
-
In the Pivot dialog:
-
Pivot Columns - Select the columns to display (for example, Status). To add additional columns, click Add Pivot Column.
-
Row Columns - Select the rows to display (for example, Project). To add additional columns, click Add Row Column.
-
Functions:
-
Select a function, column, label, and format mask.
-
To create a sum, click the Sum check box (optional).
-
-
Click Apply.
-
The Search Bar now contains at least two icons, including Report and Pivot. Select these icons to toggle between the report view and the pivot view.
The following example shows a Pivot report that displays the number of closed, on-hold, open, and pending tasks associated with each project.
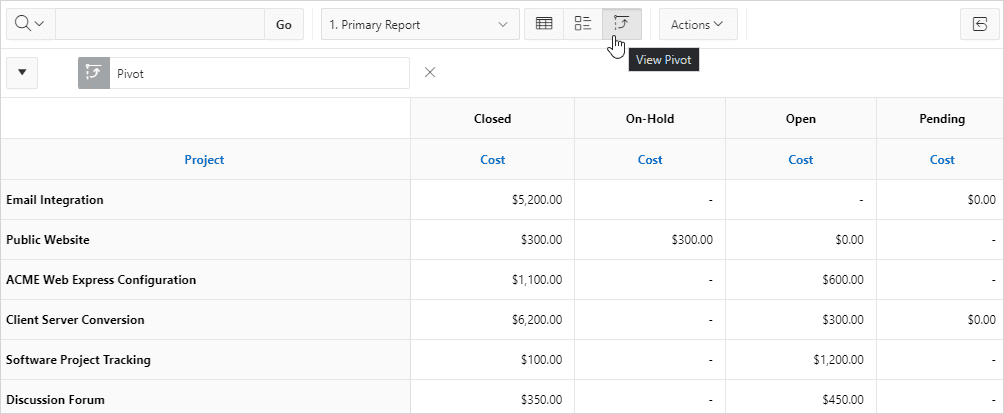
Description of the illustration ir_pivot.png
Editing a Pivot Report
Edit a pivot report by clicking the Edit Pivot filter in an interactive report and opening the Pivot dialog.
To edit a pivot report:
-
Click the Pivot filter in the Report Settings area above the report.
The Pivot dialog appears.
-
Edit the attributes.
-
To remove a previously defined column or row, select the default setting, Select Pivot Column and Select Row Column.
-
Click Apply.
Deleting a Pivot Report
Remove a pivot report from an interactive report in the Pivot dialog.
To delete a pivot report:
-
Click the Pivot filter in the Report Settings area above the report.
The Pivot dialog appears.
-
Click Delete.
Tip: You can also click the Remove Pivot icon to the right of the Pivot filter.