- App Builder User's Guide
- Managing Shared Components
- Managing Automations
- Creating an Automation
17.3.2 Creating an Automation
Create an automation as a Shared Component on the Automations page.
The following example demonstrates how to create an
automation that runs every two hours. This automation increases the
salary (SAL) of salesmen. For each salesman
(SALESMAN) with a commission
(COMM) greater than 500, the salary
(SAL) increases by 1.5%. For all other
salesman, the salary (SAL) increases by 1%.
Tip:
The examples in this section are built on the
EMP table available in the sample
dataset, EMP / DEPT. To install a sample dataset, see "Using
Sample Datasets" in Oracle Application Express SQL Workshop Guide.
- Create a new application.
- Navigate to the Automations page:
- On the Workspace home page, click App Builder.
- Select the new application.
- On the Application home page, click
Shared Components.The Shared Components page appears.
- Under Application Logic, select Automations.
The Automations page appears. - To create an automation, click
Create.
The Create Automations Wizard appears.
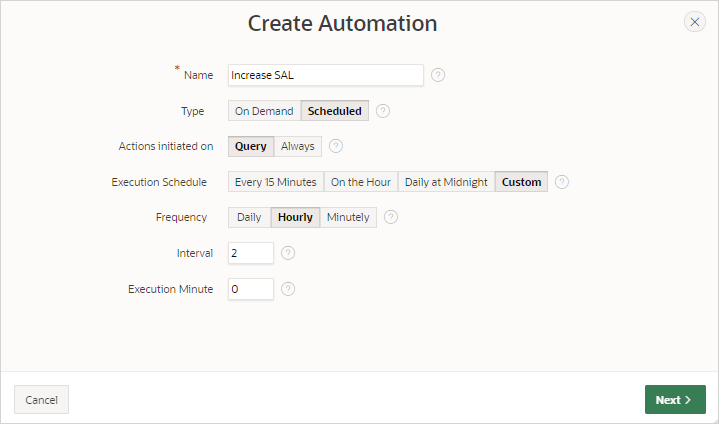
- Specify the automation name and define the execution
schedule:
- Name - Enter a name for the new Automation. For
example,
Increase SAL. - Type - Select an automation type. Select
Scheduled.
Scheduled executes automatically based on the selected frequency. On Demand executes when called explicitly using the
APEX_AUTOMATIONpackage. - Actions initiated on - Select
Query.
This option determines whether the execution of Automation Actions should be initiated based on a Query (that is, the rows returned can then be used by the actions), or if the actions should Always be executed..
- Execution Schedule - Select an execution
schedule for the new automation. Select
Custom. The Frequency, Interval, Execution Minute attributes only display if Execution Schedule is set to Custom.
- Frequency - Specify whether the execution schedule should be based on a daily, hourly or minutely basis. Select Hourly.
- Interval - Enter
2so that automation executes every 2 hours. - Execution Minute - Specify the execution
minute, from 0 to 59. Leave this to the default,
0.The Create Automation Wizard should resemble the following illustration.
- Click Next.
- Name - Enter a name for the new Automation. For
example,
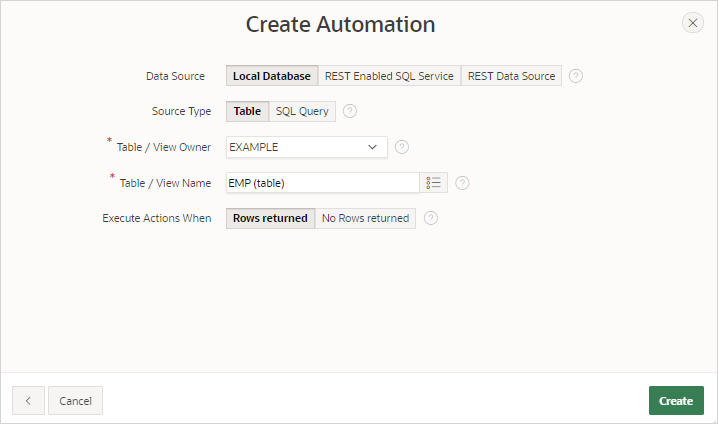
- Define the source:This example is based on the local table,
EMP.- Data Source - Select the data source for this automation. Select Local Database.
- Source Type - Select Table.
- Table/View Owner - Select the owner of the table on which you are basing this automation.
- Table/View Name - Select the table or view on which the automation will be based. For this example, select EMP (table).
- Execute Action When - This option determines if
Automation Actions should execute when the query
returns rows, or when the query does not return
rows. Select Rows
returned.
The Create Automation Wizard should resemble the following illustration.
- Click Create.
The automation edit page appears. The following message displays at the top of the page:
Automation has been
                                                  created and is in "Disabled" state. Now create
                                                  Actions to execute when the automation
                                                  runs.
- Edit the action for the first salary increase:
- Scroll down to
Actions.Note that the wizard created an action, named New Action.
- Edit the new action, New
Action:
-
Click the Edit icon adjacent to New Action.
The Edit Action page appears.
-
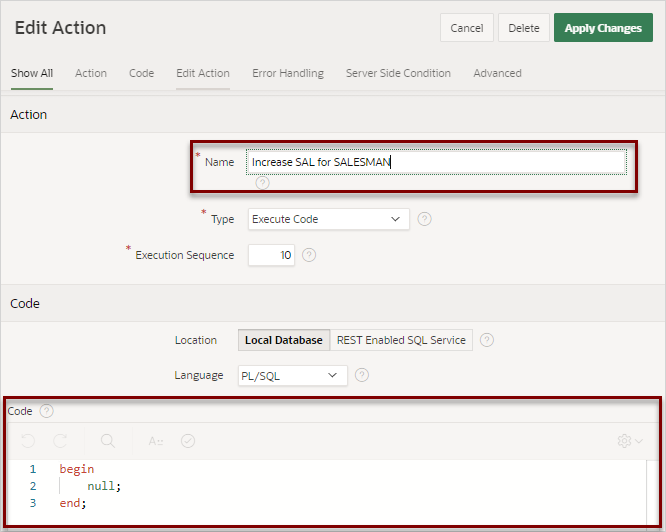
Name - Enter a meaningful name such as
Increase SAL for SALESMAN.The Edit Action page should resemble the following illustration.
-
Code - Add code for the first salary (SAL) increase.
begin
update emp set sal = round(sal * 1.015, 1) where empno = :EMPNO;
apex_automation.log_info('SAL for ' || :ENAME || ' increased.');
end;
Note that the code will run on each row. In this example, each
SQL
                                                  UPDATE
statement works on a single row based on theEMPNOprimary key column. Also note the use of theAPEX_AUTOMATION.LOG_INFOprocedure . TheLOG_INFOprocedure writes a message with the "Information" level to the Execution Log for the automation. Available message levels as "Information" are "Warning" and "Error".
-
- Server Side Condition - Create a server side
condition for the salary increase.
-
Server Side Condition, Condition Type - Select Expression.
-
Language - Select PL/SQL.
-
Expression 1- Enter an expression to only execute the action when the salesman (SALESMAN) has a commission (COMM) of more than 500. Enter:
:JOB = 'SALESMAN' and :COM > 500 -
Execute for Each Row - Enable this option to specify the condition execute for each row.
-
- Click Apply Changes.
- Scroll down to
Actions.
- Create another action the second salary increase:
- Scroll down to Actions
again and click Add
Action.The Edit Action page appears.
- Edit the new action:
-
Name - Enter a meaningful name such as
Increase SAL for all
                                                  others
. -
Code - Update the code to increase the salary (SAL) for all other salesman.
begin
update emp set sal = round(sal * 1.01, 1) where empno = :EMPNO;
apex_automation.log_info('SAL for ' || :ENAME || ' increased by 1%.');
end;
-
- Server Side Condition - Create a server side
condition for the salary increase.
-
Condition Type - Select Expression.
-
Language - Select PL/SQL.
-
Expression - Enter an expression to only execute this action when the salesman (SALESMAN) has a commission (COMM) is less than or equal to 500 or null.
:JOB != 'SALESMAN' and :COM <= 500 or :COMM is null -
Execute for Each Row - Enable this option to specify the condition execute for each row.
-
- Click Create.
- Scroll down to Actions
again and click Add
Action.
- Run the automation. On the Automation Edit page, click
Save and Run.
When you click Save and Run. the automations execute in the background. Note that the browser displays again immediately even if the actions are still running.
The following message appears:
Changes applied. Automation Execution initiated. - Review the Automation Execution Log:
- Return to the Automations page by clicking the Automations breadcrumb.
- Click the Execution Log tab and verify the automation executed.
- Click the link under
Messages to view individual
messages for processed rows.
Tip:
You can also view the target table in SQL Workshop, Object Browser to validate that the automation is actually changing the data. See "Browsing a Table" in Oracle Application Express SQL Workshop Guide.
- Clear the Automation Execution Log:
- On the Execution Log page, click
Purge Log.The Clear Automation Log dialog appears.
- In the Clear Automation Log dialog:
-
From the Automation list, select the Automation (for example, Increase Sal).
-
Click Clear Log.
-
- On the Execution Log page, click
Purge Log.
- Update the automation Settings to enable the schedule:
- Return to the Automations page by clicking Automations breadcrumb.
- Select the name of the automation to be edited. For example, select Increase SAL.
- Settings,
Schedule Expression - Click
Schedule Builder to right
of the Schedule Expression field and update the
following:
-
Frequency - Select Weekly.
-
Interval - Accept the default,
1. -
Execution Day - Select Mon, Tue, Wed, Thu, and Fri.
-
Execution Hour - Enter
14. -
Execution Minutes - Enter 30.
-
Click Set Execution Interval.
In the previous example, the automation execution would be due every working day at 2:30pm. The automation scheduler runs in the time zone of the database server.
-
- Schedule Status - Select Active.
- To save your edits, click Save Changes.
See Also:
-
"Configuring Background Jobs" in Oracle Application Express Administration Guide
-
"APEX_AUTOMATION" package in Oracle Application Express API Reference
Parent topic: Managing Automations


