17.3.7.2 Creating a Chart Using a REST Enabled SQL Reference

Create a chart on a remote database using a REST Enabled SQL reference.

Tip:

Before creating a report using a using a REST Enabled SQL reference, you must complete the tasks described in "Before You Begin: REST Enabled SQL Service Requirements" and create the reference as described in "Creating a REST Enabled SQL Service Reference."

To create a chart using a REST Enabled SQL reference:

  1. Create a REST Enabled SQL reference.
  2. Run the Create Page Wizard:
    1. Navigate to the Workspace home page.
    2. Click the App Builder icon.
    3. Select an application.
    4. On the Application home page, click Create Page.
      The Create Page Wizard appears.
  3. On Create a Page:
    1. Page Type - Select Component.
    2. Click Chart.
  4. For Chart Type, select a chart type (for example, Pie) and click Next.
  5. For Page and Region Attributes:
    1. Page Number - Select a page in which the chart object is to appear.
    2. Page Name - Specify a name for the page.
    3. Page Mode - Select a page mode. Normal presents the page as a normal Application Express application page. Modal Dialog presents the page as an overlay window positioned which remains active and focused until the end user dismisses (closes) it. The underlying page is grayed out and the end user is prevented from interacting with the rest of the page until the dialog is closed.
    4. Breadcrumb - Select whether you want to use a breadcrumb navigation control on your page, and which breadcrumb navigation control you want to use.
    5. Click Next.
  6. For Navigation Preference:
    1. Select how you want this page integrated into the Navigation Menu. To learn more, see field-level Help.
    2. Click Next.
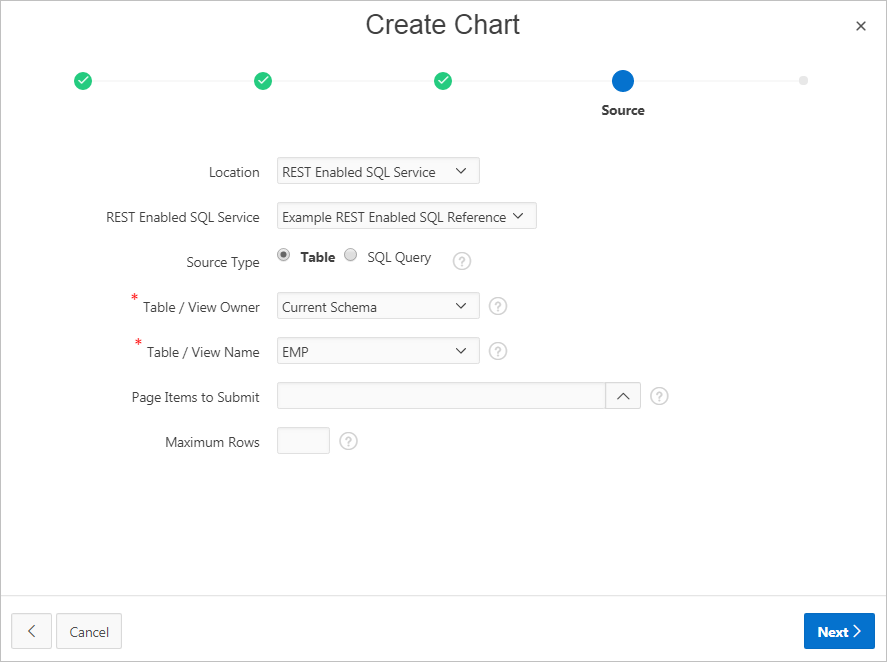
  7. On Source:
    1. Location - Select REST Enabled SQL Service.
    2. REST Enabled SQL Service - Select a previously defined reference.
    3. Source Type - Specify the source of the new page. Select either Table or SQL Query.
      The UI changes based on your selection. In the illustration that follows, the Source Type is Table. If you select, SQL Query follow the on-screen instructions.
    4. Table/View Owner - Select the owner of the table on which you are building the chart.
    5. Table/View Name - Select the table on which you are building the chart.
    6. Page Items to Submit - (Optional) Enter a comma separated list of page items on the current page to be set into session state when the chart data gets read with a separate request.
    7. Maximum Rows - (Optional) Enter the maximum number of rows you want to use to display the chart.

      For example, the next illustration shows a Source page uses a REST Enabled SQL Service reference called Example REST Enabled SQL Service Reference to define a chart on the EMP table.

      Description of rest_enabled_sql_create_chart.png follows
      Description of the illustration rest_enabled_sql_create_chart.png
    8. Click Next.
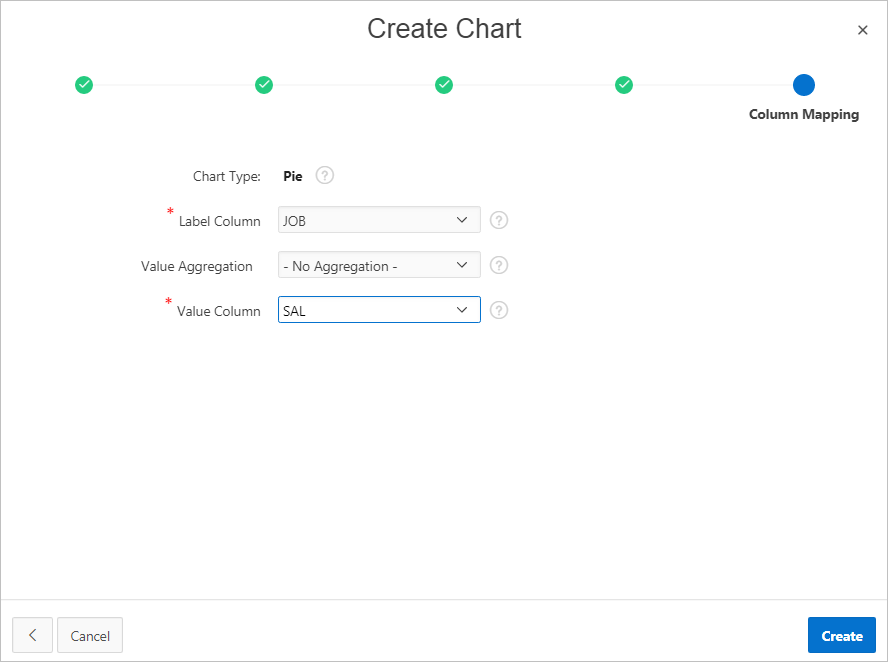
  8. On Column Mapping:

    Tip:

    The UI that appears depends upon the selected chart type.

    1. Label Column - Select the column name to be used for defining the label(s) of the x-axis on the chart. 
    2. Value Aggregation - (Optional) Select how to aggregate the chart Value Column.
    3. Value Column - Select the column name to be used for defining the value on this chart.

      For example, the next illustration shows a Column Mapping based on the Label Column, JOB, and the Value Column, SAL.

      Description of rest_enabled_sql_chart_column_map.png follows
      Description of the illustration rest_enabled_sql_chart_column_map.png
  9. Click Create.
    Page Designer appears.
  10. Click Save and Run Page to view the chart.

See Also:

"Creating Charts"