Connecting to a DB System

Oracle Base Database Service offers database systems (DB systems) on virtual machines. This topic shows how to connect to a DB system from Oracle Base Database Service using the OCI console.

DB systems are available as single-node DB systems and multi-node RAC DB systems on Oracle Cloud Infrastructure (OCI). You can manage these DB systems by using the OCI Console, the OCI API, the OCI CLI, the Database CLI (DBCLI), Enterprise Manager, or SQL Developer.
To connect to a DB System from Oracle Base Database Service using the OCI console:
  1. Go to your OCI console and on the top left, click on the Navigation menu.
  2. On the left navigation menu, click Oracle Database and then click Oracle Base Database Service. This lists the DB systems in the Oracle Base Database that you are accessing.

    Figure - Oracle Base Database Service


    Oracle Base Database Service

  3. Select your compartment on the left pane. On the right, click the DB system that you want to access.

    Figure - List of DB systems


    List of DB systems

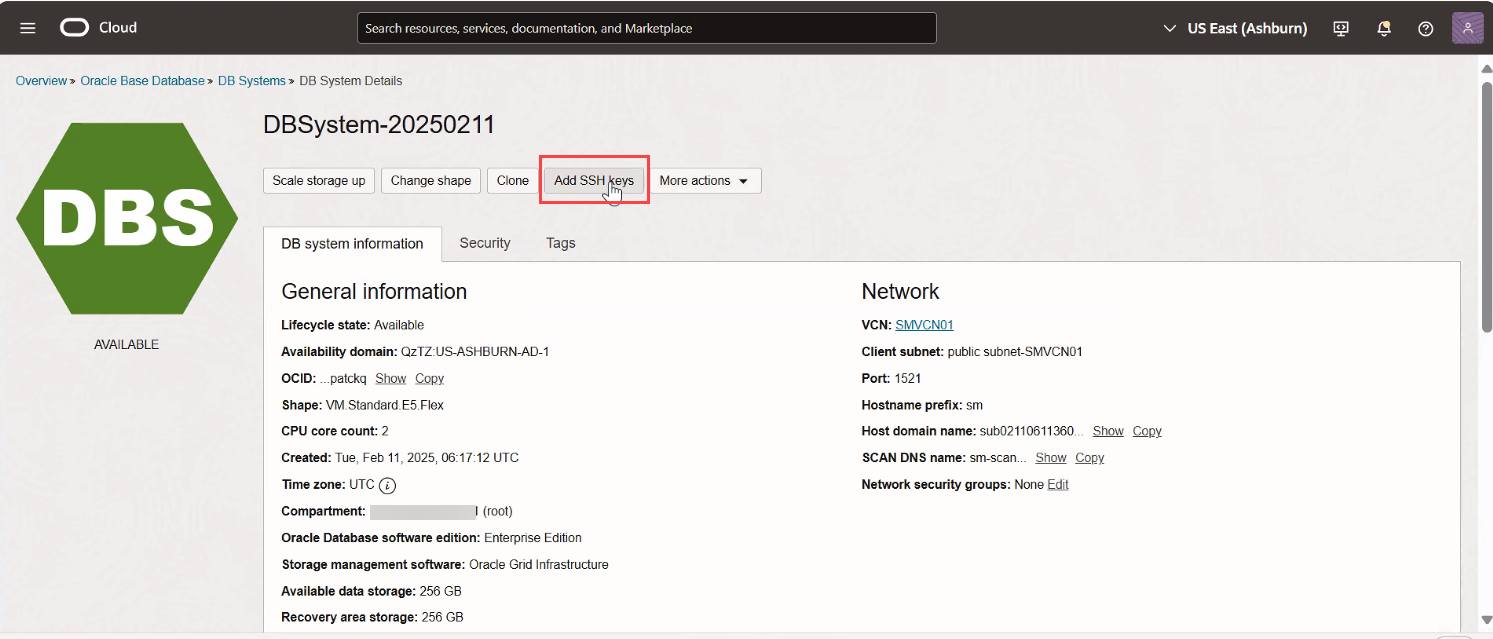
  4. The DB System information page opens. On the top, click Add SSH Keys. The Add SSH Keys pane opens.

    Figure - Add SSH Keys option on DB Systems Information page


    Add SSH Keys option on DB Systems Information page

  5. On the Add SSH Keys pane, click Generate SSH Key Pairs.

    Figure - Add SSH Keys pane


    Add SSH Keys pane

    • Generate SSH key pair: Use this option to create a new SSH key pair. Click both Save private key and Save public key when using this option. The private key is downloaded to your local machine, and should be stored in a safe location.

      Note:

      You cannot download another copy of the private key generated during this operation after completing the operation.
    • Upload SSH key files: Select this option to browse or drag and drop .pub files.
    • Paste SSH keys: Select this option to paste in individual public keys. To paste multiple keys, click + Another SSH key, and supply a single key for each entry.
  6. Click Save Changes.
  7. Now, we will import the private key that you downloaded and use PuTTY Gen for secure and passwordless authentication when connecting to the DB System using PuTTY. On PuTTy Gen, click Conversions and then click Import key. This opens the Load Private Key window.
  8. Click Browse and select the private key file that you have downloaded. Click Open.
  9. On PuTTY Gen, select SSH-1(RSA) under Parameters.

    The Save Private Key option in PuTTy Gen

  10. Click File and then click Save Private key. Once again, go to File and click Exit to close.
  11. Now, open PuTTY and under Category, click Sessions to create a new session to connect to the DB System. Enter the following:
    • Host Name (or IP Address): Type in the host name of the DB system.

      Note:

      The host name and IP address of the DB System is available on the DB System information page.
    • Connection Type: Select SSH.
    • Saved Sessions: If you already save a session saved, select it and click Load.
  12. Click Save.
  13. Under Category, go to Connections and expand SSH and click Auth and then click Credentials.
  14. In the Private Key File for Authentication field, click Browse. Browse and locate the private key file that you downloaded and saved.
  15. Now, go to Sessions under Category and click Open.
  16. This opens a PuTTy terminal.

    Note:

    In OCI environments, you are logged in an opc user. This is the default user with sudo privileges.
    You must connect to the DB system as a root user. The root user has superuser privileges.
    • To switch from opc user to root user, run
      sudo su -
    • To switch from root user to opc user, run
      sudo su - opc
    • To switch from opc user to oracle user, run
      sudo su - oracle
    • To check your current user, run
      whoami
    • To verify sudo permissions, use run
      sudo -l
This completes the task of connecting to a DB system as a root user.