Appendixes
This section contains the following topics:
- SQL*Loader Syntax Diagrams
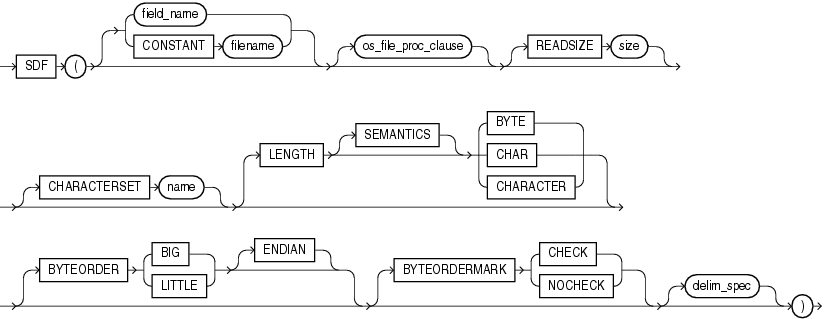
This appendix describes SQL*Loader syntax in graphic form (sometimes called railroad diagrams or DDL diagrams). - Instant Client for SQL*Loader, Export, and Import
Oracle Instant Client allows you to run your applications without installing the standard Oracle client or having an Oracle home.
SQL*Loader Syntax Diagrams
This appendix describes SQL*Loader syntax in graphic form (sometimes called railroad diagrams or DDL diagrams).
For information about the syntax notation used, see the Oracle Database SQL Language Reference
The following diagrams are shown with certain clauses collapsed (such as pos_spec). These diagrams are expanded and explained further along in the appendix.
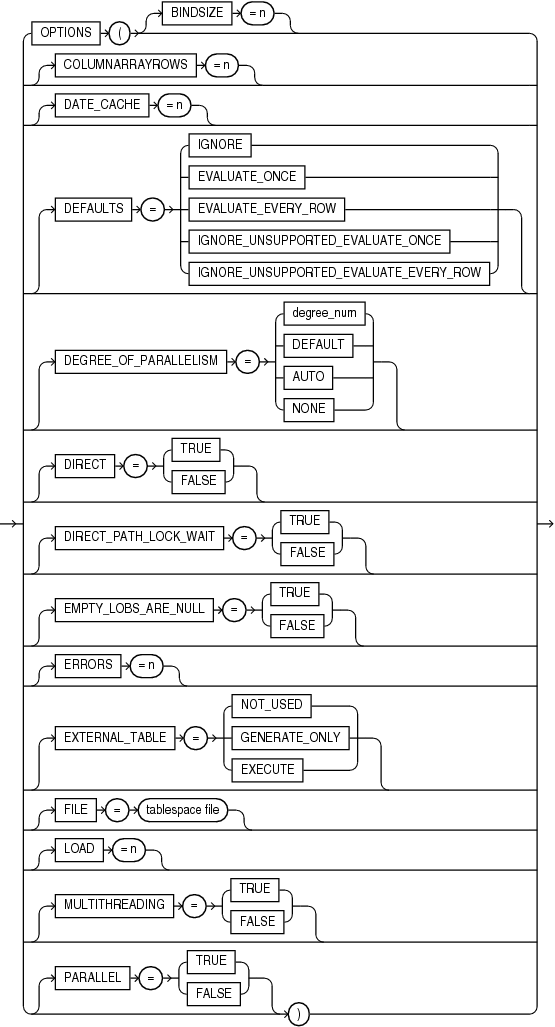
Options Clause
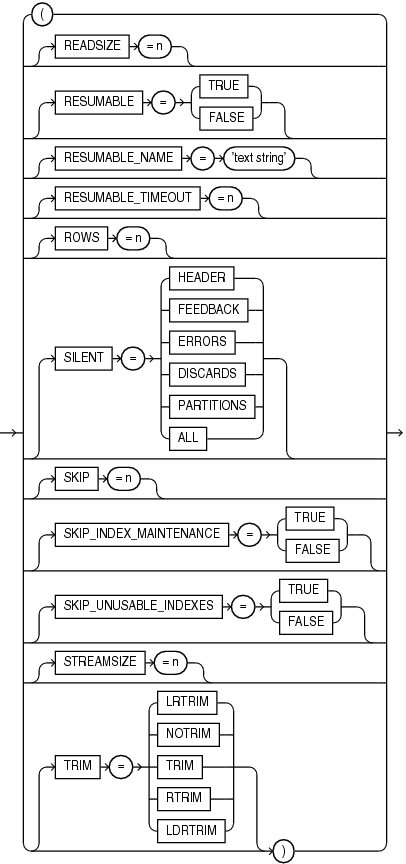
Options_Cont
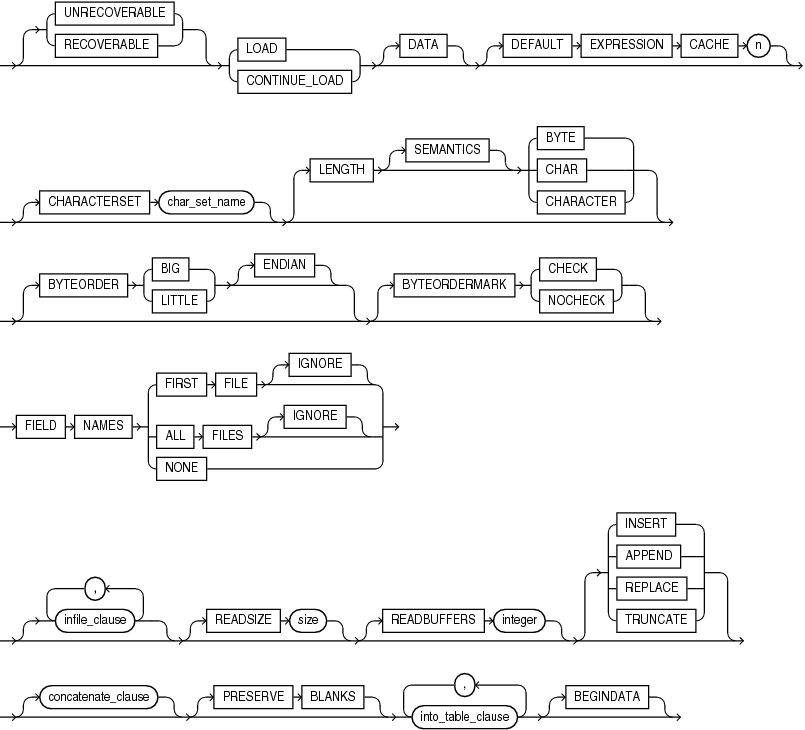
Load Statement
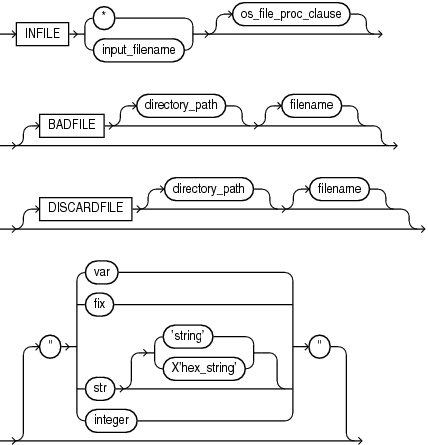
infile_clause
Note:
On the BADFILE and DISCARDFILE clauses, you must specify either a directory path, or a filename, or both.
concatenate_clause
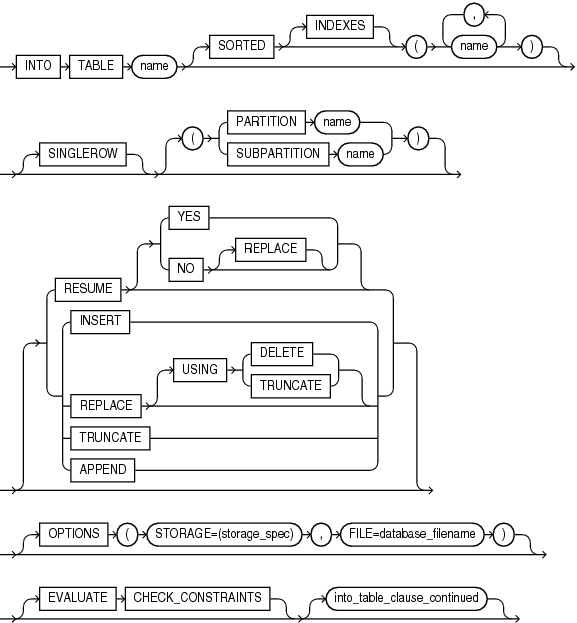
into_table_clause
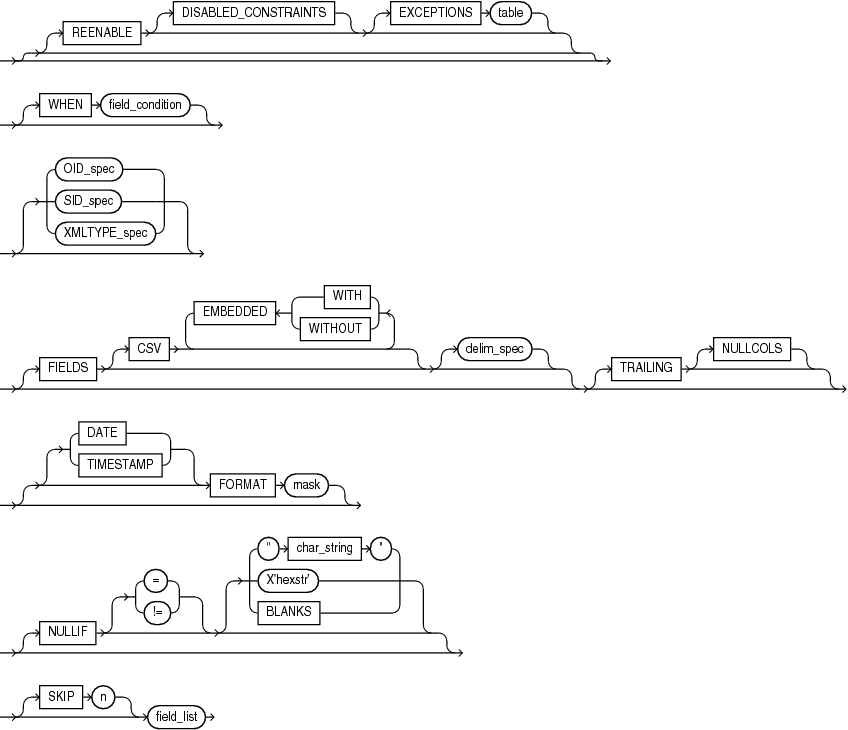
into_table_clause_continued
field_condition
full_fieldname
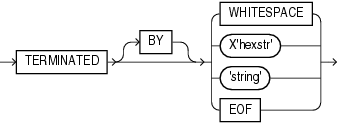
termination_spec
enclosure_spec
xmltype_spec
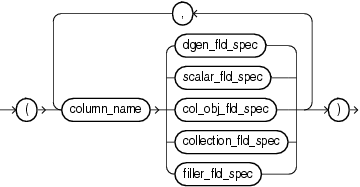
dgen_fld_spec
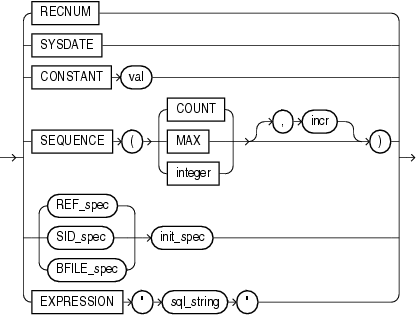
init_spec
bfile_spec
filler_fld_spec
scalar_fld_spec
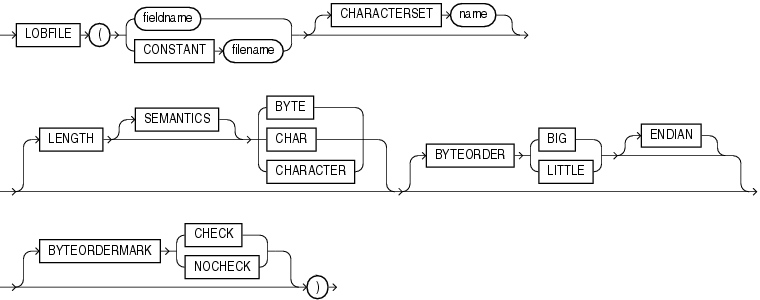
lobfile_spec
lls_field_spec
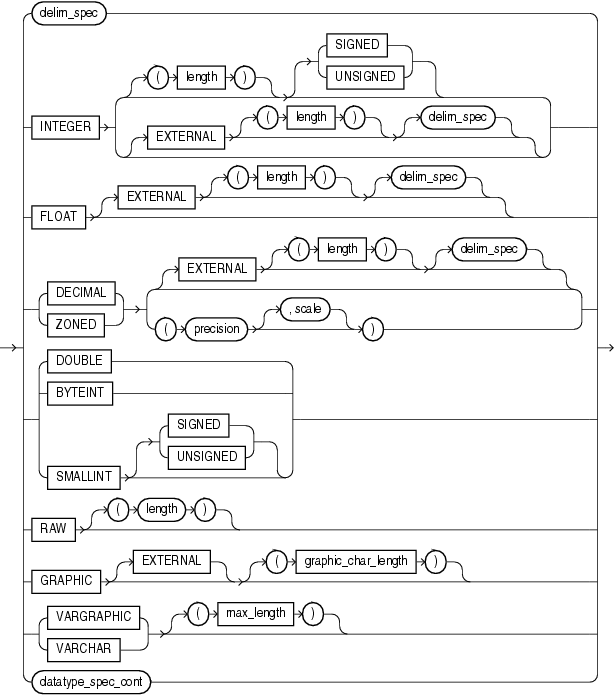
datatype_spec
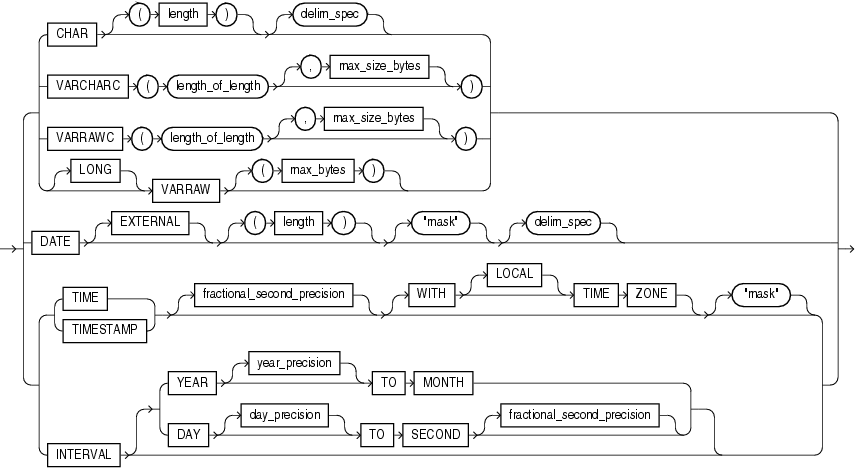
datatype_spec_cont
col_obj_fld_spec
collection_fld_spec
nested_table_spec
varray_spec
count_spec
Parent topic: Appendixes
Instant Client for SQL*Loader, Export, and Import
Oracle Instant Client allows you to run your applications without installing the standard Oracle client or having an Oracle home.
The following topics are discussed:
- What is the Tools Instant Client?
The Tools Instant Client package is available on platforms that support the OCI Instant Client. - Choosing the Instant Client to Install
Before you install the Tools Instant Client Tools package, you must first choose either Basic Instant Client or Instant Client Light. - Installing Tools Instant Client by Downloading from OTN
The OTN downloads for Linux are RPM packages. The OTN downloads for UNIX and Windows are zip files. - Installing Tools Instant Client from the 12c Client Release Media
The Tools Instant Client package can be installed from client release media. - Configuring Tools Instant Client Package
The Tools Instant Client package executable should only be used with the matching version of the OCI Instant Client. NoORACLE_HOMEorORACLE_SIDenvironment variables need to be set. - Connecting to a Database with the Tools Instant Client Package
After the Tools Instant Client package is installed and configured, you can connect to a database. - Uninstalling Instant Client
Parent topic: Appendixes
What is the Tools Instant Client?
The Tools Instant Client package is available on platforms that support the OCI Instant Client.
The Tools Instant Client package is available on platforms that support the OCI Instant Client. The Tools package contains several command-line utilities, including SQL*Loader, Data Pump Export, Data Pump Import, Original (classic) Export, and Original (classic) Import. Instant Client installations are standalone, with all the functionality of the command-line versions of the products. The Instant Client connects to existing remote Oracle databases, but does not include its own database. It is easy to install and uses significantly less disk space than the full Oracle Database Client installation required to use the command-line versions of products.
See the Oracle Call Interface Programmer's Guide for more information about the OCI Instant Client.
To use the Tools Instant Client, you need two packages:
-
Tools Instant Client Package
-
Either the Basic OCI Instant Client package, or the OCI Instant Client Light package.
The basic steps required to use the Tools Instant Client are as follows. Each of these steps is described in this appendix.
-
Choose which OCI Package (Basic or Light) you want to use, and also select the directory in which to install the Instant Client files.
-
Copy the Tools Instant Client Package, and the OCI Instant Client package of your choice, from an installed Oracle instance or download them from OTN.
-
Install (unpack) the Tools Instant Client package and the OCI package. A new directory
instantclient_12_2is created as part of the installation. -
Configure the Instant Client.
-
Connect to a remote instance with the utility you want to run.
Both the Tools package and OCI package must be from Oracle Database version 12.2.0.0.0, or higher, and the versions for both must be the same.
Parent topic: Instant Client for SQL*Loader, Export, and Import
Choosing the Instant Client to Install
Before you install the Tools Instant Client Tools package, you must first choose either Basic Instant Client or Instant Client Light.
Basic Instant Client
The Tools Instant Client package, when used with Basic Instant Client works with any NLS_LANG setting supported by the Oracle Database. It supports all character sets and language settings available in the Oracle Database.
Instant Client Light
The Instant Client Light (English) version of Instant Client further reduces the disk space requirements of the client installation. The size of the library has been reduced by removing error message files for languages other than English and leaving only a few supported character set definitions out of around 250.
Instant Client Light is geared toward applications that use either US7ASCII, WE8DEC, WE8ISO8859P1, WE8MSWIN1252, or a Unicode character set. There is no restriction on the LANGUAGE and the TERRITORY fields of the NLS_LANG setting, so the Instant Client Light operates with any language and territory settings. Because only English error messages are provided with the Instant Client Light, error messages generated on the client side, such as Net connection errors, are always reported in English, even if NLS_LANG is set to a language other than AMERICAN. Error messages generated by the database side, such as syntax errors in SQL statements, are in the selected language provided the appropriate translated message files are installed in the Oracle home of the database instance.
Parent topic: Instant Client for SQL*Loader, Export, and Import
Installing Tools Instant Client by Downloading from OTN
The OTN downloads for Linux are RPM packages. The OTN downloads for UNIX and Windows are zip files.
Instant Client packages should never be installed on an Oracle home.
Installing Instant Client from Linux RPM Packages
-
Download the RPM packages containing the Tools Instant Client package, and the OCI package from the OTN Instant Client page at http://www.oracle.com/technetwork/database/database-technologies/instant-client/overview/index.html. Both packages must be version 12.2.0.0.0 or higher, and the versions of both must be the same.
-
Use
rpm -ifor the initial install of the RPM packages, orrpm -uto upgrade to a newer version of the packages. Install the OCI Package first. -
Configure Instant Client. See Configuring Tools Instant Client Package.
Installing Instant Client from the UNIX or Windows Zip Files
-
Download the RPM packages containing the Tools Instant Client package, and the OCI package from the OTN Instant Client page at http://www.oracle.com/technetwork/database/database-technologies/instant-client/overview/index.html. Both packages must be version 12.2.0.0.0 or higher, and the versions of both must be the same.
-
Create a new directory, for example,
/home/instantclient12_2on UNIX orc:\instantclient12_2on Windows. -
Unzip the two packages into the new directory. Install the OCI Package first.
-
Configure Instant Client. See Configuring Tools Instant Client Package
List of Files Required for Tools Instant Client
The following table lists the required files from the Tools Instant Client package. You also need the files from one of the OCI packages (either Basic or Light). Other files installed that are not listed here can be ignored, or can be removed to save disk space.
See the Oracle Call Interface Programmer's Guide for more information about required files for the OCI Instant Client.
Table -6 Instant Client Files in the Tools Package
| Linux and UNIX | Windows | Description |
|---|---|---|
| exp | exp.exe | Original (classic) export executable |
| expdp | expdp.exe | Data Pump export executable |
| imp | imp.exe | Original (classic) import executable |
| impdp | impdp.exe | Data Pump import executable |
| libnfsodm12.so | Not applicable | A shared library used by the SQL*Loader Instant Client to use the Oracle Disk Manager (ODM). |
| sqlldr | sqlldr.exe | SQL*Loader executable |
| TOOLS_README | Not applicable | Readme for the Tools Instant Client package |
| wrc | wrc.exe | The Tools Instant Client package contains tools other than those described in this appendix. The wrc tool is the Workload Replay Client (wrc) for the Oracle Database Replay feature. The wrc tool is listed here for completeness sake, but it is not covered by the information in this appendix. |
Parent topic: Instant Client for SQL*Loader, Export, and Import
Installing Tools Instant Client from the 12c Client Release Media
The Tools Instant Client package can be installed from client release media.
-
Run the installer on the Oracle Database 12c Client Release media and choose the Administrator option.
-
Create a new directory, for example,
/home/instantclient12_2on UNIX and Linux, orc:\instantclient12_2on Windows. -
Copy the Tools Instant Client package and the OCI Instant Client files to the new directory. All files must be copied from the same Oracle home.
-
Configure the Tools Instant Client package. See Configuring Tools Instant Client Package.
Installing Tools Instant Client on UNIX or Linux
To install the Tools Instant Client using the Basic Instant Client package on UNIX and Linux, copy the following files:
$ORACLE_HOME/instantclient/libociei.so
$ORACLE_HOME/lib/libnfsodm12.so
$ORACLE_HOME/bin/exp
$ORACLE_HOME/bin/imp
$ORACLE_HOME/bin/expdp
$ORACLE_HOME/bin/impdp
$ORACLE_HOME/bin/sqlldr
To install the Tools Instant Client using the Instant Client Light package on UNIX and Linux, copy the following files:
$ORACLE_HOME/instantclient/light/libociicus.so
$ORACLE_HOME/lib/libnfsodm12.so
$ORACLE_HOME/bin/exp
$ORACLE_HOME/bin/imp
$ORACLE_HOME/bin/expdp
$ORACLE_HOME/bin/impdp
$ORACLE_HOME/bin/sqlldr
Installing Tools Instant Client on Windows
To install the Tools Instant Client using the Basic Instant Client package on Windows, copy the following files:
%ORACLE_HOME%\instantclient\oraociei12.dll
%ORACLE_HOME%\bin\exp.exe
%ORACLE_HOME%\bin\imp.exe
%ORACLE_HOME%\bin\expdp.exe
%ORACLE_HOME%\bin\impdp.exe
%ORACLE_HOME%\bin\sqlldr.exe
To install the Tools Instant Client using the Instant Client Light package on Windows, copy the following files:
ORACLE_HOME%\instantclient\light\oraociicus12.dll
%ORACLE_HOME%\bin\exp.exe
%ORACLE_HOME%\bin\imp.exe
%ORACLE_HOME%\bin\expdp.exe
%ORACLE_HOME%\bin\impdp.exe
%ORACLE_HOME%\bin\sqlldr.exe
Parent topic: Instant Client for SQL*Loader, Export, and Import
Configuring Tools Instant Client Package
The Tools Instant Client package executable should only be used with the matching version of the OCI Instant Client. No ORACLE_HOME or ORACLE_SID environment variables need to be set.
Configuring Tools Instant Client Package (from RPMS) on Linux
The RPMs downloaded from OTN install into Oracle specific sub-directories in the /usr file system. The subdirectory structure enables multiple versions of Instant Client to be available.
-
Add the name of the directory containing the Instant Client libraries to
LD_LIBRARY_PATH. Remove any other Oracle directories.For example, to set
LD_LIBRARY_PATHin the Bourne or Korn shells, use the following syntax:LD_LIBRARY_PATH=/usr/lib/oracle/12.2.0.1/client/lib:${LD_LIBRARY_PATH} export LD_LIBRARY_PATHOr, to set
LD_LIBRARY_PATHin the C shell, use the following syntax:% setenv LD_LIBRARY_PATH /usr/lib/oracle/12.2.0.1/client/lib:$LD_LIBRARY_PATH -
Make sure the Tools executables installed from the RPM are the first executables found in your
PATH. For example, to test this you could enterwhich sqlldrwhich should return/usr/bin/sqlldr. If it does not, then remove any other Oracle directories fromPATH, or put/usr/binbefore other Tools executables inPATH, or use an absolute or relative path to start Tools Instant Client.For example, to set
PATHin the bash shell:PATH=/usr/bin:${PATH} export PATH -
Set Oracle globalization variables required for your locale. A default locale will be assumed if no variables are set.
NLS_LANG=AMERICAN_AMERICA.UTF8
export NLS_LANG
Configuring Tools Instant Client Package (from Client Media or Zip File) on Linux and UNIX
-
Add the name of the directory containing the Instant Client files to the appropriate shared library path
LD_LIBRARY_PATH,LIBPATHorSHLIB_PATH. Remove any other Oracle directories.For example on Solaris in the Bourne or Korn shells:
LD_LIBRARY_PATH=/home/instantclient12_2:${LD_LIBRARY_PATH} export LD_LIBRARY_PATH -
Add the directory containing the Instant Client files to the
PATHenvironment variable. If it is not set, then an absolute or relative path must be used to start the utilities provided in the Tools package. Remove any other Oracle directories fromPATH. For example:PATH=/home/instantclient12_2:${PATH} export PATH -
Set Oracle globalization variables required for your locale. A default locale will be assumed if no variables are set. For example:
NLS_LANG=AMERICAN_AMERICA.UTF8
export NLS_LANG
Configuring Tools Instant Client Package on Windows
The environment may be configured using SET commands in a Windows command prompt or made permanent by setting Environment Variables in System Properties.
For example, to set environment variables in Windows 2000 using System Properties, open System from the Control Panel, click the Advanced tab and then click Environment Variables.
-
Add the directory containing the Instant Client files to the
PATHsystem environment variable. Remove any other Oracle directories fromPATH.For example, add
c:\instantclient12_2to the beginning ofPATH. -
Set Oracle globalization variables required for your locale. A default locale will be assumed if no variables are set.
For example, to set
NLS_LANGfor a Japanese environment, create a user environment variableNLS_LANGset toJAPANESE_JAPAN.JA16EUC.
Parent topic: Instant Client for SQL*Loader, Export, and Import
Connecting to a Database with the Tools Instant Client Package
After the Tools Instant Client package is installed and configured, you can connect to a database.
The utilities supplied in the Tools Instant Client are always remote from any database server. It is assumed that the server has an Oracle instance up and running and has the TNS listener running. For the Data Pump Export and Import clients, the dump files reside on the remote server; an Oracle directory object on the server must exist and should have the appropriate permissions.
To connect to a database you must specify the database using an Oracle Net connection identifier. The following information uses the SQL*Loader (sqlldr) utility, but the information applies to other utilities supplied in the Tools Instant Client package as well.
An example using an Easy Connection identifier to connect to the HR schema in the MYDB database running on mymachine is:
sqlldr hr/your_password@\"//mymachine.mydomain:port/MYDB\"Alternatively you can use a Net Service Name:
sqlldr hr/your_password@MYDBNet Service Names can be stored in a number of places, including LDAP. The use of LDAP is recommended to take advantage of the new features of Oracle Database 12c
To use Net Service Names configured in a local Oracle Net tnsnames.ora file, set the environment variable TNS_ADMIN to the directory containing the tnsnames.ora file. For example, on UNIX, if your tnsnames.ora file is in /home/user1 and it defines the Net Service Name MYDB2:
TNS_ADMIN=/home/user1
export TNS_ADMIN
sqlldr hr@MYDB2
If TNS_ADMIN is not set, then an operating system dependent set of directories is examined to find tnsnames.ora . This search path includes looking in the directory specified by the ORACLE_HOME environment variable for network/admin/tnsnames.ora . This is the only reason to set the ORACLE_HOME environment variable for SQL*Loader Instant Client. If ORACLE_HOME is set when running Instant Client applications, it must be set to a directory that exists.
This example assumes the ORACLE_HOME environment variable is set, and the $ORACLE_HOME/network/admin/tnsnames.ora or ORACLE_HOME\network\admin\tnsnames.ora file defines the Net Service Name MYDB3:
sqlldr hr@MYDB3The TWO_TASK (on UNIX) or LOCAL (on Windows) environment variable can be set to a connection identifier. This removes the need to explicitly enter the connection identifier whenever a connection is made in SQL*Loader or SQL*Loader Instant Client. This UNIX example connects to the database known as MYDB4:
TNS_ADMIN=/home/user1
export TNS_ADMIN
TWO_TASK=MYDB4
export TWO_TASK
sqlldr hr
On Windows, TNS_ADMIN and LOCAL may be set in the System Properties.
Parent topic: Instant Client for SQL*Loader, Export, and Import
Uninstalling Instant Client
The Tools Instant Client package can be removed separately from the OCI Instant Client. After uninstalling the Tools Instant Client package, the remaining OCI Instant Client libraries enable custom written OCI programs or third party database utilities to connect to a database.
Uninstalling Tools Instant Client
- For installations on Linux from RPM packages, use
rpm -eonly on the Tools Instant Client packageOR
For installations on UNIX and Windows, and installations on Linux from the Client Release media, manually remove any files specific to the Tools Instant Client. The files to be deleted should be in the Instant Client directory that you specified at installation. Be sure you do not remove any Oracle home files.
Reset environment variables and remove
tnsnames.oraif necessary.
Uninstalling the Complete Instant Client
-
For installations on Linux from RPM packages, use
rpm -qato find the Tools Instant Client and Basic OCI package names and runrpm -eto remove themOR
For installations on UNIX and Windows, and installations on Linux from the Client Release media, manually delete the directory containing the Tools executable and Oracle libraries.
-
Reset environment variables such as
PATH,LD_LIBRARY_PATHandTNS_ADMIN. -
Remove
tnsnames.oraif necessary.
Parent topic: Instant Client for SQL*Loader, Export, and Import
