 Unplug,
Plug, and Upgrade a PDB to a New CDB
Unplug,
Plug, and Upgrade a PDB to a New CDB Before You Begin
This 15-minute tutorial shows you how to unplug, plug, and upgrade a pluggable database (PDB).
Background
Upgrading a container database (CDB) will also upgrade all of the associated PDBs. One way to upgrade PDBs individually is by using the unplug/plug method. In this method, first unplug the PDB from an earlier release CDB, plug it into the later release CDB, and then upgrade it.
What Do You Need?
- You are using Oracle Managed Files.
- You have installed the same release Oracle Database software on the target server, and it is updated to the same release update and release update revision.
- The endian formats of the source CDB and the target CDB are identical.
- You have installed the same set of Oracle Database features on the source CDB and the target CDB.
- The source CDB and the target CDB have compatible character sets and national character sets.
- You must be connected to a CDB, and the current container
must be root
(CDB$ROOT). - You must have the
CREATE PLUGGABLE DATABASEsystem privilege. - The CDB in which the PDB is being created must be in read/write mode.
- The source CDB and the target CDB can be on the same server hardware or on different server hardware.
- You have backed up your PDB on the source CDB to the destination CDB, so that the backup is available on the destination CDB.
 Unplug
the Earlier Release PDB from the Earlier Release CDB
Unplug
the Earlier Release PDB from the Earlier Release CDB
- Run the
Pre-Upgrade Information Toolon the PDB.For example, run the tool on the PDB
salespdbin the CDB in$ORACLE_HOME_12.2:$ORACLE_HOME_12.2/jdk/bin/java -jar $ORACLE_HOME_18/rdbms/admin/preupgrade.jar dir /tmp -c salespdb
- Run
preupgrade_fixups.sqlon the source database.For example:
CONNECT / AS SYSDBA
SQL> ALTER SESSION SET CONTAINER=salespdb;
SQL> SET ECHO ON
SQL> SPOOL /tmp/preupgrade_fixups_salespdb.log
SQL> @/tmp/preupgrade_fixups_salespdb.sql
- Follow all the recommendations listed in
preupgrade.log. - Close the PDB that you want to unplug.
For example, to close the PDB
salespdb:SQL> ALTER PLUGGABLE DATABASE salespdb CLOSE;
- Log back in to
CDB$ROOT:CONNECT / AS SYSDBA SQL> ALTER SESSION SET CONTAINER=CDB$ROOT;
- Unplug the earlier release PDB using the following SQL
command:
SQL> ALTER PLUGGABLE DATABASE salespdb UNPLUG INTO '/home/oracle/salespdb.xml';
Pluggable database altered
Here,
salespdbis the name of the PDB, and/home/oracle/salespdb.xmlis the location of the PDB XML file. - Drop the pluggable database
salespdb, but keep the data files.SQL> DROP PLUGGABLE DATABASE salespdb KEEP DATAFILES;
Oracle recommends that you drop
salespdbafter this procedure to clean up leftover information in the CDB views, and to avoid future issues.As a best practice guideline, back up your PDB in the target CDB first, and then run the
DROPcommand on the source CDB.Caution: After you drop the PDB from its original CDB, you cannot restore the PDB on the source CDB by using a backup you have taken previously, because the
DROPcommand removes the backup files. - Exit.
 Plug
In the Earlier Release PDB to the Later Release CDB
Plug
In the Earlier Release PDB to the Later Release CDB
- Connect to the later release CDB.
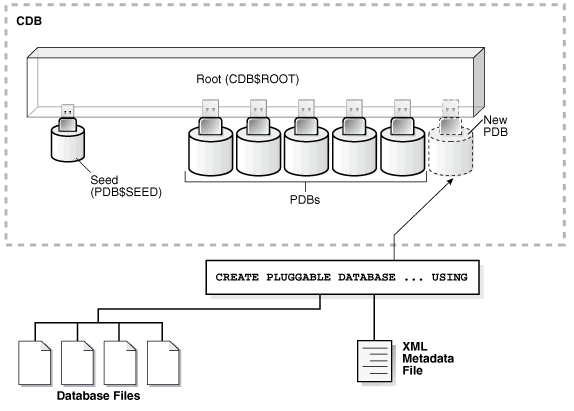
- Plug in the earlier release PDB using the following SQL
command:
SQL> CREATE PLUGGABLE DATABASE salespdb USING '/home/oracle/salespdb.xml';
Pluggable database altered
Note: When you plug in an earlier release PDB, the PDB is in
RESTRICTEDmode. You can open the PDB only for an upgrade.
 Upgrade
the Earlier Release PDB to the Later Release
Upgrade
the Earlier Release PDB to the Later Release
- If needed, switch to the PDB
salespdbthat you want to upgrade to:SQL> ALTER SESSION SET CONTAINER=salespdb;
- Open the PDB in
UPGRADEmode.SQL> ALTER PLUGGABLE DATABASE OPEN UPGRADE;
- Upgrade the PDB using the Parallel Upgrade Utility command
catctl.pl, or the shell utilitydbupgrade.When you upgrade a PDB, use the commands that you normally use with the Parallel Upgrade Utility. However, also add the option
-c PDBnameto specify which PDB you are upgrading.Capitalize the name of your PDB as shown in the following example using the PDB named
salespdb:$ORACLE_HOME/perl/bin/perl $ORACLE_HOME/rdbms/admin/catctl.pl -d \ $ORACLE_HOME/rdbms/admin -c 'SALESPDB' -l $ORACLE_BASE catupgrd.sql
- Review the results.
The default log file path is:
$ORACLE_BASE/cfgtoollogs/dbname/upgradedatetime.where:
dbname is the name of the database.
upgradedatetime is the date and time for the upgrade.
The date and time strings are in the character string format YYYYMMDDHHMMSC, in which YYYY designates the year, MM designates the month, DD designates the day, HH designates the hour, MM designates the minute, and SC designates the second.
For example:
$ORACLE_BASE/cfgtoollogs/salespdb/upgrade20180815120001/upg_summary.log
- Log in to SQL*Plus. Open the PDB to execute the post-upgrade
fixup scripts and to recompile the
INVALIDobjects in the database:SQL> connect / as sysdba SQL> ALTER SESSION SET CONTAINER=salespdb; SQL> STARTUP;
- Run the
postupgrade_fixups.sqlscript using thecatcon.plutility:$ORACLE_HOME/perl/bin/perl catcon.pl –c 'salespdb' -n 1 -e -b postfixups -d '''.''' /tmp/cfgtoollogs/salespdb/preupgrade/postupgrade_fixups.sql
- Use the utility
catcon.plto runutlrp.sqlfrom the$ORACLE_HOME/rdbms/admin directory:$ORACLE_HOME/perl/bin/perl catcon.pl –c 'salespdb' -n 1 -e -b comp -d '''.''' utlrp.sql
The
utlrp.sqlscript recompilesINVALIDobjects in the database, and places a log file in the current directory with the namecomp0.log.