Registering a Client with Azure AD Application Registration
This type of registration is similar to registering Oracle Database with Azure AD app registration.
-
Confidential and Public Client Registration
You can register the database client with Azure as either confidential or public depending on your use case. -
Registering a Database Client App with Entra ID
Creating the client app registration is similar to creating the Oracle Database instance with the Microsoft Entra ID tenancy.
Confidential and Public Client Registration
You can register the database client with Azure as either confidential or public depending on your use case.
See the Microsoft Azure article Authentication flows and application scenarios for detailed information about authentication flows and application scenarios.
Registering a confidential client app requires that the client have a secret, in addition to the client ID. The confidential client app uses both the client ID and the secret when it makes Azure AD requests. However, in an enterprise, it is not practical for every SQL*Plus and SQLcl user to create a separate app registration with its own secret. In addition, a secret is no longer a secret when you start to share it within an organization. It is far better to just create a public client app. A public client app does not have a secret; it only has a client ID. All database tool users can use the public client ID when they connect to Azure AD to get an access token. The Azure AD user still needs to authenticate to Azure AD with their own user credential.
Registering a Database Client App with Entra ID
Creating the client app registration is similar to creating the Oracle Database instance with the Microsoft Entra ID tenancy.
-
Log in to the Azure portal as an administrator who has Microsoft Entra ID privileges to register applications.
-
In the Azure Active directory admin center page, from the left navigation bar, select Microsoft Entra ID.
-
In the MS - App registrations page, select App registrations from the left navigation bar.
-
Select New registration.
-
In the Register an application page, enter the following Oracle Database client registration information:
-
In the Name field, enter a name for the client app (for example,
DatabaseClientApplication).. -
Under Supported account types, select the account type that matches your use case.
-
Accounts in this organizational directory only (tenant_name only - Single tenant)
-
Accounts in any organizational directory (Any Entra ID directory - Multitenant)
-
Accounts in any organizational directory (Any Entra ID directory - Multitenant) and personal Microsoft accounts (e.g. Skype, Xbox)
-
Personal Microsoft accounts only
-
-
-
Under Redirect URI (optional), configure the redirect URI for the client app.

Description of the illustration azure-redirect-uri.png
-
Select Public client/native (mobile & desktop) or Web. Choose Public client if this client app will be used by multiple users such as database administrators who need to use SQL*Plus to access the Oracle Database instance.
-
Add a redirect URI of
http://localhost, unless you have another address to use. This redirect URI is needed for the authorization flow.
-
-
Click Register.
At this stage, the database client has been registered with Entra ID. Next, you must add the new client to the list of authorized client apps for the Oracle Database instance.
-
To add the new client to this list of client apps, do the following:
-
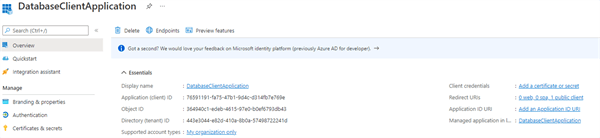
Make a note of the new client’s Application (client) ID. This ID is in the Overview page for the app.
-
On the App registrations page, open the app registration page for the database server by selecting it from the menu.
-
On the left side, select Expose an API.
-
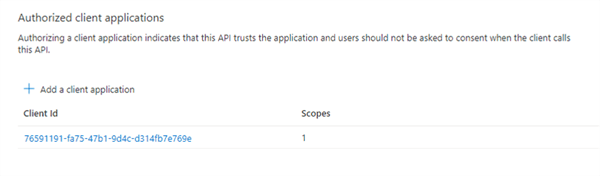
Scroll down on the main page until you see Authorized client applications.
-
Select + to add a client application.
-
Copy the new client’s Application (client) ID to the Client Id field.
-
Click Add application.
-