Using Code Based Access Control for Definer’s Rights and Invoker’s Rights
Code based access control, used to attach database roles to PL/SQL functions, procedures, or packages, works well with invoker’s rights and definer’s procedures.
-
About Using Code Based Access Control for Applications
You can use code based access control (CBAC) to better manage definer’s rights program units. -
Who Can Grant Code Based Access Control Roles to a Program Unit?
Code based access control roles can be granted to a program unit if a set of conditions are met. -
How Code Based Access Control Works with Invoker’s Rights Program Units
Code based access control can run a program unit in an invoking user’s context and with roles associated with this context. -
How Code Based Access Control Works with Definer’s Rights Program Units
Code based access control can be used to secure definer’s rights. -
Grants of Database Roles to Users for Their CBAC Grants
TheDELEGATEoption in theGRANTstatement can limit privilege grants to roles by users responsible for CBAC grants. -
Grants and Revokes of Database Roles to a Program Unit
TheGRANTandREVOKEstatements can grant database roles to or revoke database roles from a program unit. -
Tutorial: Controlling Access to Sensitive Data Using Code Based Access Control
This tutorial demonstrates how to control access to sensitive data in theHRschema by using code based access control.
About Using Code Based Access Control for Applications
You can use code based access control (CBAC) to better manage definer’s rights program units.
Applications must often run program units in the caller’s environment, while requiring elevated privileges. PL/SQL programs traditionally make use of definer’s rights to temporarily elevate the privileges of the program.
However, definer’s rights based program units run in the context of the definer or the owner of the program unit, as opposed to the invoker’s context. Also, using definer’s rights based programs often leads to the program unit getting more privileges than required.
Code based access control (CBAC) provides the solution by enabling you to attach database roles to a PL/SQL function, procedure, or package. These database roles are enabled at run time, enabling the program unit to execute with the required privileges in the calling user’s environment.
You can create privilege analysis policies that capture the use of CBAC roles.
Who Can Grant Code Based Access Control Roles to a Program Unit?
Code based access control roles can be granted to a program unit if a set of conditions are met.
These conditions are as follows:
-
The grantor is user
SYSor owns the program unit. -
If the grantor owns the program unit, then the grantor must have the
GRANT ANY ROLEsystem privilege, or have theADMINorDELEGATEoption for the roles that they want to grant to program units. -
The roles to be granted are directly granted roles to the owner.
-
The roles to be granted are standard database roles.
If these three conditions are not met, then error ORA-28702: Program unit string is not owned by the grantor is raised if the first condition is not met, and error ORA-1924: role 'string' not granted or does not exist is raised if the second and third conditions are not met.
How Code Based Access Control Works with Invoker’s Rights Program Units
Code based access control can run a program unit in an invoking user’s context and with roles associated with this context.
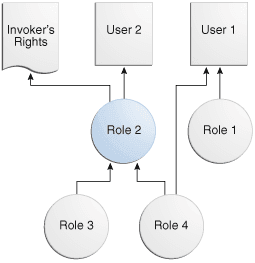
Consider a scenario where there are two application users, 1 and 2. Application user 2 creates the invoker’s right program unit, grants database role 2 to the invoker’s rights unit, and then grants execute privileges on the invoker’s rights unit to application user 1.
The following diagram shows the database roles 1 and 2 granted to application users 1 and 2, and an invoker’s right program unit.
Description of the illustration dbseg_vm_005.png
The grants are as follows:
-
Application user
1is directly granted database roles1and4. -
Application user
2is directly granted database role2, which includes application roles3and4. -
The invoker’s right program unit is granted database role
2.
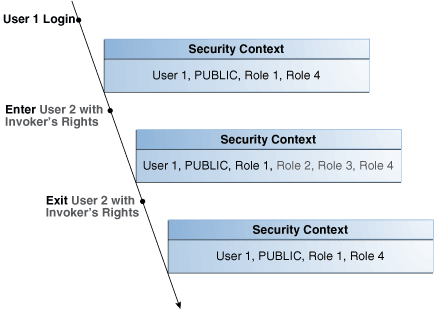
When application user 1 logs in and executes the invoker’s rights program unit, then the invoker’s rights unit executes with the combined database roles of user 1 and the database roles attached to the invoker’s rights unit.
The following diagram shows the security context in which the invoker’s rights unit is executed. When application user 1 first logs on, application user 1 has the database PUBLIC role (by default), and the database roles 1 and 4, which have been granted to it. Application user 1 next executes the invoker’s rights program unit created by application user 2.
The invoker’s rights unit executes in application user 1’s context, and has the additional database role 2 attached to it. Database roles 3 and 4 are included, as they are a part of database role 2. After the invoker’s rights unit exits, then application user 1 only has the application roles that have been granted to it, PUBLIC, role 1, and role 4.
Description of the illustration dbseg_vm_007.png
How Code Based Access Control Works with Definer’s Rights Program Units
Code based access control can be used to secure definer’s rights.
Code based access control works with definer’s rights program units to enable the program unit to run using the defining user’s rights, with the privileges of a combined set of database roles that are associated with this user.
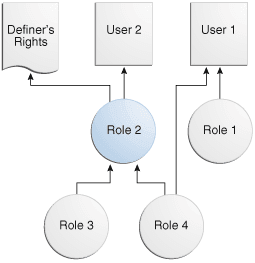
Consider a scenario where application user 2 creates a definer’s rights program unit, grants role 2 to the definer’s rights program unit, and then grants the EXECUTE privilege on the definer’s rights program unit to application user 1.
The following diagram shows the database roles granted to application users 1 and 2, and a definer’s rights program unit.
Description of the illustration dbseg_vm_006.png
The grants are as follows:
-
Application user
1is directly granted database roles1and4. -
Application user
2is directly granted database role2, which includes database roles3and4. -
The definer’s right program unit is granted database role
2.
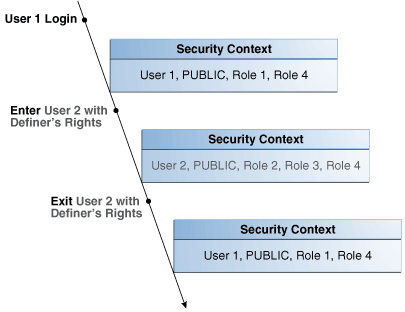
When application user 1 logs in and executes definer’s right program unit, then the definer’s rights unit executes with the combined database roles of application user 2 and the database roles attached to the definer’s rights unit (roles 2, 3, and 4).
The following diagram shows the security context in which the definer’s right program unit is executed. When application user 1 first logs on, application user 1 has the database PUBLIC role (by default), and the database roles 1 and4, which have been granted to it. Application user 1 next executes the definer’s rights program unit created by application user 2.
The definer’s rights program unit executes in application user 2’s context, and has the additional database role 2 attached to it. Database roles 3 and 4 are included, as they are a part of database role 2. After the definer’s rights unit exits, application user 1 only has the database roles that have been granted to it (PUBLIC, role 1, and role 4).
Description of the illustration dbseg_vm_008.png
Grants of Database Roles to Users for Their CBAC Grants
The DELEGATE option in the GRANT statement can limit privilege grants to roles by users responsible for CBAC grants.
When you grant a database role to a user who is responsible for CBAC grants, you can include the DELEGATE option in the GRANT statement to prevent giving the grantee additional privileges on the roles.
The DELEGATE option enables the roles to be granted to program units, but it does not permit the granting of the role to other principals or the administration of the role itself. You also can use the ADMIN option for the grants, which does permit the granting of the role to other principals. Both the ADMIN and DELEGATE options are compatible; that is, you can grant both to a user, though you must do this in separate GRANT statements for each option. To find if a user has been granted a role with these options, query the DELEGATE_OPTION column or the ADMIN_OPTION column of either the USER_ROLE_PRIVS or DBA_ROLE_PRIVS for the user.
The syntax for using the DELEGATE and ADMIN option is as follows:
GRANT role_list to user_list WITH DELEGATE OPTION;

GRANT role_list to user_list WITH ADMIN OPTION;
For example:
GRANT cb_role1 to usr1 WITH DELEGATE OPTION;

GRANT cb_role1 to usr1 WITH ADMIN OPTION;

GRANT cb_role1, cb_role2 to usr1, usr2 with DELEGATE OPTION;

GRANT cb_role1, cb_role2 to usr1, usr2 with ADMIN OPTION;
In a multitenant environment, you can use the DELEGATE option for common grants such as granting common roles to common users, just as you can with the ADMIN option.
For example:
GRANT c##cb_role1 to c##usr1 WITH DELEGATE OPTION CONTAINER = ALL;Be aware that CBAC grants themselves can only take place locally in a PDB.
Grants and Revokes of Database Roles to a Program Unit
The GRANT and REVOKE statements can grant database roles to or revoke database roles from a program unit.
The following syntax to grants or revokes database roles for a PL/SQL function, procedure, or package:
GRANT role_list TO code_list
REVOKE {role_list | ALL} FROM code_list
In this specification:
role_list ::=  code-based_role_name[, role_list]
code_list ::=  {
      {FUNCTION  [schema.]function_name}
   |  {PROCEDURE [schema.]procedure_name}
   |  {PACKAGE   [schema.]package_name}
                 }[, code_list]
For example:
GRANT cb_role1 TO FUNCTION func1, PACKAGE pack1;

GRANT cb_role2, cb_role3 TO FUNCTION HR.func2, PACKAGE SYS.pack2;

REVOKE cb_role1 FROM FUNCTION func1, PACKAGE pack1;

REVOKE ALL FROM FUNCTION HR.func2, PACKAGE SYS.pack2;
Tutorial: Controlling Access to Sensitive Data Using Code Based Access Control
This tutorial demonstrates how to control access to sensitive data in the HR schema by using code based access control.
-
About This Tutorial
In this tutorial, you will create a user who must have access to specific employee information for his department. -
Step 1: Create the User and Grant HR the CREATE ROLE Privilege
To begin, you must create the"Finance"user account and then grant this theHRuser theCREATE ROLEprivilege. -
Step 2: Create the print_employees Invoker’s Rights Procedure
Theprint_employeesinvoker’s rights procedure shows employee information in the current user’s department. -
Step 3: Create the hr_clerk Role and Grant Privileges for It
Next, you are ready to create thehr_clerkrole, which must have theEXECUTEprivilege on theprint_employeesprocedure. -
Step 4: Test the Code Based Access Control HR.print_employees Procedure
At this stage, you are ready to test the code based access controlHR.print_employeesprocedure. -
Step 5: Create the view_emp_role Role and Grant Privileges for It
Next, userHRmust create theview_emp_rolerole and then grant privileges to it. -
Step 6: Test the HR.print_employees Procedure Again
With the appropriate privileges in place, user"Finance"can try theHR.print_employeesprocedure again. -
Step 7: Remove the Components of This Tutorial
If you no longer need the components of this tutorial, then you can remove them.
About This Tutorial
In this tutorial, you will create a user who must have access to specific employee information for his department.
However, the table HR.EMPLOYEES contains sensitive information such as employee salaries, which must not be accessible to the user. You will implement access control using code based access control. The employee data will be shown to the user through an invoker’s rights procedure. Instead of granting the SELECT privilege directly to the user, you will grant the SELECT privilege to the invoker’s rights procedure through a database role. In the procedure, you will hide the sensitive information, such as salaries. Because the procedure is an invoker’s rights procedure, you know the caller’s context inside the procedure. In this case, the caller’s context is for the Finance department. The user is named "Finance", so that only data for employees who work in the Finance department is accessible to the user.
Step 1: Create the User and Grant HR the CREATE ROLE Privilege
To begin, you must create the "Finance" user account and then grant this the HR user the CREATE ROLE privilege.
-
Log into the database instance as an administrator who has privileges to create user accounts and roles.
For example:
sqlplus sec_admin
Enter password: password- Create the
"Finance"user account.
GRANT CONNECT TO "Finance" IDENTIFIED BY password;Ensure that you enter `"Finance"` in the case shown, enclosed by double quotation marks. Follow the guidelines in [Minimum Requirements for Passwords](minimum-requirements-passwords.html#GUID-AA1AA635-1CD5-422E-B8CA-681ED7C253CA) to replace *password* with a password that is secure.
- Grant the
CREATE ROLEprivilege to userHR.
GRANT CREATE ROLE TO HR;Step 2: Create the print_employees Invoker’s Rights Procedure
The print_employees invoker’s rights procedure shows employee information in the current user’s department.
You must create this procedure as an invoker’s rights procedure because you must know who the caller is when inside the procedure.
- Connect as user
HR.
CONNECT HR
Enter password: password-
Create the
print_employeesprocedure as follows.create or replace procedure print_employees authid current_user as begin dbms_output.put_line(rpad('ID', 10) || rpad('First Name', 15) || rpad('Last Name', 15) || rpad('Email', 15) || rpad('Phone Number', 20)); for rec in (select e.employee_id, e.first_name, e.last_name, e.email, e.phone_number from hr.employees e, hr.departments d where e.department_id = d.department_id and d.department_name = sys_context('userenv', 'current_user')) loop dbms_output.put_line(rpad(rec.employee_ID, 10) || rpad(rec.first_name, 15) || rpad(rec.last_name, 15) || rpad(rec.email, 15) || rpad(rec.phone_number, 20)); end loop; end; /In this example:
-
dbms_output.put_lineprints the table header. -
for rec in (select ...finds the employee information for the caller’s department, which for this tutorial is the Finance department for user"Finance". Had you created a user named"Marketing"(which is also listed in theDEPARTMENT_NAMEcolumn of theHR.EMPLOYEEStable), then the procedure could capture information for Marketing employees. -
loopanddbms_output.put_linepopulate the output with the employee data from the Finance department.
-
Step 3: Create the hr_clerk Role and Grant Privileges for It
Next, you are ready to create the hr_clerk role, which must have the EXECUTE privilege on the print_employees procedure.
After you create this role, you must grant it to "Finance".
- Create the
hr_clerkrole.
CREATE ROLE hr_clerk;- Grant the
EXECUTEprivilege on the print_employees procedure to thehr_clerkrole.
GRANT EXECUTE ON print_employees TO hr_clerk;- Grant the
hr_clerkrole to"Finance".
GRANT hr_clerk TO "Finance";Step 4: Test the Code Based Access Control HR.print_employees Procedure
At this stage, you are ready to test the code based access control HR.print_employees procedure.
To test the code based access control HR.print_employees procedure, user "Finance" must query the HR.EMPLOYEES table and try to run the HR.print_employees procedure.
- Connect to the database instance as user
"Finance".
CONNECT "Finance"
Enter password: password- Try to directly query the
HR.EMPLOYEEStable.
SELECT EMPLOYEE_ID, FIRST_NAME, LAST_NAME, SALARY FROM HR.EMPLOYEES;The query fails because user `Finance` does not have the `SELECT` privilege for `HR.EMPLOYEES`.
ERROR at line 1:
ORA-00942: table or view does not exist- Execute the
HR.print_employeesprocedure.
EXEC HR.print_employees;The query fails because user `"Finance"` does not have the appropriate privileges.
ERROR at line 1:
ORA-00942: table or view does not exist
ORA-06512: at "HR.PRINT_EMPLOYEES", line 13ORA-06512: at line 1
Step 5: Create the view_emp_role Role and Grant Privileges for It
Next, user HR must create the view_emp_role role and then grant privileges to it.
User HR grants the SELECT privilege HR.EMPLOYEES and HR.DEPARTMENTS to the view_emp_role role, and then grants SELECT on HR.EMPLOYEES and HR.DEPARTMENTS to the view_emp_role role.
- Connect as user
HR.
CONNECT HR
Enter password: password- Create the
view_emp_rolerole.
CREATE ROLE view_emp_role;- Grant the
SELECTprivilege onHR.EMPLOYEESandHR.DEPARTMENTSto theview_emp_rolerole.
GRANT SELECT ON HR.EMPLOYEES TO view_emp_role;
GRANT SELECT ON HR.DEPARTMENTS TO view_emp_role;- Grant the
view_emp_rolerole to theHR.print_employeesinvoker’s rights procedure.
GRANT view_emp_role TO PROCEDURE HR.print_employees;Step 6: Test the HR.print_employees Procedure Again
With the appropriate privileges in place, user "Finance" can try the HR.print_employees procedure again.
- Connect as user
"Finance".
CONNECT "Finance"
Enter password: password- Set the server output to display.
SET SERVEROUTPUT ON;- Try to directly query the
HR.EMPLOYEEStable.
SELECT EMPLOYEE_ID, FIRST_NAME, LAST_NAME, SALARY FROM HR.EMPLOYEES;The query fails.
ERROR at line 1:
ORA-00942: table or view does not exist- Execute the
HR.print_employeesprocedure to show the employee information.
EXEC HR.print_employees;The call succeeds.
ID        First Name     Last Name      Email          Phone Number
108       Nancy          Greenberg      NGREENBE       515.124.4569
109       Daniel         Faviet         DFAVIET        515.124.4169
110       John           Chen           JCHEN          515.124.4269
111       Ismael         Sciarra        ISCIARRA       515.124.4369
112       Jose Manuel    Urman          JMURMAN        515.124.4469
113       Luis           Popp           LPOPP          515.124.4567

PL/SQL procedure successfully completed.
Step 7: Remove the Components of This Tutorial
If you no longer need the components of this tutorial, then you can remove them.
-
Connect as a user with administrative privileges.
For example:
CONNECT sec_admin
Enter password: password- Drop the user
"Finance".
DROP USER "Finance";- Drop the
hr_clerkrole.
DROP ROLE hr_clerk;- Connect as user
HR.
CONNECT HR
Enter password: password- Drop the view_emp_role role and the
HR.print_employeesprocedure.
DROP ROLE view_emp_role;
DROP PROCEDURE print_employees;- Connect as the administrative user.
CONNECT sec_admin
Enter password: password- Revoke the
CREATE ROLEprivilege fromHR.
REVOKE CREATE ROLE FROM HR;Related Topics
- Performing Privilege Analysis to Identify Privilege Use
- Grants and Revokes of Database Roles to a Program Unit
- Grants and Revokes of Database Roles to a Program Unit
- Oracle Database SQL Language Reference for more information about the
ADMINoption - Who Can Grant Code Based Access Control Roles to a Program Unit?