Creating a Single Baseline

A single baseline is captured at a single, fixed time interval. For example, a single baseline may be captured on February 5, 2020 from 5:00 p.m. to 8:00 p.m.

You can choose future start and end times to create a baseline that captures future database activity. If both the start time and the end time are in the future, then a baseline template with the same name as the baseline is also created. A baseline template is a specification that enables Oracle Database to automatically generate a baseline for a future time period.

To create a single baseline:

  1. Access the Database Home page for the target database.

    See "Accessing the Database Home Page" for more information.

  2. From the Performance menu, select AWR and then AWR Administration.

    If the Database Login page appears, then log in as a user with administrator privileges. The Performance page appears.

  3. Under Manage Snapshots and Baselines, click the number next to Baselines.

    The AWR Baselines page appears with a list of existing baselines displayed.

  4. Click Create.

    The Create Baseline: Baseline Interval Type page appears.

  5. Select Single and then Continue.

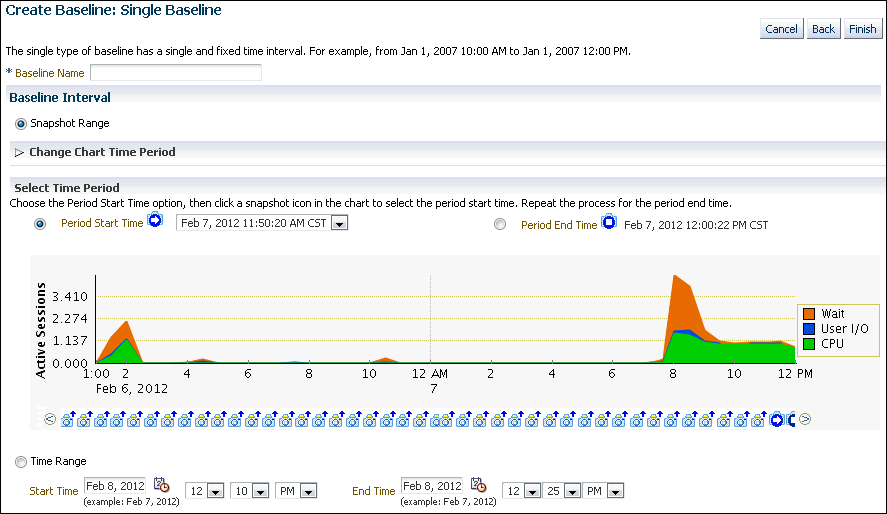
    The Create Baseline: Single Baseline page appears.

  6. In the Baseline Name field, enter a name for the baseline.
  7. Under Baseline Interval, select whether to use a snapshot range or a time range for the baseline. Do one of the following:
    • To use a range, select Snapshot Range. Complete the following steps:

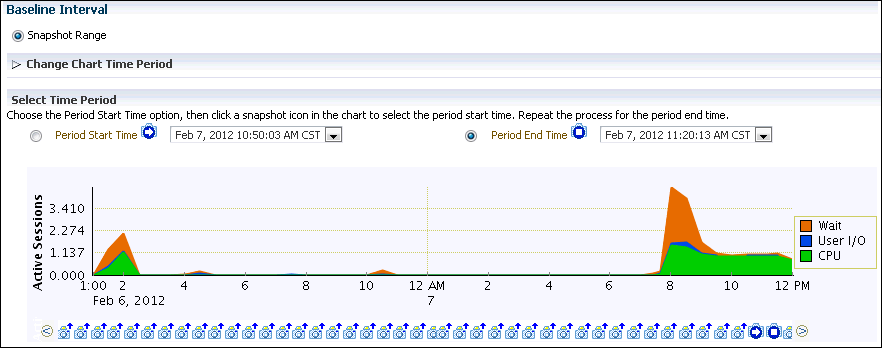
      • Under Select Time Period, specify a start time for the baseline by selecting Period Start Time radio button and then a snapshot icon below the Active Sessions chart that corresponds to the desired start time.

      • Specify an end time for the baseline by selecting Period End Time radio button and then a snapshot icon below the Active Sessions chart that corresponds to the desired end time.

      • Optionally, to view older snapshots that are not displayed below the Active Sessions chart, expand Change Chart Time Period. Enter the desired start date in the Chart Start Date field and the desired end date in the Chart End Date field, and click Go.

      In this example, a snapshot range of February 7, 2012 from 10:50 a.m. to 11:20 a.m. is selected.

    • To use a time range, select Time Range. Complete the following steps:

      • In the Start Time fields, select a start time for the baseline.

      • In the End Time fields, select an end time for the baseline.

      In the following example, a time range from 12:20 p.m. to 12:35 p.m. on February 7, 2012 is selected.

  8. Click Finish.

    The AWR Baselines page returns and has a new item for just created baseline.