Entra ID Authentication
This section enables you to connect to an Oracle Database that is configured for Entra ID (Azure AD) authentication, using the SQL Developer Extension for VS Code.
You will learn how to set up the necessary tools, configure authentication, and establish a secure connection to your database.
Install the Azure SDK
Open a SQLcl terminal inside VS Code.
The Azure SDK is a set of JAR files required by the JDBC thin driver to enable connections to databases using Entra ID authentication. The SQL Developer extension provides a simple command to install this SDK:
sdk install jdbc-azureOnce installation is complete, restart VS Code to load the newly installed JAR files.
Set up the tnsnames.ora Entry
Add a new entry to your tnsnames.ora file with the necessary parameters for Entra ID authentication:
PDB1 =
  (DESCRIPTION=
    (ADDRESS=(PROTOCOL=TCPS)(HOST=xxxxx)(PORT=0000))
    (SECURITY=
      (SSL_SERVER_DN_MATCH=TRUE)
      (WALLET_LOCATION=SYSTEM)
      (TOKEN_AUTH=AZURE_INTERACTIVE)
      (TENANT_ID=xxxxx)
      (CLIENT_ID=xxxxx)
      (AZURE_DB_APP_ID_URI=xxxxx)
    )
    (CONNECT_DATA=
      (SERVER=DEDICATED)
      (SERVICE_NAME=pdb1)
    )
)-
PROTOCOL: Must be set to
TCPSto ensure a secure connection for token transmission. -
HOST: Specify the database host.
-
PORT: Specify the database port.
-
SSL_SERVER_DN_MATCH (optional): Enforces server-side certificate validation through distinguished name (DN) matching.
-
WALLET_LOCATION: Use
SYSTEMfor public CA-signed certificates, or specify a local path if using a self-signed or private CA. When connecting to an OCI database that uses a wallet (such as Autonomous Database), ensure that it points to the extracted wallet location. -
TOKEN_AUTH: Set to
AZURE_INTERACTIVEfor Entra ID authentication. -
TENANT_ID: Set to
AZURE_INTERACTIVEfor Entra ID authentication. -
CLIENT_ID: Specify the registered Entra ID web application for the database client.
-
AZURE_DB_APP_ID_URI: Specify the URI of the registered Entra ID web application of the database server.
Create the Connection
Create a new connection using the SQL Developer Extension as you would for a standard TNS connection. The username and password are not required, as authentication will be completed through an interactive browser login prompted by the extension.
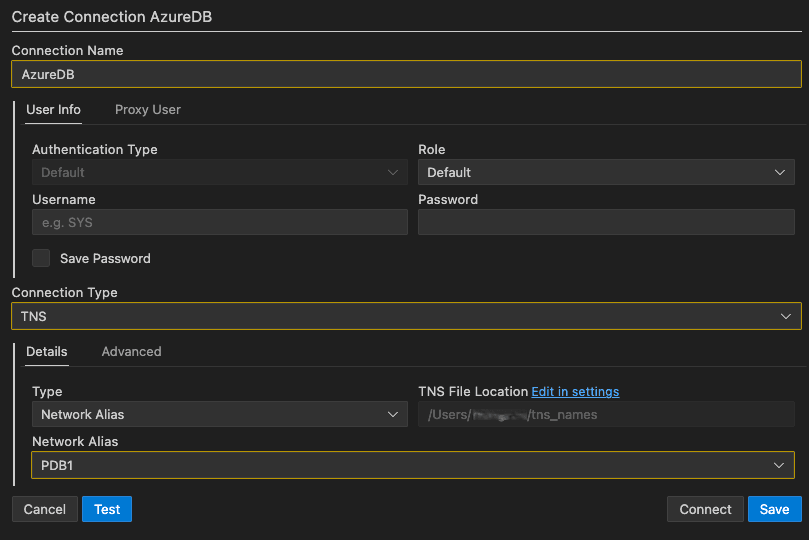
Description of the illustration entra_id_authentication.png
Once you open your connection, a browser window will launch prompting you to sign in with your Entra ID credentials. After you successfully authenticate, an authentication successful screen will be displayed. You can then close the browser and return to VS Code to proceed with your database connection.