3.2.1 Object Navigator and Files
The Navigator tab in the left pane displays saved objects for the selected schema. The Files tab enables you to view and open files saved in your browser or local system.
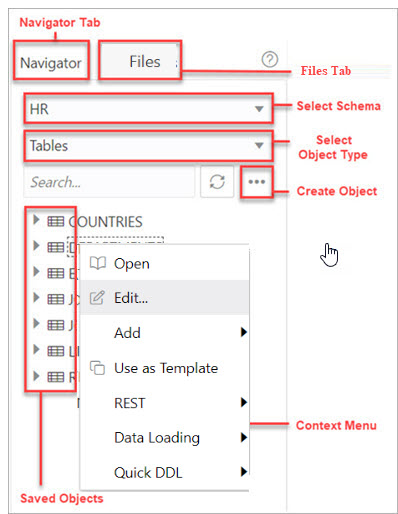
The following figure shows the various elements in the left pane.
Figure 3-1 Left Pane in SQL
Navigator Tab
Displays saved objects for the selected schema.
-
Schema and Object Type selector: Use the drop-down lists to select the schema and filter the results by object type.
-
Search: Searches the contents of a saved worksheet or search for objects in the Navigator tab by name. The search functionality is not case-sensitive, retrieves all matching entries, and does not require the use of wild card characters.
-
Context menu: Options in the context menu are:
-
Open to browse properties and data relevant to the object type (tables and views).
The Data pane displays the data for a table, view, or materialized view.
To edit an entry, double-click a cell to make edits. You can also click
 and enter the value. When you make an edit, the border of
the gutter cell in that row changes to blue.
The icons available in the Data pane are:
- Create Row: Insert a new row into the database table. When you insert a row using the Create Row icon, the row is committed into the database.
-
Delete Selected: Mark the selected row for deletion. When you mark a row for deletion, the border of the row changes to red.
-
Commit: Commit all changes made to the database.
-
Undo All: Revert all changes that are marked for commit.
Use the Filter icon at the top right corner to filter the column data. You can also right-click a cell to access the context menu to count rows, view a single record, export or copy the cell text to clipboard.
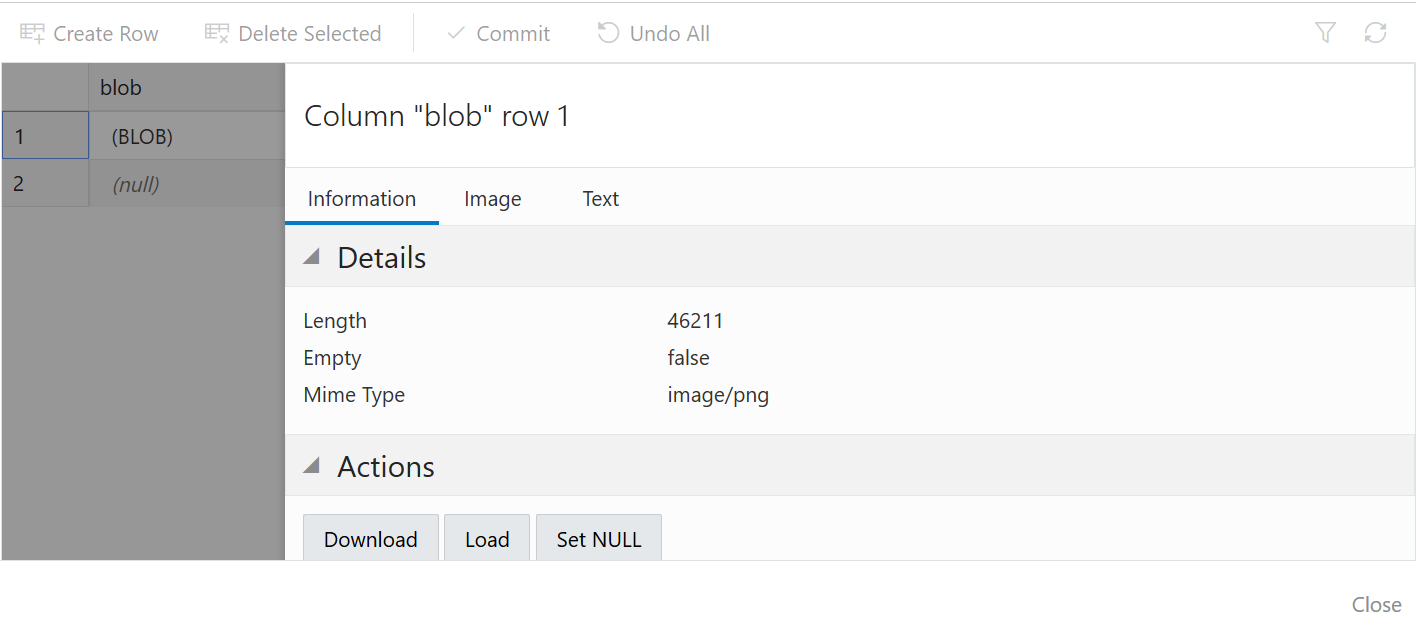
To view a Binary Large Object data type (BLOB), click the pencil icon for a BLOB data type. In the View Value dialog:- The Image tab displays the loaded image, if the loaded BLOB type is an image.
- The Text tab displays the text file, if the loaded BLOB type is text .
- The Information tab displays the details
and allows you to perform the following actions:
- Download: To download the image/text file of BLOB data type .
- Load: To insert an image/text of BLOB data type.
- Set NULL: To delete the object and set the value as NULL.
-
Edit edits the properties of an existing object.
-
Add creates an object based on the object type selected.
-
Use as Template creates an object by using the properties of an existing object as the template.
-
REST
-
Enable enables REST access for the database object. See Enabling REST Access for a Database Object
A REST enabled object is indicated by a REST Enabled icon
 in the Navigator tab.
-
Disable disables REST access for the database object after it is enabled. See Disabling REST Access for a Database Object
-
cURL Command generates a cURL call for a selected HTTP method for the database object. See Generating cURL Requests for a REST-Enabled Database Object
-
-
Data Loading loads data from local files into a table.
-
Quick DDL generates Data Definition Language statements for the object.
-
-
Refresh
 : Refreshes the objects or worksheets listed in the left pane.
-
Object Submenu
 : Opens the Create Object dialog to create a new object based on the
type selected in the drop-down list.
-
Help
 : Provides contextual help documentation.
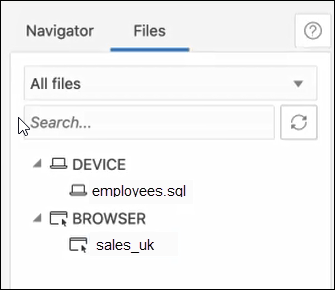
Files Tab
Enables you to open files from your browser or local device.
Note:
The DEVICE category in the left pane is displayed only when using a Chromium-based browser in a secure context (HTTPS).All files: Use the drop-down list to filter files by browser or device.
The context menu options for a file are Open and Delete. In Device, the corresponding option for deleting a file is Forget. In this case, the file is not deleted, instead the reference to the file is removed.
Drag and Drop Objects and Files into the Worksheet
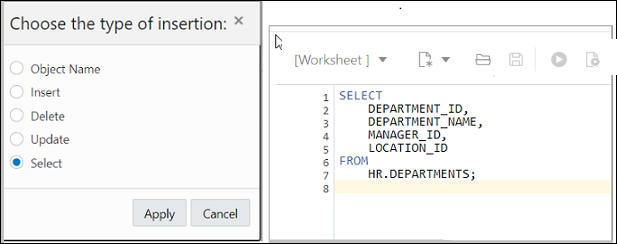
You can drag objects from the left pane and drop them into the worksheet editor in the right pane.
-
If you drag and drop a table or view, you are prompted to select one of the following SQL statements: Insert, Update, Select, or Delete. For example, if you choose Select, a Select statement is constructed with all columns in the table or view. You can then edit the statement, for example, modifying the column list or adding a WHERE clause.
If you choose Object Name, the name of the object prefixed by the schema name is added to the worksheet.
-
If you drag and drop a function or procedure, you can choose to insert the name or the PL/SQL code of the function or procedure in the worksheet. If you select the PL/SQL code, you can enter the parameters before inserting the code into the worksheet.


