3.4 Adding BuildTuxedo to the MSDEV Tools Menu
To add BuildTuxedo to the MSDEV Tools menu, follow
these steps:
- In the Microsoft Visual C++.Net IDE (
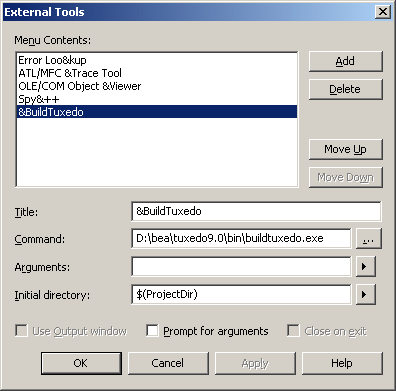
msdev) graphical user interface (GUI), choose Tools → External Tools. The External Tools window displays. - In the External Tools window, click Add to clear the Title field.
Figure 3-1 External Tools Window

- In the Title field of the External Tools page, type
&BuildTuxedoin the empty field.Note:
To enable a letter key as a hot key, put an ampersand (&) before the appropriate letter. - In the Command field of the External Tools page, provide a pathname by doing one of the following:
- Type the full pathname of
BuildTuxedo(%TUXDIR%\bin\BuildTuxedo). - To the right of the Command field, click the ellipsis button, browse to the desired directory, select
buildtuxedo.exe, and click Open. The selected pathname appears in the External Tools window. - In the Initial directory field of the External Tools page, click the right arrow button to display a pop-up menu. In the pop-up menu, choose Project Directory (
$(ProjectDir)).
- Type the full pathname of
- In the Initial directory field of the External Tools page, click the right arrow button to display a pop-up menu. In the pop-up menu, choose Project Directory (
$(ProjectDir)).Note:
To modify an item, highlight it and type over it. To move any item, highlight it and select the up or down arrow at the top of the Menu Contents box. - Click Apply to save the changes and click OK to close the External Tools window.
BuildTuxedo is now part of the MSDEV Tools
menu.