Oracle Zero Downtime Migration – Logical Offline Migration to ExaDB-D on Oracle Database@Google Cloud
Purpose
Oracle customers are rapidly increasing their workload migration into the Oracle Cloud, Engineered Systems, and Oracle Database@Google Cloud. However, migrating workloads has been a source of challenges for many years. Migrating database workloads from one system to another or into the Cloud is easier said than done.
Based on years of experience migrating Oracle workloads, Oracle has developed Zero Downtime Migration (ZDM). ZDM is Oracle’s premier solution for a simplified and automated migration experience, providing zero to negligible downtime for the production system depending on the migration scenario. ZDM allows you to migrate your on-premises Oracle Databases directly and seamlessly to and between Oracle Database@Azure, Oracle Database@ Google Cloud, Oracle Database@AWS, and any Oracle-owned infrastructure, including Exadata Database Machine On-Premises, Exadata Cloud at Customer, and Oracle Cloud Infrastructure. Oracle ZDM supports a wide range of Oracle Database versions and, as the name implies, ensures minimal to no production database impact during the migration.
ZDM follows Oracle Maximum Availability Architecture (MAA) principles and incorporates products such as GoldenGate and Data Guard to ensure High Availability and an online migration workflow that leverages technologies such as the Recovery Manager, Data Pump, and Database Links.
This technical brief is a step-by-step guide for migrating your on-premises Oracle Databases to Oracle Exadata Database Service on Dedicated Infrastructure (ExaDB-D) on Oracle Database@Google Cloud, with ZDM’s Logical Offline workflow. This guide is also valid for Oracle Base Database Service on Oracle Database@Google Cloud, all steps, connectivity, backup and ZDM configurations are equivalent and work for both targets.
Oracle ZDM will run on a separate node and connect to Source and Target to perform the migration. This guide will cover all requirements for installing the Oracle ZDM Service Host, the Source Database, the Target Database recipient of the migration process, and the networking used. The migration process will be dissected and done in a step-by-step fashion. This guide will answer the most frequently asked questions regarding the product and the overall migration process.
For more information on Oracle Zero Downtime Migration, please visit ZDM’s product website and Oracle Database@Google Cloud product website.
Disclaimer
This document in any form, software or printed matter, contains proprietary information that is the exclusive property of Oracle. Your access to and use of this confidential material is subject to the terms and conditions of your Oracle software license and service agreement, which has been executed and with which you agree to comply. This document and information contained herein may not be disclosed, copied, reproduced or distributed to anyone outside Oracle without prior written consent of Oracle. This document is not part of your license agreement nor can it be incorporated into any contractual agreement with Oracle or its subsidiaries or affiliates.
This document is for informational purposes only and is intended solely to assist you in planning for the implementation and upgrade of the product features described. It is not a commitment to deliver any material, code, or functionality, and should not be relied upon in making purchasing decisions. The development, release, timing, and pricing of any features or functionality described in this document remains at the sole discretion of Oracle. Due to the nature of the product architecture, it may not be possible to safely include all features described in this document without risking significant destabilization of the code.
Zero Downtime Migration
Oracle Zero Downtime Migration (ZDM) is the Oracle Maximum Availability Architecture (MAA)-recommended solution to migrate Oracle Databases to the Oracle Cloud. ZDM's inherent design keeps in mind the migration process as straightforward as possible to ensure the most negligible impact on production workloads. The Source Database to be migrated can be on-premises, deployed on Oracle Cloud Infrastructure, or a 3rd Party Cloud. The Target Database deployment can be on Oracle Database@Azure, Oracle Database@Google Cloud, Oracle Database@AWS, Database Cloud Service on Oracle Cloud Infrastructure (OCI) Virtual Machine, Exadata Cloud Service, Exadata Cloud at Customer, and Autonomous AI Database. ZDM automates the entire migration process, reducing the chance of human errors. ZDM leverages Oracle Database-integrated high availability (HA) technologies such as Oracle Data Guard and GoldenGate and follows all MAA best practices that ensure no significant downtime of production environments. Oracle ZDM supports both Physical and Logical Migration workflows. This technical brief covers a step-by-step guide for the Logical Offline Migration Workflow.
A standard Logical Offline migration will take the following steps:
- Download and Configure ZDM.
- ZDM Starts Database Migration.
- ZDM Starts a Data Pump Export
- ZDM Transfer Dump Files from the Source to the Selected Backup Location.
- ZDM Starts a Data Pump Import Operation with Transferred Dump Files.
- ZDM Switches Over.
- ZDM Performs Post Migration Validations.
- ZDM Finalizes the Migration.
Supported Configurations
Oracle ZDM supports Oracle Database versions 11.2.0.4, 12.1.0.2, 12.2.0.1, 18c, 19c, 21c, and 26ai. ZDM’s physical migration workflow requires the Source and Target Databases to be in the same database release.
Oracle ZDM supports Source Oracle Databases hosted on Linux, Solaris, and AIX operating systems. Oracle ZDM supports single-instance databases, Oracle RAC One Node databases, or Oracle RAC databases as sources. Oracle ZDM supports Oracle Database Enterprise & Standard Edition as Source and Target Databases. ZDM’s physical migration workflow supports only Source Databases hosted on Linux platforms.
Architecture
An architectural overview of the ZDM server, the source database on-premises, the target database on Oracle Exadata Database Service on Dedicated Infrastructure (ExaDB-D) on Oracle Database@Google Cloud, and all networks and components required are described in the diagram below:
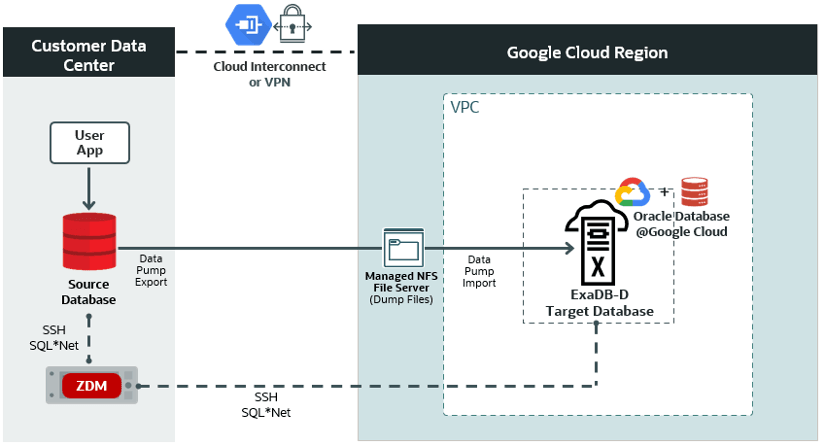
Figure 1. This is a High-Level Architectural overview showcasing the customer data center where the source database and ZDM’s server reside. It also shows all connectivity to the target Oracle Exadata Database Service on Dedicated Infrastructure (ExaDB-D) on Oracle Database@Google Cloud.
Zero Downtime Migration Service Host
Zero Downtime Migration Service Host Requirements
Oracle Zero Downtime Migration installation must take place on a separate host, which must fulfill the following requirements:
- Linux host running on Oracle 7, 8, or RHEL 8 (only these OS platforms/versions are supported).
- 100 GB of free storage space. This space is required for all the logs that ZDM will generate.
- A zdm group and a zdmuser as part of this group.
- The following packages must be installed:
glibc-develexpectunziplibaiooraclelinux-developer-release-el7
- All hostnames and IP addresses to be used must be present as entries in the /etc/hosts file.
For more information on the ZDM Service Host requirements and setting up ZDM on RHEL platforms, please refer to Oracle ZDM’s product documentation, specifically “Setting Up Zero Downtime Migration Software” section.
For this step-by-step guide, the ZDM Service Host runs on-premises on an Oracle Linux Server 8.9. The host private IP is masked for this guide, but as an example we will use the fictional zz.dd.mm.hh and the hostname is zdmhost.
Network and Connectivity
Google Cloud Region
A Google Cloud region is a geographical area that contains data centers and infrastructure for hosting resources. It is made up of zones that are isolated from each other within the region.
Google Cloud Project
A Google Cloud Project is required to use Google Workspace APIs and build Google Workspace add-ons or apps. A Cloud project forms the basis for creating, enabling, and using all Google Cloud services, including managing APIs, enabling billing, adding and removing collaborators, and managing permissions.
Google Virtual Private Cloud
Google Cloud Virtual Private Cloud (VPC) provides networking functionality to Compute Engine virtual machine (VM) instances, Google Kubernetes Engine (GKE) containers, database services, and serverless workloads. VPC provides global, scalable, and flexible networking for your cloud-based service.
Google Cloud Interconnect
Cloud Interconnect extends your on-premises network to the Google network through a highly available, low-latency connection. You can use Dedicated Interconnect to connect directly to Google or Partner Interconnect to connect to Google through a supported service provider.
Oracle Exadata Database Service
Oracle Exadata Database Service enables you to leverage the power of Exadata in the cloud. Oracle Exadata Database Service delivers proven Oracle Database capabilities on purpose-built, optimized Oracle Exadata infrastructure in the public cloud and on Cloud@Customer. Built-in cloud automation, elastic resource scaling, security, and fast performance for all Oracle Database workloads helps you simplify management and reduce costs.
Source Database
The source database runs on-premises on an Oracle Linux Server 7.7 for this step-by-step guide. The host's private IP
is masked for this guide, but as an example, we will use the fictional aa.bb.sr.db address and the hostname
is onphost. The source Oracle database is a single-instance Enterprise Edition database version 19.22 with multitenant architecture. The database name is oradb, and its unique name is oradb_onp.
The HR schema to be migrated resides in the source PDB pdbsrc.
Target Database
Oracle Database@Google Cloud offers the following products:
- Oracle Exadata Database Service on Dedicated Infrastructure (ExaDB-D)
- You can provision flexible Exadata systems that allow you to add database compute servers and storage servers to your system anytime after provisioning.
- You can provision flexible Exadata systems that allow you to add database compute servers and storage servers to your system anytime after provisioning.
- Oracle Autonomous AI Database Serverless (ADB-S)
- Autonomous AI Database provides an easy-to-use, fully autonomous database that scales elastically, delivers fast query performance, and requires no database administration.
Oracle Database@Google Cloud integrates Oracle Exadata Database Service, Oracle Real Application Clusters (Oracle RAC), and Oracle Data Guard technologies into the Google Cloud platform. The Oracle Database service runs on Oracle Cloud Infrastructure (OCI) and is co-located in Google’s data centers. The service offers features and price parity with OCI.
Oracle Database@Google Cloud service offers the same low latency as other Google-native services and meets mission-critical workloads and cloud-native development needs. Users manage the service on the Google Cloud console and with Google Cloud automation tools. The service is deployed in Google Virtual Private Cloud (VPC). The service requires that users have a Google Cloud Project and an OCI tenancy.
For this step-by-step guide, the target platform is Oracle Exadata Database Service on Dedicated Infrastructure (ExaDB-D) on Oracle Database@Google Cloud. The infrastructure contains a 2-node VM cluster. The VM cluster host private IPs are masked for this guide, but as an example, we will use the fictional ta.db.og.1 and ta.db.og.2, and the host names are exadbgoogle1 and exadbgoogle2.
ZDM requires configuring a placeholder database target environment before beginning the migration process.
The target Oracle database is a 2-node Oracle RAC version 19.24 with multitenant architecture created using Oracle Cloud Console. The database name is oradb, and the database's unique name is oradb_exa.
The HR schema is to be migrated to the target PDB pdbtgt.
Source and Target Database Pre-Requisites
- The character set on the source database must be the same as the target database.
- The DATAPUMP_EXP_FULL_DATABASE and DATAPUMP_IMP_FULL_DATABASE roles are required.
- The DATAPUMP_IMP_FULL_DATABASE role is required for the import operation at the specified target database for the specified target database user.
Additional Configuration
SSH Key
Check the key format:
[zdmuser@zdmhost ~]$ head -n1 id_rsa
Create an SSH Key in RSA format (if not already created):
[zdmuser@zdmhost ~]$ ssh-keygen -m PEM -t rsa
Change an existing SSH key into RSA format (if already created and need to reformat):
[zdmuser@zdmhost ~]$ ssh-keygen -p -m PEM -f id_rsa
NFS File Share
An NFS file share can be provided via Oracle Advanced Cluster File System (Oracle ACFS), NFS Server, or Google Filestore. See Understanding NFS Storage Options for Oracle ZDM Migrations to Oracle Database@Google Cloud for more details.
ZDM Logical Offline migration workflow uses Oracle Data Pump Export and Import to migrate the data from the source to the target database. An NFS file share is provided through Google Filestore to store the Data Pump dump files.
The IP address of the NFS share is masked for this guide, but as an example, we will use the fictional aa.an.fs.pe address. The NFS path is aa.an.fs.pe:/zdm_share.
The NFS share must be mounted on both the source and target database hosts.
To mount the NFS Share on the source and target database hosts:
As root:
mkdir -p /mnt/nfs3zdm

mount -o rw aa.an.fs.pe:/zdm_share /mnt/nfs3zdm
Make sure the Oracle user has access to the NFS mount
chown oracle:oinstall /mnt/nfs3zdm
As the Oracle user:
touch /mnt/nfs3zdm/test.txt
On the source and target PDBs:
SQL> create directory DATA_PUMP_DIR_NFS as '/mnt/nfs3zdm';
Database Migration Step by Step with ZDM
Step 1: Prepare the Source Database Host On-Premises
Copy the SSH public key of the zdmuser from the ZDM host to the .ssh/authorized_keys file on the source database host for the user you want to use for login, in this case, onpuser: On ZDM host as zdmuser
[zdmuser@zdmhost ~]$ cat .ssh/id_rsa.pub
On the source database host as user onpuser
[onpuser@onphost ~]$ vi .ssh/authorized_keys
#insert the public key and save the changes
Add the target database hostname, IP address, and SCAN name to the /etc/hosts file. As root user:
[root@onphost ~]# vi /etc/hosts
#add the following entries
ta.db.og.1 exadbgoogle1.oraclevcn.com exadbgoogle1
ta.db.og.2 exadbgoogle2.oraclevcn.com exadbgoogle2
ta.db.og.3 demo-scan-sample.oraclevcn.com target-scan
Step 2: Prepare the Source Database On-Premises
For offline logical migrations, for optimal Data Pump performance, it is recommended that you set STREAMS_POOL_SIZE to a minimum of 256MB-350MB, to have an initial pool allocated, otherwise you might see a significant delay during start-up.
As SYS user:
SQL> alter system set streams_pool_size = 256M;
SQL> grant DATAPUMP_EXP_FULL_DATABASE to system container=all;
Step 3: Prepare the target database host on ExaDB-D on Oracle Database@Google Cloud
Copy the SSH public key of the zdmuser from the ZDM host to the .ssh/authorized_keys file on the target database host for the user you want to use for login; in this case, OPC:
On ZDM host as zdmuser
[zdmuser@zdmhost ~]$ cat .ssh/id_rsa.pub
On the target database hosts as user opc (on all VMs of the VM cluster)
[opc@exadbgoogle1 ~]$ vi .ssh/authorized_keys
Insert the public key and save the changes
[opc@exadbgoogle2 ~]$ vi .ssh/authorized_keys
Insert the public key and save the changes
Add the source database hostname and IP information into the /etc/hosts file. As root user (on all VMs of the VM cluster)
[root@exadbgoogle1 ~]# vi /etc/hosts
#add the following entries
aa.bb.sr.db onphost
[root@exadbgoogle2 ~]# vi /etc/hosts
#add the following entries
aa.bb.sr.db onphost
Step 4: Prepare the target database on ExaDB-D on Oracle Database@Google Cloud
For offline logical migrations, for optimal Data Pump performance, it is recommended that you set STREAMS_POOL_SIZE to a minimum of 256MB-350MB, to have an initial pool allocated, otherwise you might see a significant delay during start-up.
As user SYS:
SQL> alter system set streams_pool_size = 256M;
SQL> grant DATAPUMP_IMP_FULL_DATABASE to system container=all;
Step 5: Prepare the ZDM Service Host On-Premises
Add the source and target hostnames and IP addresses into the /etc/hosts file. As root user:
[root@zdmhost ~]# vi /etc/hosts
#add the following entries
ta.db.oa.1 exadbgoogle1
ta.db.oa.2 exadbgoogle2
aa.bb.sr.db onphost
Test the SSH connectivity to the source and target database hosts:
[zdmuser@zdmhost ~]$ ssh -i /home/zdmuser/.ssh/id_rsa onpuser@onphost
[zdmuser@zdmhost ~]$ ssh -i /home/zdmuser/.ssh/id_rsa opc@exadbgoogle1
[zdmuser@zdmhost ~]$ ssh -i /home/zdmuser/.ssh/id_rsa opc@exadbgoogle2
Verify that TTY is disabled for the SSH-privileged user. If TTY is disabled, the following command returns the date from the remote host without any errors:
[zdmuser@zdmhost ~]$ ssh -oStrictHostKeyChecking=no -i /home/zdmuser/.ssh/id_rsa onpuser@onphost "/usr/bin/sudo /bin/sh -c date"
[zdmuser@zdmhost ~]$ ssh -oStrictHostKeyChecking=no -i /home/zdmuser/.ssh/id_rsa opc@exadbgoogle1 "/usr/bin/sudo /bin/sh -c date"
[zdmuser@zdmhost ~]$ ssh -oStrictHostKeyChecking=no -i /home/zdmuser/.ssh/id_rsa opc@exadbgoogle2 "/usr/bin/sudo /bin/sh -c date"
These commands should execute without any prompting and return the date from the remote host.
Step 6: Create the Logical Offline Migration Response File on the ZDM host
You’ll find a template on the ZDM host at $ZDMHOME/rhp/zdm/template/zdm_template.rsp, briefly describing the parameters and their possible values. Here, we will create a new response file with the minimal parameters required. As zdmuser:
[zdmuser@zdmhost ~]$ vi /home/zdmuser/logical_offline/logical_offline.rsp
#add the following parameters and save the changes
# migration method
MIGRATION_METHOD=OFFLINE_LOGICAL
DATA_TRANSFER_MEDIUM=NFS

# data pump
DATAPUMPSETTINGS_JOBMODE=SCHEMA
INCLUDEOBJECTS-1=owner:HR
DATAPUMPSETTINGS_METADATAREMAPS-1=type:REMAP_TABLESPACE,oldValue:USERS,newValue:DATA
DATAPUMPSETTINGS_DATAPUMPPARAMETERS_EXPORTPARALLELISMDEGREE=2
DATAPUMPSETTINGS_DATAPUMPPARAMETERS_IMPORTPARALLELISMDEGREE=2
DATAPUMPSETTINGS_EXPORTDIRECTORYOBJECT_NAME=DATA_PUMP_DIR_NFS
DATAPUMPSETTINGS_IMPORTDIRECTORYOBJECT_NAME=DATA_PUMP_DIR_NFS

# on source and target db: select directory_name, directory_path from dba_directories;
DATAPUMPSETTINGS_EXPORTDIRECTORYOBJECT_PATH=/mnt/nfs3zdm
DATAPUMPSETTINGS_IMPORTDIRECTORYOBJECT_PATH=/mnt/nfs3zdm


# source db (pdb)
SOURCEDATABASE_CONNECTIONDETAILS_HOST=onphost
SOURCEDATABASE_CONNECTIONDETAILS_PORT=1521
SOURCEDATABASE_CONNECTIONDETAILS_SERVICENAME=pdbsrc
SOURCEDATABASE_ADMINUSERNAME=SYSTEM


# target db (pdb)
TARGETDATABASE_CONNECTIONDETAILS_HOST=exadbgoogle1
TARGETDATABASE_CONNECTIONDETAILS_PORT=1521
TARGETDATABASE_CONNECTIONDETAILS_SERVICENAME=sample.oraclevcn.com
TARGETDATABASE_ADMINUSERNAME=SYSTEM


# oci cli

OCIAUTHENTICATIONDETAILS_USERPRINCIPAL_USERID=ocid1.user.oc1..aaaaaaaa
OCIAUTHENTICATIONDETAILS_USERPRINCIPAL_TENANTID=ocid1.tenancy.oc1..aaaaaaaa
OCIAUTHENTICATIONDETAILS_USERPRINCIPAL_FINGERPRINT=aaa.bbb.ccc.ddd
OCIAUTHENTICATIONDETAILS_USERPRINCIPAL_PRIVATEKEYFILE=/home/zdmuser/.oci/oci_api_key.pem
OCIAUTHENTICATIONDETAILS_REGIONID=us-ashburn-1
Though NFS is used instead of OCI Object Storage, the OCI CLI parameters are still required to discover the target database.
Step 7: Evaluate the Configuration
Execute the following command on the ZDM host as zdmuser to evaluate the migration. ZDM will check the source and target database configurations. The actual migration will not be started. On the ZDM host as zdmuser:
[zdmuser@zdmhost ~]$ $ZDMHOME/bin/zdmcli migrate database \
-rsp /home/zdmuser/logical_offline/logical_offline.rsp \
-sourcenode onphost \
-sourcesid oradb \
-srcauth zdmauth \
-srcarg1 user:onpuser \
-srcarg2 identity_file:/home/zdmuser/.ssh/id_rsa \
-srcarg3 sudo_location:/usr/bin/sudo \
-targetnode exadbgoogle1 \
-tgtauth zdmauth \
-tgtarg1 user:opc \
-tgtarg2 identity_file:/home/zdmuser/.ssh/id_rsa \
-tgtarg3 sudo_location:/usr/bin/sudo \
-eval
Enter source database administrative user "SYSTEM" password:
Enter target database administrative user "SYSTEM" password:
Operation "zdmcli migrate database" scheduled with the job ID "1".
If the source database uses ASM for storage management, use -sourcedb <db_unique_name> instead of -sourcesid <SID> in the zdmcli command. Check the job status. On the ZDM host as zdmuser:
Check the job status. On the ZDM host as zdmuser:
[zdmuser@zdmhost ~]$ $ZDMHOME/bin/zdmcli query job -jobid 1
zdmhost.zdm: Audit ID: 195
Job ID: 1
User: zdmuser
Client: zdmhost
Job Type: "EVAL"
Scheduled job command: "zdmcli migrate database -rsp /home/zdmuser/logical_offline_exa/logical_offline_exa.rsp -sourcenode onphost -sourcesid oradb -srcauth zdmauth -srcarg1 user:sample_user -srcarg2 identity_file:/home/zdmuser/.ssh/id_rsa -srcarg3 sudo_location:/usr/bin/sudo -targetnode targethost -tgtauth zdmauth -tgtarg1 user:opc -tgtarg2 identity_file:/home/zdmuser/.ssh/id_rsa -tgtarg3 sudo_location:/usr/bin/sudo -eval"

Current status: SUCCEEDED
Result file path: "/home/zdmuser/zdm/zdmbase/chkbase/scheduled/job-1.log"
Metrics file path: "/home/zdmuser/zdm/zdmbase/chkbase/scheduled/job-1.json"
Excluded objects file path: "/home/zdmuser/zdm/zdmbase/chkbase/scheduled/job-1-filtered-objects.json"

Job execution elapsed time: 1 minutes 53 seconds
ZDM_VALIDATE_TGT ...................... COMPLETED
ZDM_VALIDATE_SRC ...................... COMPLETED
ZDM_SETUP_SRC ......................... COMPLETED
ZDM_PRE_MIGRATION_ADVISOR ............. COMPLETED
ZDM_VALIDATE_DATAPUMP_SETTINGS_SRC .... COMPLETED
ZDM_VALIDATE_DATAPUMP_SETTINGS_TGT .... COMPLETED
ZDM_PREPARE_DATAPUMP_SRC .............. COMPLETED
ZDM_DATAPUMP_ESTIMATE_SRC ............. COMPLETED
ZDM_CLEANUP_SRC ....................... COMPLETED
Detailed information about the migration process can be found by monitoring the log file:
[zdmuser@zdmhost ~]$ tail -f "/home/zdmuser/zdm/zdmbase/chkbase/scheduled/job-1.log
Step 8: Initiate the Migration
To initiate the actual migration, execute the same command for evaluation, but this time without the -eval parameter. On the ZDM host as zdmuser:
[zdmuser@zdmhost ~]$ $ZDMHOME/bin/zdmcli migrate database \
-rsp /home/zdmuser/logical_offline/logical_offline.rsp \
-sourcenode onphost \
-sourcesid oradb \
-srcauth zdmauth \
-srcarg1 user:onpuser \
-srcarg2 identity_file:/home/zdmuser/.ssh/id_rsa \
-srcarg3 sudo_location:/usr/bin/sudo \
-targetnode exadbgoogle1 \
-tgtauth zdmauth \
-tgtarg1 user:opc \
-tgtarg2 identity_file:/home/zdmuser/.ssh/id_rsa \
-tgtarg3 sudo_location:/usr/bin/sudo
Enter source database administrative user "SYSTEM" password:
Enter target database administrative user "SYSTEM" password:
Operation "zdmcli migrate database" scheduled with the job ID "2".
Check the job status. On the ZDM host as zdmuser:
[zdmuser@zdmhost ~]$ $ZDMHOME/bin/zdmcli query job -jobid 2
zdmhost.zdm: Audit ID: 207
Job ID: 2
User: zdmuser
Client: zdmhost
Job Type: "MIGRATE"
Scheduled job command: "zdmcli migrate database -rsp /home/zdmuser/logical_offline_exa/logical_offline_exa.rsp -sourcenode onphost -sourcesid oradb -srcauth zdmauth -srcarg1 user:sample_user -srcarg2 identity_file:/home/zdmuser/.ssh/id_rsa -srcarg3 sudo_location:/usr/bin/sudo -targetnode targethost -tgtauth zdmauth -tgtarg1 user:opc -tgtarg2 identity_file:/home/zdmuser/.ssh/id_rsa -tgtarg3 sudo_location:/usr/bin/sudo"
Current status: SUCCEEDED

Result file path: "/home/zdmuser/zdm/zdmbase/chkbase/scheduled/job-2.log"
Metrics file path: "/home/zdmuser/zdm/zdmbase/chkbase/scheduled/job-2.json"
Excluded objects file path: "/home/zdmuser/zdm/zdmbase/chkbase/scheduled/job-2-filtered-objects.json"

Job execution elapsed time: 3 minutes 25 seconds
ZDM_VALIDATE_TGT ...................... COMPLETED
ZDM_VALIDATE_SRC ...................... COMPLETED
ZDM_SETUP_SRC ......................... COMPLETED
ZDM_PRE_MIGRATION_ADVISOR ............. COMPLETED
ZDM_VALIDATE_DATAPUMP_SETTINGS_SRC .... COMPLETED
ZDM_VALIDATE_DATAPUMP_SETTINGS_TGT .... COMPLETED
ZDM_PREPARE_DATAPUMP_SRC .............. COMPLETED
ZDM_DATAPUMP_ESTIMATE_SRC ............. COMPLETED
ZDM_PREPARE_DATAPUMP_TGT .............. COMPLETED
ZDM_DATAPUMP_EXPORT_SRC ............... COMPLETED
ZDM_TRANSFER_DUMPS_SRC ................ COMPLETED
ZDM_DATAPUMP_IMPORT_TGT ............... COMPLETED
ZDM_POST_DATAPUMP_SRC ................. COMPLETED
ZDM_POST_DATAPUMP_TGT ................. COMPLETED
ZDM_POST_ACTIONS ...................... COMPLETED
ZDM_CLEANUP_SRC ....................... COMPLETED
Detailed information about the migration process can be found by monitoring the log file:
[zdmuser@zdmhost ~]$ tail -f /home/zdmuser/zdm/zdmbase/chkbase/scheduled/job-2.log
Known Issues
All common issues are documented and updated periodically in Oracle Zero Downtime Migration’s documentation, specifically on the product release note, Known Issues section.
Troubleshooting & Other Resources
For Oracle ZDM log review:
- ZDM Server Logs:
- $ZDM_BASE/crsdata/<zdm_service_node>/rhp/rhpserver.log.0
- $ZDM_BASE/crsdata/<zdm_service_node>/rhp/rhpserver.log.0
- Check source node logs
- <oracle_base>/zdm/zdm_<src_db_name>_<job_id>/zdm/log
- <oracle_base>/zdm/zdm_<src_db_name>_<job_id>/zdm/log
- Check target node logs.
- <oracle_base>/zdm/zdm_<tgt_db_name>_<job_id>/zdm/log
For all Oracle Support Service Requests related to Zero Downtime Migration, please be sure to follow the instructions in the My Oracle Support document: SRDC – Data Collection for Database Migration Using Zero Downtime Migration (ZDM) (DOC ID 2595205.1).
Oracle® Database, Oracle Zero Downtime Migration, Release 21.5
G23738-03
December 09, 2025