Oracle Zero Downtime Migration – Physical Online Migration to Exadata Database Service on Oracle AI Database@Azure
Purpose statement
Oracle customers are rapidly increasing their migration of workloads into the Oracle Cloud, Engineered Systems, and Oracle AI Database@ Azure. However, migrating workloads has been a source of challenges for many years. Migrating database workloads from one system to another or into the Cloud is easier said than done.
Based on years of experience migrating Oracle workloads, Oracle has developed Zero Downtime Migration (ZDM). ZDM is Oracle’s premier solution for a simplified and automated migration experience, providing zero to negligible downtime for the production system depending on the migration scenario. ZDM allows you to migrate your on-premises Oracle AI Databases directly and seamlessly to and between Oracle AI Database@Azure and any Oracle-owned infrastructure, including Exadata Database Machine On-Premises, Exadata Cloud at Customer (ExaC@C), and Oracle Cloud Infrastructure. Oracle ZDM supports a wide range of Oracle AI Database versions and, as the name implies, ensures minimal to no production database impact during the migration.
ZDM follows Oracle Maximum Availability Architecture (MAA) principles and incorporates products such as GoldenGate and Data Guard to ensure High Availability and an online migration workflow that leverages technologies such as the Recovery Manager, Data Pump, and Database Links.
This technical brief is a step-by-step guide for migrating your on-premises Oracle AI Databases to Oracle Exadata Database Service on Dedicated Infrastructure (ExaDB-D) on Oracle AI Database@Azure, with ZDM’s Physical Online workflow, specifically the Direct Data Transfer methodology. This guide is also valid for Oracle Base Database Service and Oracle Exadata Database Service on Exascale Infrastructure (ExaDB-XS) on Oracle AI Database@Azure. Any required changes will be noted, where applicable.
Oracle ZDM will run on a separate node and connect to Source and Target to perform the migration. This guide will cover all requirements for installing the Oracle ZDM Service Host, the Source Database, the Target Database recipient of the migration process, and the networking used. The migration process will be dissected and done in a step-by-step fashion. This guide will answer the most frequently asked questions regarding the product and the overall migration process.
For more information on Oracle Zero Downtime Migration, please visit ZDM’s product website and Oracle AI Database@Azure product website.
Zero Downtime Migration
Oracle Zero Downtime Migration (ZDM) is the Oracle Maximum Availability Architecture (MAA)-recommended solution to migrate Oracle AI Databases to the Oracle Cloud. ZDM's inherent design keeps in mind the migration process as straightforward as possible to ensure the most negligible impact on production workloads. The Source Database to be migrated can be on-premises, deployed on Oracle Cloud Infrastructure, or a 3rd Party Cloud. The Target Database deployment can be in Oracle Exadata Database Service on Dedicated Infrastructure (ExaDB-D) on Oracle AI Database@Azure, Database Cloud Service on Oracle Cloud Infrastructure (OCI) Virtual Machine, Exadata Cloud Service, Exadata Cloud at Customer, and Autonomous AI Database. ZDM automates the entire migration process, reducing the chance of human errors. ZDM leverages Oracle AI Database-integrated high availability (HA) technologies such as Oracle Data Guard and GoldenGate and follows all MAA best practices that ensure no significant downtime of production environments. Oracle ZDM supports both Physical and Logical Migration workflows. This technical brief covers a step-by-step guide for the Physical Online Migration Workflow leveraging Direct Data Transfer Methodology.
A standard Physical Online migration with Direct Data Transfer will take the following steps:
- Download and Configure ZDM.
- ZDM Starts Database Migration.
- ZDM Starts a Restore from Service Operation.
- ZDM Instantiates a Standby Database.
- ZDM Synchronizes Primary and Standby.
- ZDM Switches Over & Swap Roles.
- ZDM Performs Post Migration Validations.
- ZDM Finalizes the Migration.
Supported Configurations
Oracle ZDM supports Oracle AI Database versions 11.2.0.4, 12.1.0.2, 12.2.0.1, 18c, 19c, 21c and 26ai. ZDM’s physical migration workflow requires the Source and Target Databases to be in the same database release.
Oracle ZDM supports Source Oracle AI Databases hosted on Linux, Solaris, and AIX operating systems. Oracle ZDM supports single-instance databases, Oracle RAC One Node databases, or Oracle RAC databases as sources. Oracle ZDM supports Oracle AI Database Enterprise & Standard Edition as Source and Target Databases. ZDM’s physical migration workflow supports only Source Databases hosted on Linux platforms.
Architecture
An architectural overview of the ZDM Server, your source Database on-premises, the target database Oracle Exadata Database Service on Dedicated Infrastructure (ExaDB-D) on Oracle AI Database@Azure, and all Networks and components required are described in the diagram below:
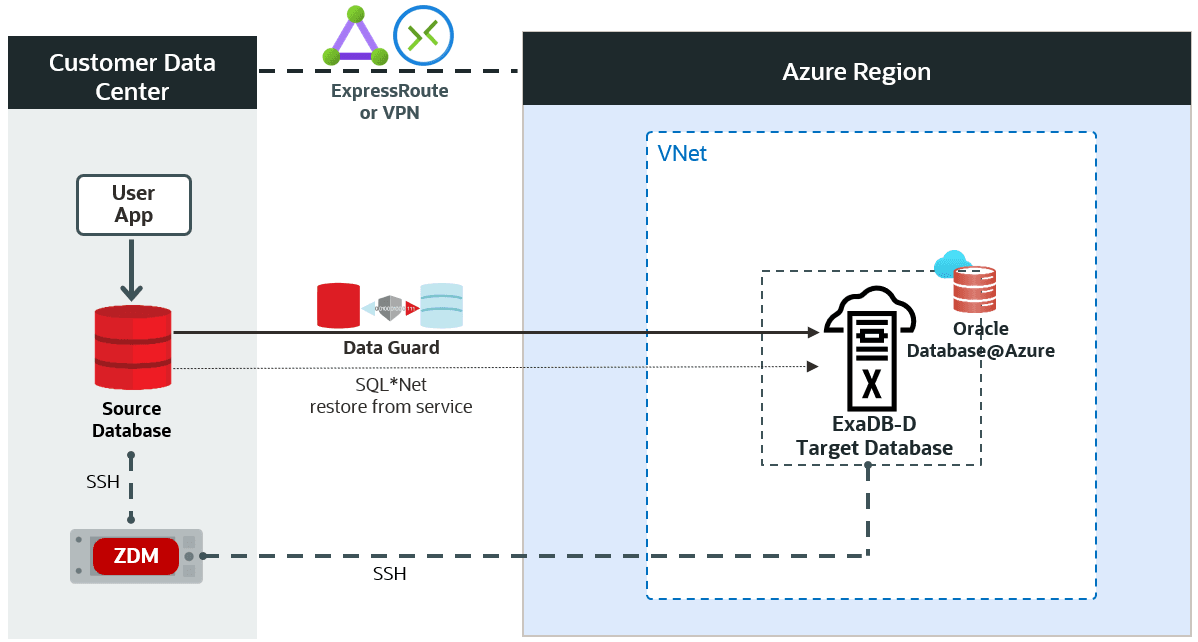
Figure 1. This is a High-Level Architectural overview showcasing the customer data center where the source database and ZDM’s server reside. It also shows all connectivity to the target Oracle Exadata Database Service on Dedicated Infrastructure (ExaDB-D) on Oracle AI Database@Azure.
Zero Downtime Migration Service Host
Zero Downtime Migration Service Host Requirements
Oracle Zero Downtime Migration installation must take place on a separate host, which must fulfill the following requirements:
- Linux host running on Oracle 7, 8, or RHEL 8 (only these OS platforms/versions are supported).
- 100 GB of free storage space. This space is required for all the logs that ZDM will generate.
- A zdm group and a zdmuser as part of this group.
The following packages must be installed:
- glibc-devel
- expect
- unzip
- libaio
- oraclelinux-developer-release-el7
- All hostnames and IP addresses to be used must be present as entries in the
/etc/hostsfile.
For more information on the ZDM Service Host requirements and setting up ZDM on RHEL platforms, please refer to Oracle ZDM’s product documentation, specifically “Setting Up Zero Downtime Migration Software” section.
For this step-by-step guide, the ZDM Service Host runs on-premises on an Oracle Linux Server 8.9. The host private IP is masked for this guide, but as an example we will use the fictional zz.dd.mm.hh and the hostname is_zdmhost_.
Network and Connectivity
Region
AnOracle Cloud Infrastructureregion is a localized geographic area that contains one or more data centers, called availability domains. Regions are independent of other regions, and vast distances can separate them (across countries or continents).
Virtual Cloud Network (VCN) and subnet
A VCN is a customizable, software-defined network that you set up in anOracle Cloud Infrastructureregion. Like traditional data center networks, VCNs give you complete control over your network environment. A VCN can have multiple non-overlapping CIDR blocks that you can change after you create the VCN. You can segment a VCN into subnets, which can be scoped to a region or an availability domain. Each subnet consists of a contiguous range of addresses that don't overlap with the other subnets in the VCN. You can change the size of a subnet after creation. A subnet can be public or private.
OCI Network Security Group (NSG)
A network security group (NSG) provides a virtual firewall for cloud resources with the same security posture. For example, a group of compute instances performs the same tasks and thus needs to use the same set of ports.
Azure VNet
Azure Virtual Network (VNet) is the fundamental building block for your private network in Azure. VNet enables many Azure resources, such as Azure virtual machines (VM), to securely communicate with each other, the internet, and on-premises networks.
Azure Delegated Subnet
Subnet delegation is Microsoft's ability to inject a managed service, specifically a platform-as-a-service service, directly into your virtual network. This means you can designate or delegate a subnet to be a home for an external managed service inside your virtual network. In other words, that external service will act as a virtual network resource, even though technically it is an external platform-as-a-service service.
Virtual network interface card (VNIC)
The services in Azure data centers have physical network interface cards (NICs). Virtual machine instances communicate using virtual NICs (VNICs) associated with the physical NICs. Each instance has a primary VNIC that's automatically created and attached during launch and is available during the instance's lifetime.
Azure Route table (User Defined Route – UDR)
Virtual route tables contain rules to route traffic from subnets to destinations outside a VNet, typically through gateways. Route tables are associated with subnets in a VNet.
Source Database
The source database runs on-premises on an Oracle Linux Server 7.7 for this step-by-step guide. The host private IP is masked for this guide, but as an example, we will use the fictional aa.bb.sr.db address, and the hostname is_onphost_.
The source Oracle AI Database is a single-instance Enterprise Edition database version 19.21 with multitenant architecture. The database name is oradb, and its unique name is oradb_onp.
Target Database
Oracle AI Database Service for Microsoft Azureoffers the following products:
Oracle Exadata Database Service
- You can provision flexible Exadata systems that allow you to add database compute servers and storage servers to your system anytime after provisioning.
Oracle Autonomous AI Database on shared Exadata infrastructure
- Autonomous AI Database provides an easy-to-use, fully autonomous database that scales elastically, delivers fast query performance, and requires no database administration.
Oracle AI Database@AzureintegratesOracle Exadata Database Service,Oracle Real Application Clusters (Oracle RAC), andOracle Data Guardtechnologies into theAzureplatform. The Oracle AI Database service runs on Oracle Cloud Infrastructure (OCI) and is co-located inMicrosoft Azuredata centers. The service offers features and price parity with OCI. Users purchase the service onAzureMarketplace.
Oracle AI Database@Azure service offers the same low latency as other Azure-native services and meets mission-critical workloads and cloud-native development needs. Users manage the service on the Azure console and with Azure automation tools. The service is deployed in Azure Virtual Network (VNet) and integrated with the Azure identity and access management system. The OCI and Oracle AI Database metrics and audit logs are natively available in Azure. The service requires that users have an Azure tenancy and an OCI tenancy.
For this step-by-step guide, the target platform is Oracle Exadata Database Service on Dedicated Infrastructure (ExaDB-D) on Oracle AI Database@Azure. The infrastructure contains a 2-node VM cluster. The VM cluster host private IPs are masked for this guide, but as an example, we will use the fictional ta.db.oa.1 and ta.db.oa.2, and the host names are exadbazure1 and exadbazure2.
ZDM requires configuring a placeholder database target environment before beginning the migration process.
The target Oracle AI Database is a 2-node Oracle RAC version 19.22 with multitenant architecture created using Oracle Cloud Console. The database name is_oradb_ (the same as the source database), and the database's unique name is oradb_exa (different from the source database’s unique name).
Source and Target Database Prerequisites
Oracle ZDM uses the provisioned placeholder database target as a template and recreates the target as a standby database from the source during migration. The following prerequisites must be met before starting the migration:
- The target database must be provisioned using Oracle Cloud Tooling without enabling automatic backups.
- The source and target databases must have the same database name (
DB_NAME). - The source and target databases must have different database unique names (
DB_UNIQUE_NAME). - The source and target databases must use a server parameter file (
SPFILE). - The source and target databases must use the same character set.
- The source and target databases must have the same encryption algorithm defined in the
sqlnet.orafile. - The SYS user account password must be the same on the source and target databases.
- The
COMPATIBLEdatabase initialization parameter must be the same on the source and target databases. - The source and target databases must have the same major release version (e.g., 19c). However, the target database could have a higher patch level (e.g., source at 19.21 and target at 19.22). If the target database is at a higher patch level than the source database, ZDM automatically runs datapatch as part of the migration.
- The target database must have a time zone file version that is the same or higher than the source database.
- For Oracle AI Database 12c Release 2 and later, the TDE wallet must exist on the source, and the wallet status must be in the OPEN state. The source database does not necessarily need to be encrypted, but a TDE wallet must be configured.
- ZDM requires the SSH key on the ZDM Service Host to be in RSA format (In Oracle Linux 8, the default is OpenSSH).
Additional Configuration
SSH Key
Check the key format:
[zdmuser@zdmhost ~]$ head -n1 id_rsaCreate an SSH Key in RSA format (if not already created):
[zdmuser@zdmhost ~]$ ssh-keygen -m PEM -t rsaChange an existing SSH key into RSA format (if already created and need to reformat):
[zdmuser@zdmhost ~]$ ssh-keygen -p -m PEM -f id_rsaTDE Wallet
If your source database is not TDE enabled, follow these steps to create an auto-login wallet. Please visit the Database Reference guide for more information regarding the WALLET_ROOT parameter.
mkir $ORACLE_BASE/admin/$ORACLE_SID/wallet
mkdir $ORACLE_BASE/admin/$ORACLE_SID/wallet/tde
alter session set container=cdb$root;
alter system set wallet_root='$ORACLE_BASE/admin/$ORACLE_SID/wallet' scope=spfile;shutdown immediate;
startup;alter system set tde_configuration='KEYSTORE_CONFIGURATION=FILE' scope=both;
administer key management create keystore identified by <your_TDE_password>;
administer key management set keystore open identified by <your_TDE_password> container=ALL;
administer key management set key identified by <your_TDE_password> with backup container=ALL;
administer key management create auto_login keystore from keystore '$ORACLE_BASE/admin/$ORACLE_SID/wallet/tde' identified by <your_TDE_password>;
administer key management set keystore close identified by <your_TDE_password> container=ALL;select * from v$encryption_wallet; --will open the auto-login wallet
set lines 300
set pages 100
col name for a20
col wrl_type for a10
col status for a15
col wallet_order for a15
col key_id for a60
col keystore_type for a20
col origin for a20
col encryptionalg for a15
col encryptedts for a15
col inst_id for 999
col value for a60select p.con_id, p.name, p.open_mode, ew.wrl_type, ew.wallet_type, ew.status, ew.wallet_order
from v$pdbs p join v$encryption_wallet ew on (ew.con_id = p.con_id)
order by p.con_id;
CON_ID NAME OPEN_MODE WRL_TYPE WALLET_TYPE STATUS WALLET_ORDER
---------- -------------------- ---------- ---------- -------------------- --------------- ---------------
2 PDB$SEED READ ONLY FILE AUTOLOGIN OPEN SINGLE
4 OPDB4 READ WRITE FILE AUTOLOGIN OPEN SINGLEselect con_id, key_id, keystore_type, origin from v$encryption_keys;
CON_ID KEY_ID KEYSTORE_TYPE ORIGIN
---------- ------------------------------------------------------------ -------------------- --------------------
4 AXLpMpzxoU/dvxXhn/okVMkAAAAAAAAAAAAAAAAAAAAAAAAAAAAA SOFTWARE KEYSTORE LOCAL
1 ASYIe3UpY08bvxPooYkRBX0AAAAAAAAAAAAAAAAAAAAAAAAAAAAA SOFTWARE KEYSTORE LOCALDatabase Migration Step by Step with ZDM
Step 1: Prepare the Source Database Host On-Premises
Copy the SSH public key of the zdmuser from the ZDM host to the .ssh/authorized_keys file on the source database host for the user you want to use for login, in this case,onpuser:
#on ZDM host as zdmuser
[zdmuser@zdmhost ~]$ cat .ssh/id_rsa.pub
#on the source database host as user onpuser
[onpuser@onphost ~]$ vi .ssh/authorized_keys
#insert the public key and save the changes
Add the target database hostname, IP address, and SCAN name to the /etc/hosts file. As root user:
[root@onphost ~]# vi /etc/hosts
#add the following entries
ta.db.oa.1 oradb_exa_sample.oravcn.sample.com target
ta.db.oa.1 demo-scan-sample.oravcn.sample.com target-scan
Step 2: Prepare the Source Database On-Premises
Prepare the source database. As SYS user:
-- To protect against unlogged direct writes in the primary database that cannot be propagated to the standby database, turn on FORCE LOGGING at the primary database:
SQL> alter database force logging;
SQL> select force_logging from v$database;
FORCE_LOGGING
---------------------------------------
YES
-- Enable ARCHIVELOG mode for the database:
SQL> select log_mode from v$database;
LOG_MODE
------------
ARCHIVELOG
-- For Oracle Database 12c Release 2 and later, it is mandatory to configure TDE before migration begins
SQL> select wrl_type, status from v$encryption_wallet;
WRL_TYPE STATUS
-------------------- ------------------------------
FILE OPEN
-- Set RMAN CONFIGURE CONTROLFILE AUTOBACKUP to ON
RMAN> CONFIGURE CONTROLFILE AUTOBACKUP ON;
Step 3: Prepare the target database host on ExaDB-D on Oracle AI Database@Azure
Copy the SSH public key of the zdmuser from the ZDM host to the .ssh/authorized_keys file on the target database host for the user you want to use for login; in this case, OPC:
#on ZDM host as zdmuser
[zdmuser@zdmhost ~]$ cat .ssh/id_rsa.pub
#on the target database hosts as user opc (on all VMs of the VM cluster)
[opc@exadbazure1 ~]$ vi .ssh/authorized_keys
#insert the public key and save the changes
[opc@exadbazure2 ~]$ vi .ssh/authorized_keys
#insert the public key and save the changes
#Add the source database hostname and IP information into the /etc/hosts file. As root user (on all VMs of the VM cluster)
[root@exadbazure1 ~]# vi /etc/hosts
aa.bb.sr.db onphost
[root@exadbazure2 ~]# vi /etc/hosts
aa.bb.sr.db onphost
Step 4: Prepare the ZDM Service Host On-Premises
Add the source and target hostnames and IP addresses into the /etc/hosts file. As root user:
[root@zdmhost ~]# vi /etc/hosts
#add the following entries
ta.db.oa.1 exadbazure1
ta.db.oa.2 exadbazure2
aa.bb.sr.db onphost
Test the SSH connectivity to the source and target database hosts:
[zdmuser@zdmhost ~]$ ssh -i /home/zdmuser/.ssh/id_rsa onpuser@onphost
[zdmuser@zdmhost ~]$ ssh -i /home/zdmuser/.ssh/id_rsa opc@exadbazure1
[zdmuser@zdmhost ~]$ ssh -i /home/zdmuser/.ssh/id_rsa opc@exadbazure2
Verify that TTY is disabled for the SSH-privileged user. If TTY is disabled, the following command returns the date from the remote host without any errors:
[zdmuser@zdmhost ~]$ ssh -oStrictHostKeyChecking=no -i /home/zdmuser/.ssh/id_rsa onpuser@onphost "/usr/bin/sudo /bin/sh -c date"
[zdmuser@zdmhost ~]$ ssh -oStrictHostKeyChecking=no -i /home/zdmuser/.ssh/id_rsa opc@exadbazure1 "/usr/bin/sudo /bin/sh -c date"
[zdmuser@zdmhost ~]$ ssh -oStrictHostKeyChecking=no -i /home/zdmuser/.ssh/id_rsa opc@exadbazure2 "/usr/bin/sudo /bin/sh -c date"
These commands should execute without any prompting and return the date from the remote host.
Step 5: Set SQL*Net connectivity between source and target database hosts
Check the SQL*Net network connectivity from source to target and vice versa:
#from source host on-premises
[oracle@onphost ~]$ tnsping exadbazure1:1521
[oracle@onphost ~]$ tnsping exadbazure2:1521
#from target hosts on ExaDB-D on Oracle AI Database@Azure
[oracle@exadbazure1 ~]$ . oradb.env
[oracle@exadbazure1 ~]$ tnsping onphost:1521
[oracle@exadbazure2 ~]$ . oradb.env
[oracle@exadbazure2 ~]$ tnsping onphost:1521
Step 6: Create the Physical Online Migration Response File on the ZDM host
You’ll find a template on the ZDM host at$ZDMHOME/rhp/zdm/template/zdm_template.rsp, briefly describing the parameters and their possible values. Here, we will create a new response file with the minimal parameters required. As zdmuser:
[zdmuser@zdmhost ~]$ vi /home/zdmuser/physical_online/physical_online.rsp
#add the following parameters and save the changes
MIGRATION_METHOD=ONLINE_PHYSICAL
DATA_TRANSFER_MEDIUM=DIRECT
ZDM_RMAN_DIRECT_METHOD=RESTORE_FROM_SERVICE
ZDM_SRC_DB_RESTORE_SERVICE_NAME=oradb
TGT_DB_UNIQUE_NAME=oradb_exa
PLATFORM_TYPE=EXACS (or VMDB for Oracle Base Database Service)
Step 7: Evaluate the Configuration
Execute the following command on the ZDM host as zdmuser to evaluate the migration. ZDM will check the source and target database configurations. The actual migration will not be started. On the ZDM host as zdmuser:
[zdmuser@zdmhost ~]$ $ZDMHOME/bin/zdmcli migrate database \
-rsp /home/zdmuser/physical_online/physical_online.rsp \
-sourcesid oradb \
-sourcenode onphost \
-srcauth zdmauth \
-srcarg1 user:onpuser \
-srcarg2 identity_file:/home/zdmuser/.ssh/id_rsa \
-srcarg3 sudo_location:/usr/bin/sudo \
-targetnode exadbazure1 \
-tgtauth zdmauth \
-tgtarg1 user:opc \
-tgtarg2 identity_file:/home/zdmuser/.ssh/id_rsa \
-tgtarg3 sudo_location:/usr/bin/sudo \
-targethome /u02/app/oracle/product/19.0.0.0/dbhome_3 \
-tdekeystorepasswd \
-eval

Enter source database oradb SYS password:
Enter source database oradb TDE keystore password:
zdmhost: Processing response file ...
Operation "zdmcli migrate database" scheduled with the job ID "12".
If the source database uses ASM for storage management, use-sourcedb <db_unique_name>instead of-sourcesid <SID>in the zdmcli command.
Check the job status. On the ZDM host as zdmuser:
[zdmuser@zdmhost ~]$ $ZDMHOME/bin/zdmcli query job -jobid 12
...
Job ID: 12
User: zdmuser
Client: zdmhost
Job Type: "EVAL"
...
Current status: SUCCEEDED
Result file path: "/home/zdmuser/zdm/zdmbase/chkbase/scheduled/job-12.log"
Metrics file path: "/home/zdmuser/zdm/zdmbase/chkbase/scheduled/job-12.json"
...
ZDM_GET_SRC_INFO ........... PRECHECK_PASSED
ZDM_GET_TGT_INFO ........... PRECHECK_PASSED
ZDM_PRECHECKS_SRC .......... PRECHECK_PASSED
ZDM_PRECHECKS_TGT .......... PRECHECK_PASSED
ZDM_SETUP_SRC .............. PRECHECK_PASSED
ZDM_SETUP_TGT .............. PRECHECK_PASSED
ZDM_PREUSERACTIONS ......... PRECHECK_PASSED
ZDM_PREUSERACTIONS_TGT ..... PRECHECK_PASSED
ZDM_VALIDATE_SRC ........... PRECHECK_PASSED
ZDM_VALIDATE_TGT ........... PRECHECK_PASSED
ZDM_POSTUSERACTIONS ........ PRECHECK_PASSED
ZDM_POSTUSERACTIONS_TGT .... PRECHECK_PASSED
ZDM_CLEANUP_SRC ............ PRECHECK_PASSED
ZDM_CLEANUP_TGT ............ PRECHECK_PASSED
Detailed information about the migration process can be found by monitoring the log file:
[zdmuser@zdmhost ~]$ tail -f /home/zdmuser/zdm/zdmbase/chkbase/scheduled/job-12.logIn case troubleshooting is required, please check the ZDM server log on the ZDM Service Host under the following location:
$ZDM_BASE/crsdata/<zdm_service_host>/rhp/zdmserver.log.0Step 8: Initiate the Migration
To initiate the actual migration, execute the same command for evaluation, but this time without the -eval parameter.
Oracle ZDM allows you to pause the migration process at any given phase. For example, the migration process can be paused before the role swap and switchover phase. Upon executing the zdm migrate database command, the pauseafter flag must be entered with the desired pausing stage, which in this case is ZDM_CONFIGURE_DG_SRC.
On the ZDM host as zdmuser:
[zdmuser@zdmhost ~]$ $ZDMHOME/bin/zdmcli migrate database \
-rsp /home/zdmuser/physical_online/physical_online.rsp \
-sourcesid oradb \
-sourcenode onphost \
-srcauth zdmauth \
-srcarg1 user:onpuser \
-srcarg2 identity_file:/home/zdmuser/.ssh/id_rsa \
-srcarg3 sudo_location:/usr/bin/sudo \
-targetnode exadbazure1 \
-tgtauth zdmauth \
-tgtarg1 user:opc \
-tgtarg2 identity_file:/home/zdmuser/.ssh/id_rsa \
-tgtarg3 sudo_location:/usr/bin/sudo \
-targethome /u02/app/oracle/product/19.0.0.0/dbhome_3 \
-tdekeystorepasswd \
-pauseafter ZDM_CONFIGURE_DG_SRC

Enter source database oradb SYS password:
Enter source database oradb TDE keystore password:
zdmhost: Processing response file ...
Operation "zdmcli migrate database" is scheduled with job ID "13".
Check the job status. On the ZDM host as zdmuser:
[zdmuser@zdmhost ~]$ $ZDMHOME/bin/zdmcli query job -jobid 13
...
Job ID: 13
User: zdmuser
Client: zdmhost
Job Type: "MIGRATE"
...
Current status: PAUSED
Result file path: "/home/zdmuser/zdm/zdmbase/chkbase/scheduled/job-13.log"
Metrics file path: "/home/zdmuser/zdm/zdmbase/chkbase/scheduled/job-13.json"
...
ZDM_GET_SRC_INFO .............. COMPLETED
ZDM_GET_TGT_INFO .............. COMPLETED
ZDM_PRECHECKS_SRC ............. COMPLETED
ZDM_PRECHECKS_TGT ............. COMPLETED
ZDM_SETUP_SRC ................. COMPLETED
ZDM_SETUP_TGT ................. COMPLETED
ZDM_PREUSERACTIONS ............ COMPLETED
ZDM_PREUSERACTIONS_TGT ........ COMPLETED
ZDM_VALIDATE_SRC .............. COMPLETED
ZDM_VALIDATE_TGT .............. COMPLETED
ZDM_DISCOVER_SRC .............. COMPLETED
ZDM_COPYFILES ................. COMPLETED
ZDM_PREPARE_TGT ............... COMPLETED
ZDM_SETUP_TDE_TGT ............. COMPLETED
ZDM_RESTORE_TGT ............... COMPLETED
ZDM_RECOVER_TGT ............... COMPLETED
ZDM_FINALIZE_TGT .............. COMPLETED
ZDM_CONFIGURE_DG_SRC .......... COMPLETED
ZDM_SWITCHOVER_SRC ............ PENDING
ZDM_SWITCHOVER_TGT ............ PENDING
ZDM_POST_DATABASE_OPEN_TGT .... PENDING
ZDM_DATAPATCH_TGT ............. PENDING
ZDM_MANIFEST_TO_CLOUD ......... PENDING
ZDM_POST_MIGRATE_TGT .......... PENDING
ZDM_POSTUSERACTIONS ........... PENDING
ZDM_POSTUSERACTIONS_TGT ....... PENDING
ZDM_CLEANUP_SRC ............... PENDING
ZDM_CLEANUP_TGT ............... PENDING
Detailed information about the migration process can be found by monitoring the log file:
[zdmuser@zdmhost ~]$ tail -f /home/zdmuser/zdm/zdmbase/chkbase/scheduled/job-13.logThe current job is in PAUSED status now. Also, the progress stopped after phase ZDM_CONFIGURE_DG_SRC was COMPLETED. Check the database roles. The source is primary now, and the target is on standby:
[oracle@onphost ~]$ sqlplus / as sysdba
SQL> select database_role from v$database;
DATABASE_ROLE
----------------
PRIMARY

SQL> select database_role from v$database;
DATABASE_ROLE
----------------
PHYSICAL STANDBY
At this stage, every change in the source database is immediately synchronized with the target database. Resume the job when your application is ready for migration.
Step 9: Complete the Migration
Resume the job from the previous step. On the ZDM host as zdmuser, resume the job and also query the status until all phases are completed:
[zdmuser@zdmhost ~]$ $ZDMHOME/bin/zdmcli resume job -jobid 13
[zdmuser@zdmhost ~]$ $ZDMHOME/bin/zdmcli query job -jobid 13
...
ZDM_GET_SRC_INFO .............. COMPLETED
ZDM_GET_TGT_INFO .............. COMPLETED
ZDM_PRECHECKS_SRC ............. COMPLETED
ZDM_PRECHECKS_TGT ............. COMPLETED
ZDM_SETUP_SRC ................. COMPLETED
ZDM_SETUP_TGT ................. COMPLETED
ZDM_PREUSERACTIONS ............ COMPLETED
ZDM_PREUSERACTIONS_TGT ........ COMPLETED
ZDM_VALIDATE_SRC .............. COMPLETED
ZDM_VALIDATE_TGT .............. COMPLETED
ZDM_DISCOVER_SRC .............. COMPLETED
ZDM_COPYFILES ................. COMPLETED
ZDM_PREPARE_TGT ............... COMPLETED
ZDM_SETUP_TDE_TGT ............. COMPLETED
ZDM_RESTORE_TGT ............... COMPLETED
ZDM_RECOVER_TGT ............... COMPLETED
ZDM_FINALIZE_TGT .............. COMPLETED
ZDM_CONFIGURE_DG_SRC .......... COMPLETED
ZDM_SWITCHOVER_SRC ............ COMPLETED
ZDM_SWITCHOVER_TGT ............ COMPLETED
ZDM_POST_DATABASE_OPEN_TGT .... COMPLETED
ZDM_DATAPATCH_TGT ............. COMPLETED
ZDM_MANIFEST_TO_CLOUD ......... COMPLETED
ZDM_POST_MIGRATE_TGT .......... COMPLETED
ZDM_POSTUSERACTIONS ........... COMPLETED
ZDM_POSTUSERACTIONS_TGT ....... COMPLETED
ZDM_CLEANUP_SRC ............... COMPLETED
ZDM_CLEANUP_TGT ............... COMPLETED
Finally, check the target database role:
[oracle@exadbazure1 ~]$ sqlplus / as sysdba
SQL> select database_role from v$database;
DATABASE_ROLE
----------------
PRIMARY
Known Issues
All common issues are documented and updated periodically in Oracle Zero Downtime Migration’s documentation, specifically on the product release note, Known Issues section: https://docs.oracle.com/en/database/oracle/zero-downtime-migration/.
Troubleshooting & Other Resources
For Oracle ZDM log review:
ZDM Server Logs:
- Check - $ZDM_BASE/crsdata/<zdm_service_node>/rhp/rhpserver.log.0
Check source node logs:
- <oracle_base>/zdm/zdm_<src_db_name>_<job_id>/zdm/log
Check target node logs:
- <oracle_base>/zdm/zdm_<tgt_db_name>_<job_id>/zdm/log
For all Oracle Support Service Requests related to Zero Downtime Migration, please be sure to follow the instructions in My Oracle Support Document:
Oracle® Database, Oracle Zero Downtime Migration – Physical Online Migration to Exadata Database Service on Oracle AI Database@Azure, 1
G33192-03
July 2026
Copyright © 2026, Oracle and/or its affiliates.
Primary Author: Sinan Petrus Toma
Secondary Author: Roopam Jain