Create a Confidential Identity Application
Before deploying the Essbase stack, create a confidential application in OCI Identity and Access Management (IAM) or Oracle Identity Cloud Service (IDCS), and register Essbase with it.
If you are not sure which identity management is used on your tenancy (IAM or IDCS), refer to Documentation to Use for Cloud Identity.
-
Open the Oracle Cloud Infrastructure Console. Select Identity & Security.
-
Click Domains.
Ensure that an identity domain exists for the Essbase stack to use.
If you already deploy Essbase on OCI, and your tenancy has been updated to use IAM identity domains, you don't need to create a new confidential application. Your identity application is migrated into an IAM identity domain.
If you are starting a new cloud deployment on an OCI tenancy with IAM, Oracle recommends creating a unique identity domain for Essbase, instead of using the default identity domain. Then create the dynamic groups and the confidential identity application within the identity domain.
You can create two custom applications per identity domain without incurring any added cost. Each Essbase stack deployed from Marketplace is considered one custom-developed application on the OCI tenancy, as is any non-Oracle application you create. For information about identity domain limits, refer to IAM Identity Domain Types. For information about Marketplace stacks, refer to Overview of Marketplace.
-
Assuming you have an identity domain for Essbase, click Integrated applications within that domain.
If you do not already have a confidential application for Essbase, click Add application, click Confidential Application, and click Launch workflow.
-
Enter a name for the application, and click Next.
-
In the Client configuration tile, select the option Configure this application as a client now.
-
In the Authorization section,
-
Select the following allowed grant types: Client Credentials and Authorization Code.
-
If you don’t plan to provision a load balancer, select Allow non-HTTPS URLs.
-
For the Essbase Redirect URL, enter a temporary/mock redirection URL (it ends with _uri):
http://temp/essbase/redirect_uri -
For the Essbase Post Logout Redirect URL, enter a temporary/mock URL:
http://temp/essbase/jet/logout.html
-
-
If you're provisioning a load balancer, use https:, as shown.
-
For the Essbase Redirect URL, enter a temporary/mock redirection URL:
https://temp/essbase/redirect_uri -
For the Essbase Post Logout Redirect URL, enter a temporary/mock URL:
https://temp/essbase/jet/logout.html
-
-
-
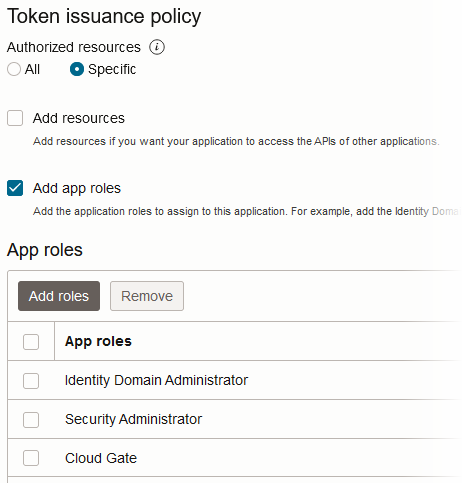
Under Token Issuance Policy, add the following application roles: Identity Domain Administrator, Cloud Gate, and Security Administrator.

-
Complete the confidential application configuration, save the changes, and activate it.
-
From the application information, record the following details, which are under General Information: Client ID and Client secret. Record these values to use during your Essbase stack deployment. Store the Client secret in the Vault (see Create Vault, Secrets, and Encrypt Values).
-
Record the IDCS Instance GUID from the following location: in the OCI Console, navigate to Identity & Security, and click Domains. Click the domain name that contains your confidential application. In the Domain information tab, copy the Domain URL value. From this value, extract only the host name; for example,
idcs-123456789a123b123c12345678d123e1. If you don't have access to this value, ask your identity domain administrator to provide it. Save this value and enter it when prompted for the IDCS Instance GUID during your Essbase stack deployment. -
To configure clients to be able to access the signing certificate for the identity domain, go to the Settings for the identity domain you created for Essbase. Under Access signing certificate, select Configure client access.
-
Open the Oracle Identity Cloud Service Console. From Oracle Cloud Infrastructure, select Identity, Federation, Identity Provider Details. In the Identity Provider Information tab, click the Oracle Identity Cloud Service Console link.
-
In Identity Cloud Service console, in the Applications and Services tile, click +Add.
-
Select Confidential Application.
-
In the App Details step, enter a name only, and click Next. Tip: you may use the same name as the compartment, as you need one confidential application per compartment. Record the name for your information.
-
In the Client step, select the option Configure this application as a client now.
-
In the Authorization section,
-
Select the following allowed grant types: Client Credentials and Authorization Code.
-
If you don’t plan to provision a load balancer, select Allow non-HTTPS URLs.
-
For the Essbase Redirect URL, enter a temporary/mock redirection URL (it ends with _uri):
http://temp/essbase/redirect_uri -
For the Essbase Post Logout Redirect URL, enter a temporary/mock URL:
http://temp/essbase/jet/logout.html
-
-
If you're provisioning a load balancer, use https:, as shown.
-
For the Essbase Redirect URL, enter a temporary/mock redirection URL:
https://temp/essbase/redirect_uri -
For the Essbase Post Logout Redirect URL, enter a temporary/mock URL:
https://temp/essbase/jet/logout.html
-
-
-
Under Token Issuance Policy, in the section Grant the client access to Identity Cloud Service Admin APIs, click Add.
-
In the Add App Role dialog, find and add the following roles: Identity Domain Administrator, Cloud Gate, and Security Administrator.
-
Scroll to the top of the page and click Next until you reach the Authorization section.
-
Click Finish.
-
From the Application Added popup window, record the following details: IDCS Application Client ID and IDCS Application Client Secret. Record these values to use during your Essbase deployment. Store the Client Secret in the Vault (see Create Vault, Secrets, and Encrypt Values).
-
Record the IDCS Instance GUID from the following location: in the Identity Cloud Service Console, select your ID icon in the top right corner (the icon contains your initials), select About, and record the IDCS Instance GUID value. If you don't have access, ask your administrator to provide it. Example:
idcs-123456789a123b123c12345678d123e1. Alternatively, the IDCS Instance GUID is at the front of the IDCS url in the browser - take the host portion of the url. -
Select Activate in the title bar, next to your application's name.