Create New Dimension Build Rule
Create and test a dimension build rule using the rule editor in the Essbase web interface. Build dimensions in an Essbase cube using data from a flat file or from a variety of external sources. This example uses a flat file.
It is very efficient to modify existing rules, such as those that are created for you when you deploy from application workbooks. However, if you are creating a new rule in the Essbase web interface, this topic illustrates a sample flow for creating it, with the goal of adding and editing dimension members in an Essbase cube.
Prerequisites:
-
Import/build the Sample Basic cube, using the application workbook available from the gallery in the file catalog on the Essbase server.
-
Create a tab-delimited data file like the following, name it
add_product.txt, and upload it to the Sample Basic cube directory.500 500-10 500 500-10 500 500-20 500 500-20 500 500-20
-
Log in to the Essbase web interface.
-
On the Home page, open the application and then open the database (cube).
-
Select the Scripts tab, and then click Rules.

-
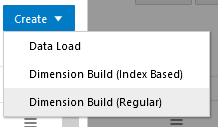
Click Create and choose Dimension Build (Regular).
Note:
Regular dimension build rules have validation requirements pertaining to the order of fields. For example, the properties of generation 1 must appear after the Generation 1 column. Other generations must appear in order of Parent/Child. If fields are out of order, the Verify action will display an error message.
For index-based rules (sometimes called BPM rules), fields can be in any order; for example, Generation 2 can come before Generation 1, and a property of Generation 1 can come before the actual Generation 1 column. An index-based rule does not offer column operations (join, split, and move).
You can change the type of dimension build rule by modifying the end of the URL in the Essbase web interface when the rule is open for editing. Regular type rules have a URL ending in
&type=regular, and index-based rules have a URL ending in&type=index.Data load rules do not have different types. Similar validation rules exist as for the Regular dimension build rules.
-
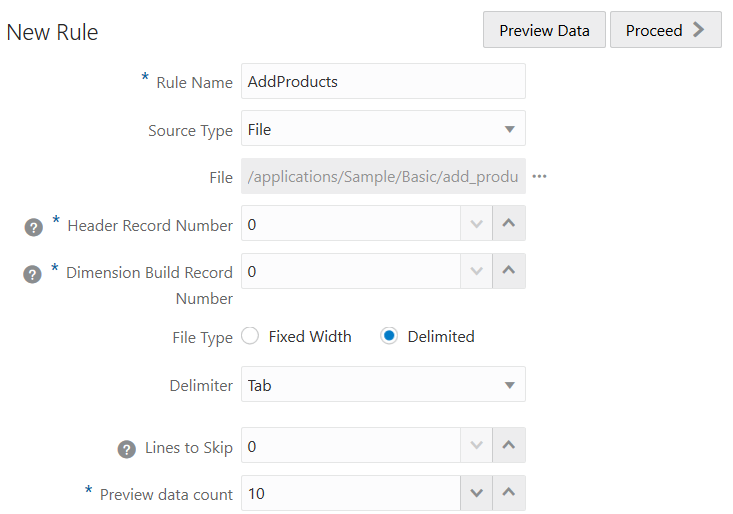
In the New Rule dialog,
-
Enter a rule name.
-
For Source Type select File, as this example workflow is based on the assumption of using a flat data file. Select the data file you uploaded. For example, click Catalog and navigate to
add_product.txt.Note:
Additional options besides File are available to use as the Source Type. Use these when your dimension build source data is an external source rather than a flat file.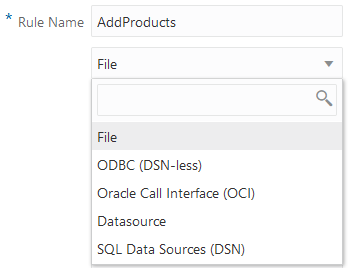
When you are using an external source of data to build dimensions, you must complete certain prerequisites, depending on which type of connectivity you have to the source of data.
- If your connectivity has been predefined using a connection and Datasource established in Essbase by an application manager or service administrator, choose Datasource as the Source Type for the dimension build rule. To ensure your connectivity is ready, see Access External Data Using a Connection and Datasource to understand the prerequisite steps.
- If your connectivity depends on ODBC drivers configured on the Essbase server, choose ODBC (DSN-less) or SQL Data Sources (DSN) as the Source Type for the dimension build rule. To ensure your connectivity is ready, see Access Data Using ODBC Connectivity to understand the prerequisite steps.
- If your connectivity depends on a connection string that includes
OCIsyntax, choose Oracle Call Interface (OCI) as the Source Type for the dimension build rule. To ensure your connectivity is ready, see Access Oracle Database Using Oracle Call Interface to understand the prerequisite steps.
-
Leave the Record Number fields blank.
-
As the sample data file is tab delimited, change the Delimiter value to Tab.
-
Click Proceed.
-
The dimension build rule opens with undefined fields, and preview data (from the text file) populating the grid below the fields.
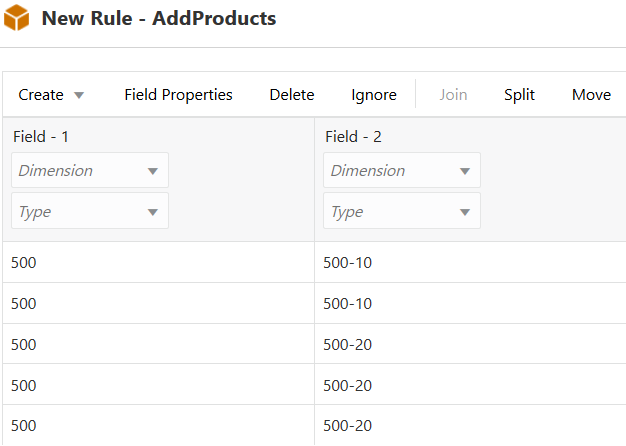
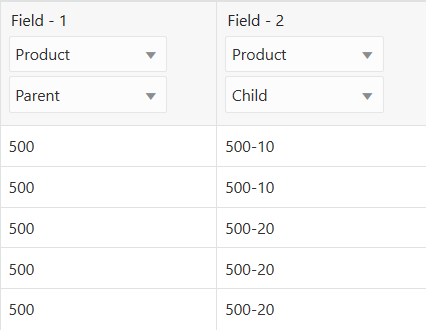
Each row in the source data is a record, and corresponds with the rows you see in the rule preview data. The data is top-down, as you can tell by the parent-child order that begins each record (for example, 500 is a general product category, and 500-10 gets more specific about the product type).
-
-
In a dimension build rule, all fields must map to a dimension. Typically, one dimension is used for all fields in a dimension build rule. You already have dimensions to associate because you are building on Sample Basic. However, if you create a new cube, there are no dimensions, and you need to create and map them to your rule.
Skip to the next step unless you are working with a new cube with no dimensions, instead of with Sample Basic. Or, use this step if you want to add a new dimension.
- To create and map a dimension, click Dimensions.

- Type in or search for a dimension name; for example, Products. Click Add.

- To create and map a dimension, click Dimensions.
-
Click Dimension in Field 1, and select Product to associate the dimension with Field 1.
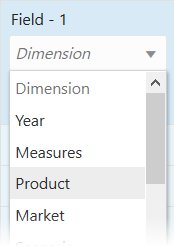
Product populates the Dimension selector for all fields in the rule. This is acceptable, as in this example exercise, you are designing the rule to build upon just one dimension in the Essbase cube.
-
Select field types for each field.
-
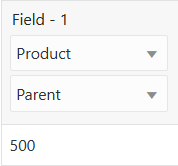
For Field 1, select Parent as the type.
-
For Field 2, select Child as the type.
-
-
Verify the rule, then save and close.
-
Close the cube inspector, and click Jobs to test your dimension build rule.
-
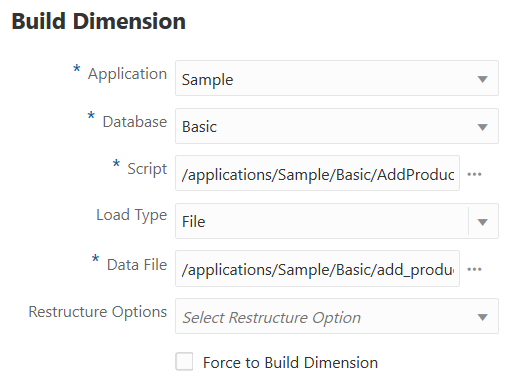
Click New Job and Build Dimension.
- For Application, select Sample.
- For Database, select Basic.
- For Script, navigate to the rule file you created in the Sample Basic directory.
- For Load Type, specify File.
- For Data File, navigate to the text file you uploaded in the prerequisite step.
-
Click the refresh icon until the job status is Completed.
-
On the Applications page, expand the application (Sample).
-
From the Actions menu, to the right of the cube name (Basic), click Outline.
-
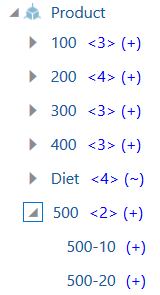
Expand the Products dimension and note that the new product, 500, was added with its children.
Bonus Exercise: Add a Comment
In the preceding steps, you used a regular dimension build rule to add a product member to the Sample Basic cube. Now, create an index-based rule to modify a property of the new member.
-
Upload a file named
addcomment.txtto the Sample Basic directory, with the following contents:500,"New product added 2024" -
Create an Index-based rule named AddComment, and preview it with the text file you uploaded.
-
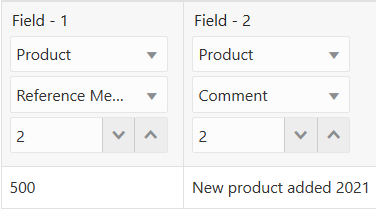
For Field 1, set the Dimension to Product, set the Type to Reference Member, and increment Generation to 2.
-
For Field 2, set the Type to Comment, and increment Generation to 2.
-
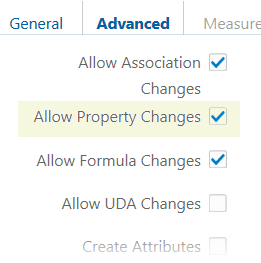
Click Dimensions, click Product, and click Advanced.
-
Check Allow Property Changes and click OK.
-
Verify the rule, then save and close.
-
Run the dimension build job.
-
View the outline, and inspect the properties of Product member 500 to confirm that the comment was added.