Compare Outlines
You can compare two outlines in the Essbase web interface. The outlines must be of the same type, both aggregate storage, or both block storage. They can be on the same Essbase server, or on different Essbase servers.
- In the Essbase web interface, click Import.
- In the Import dialog box, click Catalog.
- Go to gallery > Applications > Demo Samples > Block Storage, select Sample_Basic.xlsx and click Select.
- Click OK to build the cube.
- Repeat steps 1 through 4, this time building Demo_Basic.xlsx.
To open two outlines side-by-side,
- On the Home page, navigate to the Sample
application, and select the Actions menu
 .
.
- Choose Databases > Basic > Launch Outline.
- On the outline toolbar, click the Compare Outlines
icon.

- In the Compare dialog box, keep the
(Current) connection and
select the Demo application
and the Basic database
(cube).
Alternatively, you can select a connection to another server in the Connection drop down menu, and compare two outlines on different servers.
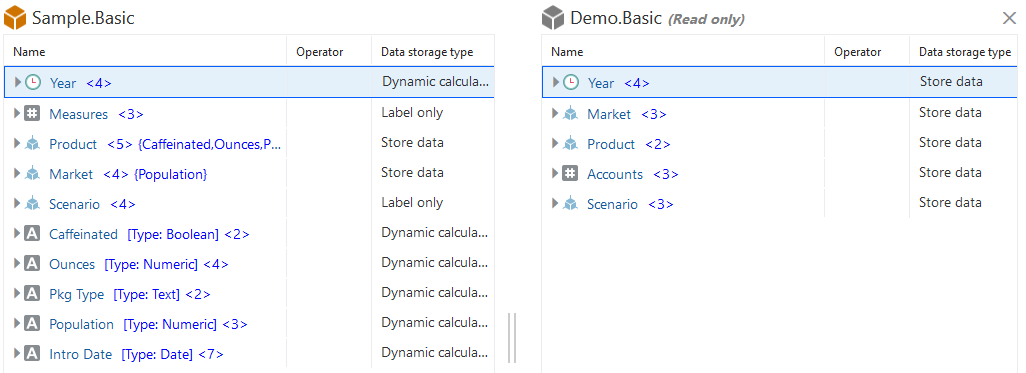
- Click Open, and Demo.Basic is opened to the right of Sample.Basic. Demo.Basic is read only. The read only outline is the source outline. The writeable outline is the target outline.

- On the Applications page, expand the Sample application, and from the Actions menu to the right of the cube name, choose Outline.
- On the outline toolbar, click the To compare outlines icon.

- In the Compare outline dialog box, keep the (Current) connection and select the Demo application and the Basic database.
Alternatively, you can select a connection to another server in the Connection drop down menu, and compare two outlines on different servers.
- Click Open, and Demo.Basic is opened to the right of Sample.Basic. Notice that Demo.Basic is read only. The read only outline is the source outline. The writeable outline is the target outline.

To synchronize expanding and collapsing hierarchies,
- Expand the Year dimension in Sample.Basic and notice that the Year dimension in Demo.Basic is expanded as well.
- In the outline toolbar, next to Compare, click
Auto expand/collapse target
members
 to deselect it (it is selected by
default) .
- Collapse the Year dimension in Demo.Basic and notice that the Year dimension in Sample.Basic is still expanded. Collapse the Year dimension in Sample.Basic.
- Expand the Year dimension in Sample.Basic and notice that the Year dimension in Demo.Basic is expanded as well.
- In the outline toolbar, under Compare, click the Auto expand/collapse target members icon to deselect it (it is selected by default)
 .
.
- Collapse the Year dimension in Demo.Basic and notice that the Year dimension in Sample.Basic is still expanded. Collapse the Year dimension in Sample.Basic.
To synchronize scrolling,
- Click Auto expand/collapse target members
 and expand several dimensions so that you
need to scroll in order to see the entire
outline.
- Confirm that in the outline toolbar Enable/disable synchronize
scroll
 is selected.
- Scroll the Sample.Basic outline and observe that the Demo.Basic outline scrolls in sync with it.
- Click the Auto expand/collapse target members icon
 and expand several dimensions so that you need to scroll in order to see the entire outline.
- Confirm that in the outline toolbar, under Compare, the Enable/disable synchronize scroll icon is selected
 .
.
- Scroll the Sample.Basic outline and observe that the Demo.Basic outline scrolls in sync with it.
To synchronize showing and hiding columns,
- In the outline toolbar, click Select Columns to
Display.

- In the Selected Columns column, select operator and data storage type and click the left arrow. Notice that the displayed columns in both Sample.Basic and Demo.Basic change accordingly.
- In the outline toolbar, under Inspect, click Display selected columns in the table.

- In the Select member properties to display dialog box, clear the selections for operator and data storage type and click Apply and Close. Notice that the displayed columns in both Sample.Basic and Demo.Basic change accordingly.
- In the upper right-hand corner of the outline editor, click Edit outline
 .
.
- In the Demo.Basic outline, expand the Product dimension.
- Right click Audio and select Copy.
- In the Sample.Basic outline, expand the Product dimension.
- Right click Product, and select Paste, and then As child.
Audio and its children are added as children of Product.
- In the outline toolbar, click Search Members
 .
.
- Notice that search bars open for both Sample.Basic and Demo.Basic, allowing you to search either one.
Note:
The search bar does not open for the target outline when it is from an Essbase version prior to 21c.