Add Dimensions and Members to Outlines
The top level members of any hierarchy in an Essbase outline are called dimension names or dimensions. There are two types of dimensions: standard dimensions and attribute dimensions.
You can add dimensions and members to a cube using any of the following methods:
-
Add dimensions and members manually with the outline in edit mode.
-
Import an Excel file containing dimension definitions (either tabular data or an application workbook).
-
Build dimensions using a datasource and rule file.
In this chapter, we focus on manual outline updates.
Add Dimensions to Outlines Manually
In block storage or partial hybrid mode cubes (which have one or more stored dimensions), if you add, delete, or move members in dimensions and then save the outline, then the cube is restructured.
After restructuring is complete, recalculate the data. Aggregate storage and fully hybrid mode cubes do not need to be recalculated because they are dynamic (upper level data is not stored).
If you add a dimension that is virtual (dynamic calc or label only), then any data existing in the cube is stored with the first level-0 stored member in the new dimension. There must be at least one stored member in the hierarchy.
Dimension names must always be unique in the outline, even if the outline allows duplicate member names. To add a dimension to an outline:
- On the Home page, navigate to the application, and select the Actions menu
 .
.
- Choose Databases > Database Name > Launch Outline.
- If the outline is locked, and you are an administrator, click Unlock
 .
.
Before you forcefully unlock a locked outline, make sure that no one else is working with it.
- Click Edit
 , and then select a dimension.
If the outline doesn't contain any dimensions, the Create your first dimension text box is displayed. Type a dimension name, click Add dimension, and select the new dimension.
- On the outline toolbar, from the Add member menu, select Add sibling member below.
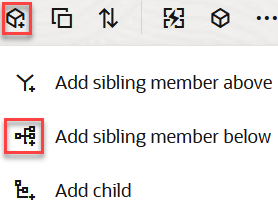
- In the Add Member(s) dialog box, under Member name, enter a name.
Use no more than 1024 characters when naming dimensions, members, or aliases.
- Still in the Add Member(s) dialog box, select the member properties that you want for the new dimension.
- Press Add.
- Press Close.
- Press Validate
 .
.
- Press Save
 .
.
- Select from restructure database options and save your changes. See Restructure Cubes.
Add Members to Outlines Manually
You can manually add members to an outline using the outline editor in the Essbase web interface. Unless the cube is enabled for duplicate member names, each member has a unique name.
- On the Home page, navigate to the application, and select the Actions menu .
- Choose Databases > Database Name > Launch Outline.
- If the outline is locked, and you are an administrator, click Unlock .
Before you forcefully unlock a locked outline, make sure that no one else is working with it.
- Click Edit .
- To view and select lower-level members in a dimension, drill down in the dimension by expanding the dimension name and subsequent member names.
- When you reach the member to which you want to add a child or sibling member, select it.
- On the toolbar, from the
 Add member menu, select Add sibling member above, Add sibling member below, or Add child.
- In the Add Member(s) dialog box, under Member name, enter a name for the new member.
Use no more than 1024 characters when naming dimensions, members, or aliases.
- Still in the Add Member(s) dialog box, select the properties that you want for the new member.
- Press Add and then Close.
- Press Validate .
- Press Save .