Create a Connection and Datasource for Autonomous AI Lakehouse
Define a connection and Datasource between Essbase and Autonomous AI Lakehouse.
If you will create a federated partition between Essbase and Autonomous AI Lakehouse Serverless, use the following topic instead of this one: Create a Connection for Federated Cubes.
To create a global connection, you need to have the service administrator role. To create an application level connection, you need to have user role, plus application manager permission on the application.
-
Log in to the Essbase web interface as a service administrator.
-
Click Sources.

To define the connection and Datasource at application level, instead of globally, start on the Applications page instead of the Sources page. Click an application name, and then click Sources.
-
Click Create Connection and select Oracle Database.
-
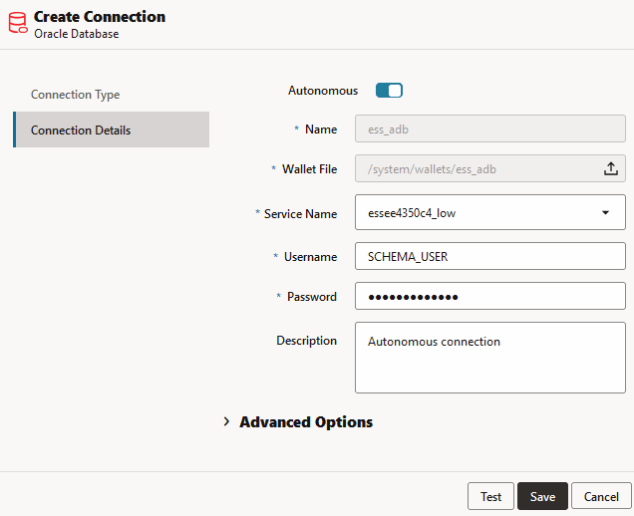
Select Autonomous using the toggle switch.
-
Enter a connection name.
-
If needed, drag and drop a wallet file, or click the Wallet File field to upload one.
If you are using a connection which has already been made available to you (a repository connection), you do not need to upload a wallet, because it should already be in the repository. Select the Repository Database option.
If you need to upload a wallet, obtain a wallet file by selecting Download Client Credentials (Wallet) from your Autonomous Data Warehouse Administration page in Oracle Cloud Infrastructure.
-
Select a service name.
-
Enter your Autonomous AI Lakehouse username and password, and optionally, a description.
-
Click Test to validate the connection, and if successful, click Save.
If you get connection errors, you may need to expand Advanced Options to adjust the minimum and maximum connection pool sizes.
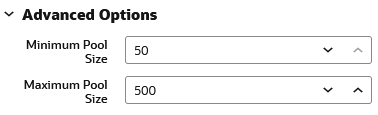
Refer to About Controlling the Pool Size in UCP in Universal Connection Pool Developer's Guide.
-
Verify that the connection was created successfully and appears in the list of connections.
-
Next, you will create a Datasource for the Autonomous AI Lakehouse connection. Click Datasources, and click Create Datasource.
-
From the Connection drop-down box, select the name of the connection you just created; for example, essbaseadb_public. For application-level Datasources, select the application-level connection name, in the format appName.connectionName.
-
Provide a name for the Datasource; for example, essbaseadb_ds.
-
Optionally enter a description of the Datasource; for example, Autonomous AI Lakehouse Datasource.
-
In the Query field, provide the appropriate SQL query that selects the Autonomous AI Lakehouse data you want to make available in this Datasource.
-
Click Next. If the SQL statement was correct to query an Autonomous AI Lakehouse area, the queried columns should display with numeric indices, column names, and data types.
-
Change any additional source-specific data types, if applicable, and click Next.
-
Review the preview panel. The results of the SQL query should fetch some columns of data from Autonomous AI Lakehouse.
-
If the preview is correct, click Save to finish creating the Datasource.