Perform DDL operations using Visual Studio Code
You can use Visual Studio Code to perform DDL operations.
Some of the DDL operations that can be performed from inside the Visual Studio Code plugin are:
CREATE TABLE
You can create the Oracle NoSQL Database table in two modes:
-
Simple DDL Input: You can use this mode to create the Oracle NoSQL Database table declaratively, that is, without writing a DDL statement.
-
Advanced DDL Input: You can use this mode to create the Oracle NoSQL Database table and JSON collection table using a DDL statement.
-
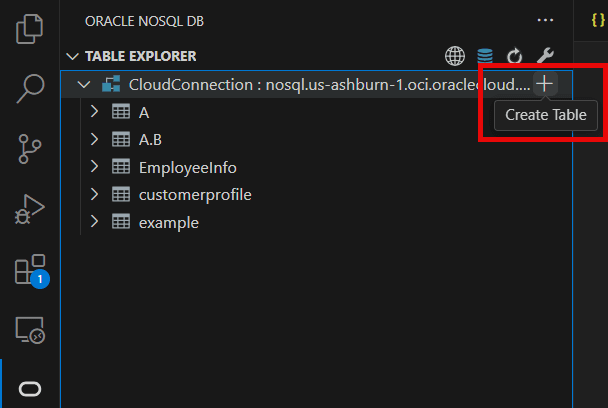
Hover over the Oracle NoSQL Database connection to add the new table.
-
Click the Plus icon that appears or right-click on the database connection name and click Create Table\
\
-
In the Create Table page, select Simple DDL Input.
Table 2 Create an Oracle NoSQL Database Table
Field Description Table Name: Specify a unique table name. Column Name Specify a column name for the primary key in your table. Column Type Select the data type for your primary key column. Set as Shard Key Select this option to set this primary key column as shard key. Shard key is to distribute data across the Oracle NoSQL Database cluster for increased efficiency, and to position records that share the shard key locally for easy reference and access. Records that share the shard key are stored in the same physical location and can be accessed atomically and efficiently. Remove Click this button to delete an existing column. + Add Primary Key Column Click this button to add more columns while creating a composite (multi-column) primary key. Column Name Specify the column name. Column Type Select the data type for your column. Default Value (optional) Specify a default value for the column. <div class="infoboxnote" id="GUID-484FED94-2220-44F1-93BF-0A02E0A4AB07__GUID-6C4E66C9-4E1A-4B36-AA8C-5FE242D6D652"> <p class="notep1">Note:</p>Default values can not be specified for binary and JSON data type columns. </div> Not Null Select this option to specify that a column must always have a value. Remove Click this button to delete an existing column. + Add Column Click this button to add more columns. Unit Select the unit (Days or Hours) to use for TTL value for the rows in the table. Value Specify expiration duration for the rows in the table. After the number of days or hours, the rows expire automatically, and are no longer available. The default value is zero, indicating no expiration time. <div class="infoboxnote" id="GUID-484FED94-2220-44F1-93BF-0A02E0A4AB07__GUID-48AD936F-1EE3-4A3F-83CA-59D2C83B0790"> <p class="notep1">Note:</p>Updating Table Time to Live (TTL) does not change the TTL value of any existing data in the table. The new TTL value applies only to those rows that are added to the table after this value is modified and to the rows for which no overriding row-specific value has been supplied. </div> -
Click Create.
-
You have an option to the view the DDL statement before and after creating a table.
-
Before creating the table - Click Show DDL in the Create Table screen to view the DDL statement formed based on the values entered in the fields in the Simple DDL input mode. This DDL statement gets executed when you click Create.
-
After creating the table - Right click on the existing table. Choose View Table DDL.
-
CREATE CHILD TABLE
To create a child table, right click on the desired table and choose Create Child Table. You can create a child table for an already existing Oracle NoSQL Database table in one of the two modes:
-
Simple DDL Input: You can use this mode to create a child table by simply entering a table name along with other required details.
-
Advanced DDL Input: You can use this mode to create a child table using a DDL statement. Click Create to create a child table.
For more details on child tables, see Table Hierarchies in Developer’s Guide.
DROP TABLE
-
Right-click the target table.
-
Click Drop Table.
-
Click Yes to drop the table.
CREATE INDEX
-
Locate the Table Explorer, and click the Refresh Schema icon to reload the schema.
-
Right click on the table where index need to be created. Choose Create Index.
-
In the Create Index panel, you have an option to create index in two modes:
-
Simple Input: Specify the name of the index and the columns to be part of the index. If the column type is JSON, you see an additional field called “JSON Path to Index Field”. Enter the path to the location of the JSON field, and choose the data type for it.
-
Using Advance DDL: Enter a valid DDL statement to create an index on any column(s). It can also include complex data type i.e. array, map, and record.
-
-
Click Add Index.
-
You have an option to the view the Index DDL statement. Right click on the existing index. Choose View Index DDL. Click OK to close the dialog box.
DROP INDEX
-
Locate the Table Explorer, and click the Refresh Schema to reload the schema.
-
Click on the table where the index needs to be removed. The list of indexes are displayed below the column names.
-
Right click on the index to be dropped. Click Drop Index.
-
A confirmation window appears, click Ok to confirm the drop action.
ADD COLUMN
-
Locate the Table Explorer, and click the Refresh Schema to reload the schema.
-
Right click on the table where column needs to be added. Click Add columns.
-
In the Add Column(s) Panel, you have an option to add column in two modes:
-
Simple DDL Input: Specify the name of the column and define the column with its properties - datatype, default value and whether it is nullable. In case of binary or fixed binary select the data type as
Binary. For fixed binary enter the size of the file in theSizefield and keep the field null in case of binary data type. -
Advanced DDL Input: You can use this mode to add new columns into the table by supplying a valid DDL statement, as well as, create columns with complex data type (e.g. array, map, or record and also in nested format).
-
-
Click Add New Columns.
DROP COLUMN
-
Locate the Table Explorer, and click the Refresh Schema to reload the schema.
-
Expand the table where column needs to be removed.
-
Right click the column to be removed and choose Drop Column.
-
A confirmation window appears, click Ok to confirm the drop action.
EXECUTE DDL
This feature allows you to execute DDL operations, for example, managing regions, namespaces, and roles.
To execute the DDL commands, follow these steps:
-
Click the triangle icon in the Table Explorer to open the Execute DDL panel or right-click on the Connection Name and click Execute DDL.
-
In the DDL text box enter the SQL DDL statement you would like to perform. Click Execute. You can view the output in the below textbox named Result.
The Execute DDL supports the following operations:
-
Create namespace: You can create a new namespace by using
CREATE NAMESPACEstatement and create tables within them.CREATE NAMESPACE ns1 -
Create remote region: You can create remote regions for a Multi-Region table.
CREATE REGION fra -
Add local region: You can set a name to the local region for a Multi-Region table.
SET LOCAL REGION lnd -
Drop region: You can remove a region using the
DROP REGIONstatement.DROP REGION fra -
Create an on-premises Multi-Region table: You can create an on-premises Multi-Region table on a data store and specify the list of regions that the table should span. You can also expand a Multi-Region table by adding more regions or contract a Multi-Region table by removing the table from any existing region.
-
Create a Multi-Region table
CREATE TABLE users(id INTEGER, name STRING, team STRING,PRIMARY KEY(id))IN REGIONS fra,lnd -
Expand a Multi-Region table
CREATE REGION dub ALTER TABLE users ADD REGIONS dub -
Contract a Multi-Region table
ALTER TABLE users DROP REGIONS dub
Note: See Configuring Multi-Region data stores for details on deploying and configuring a data store to support Multi-Region tables.
-