Deploying Database Systems and Application VMs on Oracle Database Appliance
This document in the Solution-in-a-Box series provides a step-by-step guide to utilize the KVM technology on Oracle Database Appliance bare metal system release 19.18 and later. It provides guidelines how to create the Application tier together with the database tier on the same Oracle Database Appliance hardware.
- About Oracle Database Appliance
Oracle Database Appliance is a pre-built, ready to deploy platform for Oracle Database. - Why Use Virtualization and How does Oracle Database Appliance provide a Virtualization Solution
Understand how Oracle Database Appliance can address your virtualization requirements. - Oracle Database Appliance Virtualization Terminology
Understand the terminology used in this document. - Solution-in-a-Box Designs
There are three basic scenarios on how to install the application along with the database on an Oracle Database Appliance. For an Oracle Database Appliance High-Availability hardware model, there are additional designs since your database can be a Oracle RAC or a single instance database on one node only and depending on your application, you may be able to run it on one or both nodes. - High-Availability and Networking Considerations
Understand the high-availability and networking options when deploying your Solution-in-a-Box. - Solution: Create an Application VM with Linux Operating System
Following is an example of how to set up an application VM or a Compute Instance with Linux operating system. - Solution: Create an Application VM with Linux Operating System Using a Kickstart File
Following is an example of how to use a kickstart file to automate some of the steps in the operating system configuration. - Solution: Create an Application VM with Windows OS
Following is an example of how to set up an application VM or Compute Instance with Microsoft Windows operating system. - Creating a DB System
Understand how you can create a KVM DB system on Oracle Database Appliance. - Deploying JD Edwards EnterpriseOne on Oracle Database Appliance KVM
Understand how you can deploy JD Edwards EnterpriseOne on Oracle Database Appliance KVM. - Deploying Oracle E-Business Suite on Oracle Database Appliance KVM
Understand how you can deploy Oracle E-Business Suite on Oracle Database Appliance KVM. - Deploying Oracle FLEXCUBE on Oracle Database Appliance KVM
Understand how you can deploy Oracle FLEXCUBE on Oracle Database Appliance KVM. - Deploying Oracle Enterprise Manager Cloud Control on Oracle Database Appliance KVM
Understand how you can deploy Oracle Enterprise Manager Cloud Control on Oracle Database Appliance KVM. - Deploying PeopleSoft on Oracle Database Appliance KVM
Understand how you can deploy PeopleSoft PeopleTools on Oracle Database Appliance KVM. - Migrating Oracle VM Guest Machines to KVM on Oracle Database Appliance
Understand how you can migrate Oracle VM guest machines from Virtualized Platform to Oracle KVM guest machines on Oracle Database Appliance KVM. - Backing up Oracle Database Appliance KVM Guest Machines
Understand how you can back up KVM guest machines on Oracle Database Appliance. - Oracle Database Appliance References
Links and references to the concepts, commands, and examples used in this document.
About Oracle Database Appliance
Oracle Database Appliance is a pre-built, ready to deploy platform for Oracle Database.
Oracle Database Appliance is an engineered system, an integrated, full-stack solution developed for Oracle Database. Oracle hardware and software are designed to work perfectly together and are able to run crucial customer workloads faster, at lower costs, and with greater security than multivendor, on-premises ‘build your own’ solutions. Each Oracle Database Appliance system consists of server nodes, networking, and redundant storage. Oracle Database Appliance can be a single node model (S for small, M for Medium and in the case of X6-2L, for Large), or a two node HA model (HA models support high-availability). With the High-Availability models, you get two clustered nodes and you are able to create highly-available Oracle RAC databases easily and quickly using either the browser user interface (BUI) or the command-line interface (CLI).
Why Use Virtualization and How does Oracle Database Appliance provide a Virtualization Solution
Understand how Oracle Database Appliance can address your virtualization requirements.
Why use Virtualization?
There are several reasons why virtualization might be considered. Virtual Machines (VMs) can be used to consolidate and to utilize resources more effectively. Rather than disable cores that are not licensed, you can utilize them for other workloads. This can reduce the number of physical servers, resulting in space, power maintenance reductions, and cost savings. Virtualization is a great technology that provides application and database isolation and enables bundling of applications, middleware, and databases on the same hardware.
How does Oracle Database Appliance provide a Virtualization Solution?
Oracle Database Appliance has provided virtualization since Oracle Database Appliance release 2.5. To use virtualization on Oracle Database Appliance earlier, it had to be deployed with a special image. Users had to decide before deploying Oracle Database Appliance to go with either the bare metal (BM) image or the virtualized platform image (VP). To change from one layout to the other, the appliance had to be reimaged from scratch. Oracle Database Appliance VP was only available for Oracle Database Appliance High Availability (2 node appliance) and not for single node appliance. Virtualization on Oracle Database Appliance was introduced to allow the utilization of cores not licensed for Oracle Database. To avoid leaving these cores unused, virtualization allowed to utilize them for virtual machines hosting applications, webservers, and others. To host not only the database tier, but also the application and web tier on the same Oracle Database Appliance is also known as Solution-in-a-Box. This concept is widely adopted and not only used for Oracle Applications like EBS, WLS, Peoplesoft, Oracle Hospitality to name a few, but as well for many customer and third party software vendor developed applications.
In the past virtualization on Oracle Database Appliance was implemented with Oracle Virtual Machine (OVM) which is a type 1 bare metal hypervisor based on xen technology. Virtualization on Oracle Database Appliance is now available with KVM. KVM stands for Kernel-based Virtual Machine and is a type 2 host OS-based hypervisor. KVM provides modules that enable the Linux kernel to be used as a hypervisor. It is available on all Oracle Database Appliance hardware models (single node and HA). KVM is a mature technology that has been around since 2007 and offers several advantages. To name one, Oracle Database Appliance does not need separate bare metal system and virtualized platform images anymore. Starting with Oracle Database Appliance 19.9, Oracle Database Appliance integrated KVM support for applications. A user can use the built-in BUI or the command line to manage the Application VM life cycle on Oracle Database Appliance. The user is responsible for managing the application inside the KVM, for the Oracle Database Appliance software tooling it is a ‘black box’. Starting with Oracle Database Appliance 19.10, Oracle Database Appliance integrates KVM support for Oracle databases. A user can use Oracle Database Appliance's built-in BUI or the command line to manage both DB System (database KVM system on Oracle Database Appliance) life cycle and databases inside DB Systems. DB Systems allow Oracle hard partitioning licensing, thus a user only needs to have Oracle Database licenses for the CPU cores assigned to the DB System.
Oracle Database Appliance Virtualization Terminology
Understand the terminology used in this document.
- Virtual Machine (VM): Image and virtual resources that behave like an actual server within the host server.
- KVM guest machine: The software on an application VM with an independent operating system instance.
- DB System (KVM Database System): A database VM which runs an Oracle Database on Oracle Database Appliance. The DB System is created and managed by Oracle Database Appliance tooling.
- VM Storage: Central location for storing resources needed to create virtual machines.
- Virtual Network: Separate virtual network for the VM.
- Virtual Disk: Additional storage option for VMs to add additional block storage.
- KVM Database System Networks: Default networks created on Oracle Database Appliance, which are the public network (vnetwork pubnet) and the internal managed cluster interconnect and Oracle ASM network.
Solution-in-a-Box Designs
There are three basic scenarios on how to install the application along with the database on an Oracle Database Appliance. For an Oracle Database Appliance High-Availability hardware model, there are additional designs since your database can be a Oracle RAC or a single instance database on one node only and depending on your application, you may be able to run it on one or both nodes.
The basic scenarios are:
Application and Database installed in bare metal system
This option is only applicable for a few applications which do not interfere with the database software and operating system installation. One supported example is the Oracle Enterprise Manager software.
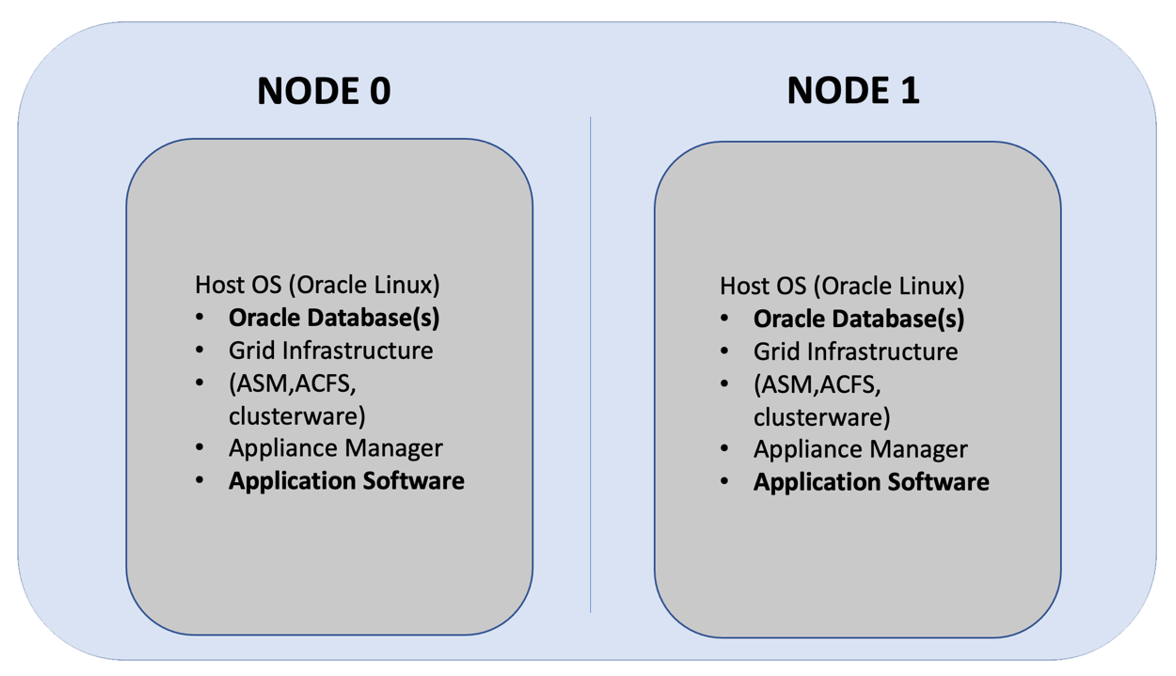
Description of the illustration option1_application_db_in_bm.png
Database installed in bare metal system, Application installed in KVM guest machine
This option does not allow hard partitioning, that is, separation of cores for database and application is not possible.
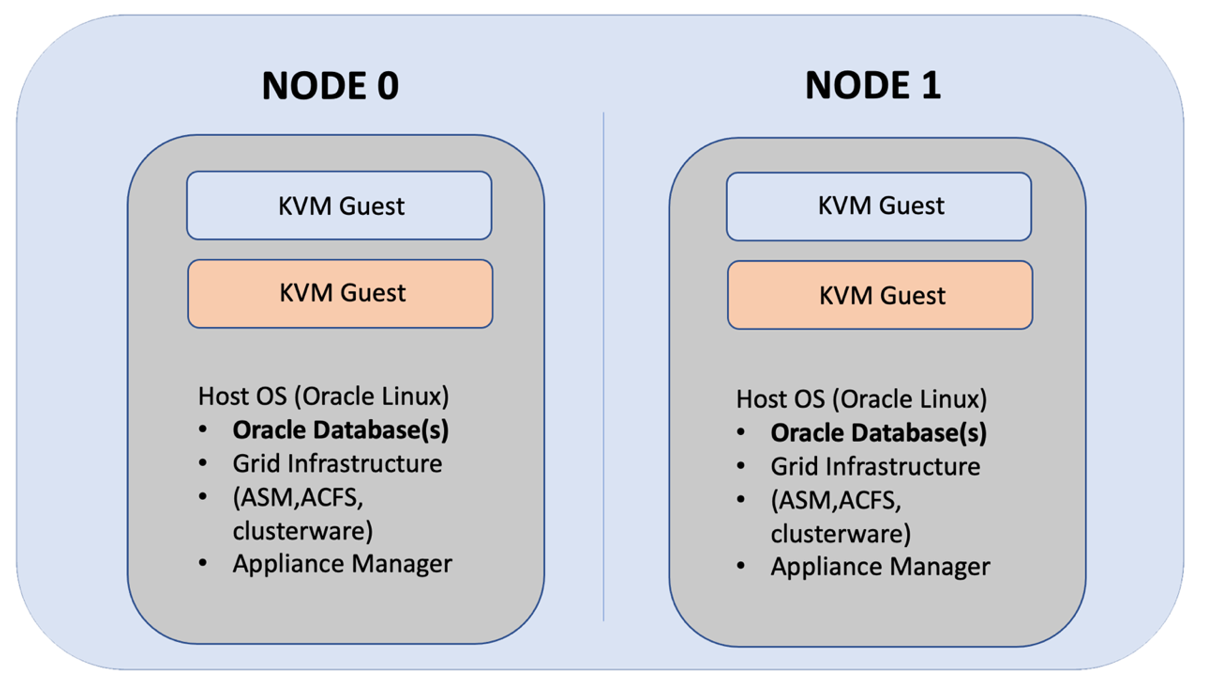
Description of the illustration option2_application_in_bm_db_in_kvm.png
Database and Application in separate KVM guest machines
This third option is ideal to separate resources for databases and applications and license them independently. This step-by-step guide covers an example of the third case since this is the best solution for most use cases.
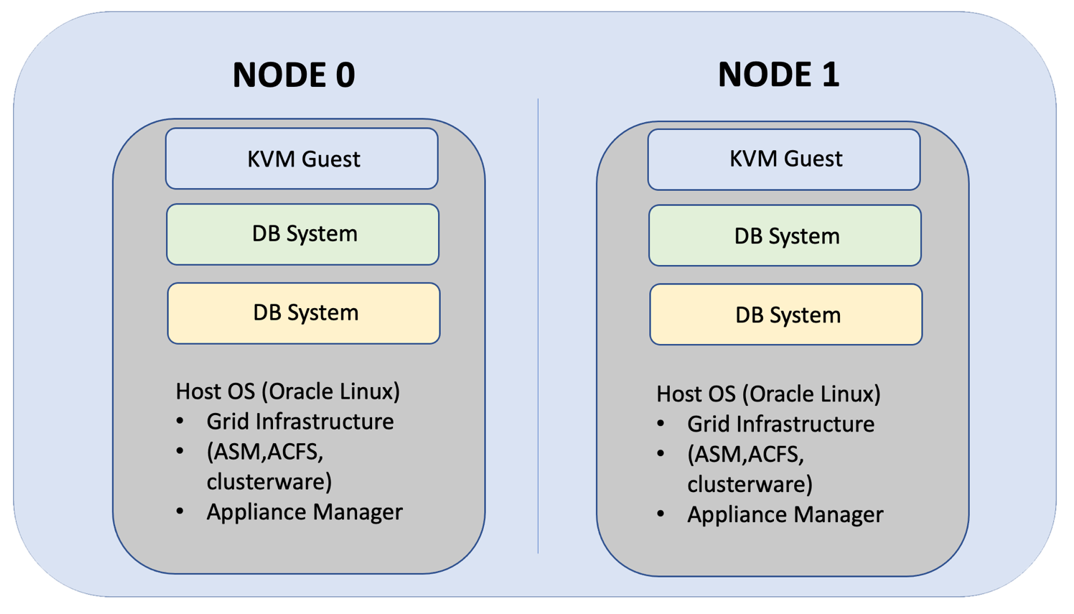
Description of the illustration option3_application_db_in_kvm.png
High-Availability and Networking Considerations
Understand the high-availability and networking options when deploying your Solution-in-a-Box.
High-Availability Considerations
With Oracle Database Appliance, the best High Availability
option is to use an Oracle RAC database. An Oracle RAC One Node
design may be sufficient for your availability requirements as well.
These options are only available with an Oracle Database Enterprise
Edition (EE) licence. Oracle Database Standard Edition (SE) Oracle
databases have Standard Edition High Availability (SEHA) feature
enabled. The KVM guest machines you create for your applications are
set up by default to auto-restart and auto-failover. You can confirm
the setting by running the command odacli
describe-vm. The output displays: Auto
start: YES - Fail over: YES
Networking Considerations
Oracle Database Appliance KVM virtual network supports two type of networks, bridged and bridged-vlan. For bridged network, a bridge is created and a NIC or a bond is attached to it. On the public network, selected during appliance deployment, a bridge with the name pubnet is attached. If a VM needs access to pubnet, it can be attached to this network. This pubnet vnetwork cannot be modified or deleted. If additional bridged virtual networks are required, then they can be created on other interfaces that are not used for the pubnet. For DB Systems on Oracle Database Appliance release 19.10, you cannot use a virtual network other than the pubnet. With later releases of Oracle Database Appliance, VLANs can be created on all available public interfaces, including the interface on which the public network is already configured. When planning to run one or more DB Systems, be aware that every DB System requires its own set of VIPs and SCAN IPs.Solution: Create an Application VM with Linux Operating System
Following is an example of how to set up an application VM or a Compute Instance with Linux operating system.
Tip:
Do not use Oracle KVM guest machines to run an Oracle database. Use DB systems, instead, to run an Oracle database. Some of the following steps are mandatory as indicated, and other steps are optional. Decide to run the optional steps based on how you designed your Solution-in-a-Box. For example, if your application VM must only use a defined number of CPUs, then, you must create a VM CPU Pool as part of the process. Creation of VM storage is mandatory as several application VMs can share a single VM storage. If you have specific network requirements, you can create additional virtual networks for these purposes. Another optional step is the creation of virtual disks. One VM disk is created for each application guest KVM as part of the VM instance creation. You can create additional virtual disks for your application VM and these virtual disks can be shared between different application VMs, if required.Step 1: Create a VM CPU Pool (Optional)
Create a CPU pool to specify how many CPU cores your KVM should use. This CPU pool is later assigned to the KVM guest machine.
In the Browser User Interface (BUI), in the Appliance tab, navigate to the Create CPU Pool page and specify the CPU Pool Name, Number of CPU Cores, and select the CPU Pool Type as VM Instance. You can specify the sockets to use for the CPU pool. To use all sockets, do not specify any value.
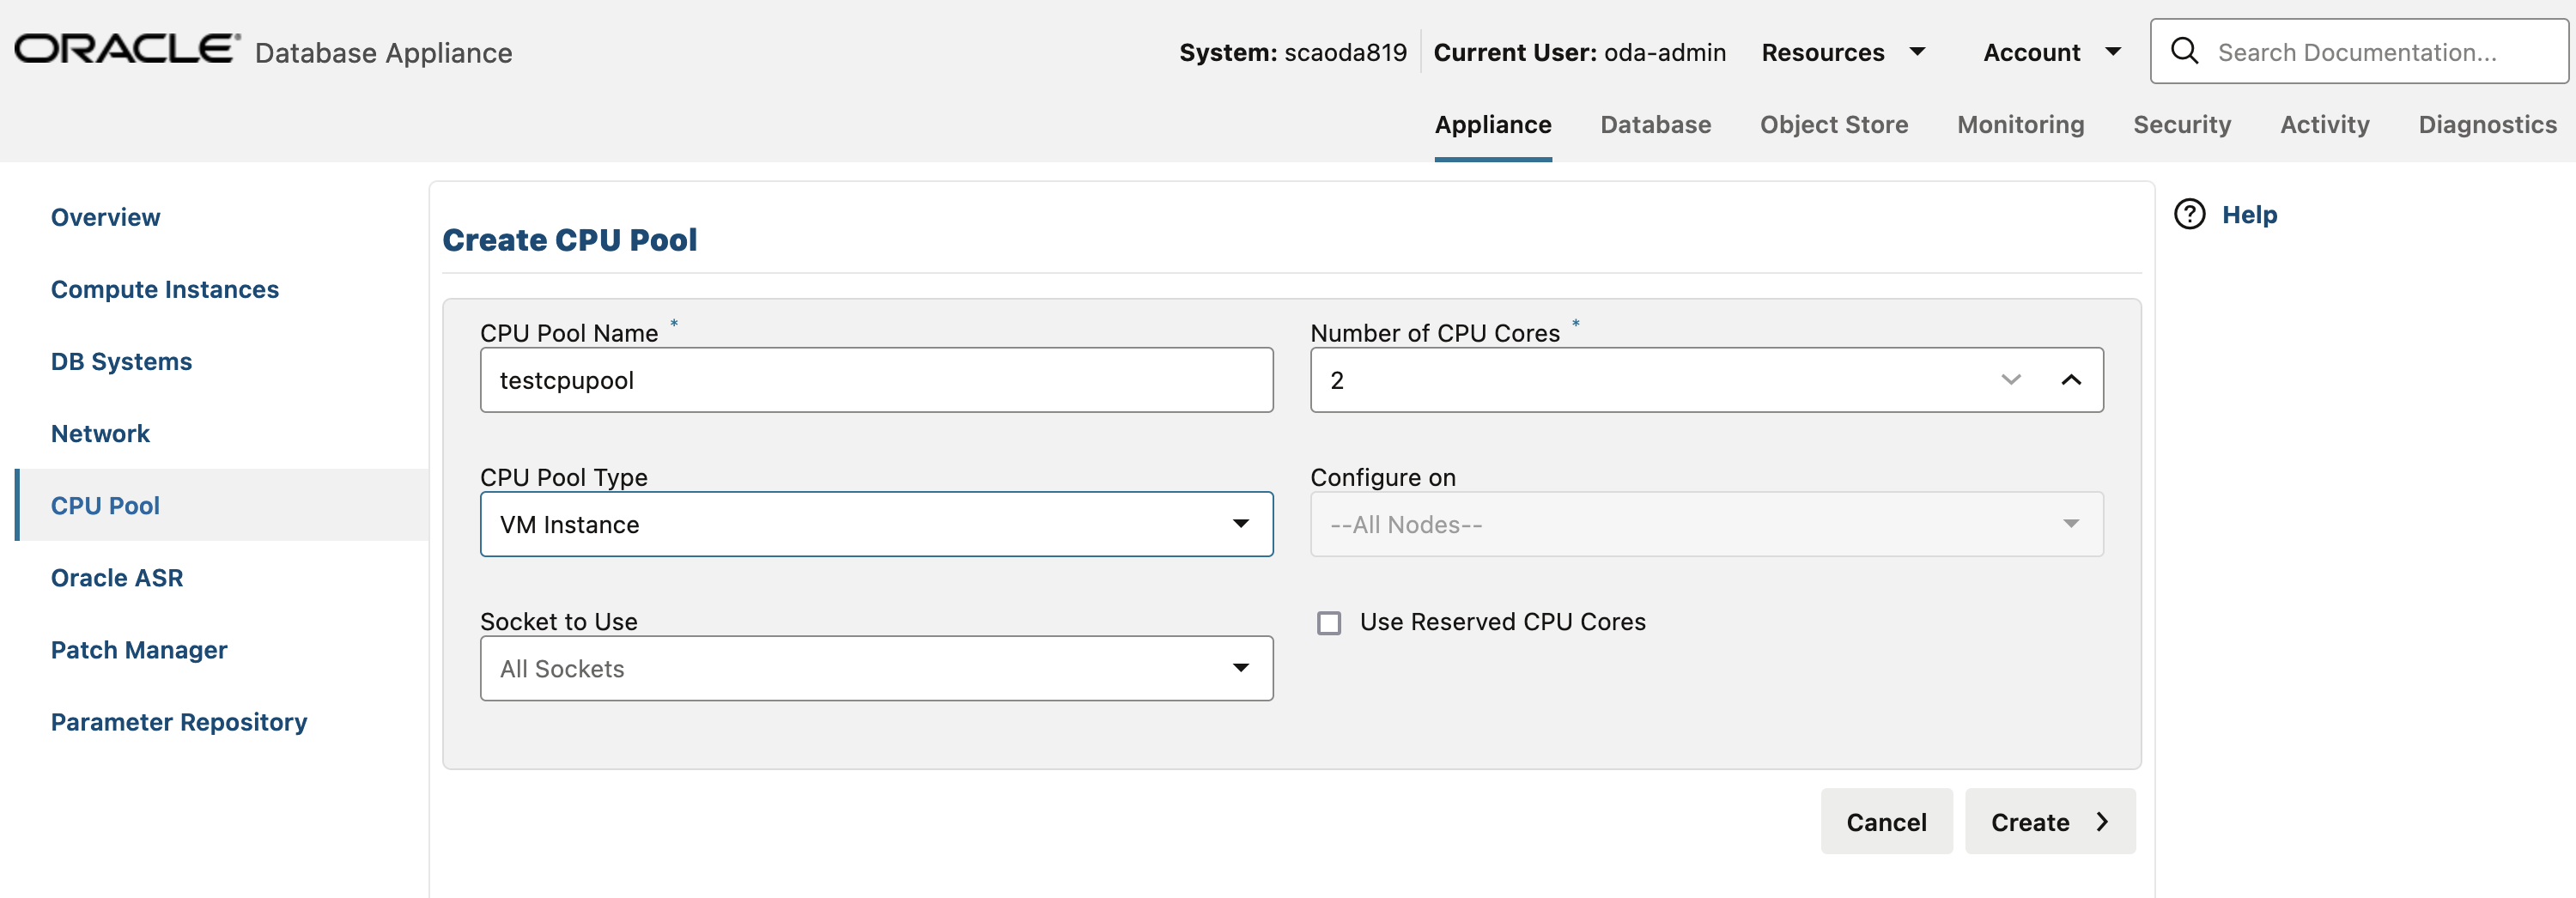
Description of the illustration create_cpu_pool_1919.png
ODACLI command for creating a CPU pool:
# odacli create-cpupool -n testcpupool -c 2 -vmStep 2: Create VM Storage
In the Appliance tab, select Compute Instances, and then navigate to the Create VM Storage page and specify Storage Name, Storage Size, and ASM Disk group. Click Create.

Description of the illustration create_vm_stor_1919.png
ODACLI command for creating VM storage:
# odacli create-vmstorage -n testvmstor -s 100G -dg DATA Note that the default value of -dg is
DATA.
Step 3: Create a Virtual Network (if required)
Any VM
that needs to access the public network must be attached to the
pubnet virtualnetwork. No bridged network other than the default
pubnet bridge is allowed to be created on the public network
interface. Additional bridged vnetwork (public network without
tagged VLAN configuration) can be created on other interfaces that
are not used for the public network. It is not mandatory to assign
IP addresses to the bridge. IP addresses are only required if
communication between the bare metal system host and the KVM guest
is desired. When two IP addresses are assigned to a
high-availability machine, the first will be assigned to the bridge
on node0 and the second IP address to
node1.
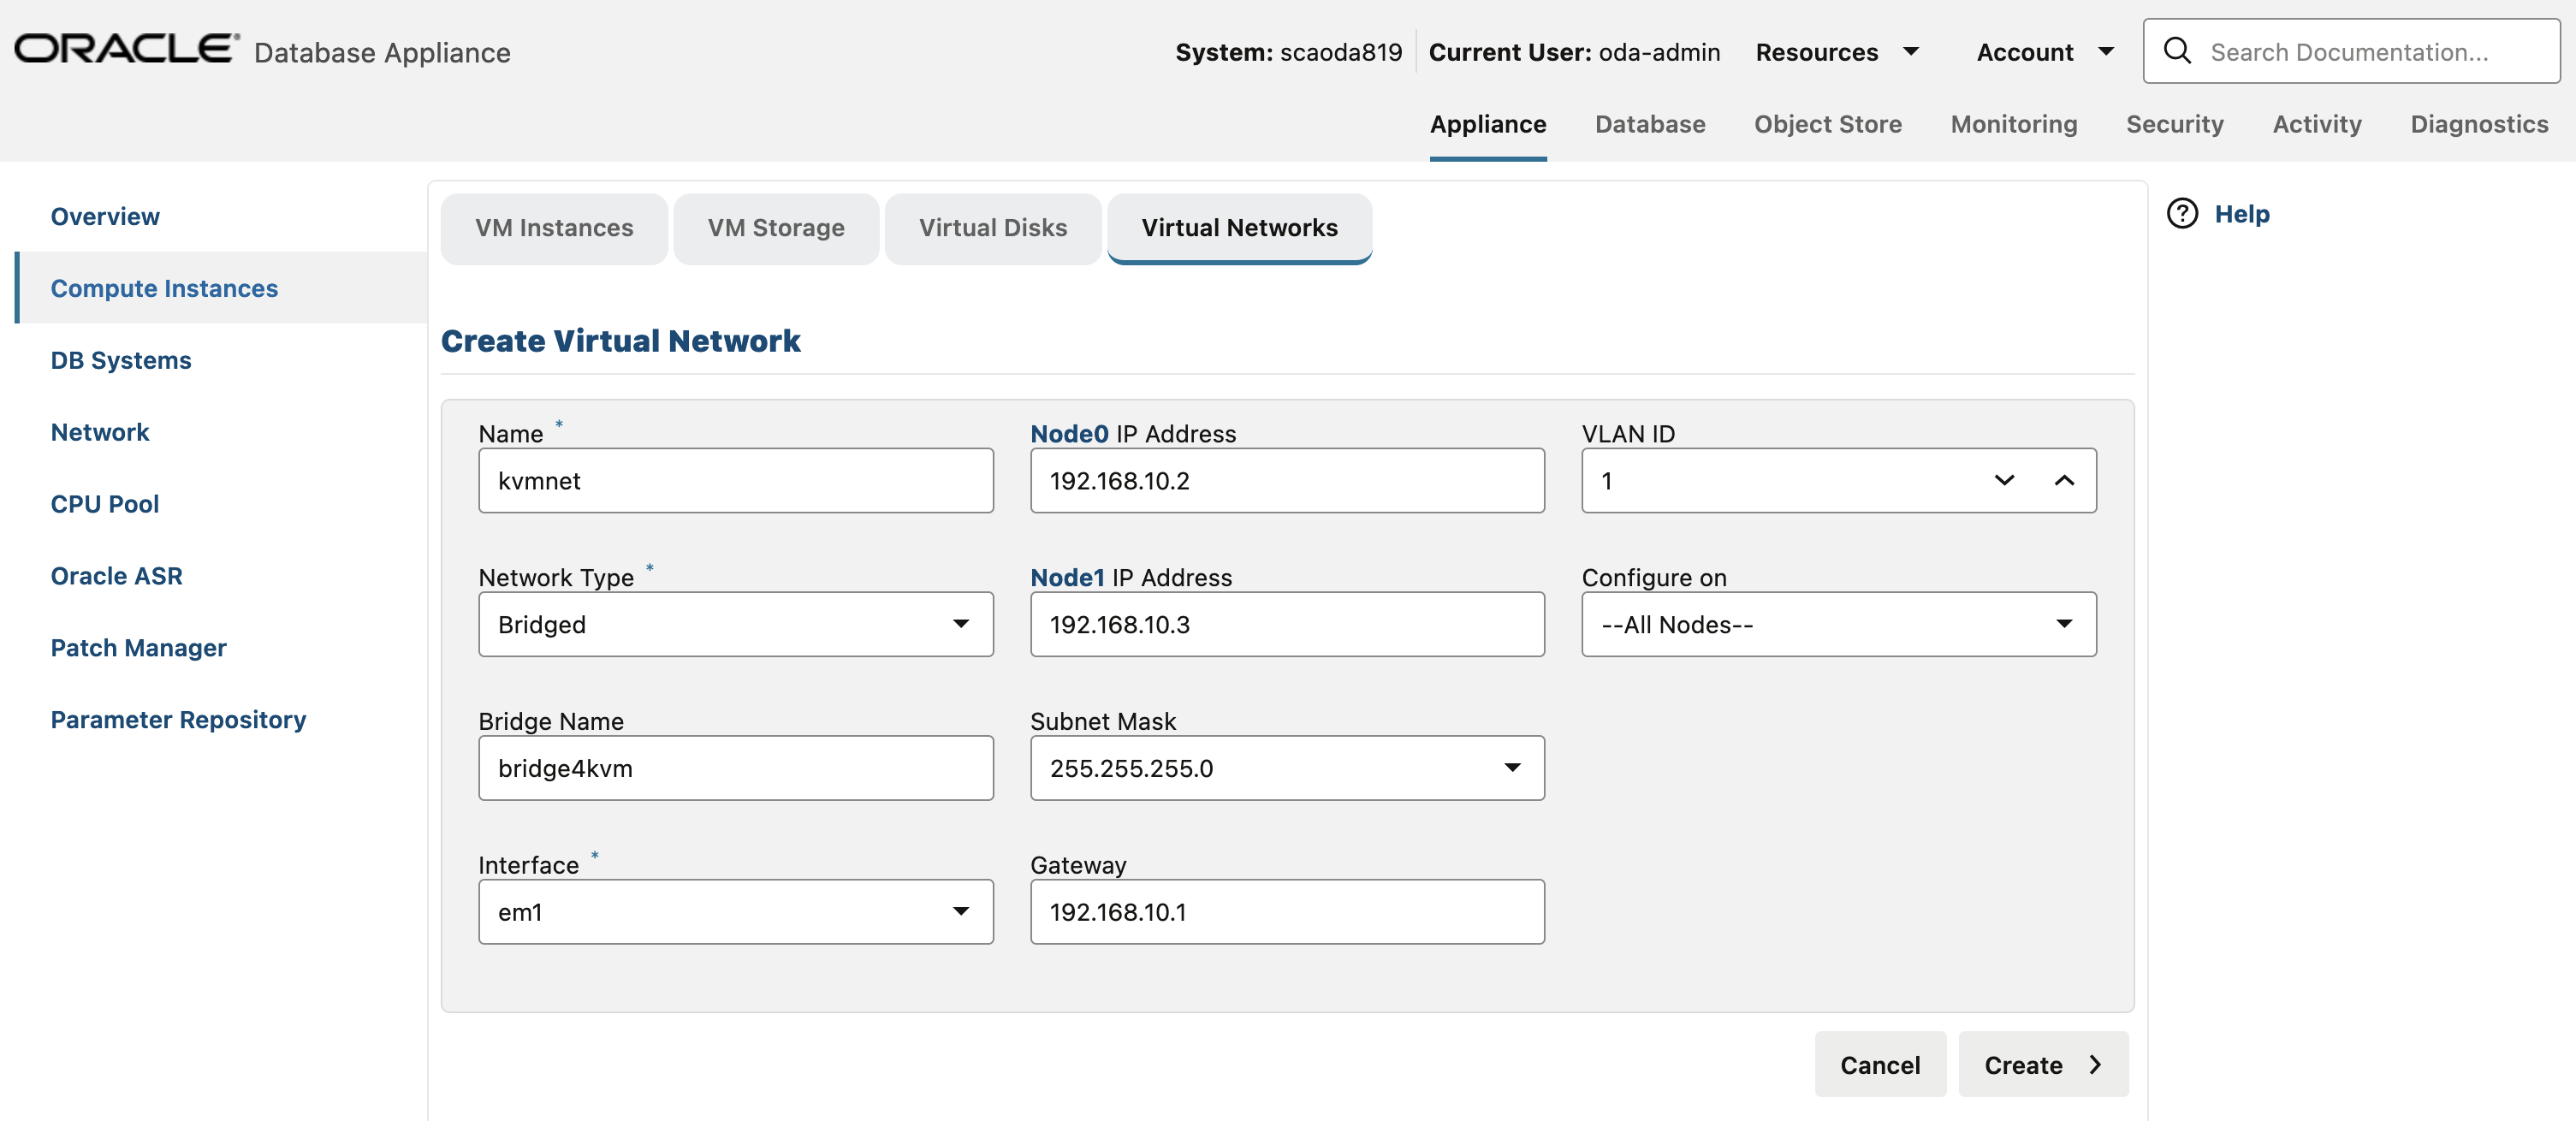
Description of the illustration create_virnet_1919.png
ODACLI command for creating a virtual network:
# odacli create-vnetwork –name officenet –bridge bridge4kvm –type bridged –interface bond1 –ip xx.xx.xx.xx –gateway xx.xx.xx.xx –netmask xx.xx.xx.xxStep 4: Create Virtual Disk (if required)
During the VM creation, a VM disk is created to host the operating system. If additional disks are required ,you must create them in advance. Using virtual disks provides better control over the storage layout of your VM.

Description of the illustration create_vdisk_1919.png
ODACLI command for creating a virtual disk:
# odacli create-vdisk -n testvmdisk -vms testvmstor -s 49G -shStep 5: Create the VM Instance
To create the VM go to ‘VM Instances’ and ‘Create VM’. Type in the mandatory information for your VM plus the additional configuration you would like to use for your VM guest. Mandatory information is the ‘VM name’, ‘VM Storage Name’, the path to the application to install, under ‚Source installation‘. You have as well to define how many CPUs and how much memory to use for the VM. If you have created a CPU Pool a Virtual Disk or a Virtual Network, select them into the respective fields. Specify the size of the OS disk to be created for your VM guest in “VM Disk Size”. If you need your VM to access the DB System via the pubnet, make sure ‘pubnet’ is selected in the ‘Virtual Networks’.
In the Appliance tab,
select Compute Instances, and then navigate to the Create
VM Instance page and specify VM
Name and VM Storage Name.
Specify the path for the installation of application in the
Source Installation field. Define the
Number of vCPUS to use and the
Maximum Memory Size for the VM. If
you have created a CPU pool, virtual disk, or virtual network, then
specify their names. Specify the operating system disk size to be
created for your guest VM in the VM Disk Size
field. To ensure that your VM can access the DB system through the
pubnet, select pubnet in the Virtual
Networks field. Click
Create.
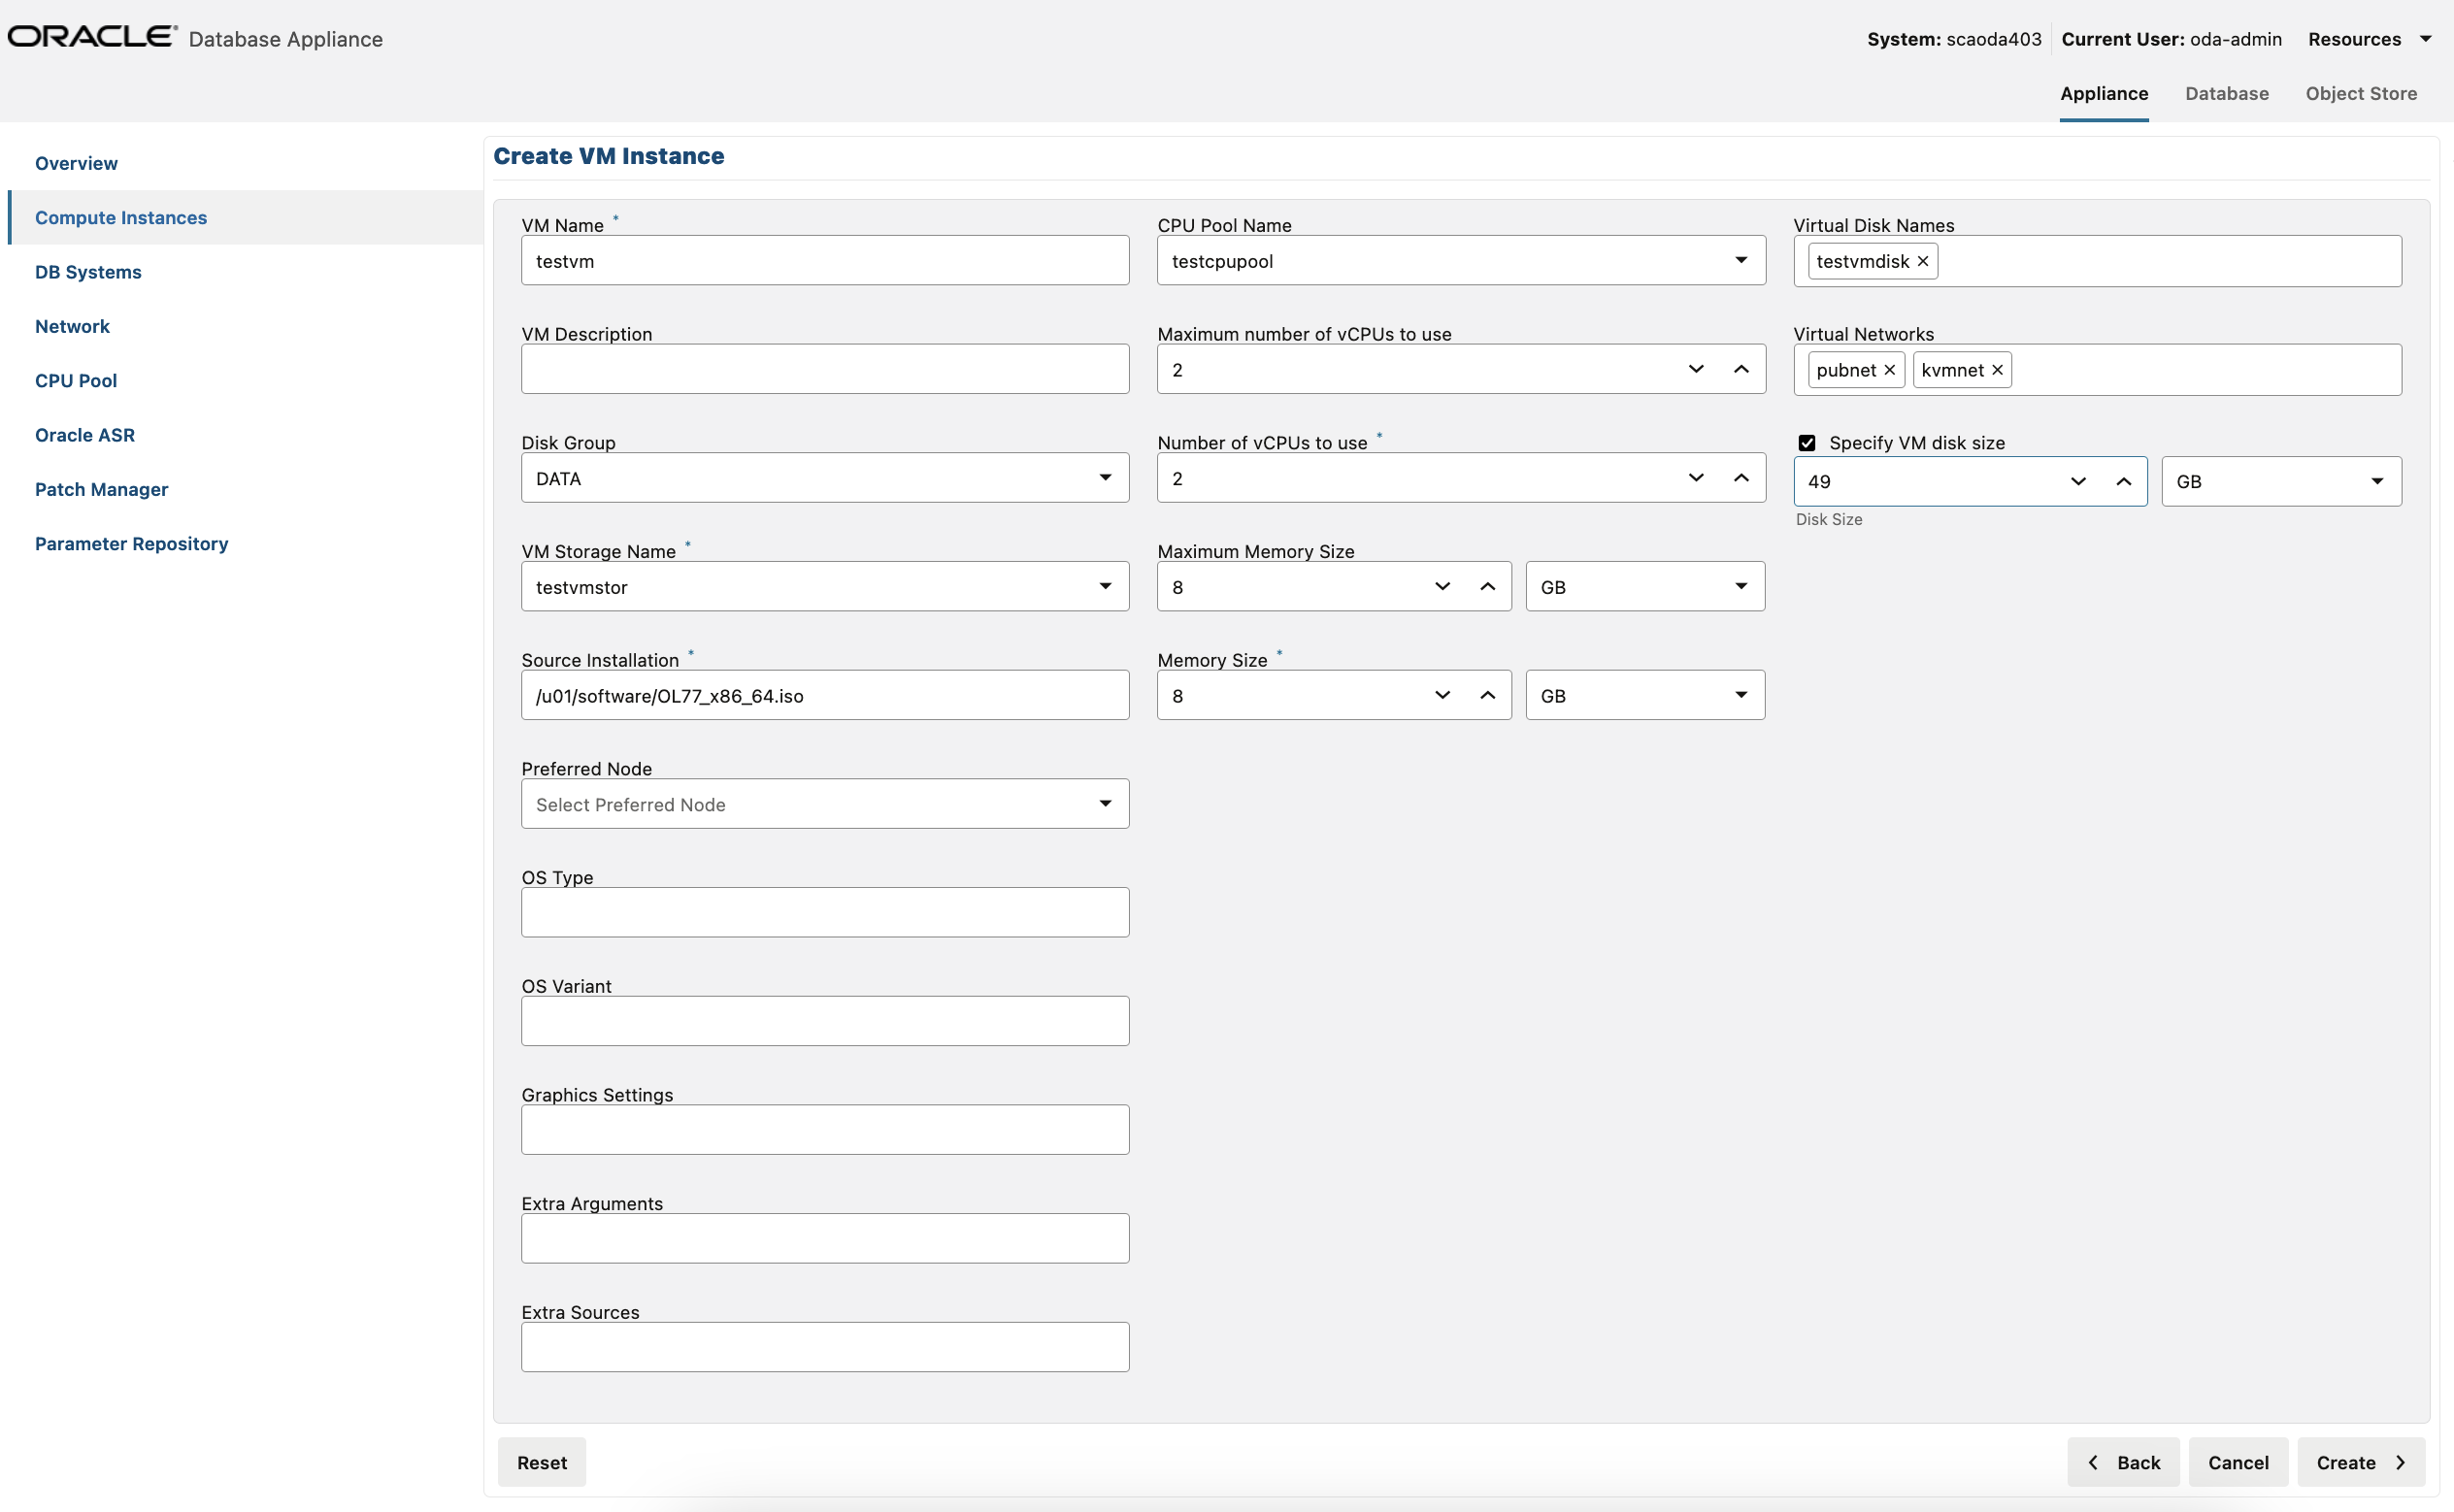
Description of the illustration create_vm_instance_1919.png
ODACLI command for creating a VM instance:
# odacli create-vm -n testvm -vc 2 -m 8G -vms testvmstor -vd testvmdisk -s 49G -cp testcpupool -vn pubnet,kvmnet -src /u01/software/OL77_x86_64.isoStep 6: Complete the operating system installation
If the creation of the VM was successful, use the
odacli describe-vm command to check the VNC
port.
# odacli describe-vm -n testvm
VM details
--------------------------------------------------------------------------------
ID: 20065687-ccc5-4001-b06c-00b8253b0cd2
Name: testvm
Created: 2023-05-07 08:25:35 GMT
Updated: 2023-05-07 08:25:35 GMT
VM Storage: testvmstor
Description: NONE
VM image path: /u05/app/sharedrepo/testvmstor/.ACFS/snaps/vm_testvm/testvm
VM size: 49.00 GB
Source: OL77_x86_64.iso
Cloned from: N/A
OS Type: NONE
OS Variant: NONE
Graphics settings: vnc,listen=127.0.0.1
Display Port: 127.0.0.1:0

Status
--------------------------
Current node: node1
Current state: ONLINE
Target state: ONLINE

Parameters
--------------------------
Preferred node: NONE
Boot option: NONE
Auto start: YES
Fail over: YES
NUMA enabled: NO

Config Live
------------------------- -------------------------
Memory: 8.00 GB 8.00 GB
Max Memory: 8.00 GB 8.00 GB
vCPU count: 2 2
Max vCPU count: 2 2
CPU Pool: testcpupool testcpupool
Effective CPU set: 1,19,37,55 1,19,37,55
vCPUs: 0:1,19,37,55 0:1,19,37,55
1:1,19,37,55 1:1,19,37,55
vDisks: testvmdisk:vdb testvmdisk:vdb
vNetworks: kvmnet:52:54:00:ed:02:57 kvmnet:52:54:00:ed:02:57
pubnet:52:54:00:00:b4:93 pubnet:52:54:00:00:b4:93
Step 7: Connect to the Oracle Database Appliance bare metal system node using VNC
vncserver
command.# vncserver
perl: warning: Setting locale failed.
perl: warning: Please check that your locale settings:
LANGUAGE = (unset),
LC_ALL = (unset),
LC_CTYPE = "UTF-8",
LANG = "en_US.UTF-8"
are supported and installed on your system.
perl: warning: Falling back to the standard locale ("C").
You will require a password to access your desktops.
Password:
Verify:
Would you like to enter a view-only password (y/n)? n
A view-only password is not used
xauth: file /root/.Xauthority does not exist
New 'node1:1 (root)' desktop is node1:1 VNC port
Creating default startup script /root/.vnc/xstartup
Creating default config /root/.vnc/config
Starting applications specified in /root/.vnc/xstartup
Log file is /root/.vnc/node1:1.logUse a VNC client of your choice and connect to
host:vncport (the host is your Oracle
Database Appliance bare metal system, the VNC port is from the
vncserver command).
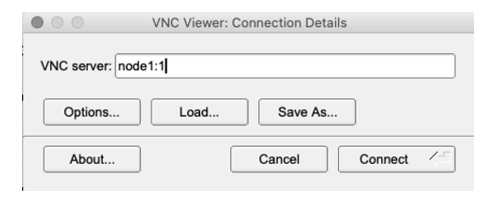
Description of the illustration vnc_settings.png
The command prompt in the VNC viewer is displayed.
Specify vncviewer 127.0.0.1:2 in the command
prompt. Note that this Display Port: 127.0.0.1:2 is the same as
displayed in the odacli describe-vm
output.

Description of the illustration vnc_cmd.png
Step 8: Complete the installation process
Select the language:
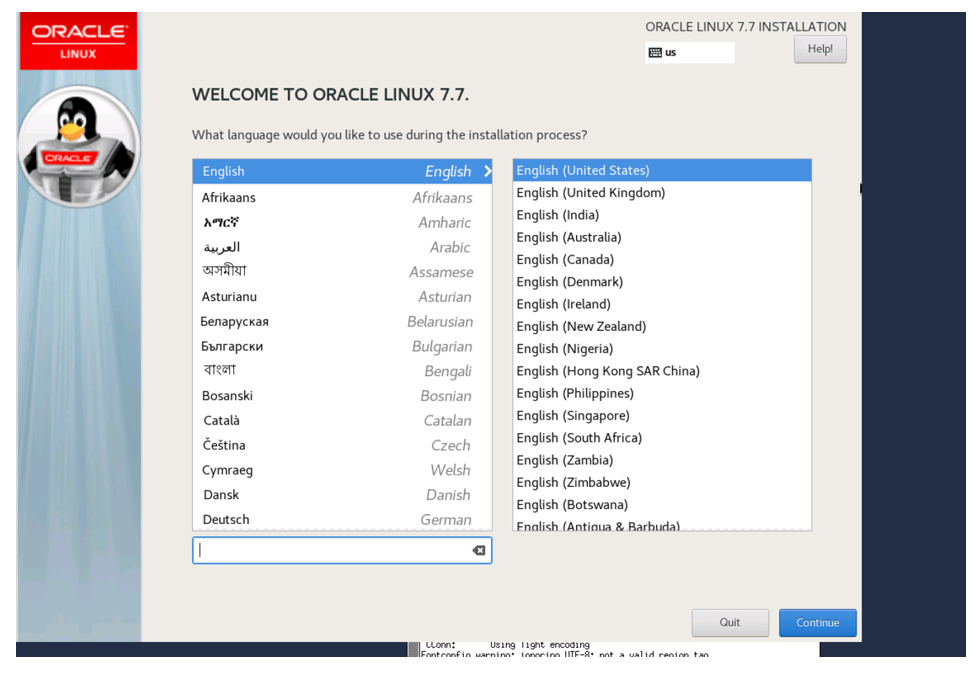
Description of the illustration oracle_linux_installation.png
In the Device Selection screen, the disks that were
created when you ran the odacli create-vm and
odacli create-vdisk commands are displayed.
Ensure that you select the appropriate disk for the operating system
install.
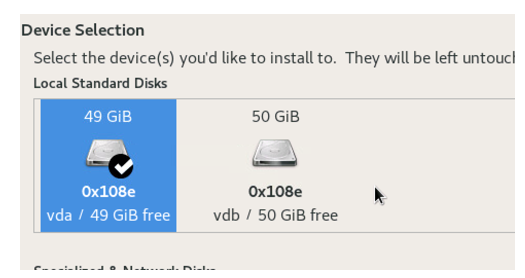
Description of the illustration oracle_linux_installation_device_selection.png
Accept the message to restart, and then run the VNC to complete the setup, such as accepting the license agreement.
Step 9: Configure the Application VM network
# odacli describe-vm -n testvm

vNetworks: kvmnet:52:54:00:ed:02:57 kvmnet:52:54:00:ed:02:57
pubnet:52:54:00:00:b4:93 pubnet:52:54:00:00:b4:93 ip link show to identify the interface
with the MAC address described in the command above.
# ip link show
1: lo: <LOOPBACK,UP,LOWER_UP> mtu 65536 qdisc noqueue state UNKNOWN mode DEFAULT group default qlen 1000
    link/loopback 00:00:00:00:00:00 brd 00:00:00:00:00:00
2: eth0: <BROADCAST,MULTICAST,UP,LOWER_UP> mtu 1500 qdisc pfifo_fast state UP mode DEFAULT group default qlen 1000
    link/ether 52:54:00:7d:7b:6b brd ff:ff:ff:ff:ff:ff
3: virbr0: <NO-CARRIER,BROADCAST,MULTICAST,UP> mtu 1500 qdisc noqueue state DOWN mode DEFAULT group default qlen 1000
    link/ether 52:54:00:42:63:d7 brd ff:ff:ff:ff:ff:ff
4: virbr0-nic: <BROADCAST,MULTICAST> mtu 1500 qdisc pfifo_fast master virbr0 state DOWN mode DEFAULT group default qlen 1000
link/ether 52:54:00:42:63:d7 brd ff:ff:ff:ff:ff:ff/etc/sysconfig/network-scripts/ifcfg-eth0
and /etc/resolv.conf file to find the DNS inside
the VM. Refer to your operating system specific document to
configure the network interface. The following is an
example:# cat /etc/sysconfig/network-scripts/ifcfg-eth0
TYPE=Ethernet
BOOTPROTO=none
DEFROUTE=yes
NAME=eth0
DEVICE=eth0
NM_CONTROLED=no
ONBOOT=yes
IPADDR=your IP address
PREFIX=your subnet prefix
GATEWAY=your gateway# cat /etc/resolv.conf
search domain
nameserver your first DNS server
nameserver your second DNS serverStep 10: Test for the required connectivity to the VM guest machine
Test that you are able to connect to all guest machines and clients (database, external machines, and others). To connect as root through SSH, you may need to change SELINUX to permissive mode in the/etc/selinux/config file. If required, test this
connectivity as well after you migrate the VM guest machine to the other
node. To migrate the node, run the following
commands:# odacli describe-vm -n testvm2 | grep 'Current node'
Current node: node1
# odacli migrate-vm -n testvm2 -to node2
# odacli describe-vm -n testvm2 | grep 'Current node'
Current node: node2
Solution: Create an Application VM with Linux Operating System Using a Kickstart File
Following is an example of how to use a kickstart file to automate some of the steps in the operating system configuration.
For example, you can set the root password, IP address, host name and other settings using the kickstart file. Specify the kickstart file location in the ODACLI command to create a KVM. Follow these steps:
Step 1: Set up the HTTP Server that Hosts the Kickstart File
Currently, ODACLI only supports kickstart configuration file over the network.
# yum install httpd# systemctl enable httpd --nowStep 2: Create a Kickstart File
The easiest way to create a kickstart file is to use one from an existing Oracle
Linux machine. Each Oracle Linux installation creates a kickstart
file, for example, /root/anaconda-ks.cfg. You can
use the file to repeat an installation, or you can customise the
settings in this file for different system configurations. The
following example displays a kickstart file from the earlier manual
installation with updated network information and a different root
password:
# Network information
network --bootproto=static --device=eth0 --gateway=ww.xx.yy.1 --ip=ww.xx.yy.zz --nameserver=aa.bb.cc.dd --netmask=iii.iii.iii.iii --noipv6 --activate network --hostname=mykvmhost

# Root password
rootpw welcome1
Store the file on the HTTP server as /var/www/html/ks.txt.
Step 3: Access Kicsktart File from Oracle Database Appliance
To verify that you can access the kickstart file, from the Oracle Database Appliance bare metal system server, run the command:
curl -I "st.uv.wx.yz:80/ks.txt" ←replace st.uv.wx.yz with the IP address of your http serverThe contents of the ks.txt file are displayed.
Step 4: Install the KVM on Oracle Database Appliance
Run the odacli create-vm command and provide the
additional kickstart information with the
--extra-args option. Provide under
ip= the IP, gateway, subnet and hostname of
the VM you want to deploy, for example,
ip=ip::gateway:netmask:hostname:interface:none.
In ks=, specify the location of the
ks.txt file as explained in Step 3.
Following is an
example:
odacli create-vm -n testkick -vc 2 -m 8G -vms testvmstor -s 49G -vn pubnet -src /u01/software/OL77_x86_64.iso --extra-args "dns=aa.bb.cc.dd ip=ww.xx.yy.zz::ww.xx.yy.1:iii.iii.iii.iii:mykvmhost.us.oracle.com:eth0:none ks=st.uv.wx.yz:80/ks.txt"odacli create-vm command
completes, check the VNC connection details of the VM as
follows:# odacli describe-vm -n testkick|grep Display ← where testkick is the name of your VM
Display Port: 127.0.0.1:2To monitor the progress of the operation, use a VNC
client of your choice and connect to host:vncport
(the host is your Oracle Database Appliance bare metal system, the
VNC port is from the vncserver command).

Description of the illustration vnc_settings.png
The command prompt in the VNC viewer is displayed.
Specify vncviewer 127.0.0.1:2 in the command
prompt. Note that this Display Port: 127.0.0.1:2 is the same as
displayed in the odacli describe-vm
output.

Description of the illustration vnc_cmd.png
Solution: Create an Application VM with Windows OS
Following is an example of how to set up an application VM or Compute Instance with Microsoft Windows operating system.
The following procedure is applicable for Oracle Database Appliance release 19.12 or later. If your Oracle Database Appliance is on an earlier release, then follow the instructions in My Oracle Support Note 2748946.1 at the location https://support.oracle.com/rs?type=doc&id=2748946.1.
Before you start, download the Oracle VirtIO Drivers Version
for Microsoft Windows software either from Oracle Software Delivery Cloud or
from My Oracle Support. For details, refer to the Oracle
Linux KVM User's Guide . With BUI of Oracle Database
Appliance release 19.12 or 19.11, the option to define an external source is
not available. Use ODACLI commands to create the VM with the option
-esrc.
Step 1: Create a VM CPU Pool (Optional step, required only for cases when you need dedicated CPU resources for the Windows VM)
# odacli create-cpupool -n winvmcpupool -c 2 -vmStep 2: Create VM Storage
# odacli create-vmstorage -n winvmstor -s 100G -dg DATAStep 3: Create Virtual Disk (Optional, required only if you need additional disks for the Windows VM )
# odacli create-vdisk -n winvmdisk -vms winvmstor -s 49G -shStep 4: Create the VM Instance
# odacli create-vm -n winvm -vc 2 -m 8G -vms winvmstor -s 49G -vd winvmdisk -cp winvmpool -vn pubnet -src /tmp/win19.iso -esrc /tmp/winvirtio.iso -ost windowsStep 5: Identify the VNC port
# odacli describe-vm -n winvm
VM details
--------------------------------------------------------------------------------
                       ID:  7b741c6a-7073-4d39-9270-24698b887135
                     Name:  winvm
                  Created:  2021-08-03 02:59:42 HDT
                  Updated:  2021-08-03 02:59:42 HDT
               VM Storage:  winvmstor
              Description:  NONE
                  VM size:  49.00 GB
                   Source:  win19.iso
                  OS Type:  windows
               OS Variant:  NONE
        Graphics settings:  vnc,listen=127.0.0.1
             Display Port:  127.0.0.1:0

 Status
--------------------------
             Current node:  node1
            Current state:  ONLINE
             Target state:  ONLINE

 Parameters
--------------------------
           Preferred node:  NONE
              Boot option:  NONE
               Auto start:  YES
                Fail over:  YES

                            Config                     Live
                            -------------------------  -------------------------
                   Memory:  8.00 GB                    8.00 GB
               Max Memory:  8.00 GB                    8.00 GB
               vCPU count:  2                          2
           Max vCPU count:  2                          2
                 CPU Pool:  winvmpool                  winvmpool
        Effective CPU set:  0-1,32-33                  0-1,32-33
                    vCPUs:  0:0-1,32-33                0:0-1,32-33
                            1:0-1,32-33                1:0-1,32-33
                   vDisks:  winvmdisk:vdb              winvmdisk:vdb
                vNetworks:  pubnet:52:54:00:84:8f:cd   pubnet:52:54:00:84:8f:cd
Step 6: Connect to the Oracle Database Appliance bare metal system node using VNC
vncserver
command.# vncserver
perl: warning: Setting locale failed.
perl: warning: Please check that your locale settings:
LANGUAGE = (unset),
LC_ALL = (unset),
LC_CTYPE = "UTF-8",
LANG = "en_US.UTF-8"
are supported and installed on your system.
perl: warning: Falling back to the standard locale ("C").
You will require a password to access your desktops.
Password:
Verify:
Would you like to enter a view-only password (y/n)? n
A view-only password is not used
xauth: file /root/.Xauthority does not exist
New 'node1:1 (root)' desktop is node1:1 VNC port
Creating default startup script /root/.vnc/xstartup
Creating default config /root/.vnc/config
Starting applications specified in /root/.vnc/xstartup
Log file is /root/.vnc/node1:1.logStep 7: Connect to the VM guest machine using VNC
Use
a VNC client of your choice and connect to
host:vncport (the host is your Oracle
Database Appliance bare metal system, the VNC port is from the
vncserver command).

Description of the illustration vnc_settings.png
The command prompt in the VNC viewer of type
vncviewer 127.0.0.1:2 is displayed. Note
that this Display Port: 127.0.0.1:2 is the same as displayed in the
odacli describe-vm output.

Description of the illustration vnc_cmd.png
Step 8: Complete the Windows operating system installation
Select the configuration details.
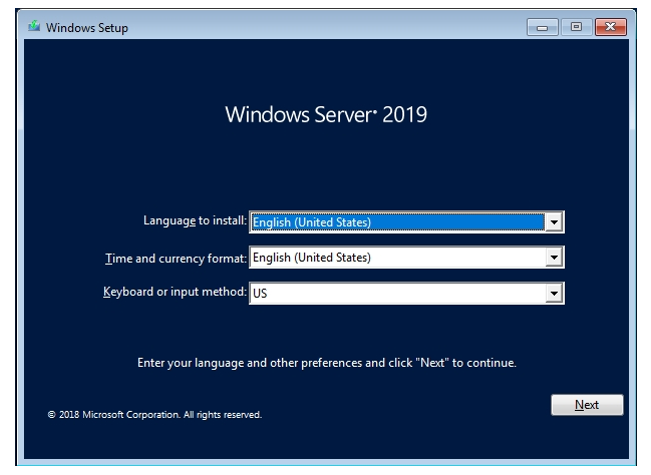
Description of the illustration windows_server_selection1.png
Provide the required values and navigate through the installation setup.
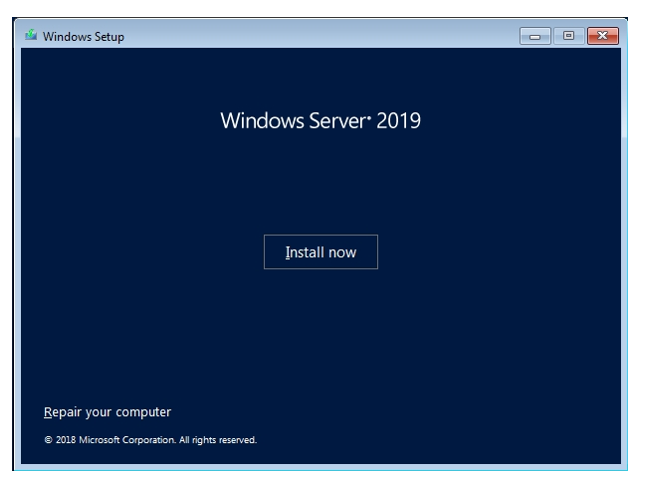
Description of the illustration windows_server_install.png
Select the configuration details.
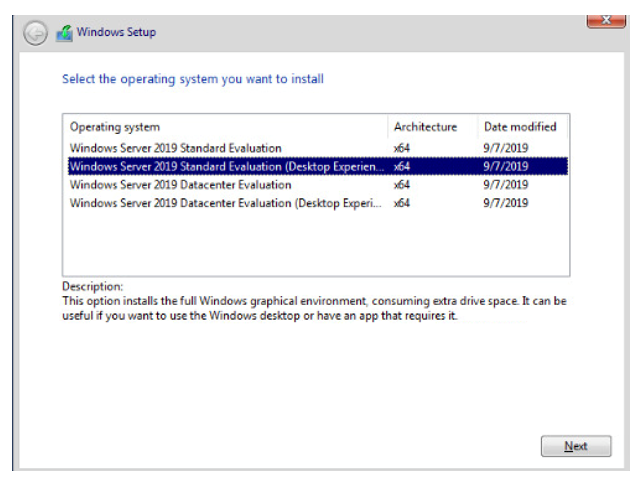
Description of the illustration windows_setup_os_selection.png
When prompted Where do you want to install Windows?, select Load driver.
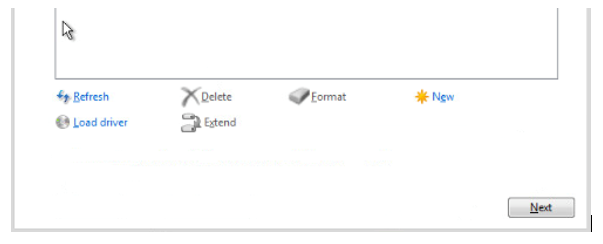
Description of the illustration windows_setup_load_driver.png
Navigate to the VirtIO driver on E:
CDROM drive.
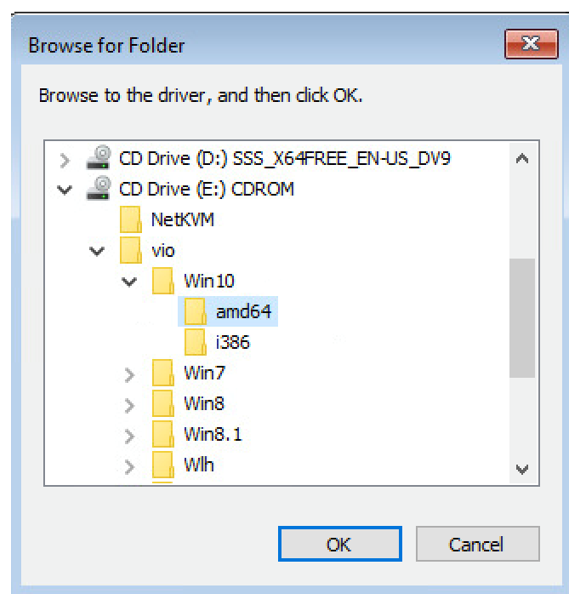
Description of the illustration windows_setup_load_driver_path.png
In the vio/Win10/amd64 directory,
select viostororcl.inf from the list.
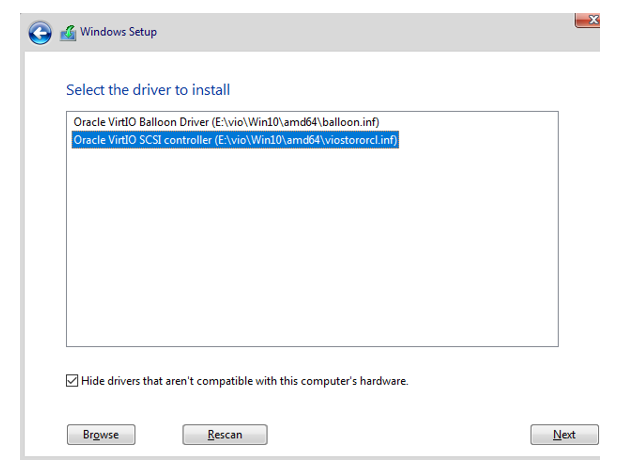
Description of the illustration driver_selection_windows_setup.png
After loading the driver, the pre-created virtual
disk and the extra virtual disk (winvmdisk) is
displayed. Select the pre-created virtual disk and continue with the
installation.
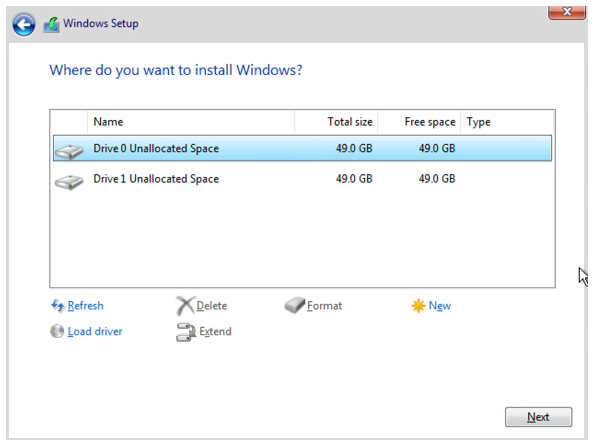
Description of the illustration drive_selection_windows_setup.png
Review the progress of the installation.
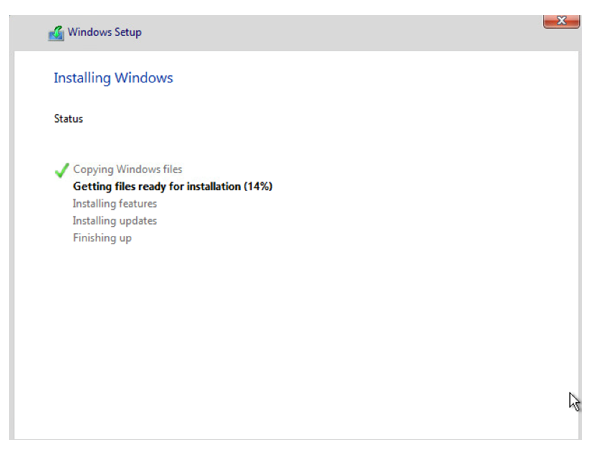
Description of the illustration windows_install_progress.png
To run Ctrl+Alt+Delete in the Windows operating system, click inside the Windows screen and press the F8 key. On a Mac, press Fn+F8.
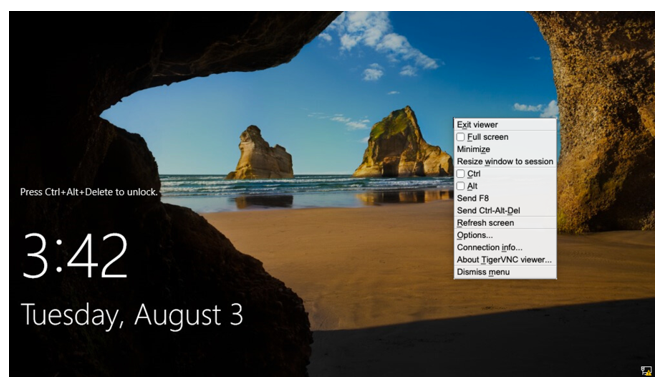
Description of the illustration lock_inside_windows.png
Step 9: Install the VirtIO drivers by running Setup from the CDROM drive E:
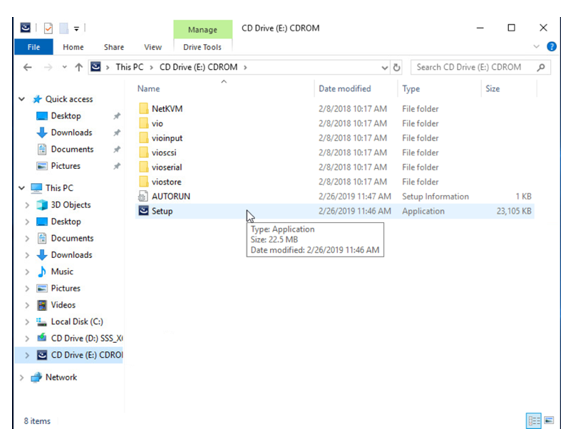
Description of the illustration install_virtio_drivers.png
Navigate through the installation setup.
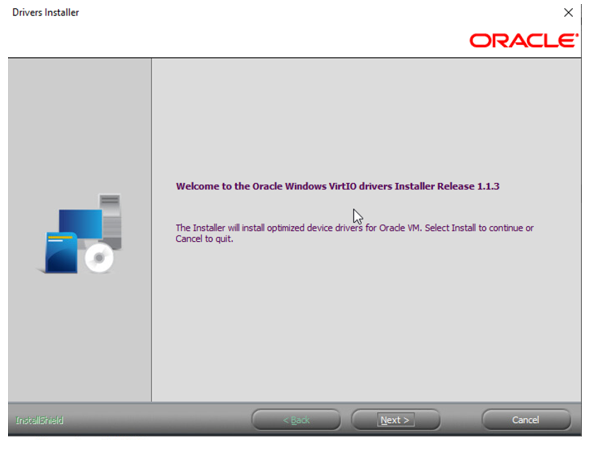
Description of the illustration driver_installation.png
Select the default option.
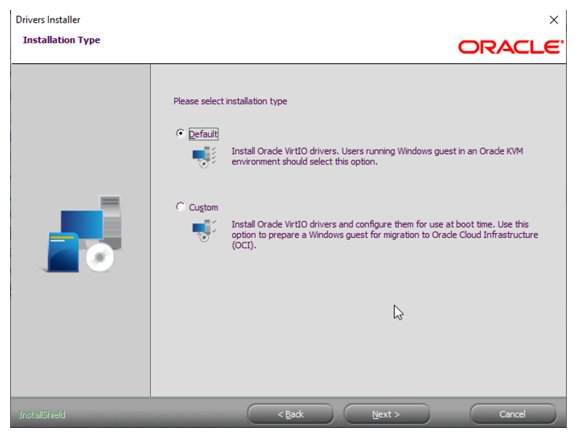
Description of the illustration default_driver_selection.png
When prompted, do not select to restart the computer.
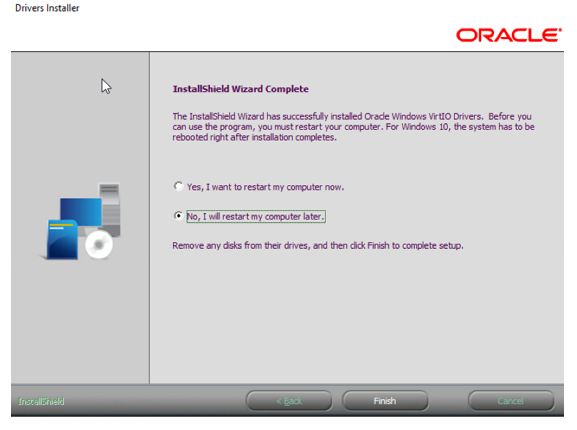
Description of the illustration choose_not_to_restart.png
Restart the computer from the Windows Start menu.
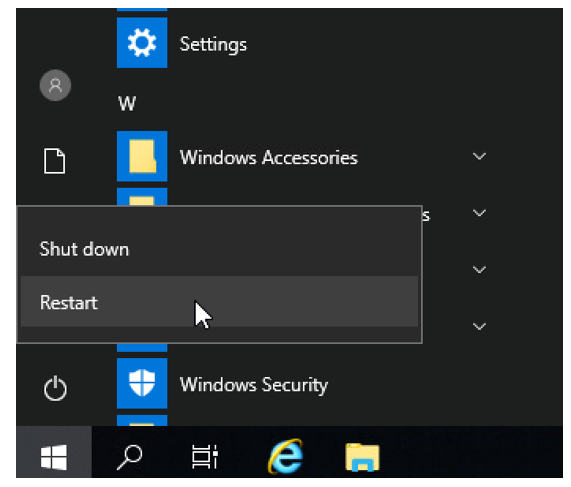
Description of the illustration restart_from_start_menu.png
Step 10: Complete the configuration
Connect to your guest VM using VNC and configure it according to your needs. For example, you can assign a fixed IP address.
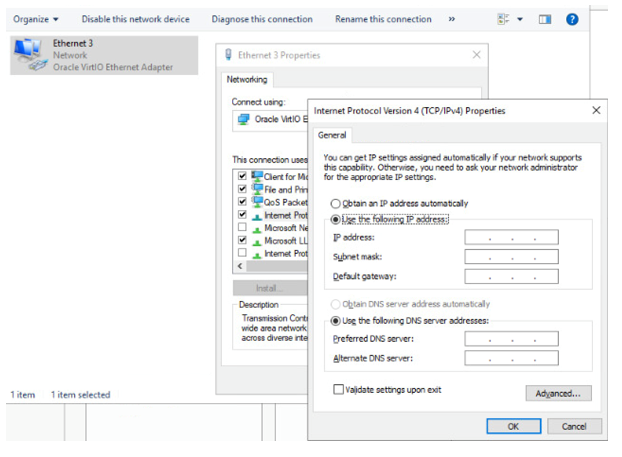
Description of the illustration assign_fixed_ip.png
After disabling the Windows firewall, you can ping the bare metal system host IP from the KVM guest machine and vice versa.
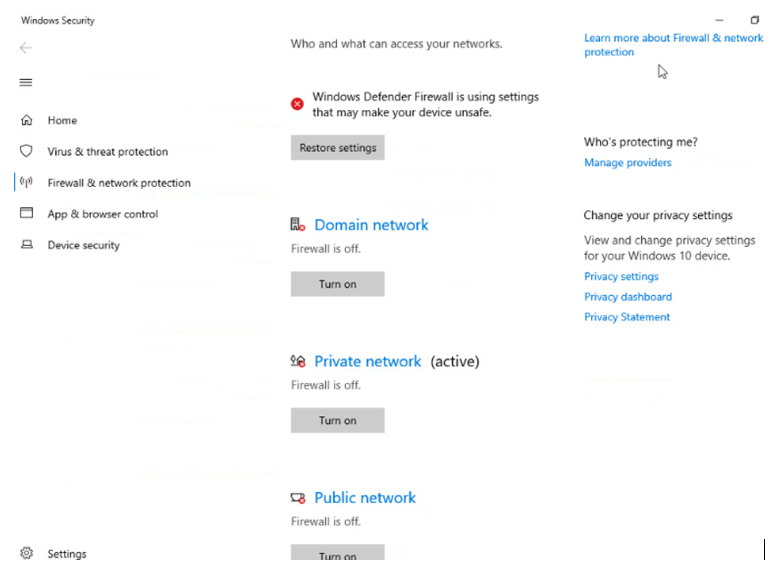
Description of the illustration firewall_disable.png
Step 11: Remove the ISO image files
To delete the ISO files from the/tmp directory, you must remove the files from the
KVM configuration as follows:
- Stop the VM:
odacli stop-vm -n winvm - View the list of configured
disks:
virsh domblklist winvm ------------------------------------------------------------------------------- vda /u05/app/sharedrepo/winvmstor/.ACFS/snaps/vm_winvm/winvm vdb /u05/app/sharedrepo/winvmstor/.ACFS/snaps/vdisk_winvmdisk/winvmdisk hda /tmp/win19.iso hdb /tmp/winvirtio.iso - Detach
disks:
virsh detach-disk winvm hda –config (to detach the install media) - Detach the driver
disk:
virsh detach-disk winvm hdb –config (to detach the virtio driver disk) - Replace the KVM XML file in
/u05/app/sharedrepo/your_kvm_storagewith the XML file at/etc/libvirt/qemu:cp /etc/libvirt/qemu/winvm.xml /u05/app/sharedrepo/winvmstor/.ACFS/snaps/vm_winvm/winvm.xml - Rename or remove the
.isofiles from/tmp. - Start the
VM:
odacli start-vm -n winvm - Test the KVM migration to the other
node:
#odacli migrate-vm -n winvm -to second_node_name
Creating a DB System
Understand how you can create a KVM DB system on Oracle Database Appliance.
Always review the latest Oracle Database Appliance documentation library for the features and configuration details for each release since these procedures may change with each release.
Oracle Database Appliance documentation library is available at:
https://docs.oracle.com/en/engineered-systems/oracle-database-appliance/index.html
The space reserved on Oracle ACFS storage for a DB system node is fixed at 200 GB. This is the space assigned for the operation system, Oracle Grid Infrastructure home and the database home of the DB system. The database files are stored on Oracle ASM disk groups of the Oracle Database Appliance bare metal system to which the Oracle Grid Infrastructure of the DB System connects as a client.
Follow these steps to create a DB system on your appliance:
Check the Oracle Database Appliance release
# /opt/oracle/dcs/bin/odacli describe-component -v
System Version
---------------
19.18.0.0.0
Download the DB System image
# cd /tmp
#unzip p32451228_1918000_Linux-x86-64.zip
odacli-dcs-19.18.0.0.0-230205-ODAVM-19.18.0.0.zip
Update the Oracle Database Appliance repository
# /opt/oracle/dcs/bin/odacli update-repository -f /tmp/odacli-dcs-19.18.0.0.0-230205-ODAVM-19.18.0.0.zip
{
  "jobId" : "2e392dad-587b-4ed1-87b6-995f3131cab6",
  "status" : "Created",
  "message" : "/tmp/odacli-dcs-19.18.0.0-230205-ODAVM-19.18.0.0.zip",
  "reports" : [ ],
  "createTimestamp" : "May 15, 2023 00:26:39 AM HDT",
  "resourceList" : [ ],
  "description" : "Repository Update",
  "updatedTime" : "May 15, 2023 00:26:39 AM HDT"
Confirm the DB System image is correctly registered
# /opt/oracle/dcs/bin/odacli describe-dbsystem-image
DB System Image details
--------------------------------------------------------------------------------
Component Name        Supported Versions    Available Versions
--------------------  --------------------  --------------------
DBVM                  19.18.0.0.0           19.18.0.0.0
Create the DB System Using BUI
Decide on the database shape according to your Database Class (OLTP, DSS or IMDB) resource requirements and available licenses.The database shape determines the number of cores you assign to the DB system. For a complete list of DB shapes, review the Oracle Database Appliance documentation. You can use the BUI to create a DB system or you can use a JSON file to create the DB system using ODACLI commands.
Log into the BUI. In the Appliance tab, click DB Systems and then click Create DB System. If you need to assign more cores later, then ou can change the configuration after creation.
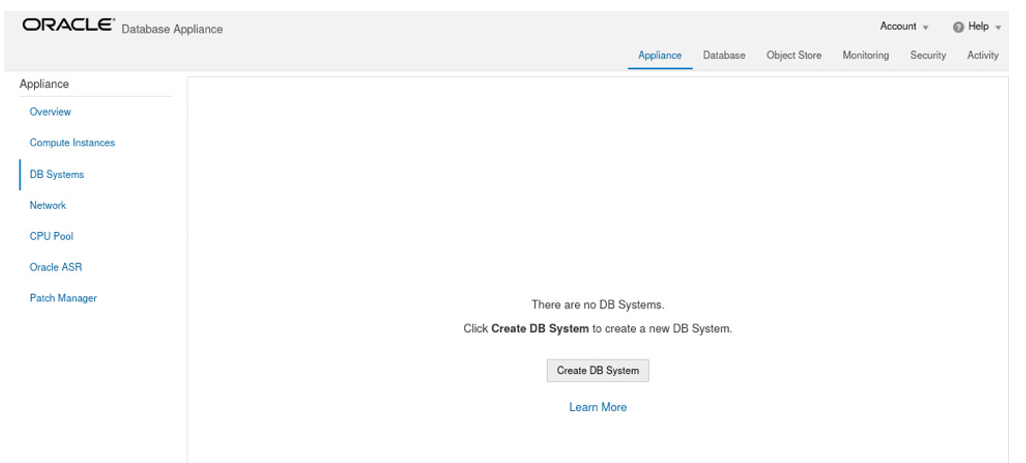
Description of the illustration create_db_system_bui.png
Create the DB System: System Information
Provide the system information.
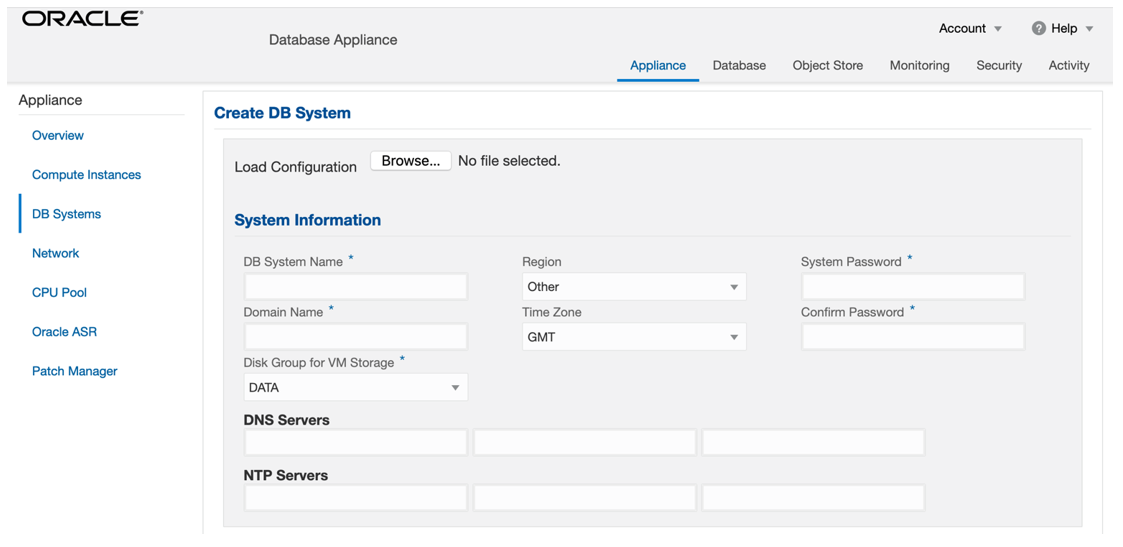
Description of the illustration create_db_system_system_information.png
Create the DB System: Network Information
Provide the network information.
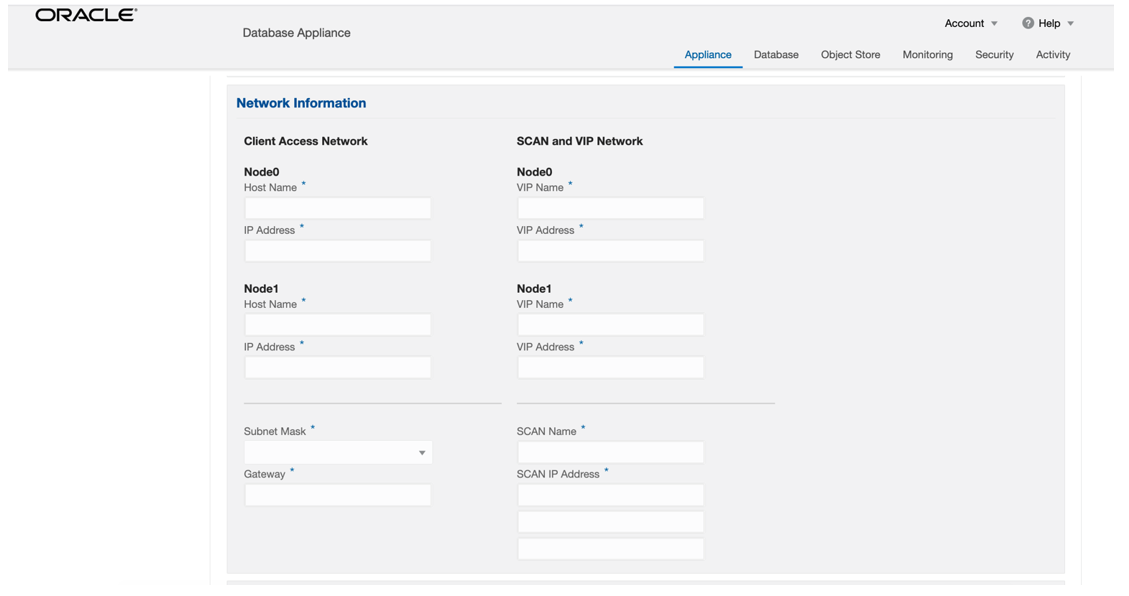
Description of the illustration create_db_system_network_information.png
Create the DB System: Users and Groups and Database Information
Customize
users and groups and decide if you want to use operating system role separation. You
must specify the same configuration details for the DB system users and groups as
the configuration details for the Oracle Grid Infrastructure installation on the
bare metal system . If your bare metal system has a user grid and a
user oracle, then you are using role separation. You can also
provide information about the database you want to create.
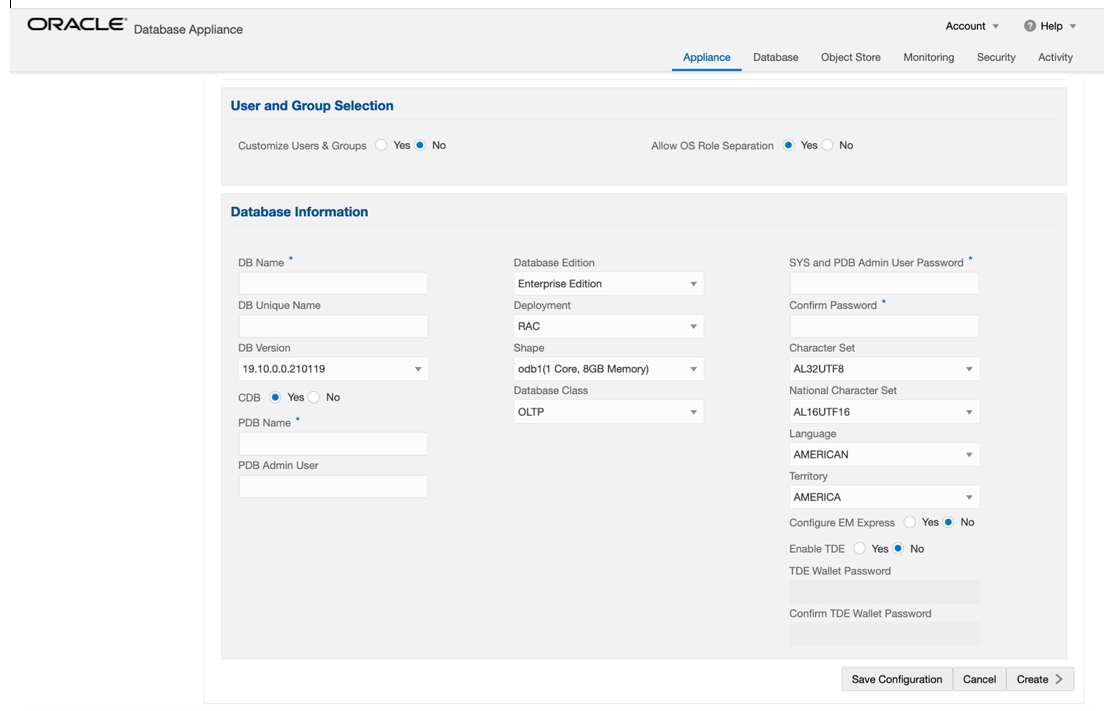
Description of the illustration create_db_system_db_information.png
odacli list-jobs helps you to find the running job. The
odacli describe-job command displays the completed steps and
the running ones. Following are the steps to check the DB system creation
process:
- Obtain the job ID in the bare metal system.
- SSH into the DB system VM.
- Obtain the job ID inside the DB system.
- Query the status of the job.
# odacli list-jobs

ID Description Created Status
---------------------------------------- ----------------------------------------------------------------
.
.
0887d7d3-bd2d-4ab4-b996-80ae5c65ce84 DB System scaoda403c1n creation May 8, 2023 8:50:45 AM GMT Running

# ssh root@IP of DB System

# odacli list-jobs

ID                                   Description                  Created                    Status
---------------------------------------- --------------------------------------------------------------------------- ----------------------------------- ----------
16483e55-3a7a-4e48-8a61-c1180fc7dbd0 Provisioning service creation May 8, 2023 9:02:47 AM GMT Running


# odacli describe-job -i 16483e55-3a7a-4e48-8a61-c1180fc7dbd0

Job details
----------------------------------------------------------------
ID: 16483e55-3a7a-4e48-8a61-c1180fc7dbd0
Description: Provisioning service creation
Status: Running
Created: May 8, 2023 9:02:47 AM GMT
Message:

Task Name                    Node Name Start Time                 End Time                  Status
----------------------------------------------------------------- -----------------------------------
Network setup                 n1       May 8, 2023 9:04:45 AM GMT May 8, 2023 9:05:28 AM GMT Success
OS usergroup 'asmdba'creation n1       May 8, 2023 9:05:28 AM GMT May 8, 2023 9:05:31 AM GMT Success
....
Extract DB clones             n1       May 8, 2023 9:39:40 AM GMT May 8, 2023 9:46:38 AM GMT Success
ProvDbHome by using RHP       n1       May 8, 2023 9:46:39 AM GMT May 8, 2023 9:46:39 AM GMT Running
Create DB System Using BUI
You can also create a DB System using a JSON file. Check the latest Oracle Database Appliance documentation for sample JSON file to deploy a high-availability DB system. You can also specify the DB system details in the BUI and create a JSON file when you click Save Configuration on the Create DB System page.
Create DB System with the odacli create-dbsystem command
# odacli create-dbsystem -p /tmp/prov.json
Job details
----------------------------------------------------------------
 ID:  b8dc3738-e542-44fd-bdb2-fd06456d0e17
Description:  DB System mydbsystem creation
Status:  Created
Created:  October 13, 2021 11:19:44 PM HST
Message:
Confirm the DB System creation
# odacli describe-dbsystem -n mydbsystem
# odacli describe-dbsystem -n scaoda403c1n


               DB System details
-----------------------------------------------------------
                 ID:  e4767f1a-f223-4227-89f4-11f23bee327c
               Name:  scaoda403c1n
      Image version:  19.18.0.0.0
    Current version:  19.18.0.0.0
              Shape:  odb2
       Cluster name:  dbsc0c48fb2c
       Grid version:  19.18.0.0.230117
    Number of cores:  2
             Memory:  16.00 GB
       NUMA enabled:  YES
             Status:  CONFIGURED
            Created:  2023-05-08 08:50:49 GMT
            Updated:  2023-05-08 10:18:37 GMT

                   CPU Pool
           -------------------------
               Name:  cc0c48fb2c
    Number of cores:  2
               Host:  node1
  Effective CPU set:  3,21,39,57
        Online CPUs:  3, 21, 39, 57
       Offline CPUs:  NONE
               Host:  node2
  Effective CPU set:  3,21,39,57
        Online CPUs:  3, 21, 39, 57
       Offline CPUs:  NONE

                VM Storage
          --------------------------
          Disk group:  DATA
         Volume name:  SC0C48FB2C
       Volume device:  /dev/asm/sc0c48fb2c-459
                Size:  400.00 GB
         Mount Point:  /u05/app/sharedrepo/scaoda403c1n
          Redundancy:  High
     Acc Volume name:  ASC0C48FB2C
   Acc Volume device:  /dev/asm/asc0c48fb2c-369
     Acc Volume size:  1.60 GB

                    VMs
           --------------------------
                Host:  node1
             VM Name:  xc0c48fb2c
        VM Host Name:  scaoda403c1n1.us.oracle.com
       VM image path:  /u05/app/sharedrepo/scaoda403c1n/.ACFS/snaps/vm_xc0c48fb2c/xc0c48fb2c
        Target State:  OFFLINE
       Current State:  OFFLINE
                Host:  node2
             VM Name:  yc0c48fb2c
        VM Host Name:  scaoda403c1n2.us.oracle.com
       VM image path:  /u05/app/sharedrepo/scaoda403c1n/.ACFS/snaps/vm_yc0c48fb2c/yc0c48fb2c
        Target State:  ONLINE
       Current State:  ONLINE

                  VNetworks
             --------------------------
                Host:  node1
             VM Name:  xc0c48fb2c
              Public:  xx.xx.xx.xx   / 255.255.248.0   / ens3 / BRIDGE(pubnet)
                 ASM:  192.168.16.2    / 255.255.255.0   / ibbond0 / VF(90:00.1)
        Interconnect:  192.168.17.129  / 255.255.255.252 / ibbond1 / VF(90:00.2)
                Host:  node2
             VM Name:  yc0c48fb2c
              Public:  yy.yy.yy.yy   / 255.255.248.0   / ens3 / BRIDGE(pubnet)
                 ASM:  192.168.16.3    / 255.255.255.0   / ibbond0 / VF(90:00.1)
        Interconnect:  192.168.17.130  / 255.255.255.252 / ibbond1 / VF(90:00.2)

                Extra VNetworks
             --------------------------

                Host:  node1
             VM Name:  xc0c48fb2c
              pubnet:  10.128.18.144   / 255.255.248.0   / PUBLIC
                Host:  node2
             VM Name:  yc0c48fb2c
              pubnet:  10.128.18.145   / 255.255.248.0   / PUBLIC

                  Databases
             --------------------------
                 Name:  hag
          Resource ID:  1371b114-7686-425a-9069-757250da0fa6
          Unique name:  hag
          Database ID:  2086805064
          Domain name:  domain_name
           DB Home ID:  7243718e-98d2-477e-be06-32ceb66b951e
                Shape:  odb2
              Version:  19.18.0.0.230117
              Edition:  EE
                 Type:  RAC
                 Role:  PRIMARY
                Class:  OLTP
              Storage:  ASM
           Redundancy:
     Target node name:
        Character set:  AL32UTF8
    NLS character set:
             Language:  AMERICAN
            Territory:  AMERICA
      Console enabled:  false
         SEHA enabled:  false
  Associated networks:  Public-network
     Backup config ID:
   Level 0 Backup Day:  sunday
   Autobackup enabled:  false
          TDE enabled:  false
             CDB type:  false
             PDB name:
       PDB admin user:
Test the database connection
Test connectivity to your DB System. During creation of the DB system you specified the SCAN name and database name. With this information you should be able to build your TNS connect string using the default service name which is the same as the database name. It is a best practice to create your own database services based on your high-availability requirements. For an initial connection test, the default service is sufficient.
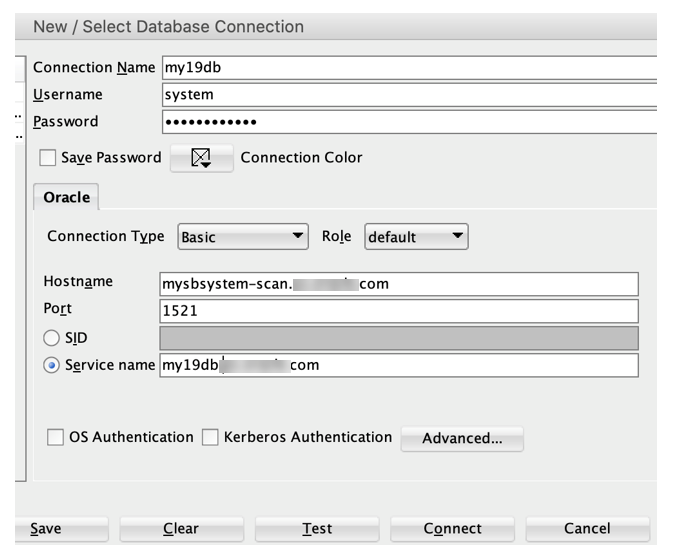
Description of the illustration create_db_system_db_connection.png
# ssh root@node1n1
# su – oracle
$ export ORACLE_HOME=/u01/app/oracle/product/19.0.0.0/dbhome_1
$ export ORACLE_SID=my19db1     (the ‘1’ after the DB name is for instance 1 on the first RAC node)
$ /u01/app/oracle/product/19.0.0.0/dbhome_1/bin/sqlplus / as sysdba

SQL*Plus: Release 19.0.0.0.0 - Production on Mon Mar 15 08:32:37 2021
Version 19.10.0.0.0

Copyright (c) 1982, 2020, Oracle.  All rights reserved.

Connected to:
Oracle Database 19c Enterprise Edition Release 19.0.0.0.0 - Production
Version 19.10.0.0.0

SQL>
Modify a DB System
You can change several settings of a DB system at any time after creation, for
example, the shape or the memory allocation. The --help option of
the odacli modify-dbsystem command provides you the possible
setting you can change.
# odacli modify-dbsystem -h
modify-dbsystem
Modifies a DB System

Syntax
modify-dbsystem -n [-avn ] [-cp ]
[-dvn ] [-en] [-f] [-gw ] [-ip ]
[-m ] [-nm ] [-no-cp] [-sip ]
[-sn ] [-s ] [-vips ] [-vt ] [-j]
[-h]

Parameters
Options                   Description
------------------------- -------------------------------------------------
--name,-n (*)             Specifies the DB System name
--attach-vnetwork,-avn    Defines the name of the VNetwork to attach
--cpupool,-cp             Defines the shared DB System CPU Pool name
--detach-vnetwork,-dvn    Defines the VNetworks to detach
--enable-numa,-en         Enables NUMA configuration for the DB System
--force,-f                Specifies to force the operation
--gateway,-gw             Defines the gateway of the network
--ip,-ip                  Defines the IP of the network
--memory,-m               Defines the memory size (Format: ,units: M|G)
--netmask,-nm             Defines the netmask of the network
--no-cpupool,-no-cp       Specifies to dissociate the current DB System CPU Pool
--scan-ips,-sip           Defines the scan IP of the network
--scan-name,-sn           Defines the scan of the network
--shape,-s                Defines the new DB System shape
--vips,-vips              Defines the VIPs of the network in format :0:,:1:
--vnetwork-type,-vt       Defines the VNetwork type to attach(dataguard|database|management|backup|other)
--json,-j                 Specifies to show output in JSON format
--help,-h Specifies to display help message Deploying JD Edwards EnterpriseOne on Oracle Database Appliance KVM
Understand how you can deploy JD Edwards EnterpriseOne on Oracle Database Appliance KVM.
Note:
JD Edwards EnterpriseOne provides an Xen Virtualization VM Template. You cannot use this template for KVM virtualization deployment.- On Oracle Database Appliance, create the application KVM for Windows guest machines as described in this document.
- Create a DB system on Oracle Database Appliance and deploy Oracle Database.
- Follow the JD Edwards EnterpriseOne documentation steps to install JD Edwards
EnterpriseOne:
https://docs.oracle.com/cd/E84502_01/learnjde/installation.html#one-click-provisioning
Deploying Oracle E-Business Suite on Oracle Database Appliance KVM
Understand how you can deploy Oracle E-Business Suite on Oracle Database Appliance KVM.
Considerations for E-Business Suite 12.2 on Oracle Database Appliance:
- The Rapid Install tool is not supported on Oracle Database Appliance DB System. You cannot directly install new Oracle E-Business Suite environment on Oracle Database Appliance DB System.
- Existing Oracle E-Business Suite databases can be
migrated to Oracle Database Appliance DB System. Use the
following procedure to migrate Oracle E-Business Suite
databases to Oracle Database Appliance DB System:
- Create a DB System.
- Refer to either of the following My Oracle
Support Notes to migrate the database from source
system to Oracle Database
Appliance:
Export/Import Process for Oracle E-Business Suite Release 12.2 Database Instances Using Oracle Database 19c (Doc ID 2554156.1)
Using Transportable Tablespaces to Migrate Oracle E-Business Suite Release 12.2 Using Oracle Database 19c Enterprise Edition On a Multitenant Environment (Doc ID 2674405.1)
- If Oracle Database Appliance DB System Oracle RAC Database, then run Autoconfig on the remaining nodes following the instructions in Step 8.2 of My Oracle Support Note: Using Oracle 19c RAC Multitenant (Single PDB) with Oracle E-Business Suite Release 12.2 (Doc ID 2530665.1)
- E-Business Suite requires one-off patches to be installed. This would conflict that future upgrades using Oracle Database Appliance tooling. Typically, these one-off patches must be rolled back, the database home patched and the equivalent E-Business Suite patches applied again.
- This process was tested with E-Business Suite 12.2 with Oracle Database Appliance releases 12.2 and 19.11.
E-Business Suite References
Interoperability Notes: Oracle E-Business Suite Release 12.2 with Oracle Database 19c (Doc ID 2552181.1)
Oracle E-Business Suite Release 12.2: Consolidated List of Patches and Technology Bug Fixes (Doc ID 1594274.1)
Export/Import Process for Oracle E-Business Suite Release 12.2 Database Instances Using Oracle Database 19c(Doc ID 2554156.1)
Using Transportable Tablespaces to Migrate Oracle E-Business Suite Release 12.2 Using Oracle Database 19c Enterprise Edition On a Multitenant Environment (Doc ID 2674405.1)
Using Oracle 19c RAC Multitenant (Single PDB) with Oracle E-Business Suite Release 12.2 (Doc ID 2530665.1)
Deploying Oracle FLEXCUBE on Oracle Database Appliance KVM
Understand how you can deploy Oracle FLEXCUBE on Oracle Database Appliance KVM.
Note:
Oracle FLEXCUBE does not provide a Virtualization Template.- On Oracle Database Appliance, create the application KVM for your specific deployment, as described in this document.
- Follow the Oracle FLEXCUBE documentation steps to install Oracle FLEXCUBE:
Deploying Oracle Enterprise Manager Cloud Control on Oracle Database Appliance KVM
Understand how you can deploy Oracle Enterprise Manager Cloud Control on Oracle Database Appliance KVM.
You can install Oracle Enterprise Manager Cloud Control directly on the Oracle Database Appliance bare metal system. It is recommended that you install Oracle Enterprise Manager Cloud Control on the KVM guest VM.
Prerequisites
- Create one application KVM guest machine with Oracle Linux.
- Create a DB System to host Oracle Enterprise Manager Cloud Control repository database.
Procedure
Follow the Oracle Enterprise Manager Cloud Control 13.5 documentation to install and configure the software:
There are no additional configuration requirements specific to Oracle Database Appliance. The deployment of Oracle Linux 8.2 on the application KVM guest machine with Oracle Database Appliance release 19.12 DB System and Oracle RAC database release 19.12 are supported.
Install the Oracle Database Appliance plug-in on the bare metal system nodes so that Oracle Enterprise Manager agent can monitor the hardware and other specific metrics for Oracle Database Appliance.
The latest Oracle Enterprise Manager Cloud Control plug-in is available for download at:
https://www.oracle.com/enterprise-manager/downloads/oem-v135-update-plugins-downloads.html
Oracle Database Appliance Plug-in documentation is available at:
https://docs.oracle.com/en/engineered-systems/oracle-database-appliance/plugin.html
Deploying PeopleSoft on Oracle Database Appliance KVM
Understand how you can deploy PeopleSoft PeopleTools on Oracle Database Appliance KVM.
You can install PeopleSoft PeopleTools directly on the Oracle Database Appliance bare metal system. It is recommended that you install PeopleTools on the KVM guest VM. For each release of Oracle Database Appliance and PeopleSoft, you must ensure that additional RPMs installed do not replace or conflict with the Oracle Database Appliance binaries.
Prerequisites
- Create one application KVM guest machine with Oracle Linux.
- Create a DB System to host PeopleSoft repository database.
Procedure
Follow the PeopleSoft PeopleTools 8.59 or later documentation to install and configure the software. The documentation and software can be obtained from Oracle Software Delivery Cloud by searching for PeopleSoft PeopleTools and downloading the software.
There are no additional configuration requirements specific to Oracle Database Appliance. The deployment of Oracle Linux 8.2 on the application KVM guest machine with Oracle Database Appliance release 19.12 DB System and Oracle RAC database release 19.12 are supported.
Oracle Software Delivery Cloud is available at:
Migrating Oracle VM Guest Machines to KVM on Oracle Database Appliance
Understand how you can migrate Oracle VM guest machines from Virtualized Platform to Oracle KVM guest machines on Oracle Database Appliance KVM.
Creating a Solution-in-a-Box does not necessitate creation of a new virtual machine. You may have an existing Oracle Database Appliance running Oracle Virtual Machine (OVM) and you would may want to migrate the OVM from this machine to a KVM guest.
For the procedure, refer to My Oracle Support Note 2773840.1: Migrating OVM guests from ODA VP to KVM on ODA BM at:
Backing up Oracle Database Appliance KVM Guest Machines
Understand how you can back up KVM guest machines on Oracle Database Appliance.
Backup and Recovery procedures for the DB Systems are similar to Oracle Database database backup procedures.
For backup of application VMs, refer to My Oracle Support Note 2779329.1: Backup of KVM guests on ODA 19.9 BM and later.
https://support.oracle.com/rs?type=doc&id=2779329.1
For backup of DB Systems, refer to My Oracle Support Note 2784991.1: Database System backup on Oracle Database Appliance Release 19.10 and later.https://support.oracle.com/rs?type=doc&id=2784991.1
Oracle Database Appliance References
Links and references to the concepts, commands, and examples used in this document.
Oracle Database Appliance documentation library is available at:
https://docs.oracle.com/en/engineered-systems/oracle-database-appliance/index.html
Oracle Database Appliance KVM and DB Systems Command Line Reference:
Oracle Database Appliance Command-Line Interface for KVM
Sample JSON file for creating a DB System on Oracle Database Appliance KVM:
Example JSON File to Create a High-Availability DB System
Supported Database Shapes on Oracle Database Appliance KVM:
Documentation Accessibility
For information about Oracle's commitment to accessibility, visit the Oracle Accessibility Program website at http://www.oracle.com/pls/topic/lookup?ctx=acc&id=docacc.
Access to Oracle Support
Oracle customers that have purchased support have access to electronic support through My Oracle Support. For information, visit http://www.oracle.com/pls/topic/lookup?ctx=acc&id=info or visit http://www.oracle.com/pls/topic/lookup?ctx=acc&id=trs if you are hearing impaired.
Oracle Database Appliance Solution-in-a-Box: Deploying Database Systems and Application VMs on Oracle Database Appliance
F82553-01
August 2023
Copyright © 2022, 2023, Oracle and/or its affiliates.
Primary Authors: Aparna Kamath, Hagen Herbst, MAA Platform Engineering team (Oracle RACPACK)