11 Archiving Backups to Cloud

This procedure for archive-to-cloud builds on the techniques used for copy-to-tape. The difference is that it sends backups to cloud repositories for longer term storage.

This procedure includes steps for configuring a credential wallet to store TDE master keys, because backups are encrypted before they are archived to a cloud repository. The initial configuration tasks are performed in the Oracle Key Vault to prepare the wallet. RACLI commands were developed to assist configuring the Recovery Appliance for archive-to-cloud and using the wallet. At the end, a job template is created and run for archive-to-cloud.

Grouping Backup Pieces

The performance of copy-to-tape and archive-to-cloud is improved by grouping archived logs from protected databases' real-time redo into fewer number of backup sets.

Protected databases can achieve real-time protection by enabling real-time redo transport to the Recovery Appliance. Each received redo log on the appliance is compressed and written to the storage location as an individual archived log backup. These log backups can be archived to tape or cloud, to support fulls and incremental backups that are archived for long-term retention needs.

  • To tape: use Oracle Secure Backup (OSB) module or a third-party backup software module installed on the Recovery Appliance.

  • To cloud: use the Cloud Backup SBT module.

Inter-job latencies can happen between writing each backup piece during copy-to-tape operations. When the number of backup pieces is high, this pause constitutes a large percentage of the time the tape drive is unavailable. This means five (5) 10GB pieces will go to tape more quickly than fifty (50) 1GB pieces.

Recovery Appliance addresses inter-job latency by grouping the archived log backup pieces together and copying them as a single backup piece. Therefore this results in larger backup pieces on tape storage than previous releases. This feature is enabled by default. DMBS_RA CONFIG has the parameter group_log_max_count for setting the maximum archived logs per backup piece that is copied to tape; its default is 1. The group_log_backup_size_gb parameter is used to limit the size of these larger backup pieces; its default is 256 GB.

Pre-requisites for Archive-to-Cloud

The following prerequisites must be met before starting to use cloud storage with the Recovery Appliance.

  • Protected database(s) should already be enrolled and backups taken to the Recovery Appliance.

    This is covered in Configuring Recovery Appliance for Protected Database Access. Brief review:
    • Create a virtual private catalog user.
    • Enroll the protected database.
    • Update the properties for the protected database.
  • The Recovery Appliance has been registered and enrolled at an Oracle Key Vault.

  • Archive-to-cloud features are only supported on small endian databases. Only Linux and Windows.

    Big endian databases that attempt to archive-to-cloud cause error ORA-64800: unable to create encrypted backup for big endian platform, because the operation cannot create encrypted backup for big endian platforms.

Flow for Archive-to-Cloud Storage

All backup objects archived to cloud storage are encrypted using a random Data Encryption Key (DEK). A Transparent Data Encryption (TDE) master key for each protected database is used to encrypt the DEK; the encrypted DEK is stored in the backup piece. The Oracle Key Vault (OKV) contains the TDE master keys; it does not contain the individual DEKs used to encrypt backups written to tape or cloud. A protected database may acquire many TDE master keys with time, so restoration of an individual archived object requires the protected database's master key in use at time of backup.

The following image shows the flow for backing up to a Recovery Appliance that archives to cloud storage. The restore operations are predicated on this backup and archive flow.

Figure 11-1 Flow for Backups to Cloud Storage
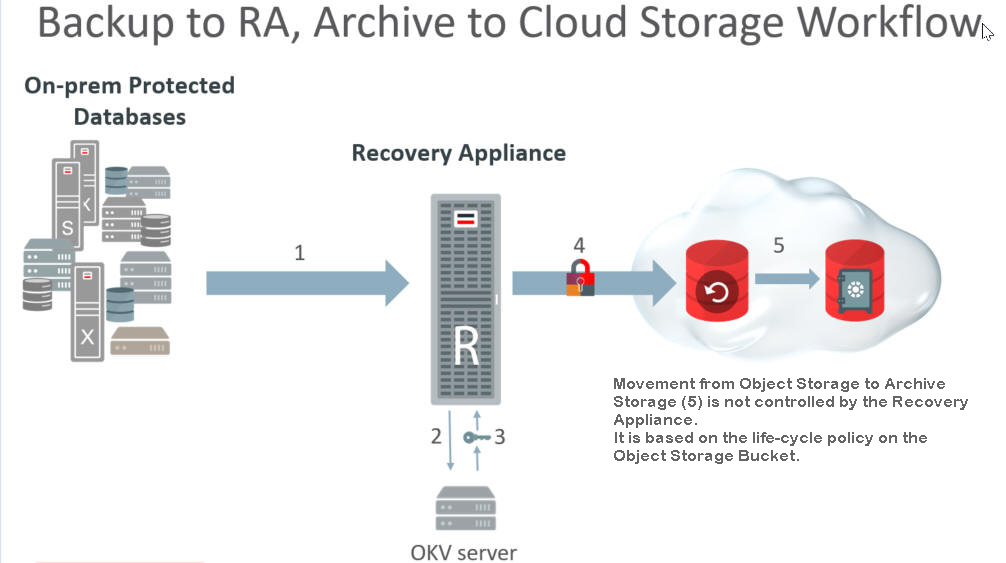
Description of Figure 11-1 follows
Description of "Figure 11-1 Flow for Backups to Cloud Storage"
  1. Incremental backups of the database are performed regularly to the Recovery Appliance. This happens at a different interval than the following archive operations.

  2. When the scheduled archive-to-cloud operation starts, the Recovery Appliance requests a master key for the protected database from the OKV Server.

  3. The OKV returns the protected database's master key. If one doesn't exist for the protected database, a new master key is generated. (A new master key can be generated whenever desired.)

    1. A DEK is generated for the backup object(s).

    2. The backup objects are encrypted using the DEK.

    3. Using the master key, the Recovery Appliance encrypts the DEK and stores this with the backup object.

  4. The life-cycle policy for a given database determines if and when its backup objects are written to tape or cloud storage.

  5. The life-cycle policy of the object storage bucket determines if and when a backup object in cloud storage moves from object storage to archive storage. The Recovery Appliance does not control this.

Oracle Key Vault and Recovery Appliance

The Oracle Key Vault (OKV) stores the TDE master keys and also keeps track of all enrolled endpoints.

Endpoints are the database servers, application servers, and computer systems where actual cryptographic operations such as encryption or decryption are performed. Endpoints request OKV to store and retrieve security objects.

A brief overview of the Oracle Key Vault (OKV) configurations:

  • All compute nodes of the Recovery Appliance are registered and enrolled as OKV endpoints.

  • A single OKV endpoint group contains all the endpoints corresponding to all of the compute nodes of the Recovery Appliance.

  • A single wallet is shared and configured as 'Default Wallet' for all endpoints corresponding to all of the compute nodes of the Recovery Appliance.

  • The OKV endpoint group is configured with read/write/manage access to the shared virtual wallet.

  • If more than one Recovery Appliance is involved, each Recovery Appliance has its own end point group and wallet.
  • The host-specific okvclient.jar is created and saved during the enrollment process of each endpoint to the staging path on its respective node. If the root user is performing the operation, the /radump is the staging path. If a named user (such as raadmin) is performing the operation, then the staging has to be in /tmp. The staged file has to be named either as-is okvclient.jar or <myHost>-okvclient.jar, where <myHost> matches what hostname returns.

Note:

Refer to Oracle Key Vault Administrator's Guide for more information.

Review: Oracle Key Vault

This reference section employs concepts from the Oracle Key Vault Administrator's Guide (OKV).

The OKV administrator performs these tasks, and are a pre-requisite for the operations performed by the Recovery Appliance administrator. The OKV administrator configures the OKV Endpoints.

Creating the Endpoints

These operations for created an Endpoint are performed from the Key Vault Server Web Console.

  1. Log into the Oracle Key Vault Server.
  2. Click Endpoints tab.
  3. Click Add button in right corner of the Endpoints page.
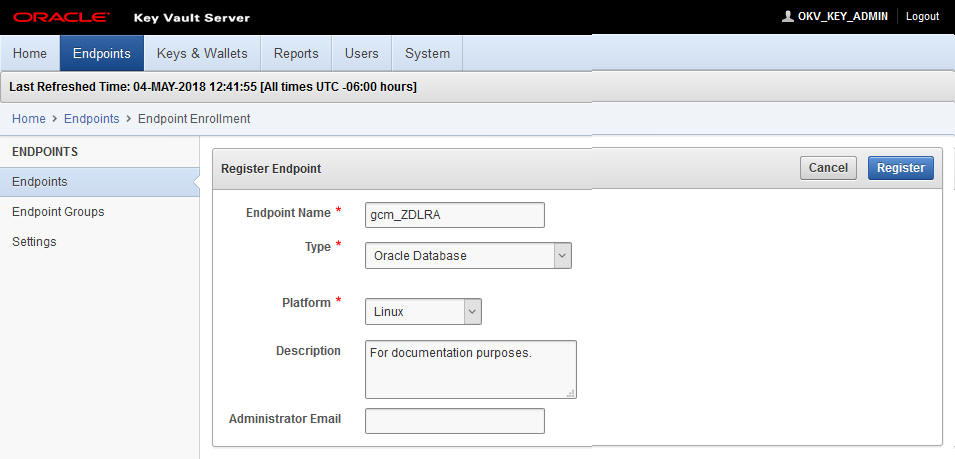
  4. Enter the information specific to the Recovery Appliance node that the endpoint is to be associated with. (Name/Type/Platform/Desc/Email)
  5. Click Register button on the right.
  6. Repeat the above steps to create an endpoint for every Recovery Appliance node.

Creating the Endpoint Group

These operations for creating an Endpoint Group are performed from the Key Vault Server Web Console.

  1. Click Endpoints tab.
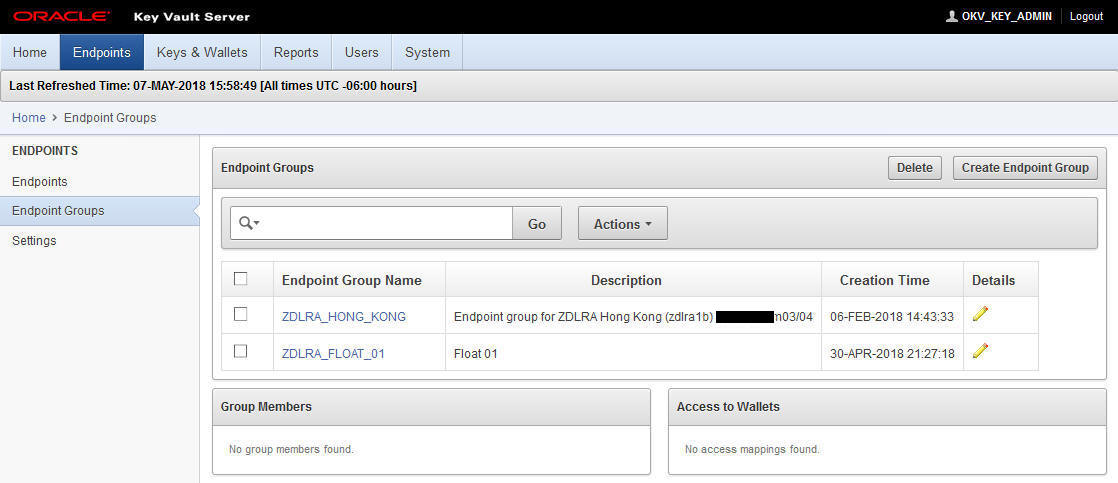
  2. Click Endpoint Groups option on the left.
  3. Click Create Endpoint Group button on top right.
  4. Enter name and description, and select all endpoints created in the previous operations.
  5. Click Save button on the right.

Creating a Wallet

These operations for created an Wallet are performed from the Key Vault Server Web Console.

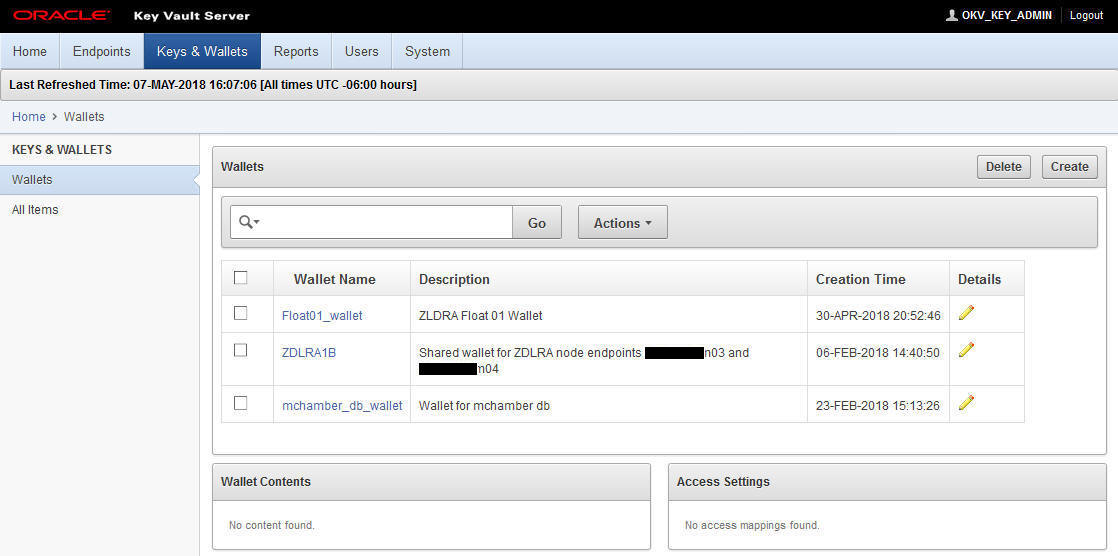
  1. Click Keys & Wallets tab.
  2. Click Create button at top right.
  3. Enter name and description specific to the first node/endpoint.
  4. Click on the Save button on the right.

Associating Default Wallet with Endpoints

These operations for associating the virtual wallet with an Endpoint are performed from the Key Vault Server Web Console.

  1. Click Endpoints tab.
  2. Click on the specific name for the endpoint being associated with a wallet.
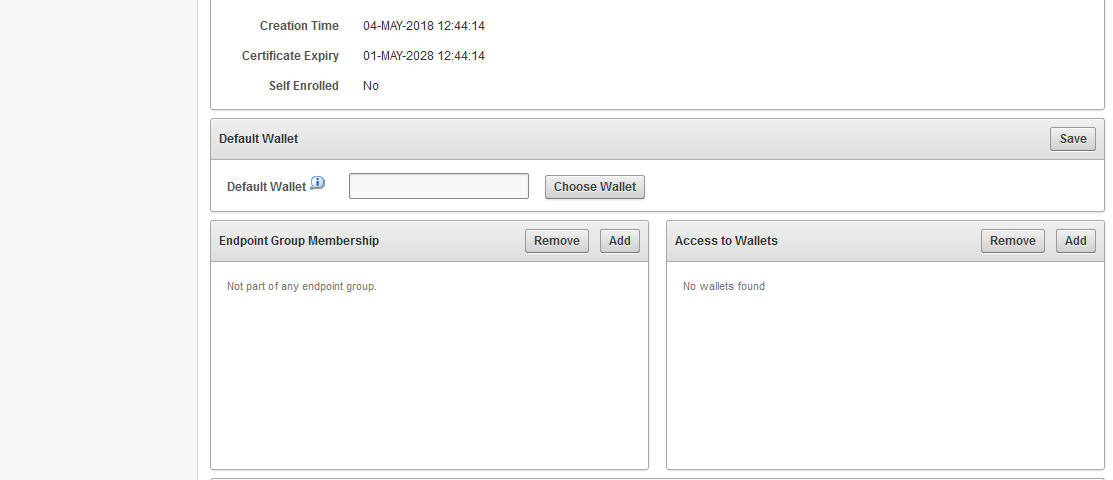
  3. In Default Wallet section, click Choose Wallet button.
  4. Click on the name of the wallet created above, and click Select to assign endpoints.
  5. Click Save button on the right.
  6. Repeat wallet assignment for other endpoints. The same wallet is assigned to those endpoints.

Acquiring the Enrollment Tokens

These operations for acquiring the enrollment tokens are performed from the Key Vault Server Web Console.

  1. Click Endpoints tab.

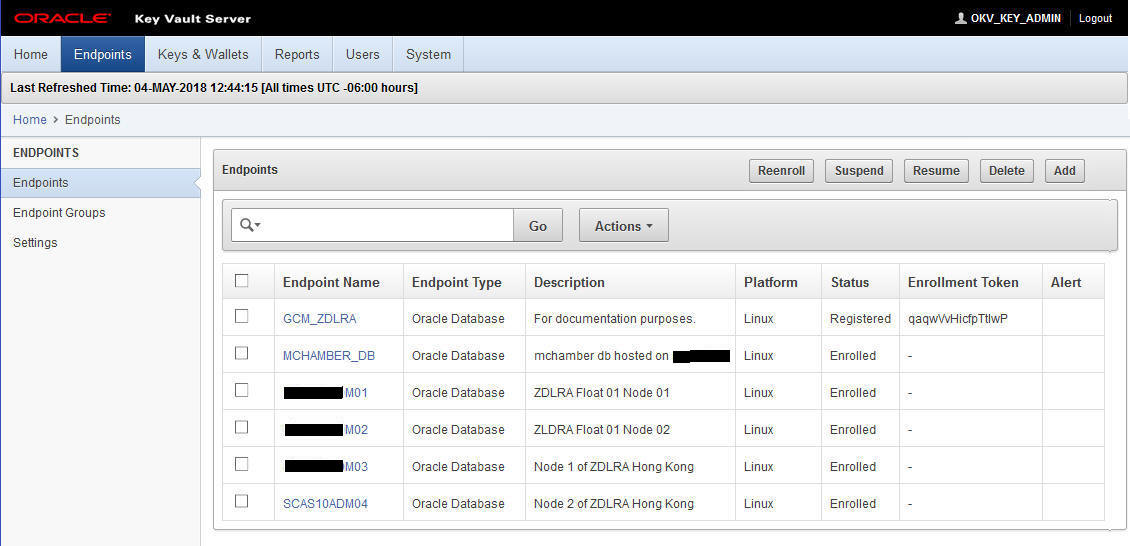
    The page now includes enrollment tokens specific to each endpoint/node.

    Description of okv_03_endpoitns.jpg follows
    Description of the illustration okv_03_endpoitns.jpg
  2. Copy and retain (in a file) the enrollment token specific to each endpoint, because it is used in a later enrollment step.
  3. Logout of the web interface. This step is required in order for other steps to display refreshed information.

Downloading the OKV Client Software

These operations for downloading the OKV client software are performed from the Key Vault Server Web Console.

The follow steps are repeated for each node of the Recovery Appliance. These steps download JAR files that are specific to the Recovery Appliance node.

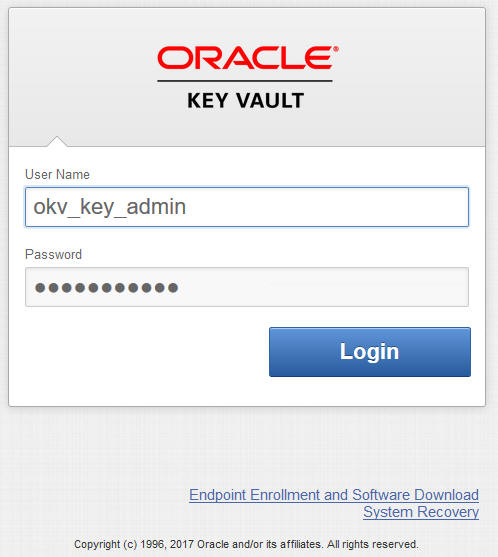
Description of okv_04_login.jpg follows
Description of the illustration okv_04_login.jpg

  1. Click on Endpoint Enrollment and Software Download link on the Management Console. This link is below the login section.
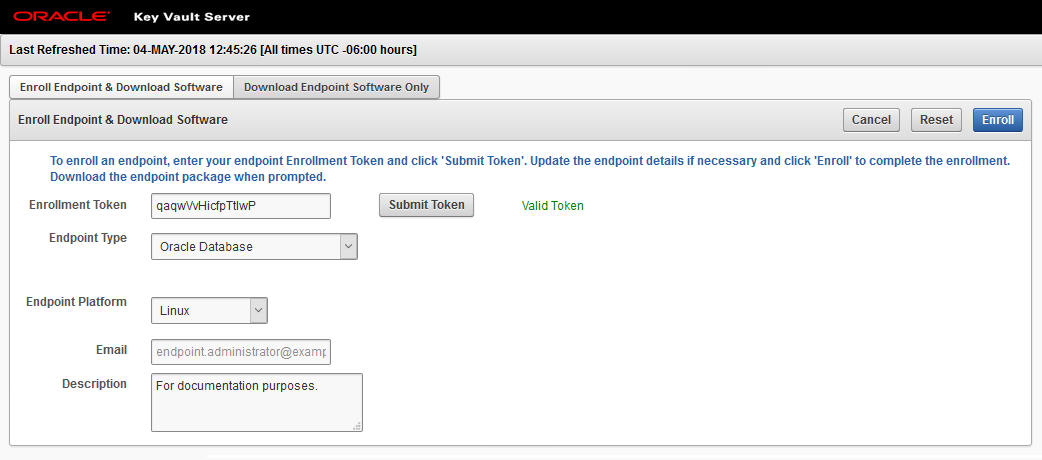
  2. Using an enrollment token saved from previous steps, paste it into the Enrollment Token field.
  3. Click Submit Token button.
    This displays the endpoint information entered.Description of okv_06_enrollment.jpg follows
    Description of the illustration okv_06_enrollment.jpg
  4. Click Enroll at top right. A progress bar appears with the text "processing".
    A software download window appears after the request has been processed.
  5. The okvclient.jar should be re-named in a host-specific manner, saved locally, and then copied to the /radump directory on its respective Recovery Appliance node.

    The staged file in the /radump has to be named either:

    • as-is okvclient.jar, or
    • "<myHost>-okvclient.jar", where <myHost> matches what hostname -s returns.

    Renaming the file <myHost>-okvclient.jar avoids confusion and the temptation to use an okvclient.jar on any other node but the one it was generated for.

  6. Repeat the above steps for each node of the Recovery Appliance.

Note:

Do not install the JAR files at this point in time. Installation happens after other Recovery Appliance configuration steps.

The JAR files are only valid until enrollment of OKV endpoints are complete.

Recovery Appliance Cloud Archive Configuration

This section configures the Recovery Appliance to be able to use wallets and cloud objects as required for archive-to-cloud.

Configuring the Credential Wallet and Encryption Keystore

All database backup pieces are DEK encrypted before any copy-to-tape or archive-to-cloud operation.

These steps create a shared wallet to be used by all nodes of the Recovery Appliance. The wallet stores TDE master keys that encrypt the individual DEK keys.

  1. Create the Recovery Appliance credential wallet. You are prompted to enter new passwords for the keystore and then the wallet. The credentials to access the Recovery Appliance encryption keystore are saved in this wallet.
    [root@myComputeNodeX ~]# racli add credential_wallet
    
    Fri Jan 1 08:56:27 2018: Start: Add Credential Wallet
    Enter New Keystore Password: <OKV_endpoint_password>
    Confirm New Keystore Password:
    Enter New Wallet Password: <ZDLRA_credential_wallet_password> 
    Confirm New Wallet Password:
    Re-Enter New Wallet Password:
    Fri Jan 1 08:56:40 2018: End: Add Credential Wallet
    

    For details on the command options, refer to "racli add credential_wallet".

  2. Configure the Recovery Appliance encryption keystore. This keystore contains one or more TDE Master keys for each Recovery Appliance client database, plus the Recovery Appliance’s TDE Master key. The per-client TDE Master keys are used to encrypt backups pieces that are copied to the cloud.

    Attention:

    The Recovery Appliance database is restarted to activate the keystore; plan for short outage.
    [root@myComputeNodeX ~]# racli add keystore --type hsm --restart_db
    
    Updating log /opt/oracle.RecoveryAppliance/log/racli.log
    Fri Jan 1 08:57:03 2018: Start: Configure Wallets
    Fri Jan 1 08:57:04 2018: End: Configure Wallets
    Fri Jan 1 08:57:04 2018: Start: Stop Listeners, and Database
    Fri Jan 1 08:59:26 2018: End: Stop Listeners, and Database
    Fri Jan 1 08:59:26 2018: Start: Start Listeners, and Database
    Fri Jan 1 09:02:16 2018: End: Start Listeners, and Database

    For details on the command options, refer to "racli add keystore".

A shared wallet is created that all nodes of the Recovery Appliance use. It stores TDE master keys that encrypt the individual DEK keys.

Installing the OKV Client Software

Each node of the Recovery Appliance needs to have the appropriate client software for the Oracle Key Vault (OKV). This is accomplished using RACLI in one step.

If the user is not an admin_user or root user who have access to /radump, then stage the okvclient.jar file in /tmp on both nodes.
  1. From the primary node of Recovery Appliance, run only once the following command. It adds all OKV endpoints associated with the Recovery Appliance. It applies to ~all~ nodes.
    [root@myComputeNodeX ~]# racli install okv_endpoint 
    
    Wed August 23 20:14:40 2018: Start: Install OKV End Point [node01]
    Wed August 23 20:14:43 2018: End: Install OKV End Point [node01]
    Wed August 23 20:14:43 2018: Start: Install OKV End Point [node02]
    Wed August 23 20:14:45 2018: End: Install OKV End Point [node02]
    

    For details on the command options, refer to "racli install okv_endpoint".

  2. Verify that the Oracle Key Vault endpoint software has been provisioned properly.
    [root@myComputeNodeX ~]# racli status okv_endpoint
    
    Node: node02
    Endpoint: Online
    Node: node01
    Endpoint: Online
    
All nodes should have the client software for the OKV.

Enabling the Encryption Keystore and Creating a TDE Master Key

This task enables a keystore and creates the first TDE master key.

The OKV endpoint keystore is also known as the "OKV shared wallet." Once a keystore has been created, it must be enabled for use and the first TDE master key created for it.

  1. Open the keystore so that it can be used.
    [root@myComputeNodeX ~]# racli enable keystore

    For details on the command options, refer to "racli enable keystore".

  2. Create a TDE master key for the Recovery Appliance.
    [root@myComputeNodeX ~]# racli alter keystore --initialize_key

Creating Cloud Objects for Archive-to-Cloud

This task creates the OCI objects Cloud_Key and Cloud_User for use with archive-to-cloud.

  1. Add a Cloud_Key. This object is specific for OCI Cloud Archive support.
    [root@myComputeNodeX ~]# racli add cloud_key --key_name=example_key
    
    Thu Sep  1 18:11:23 2022: Using log file
    /opt/oracle.RecoveryAppliance/log/racli.log
    Thu Sep  1 18:11:23 2022: Start: Add Cloud Key example_key
    Thu Sep  1 18:11:25 2022: Start: Creating New Keys
    Thu Sep  1 18:11:25 2022: Oracle Database Cloud Backup Module Install Tool,
    build 19.9.0.0.0DBBKPCSBP_2022-05-02
    Thu Sep  1 18:11:25 2022: OCI API signing keys are created:
    Thu Sep  1 18:11:25 2022:   PRIVATE KEY -->
    /raacfs/raadmin/cloud/key/example_key/oci_pvt
    Thu Sep  1 18:11:25 2022:   PUBLIC  KEY -->
    /raacfs/raadmin/cloud/key/example_key/oci_pub
    Thu Sep  1 18:11:25 2022: Please upload the public key in the OCI console.
    Thu Sep  1 18:11:25 2022: End: Creating New Keys
    Thu Sep  1 18:11:26 2022: End: Add Cloud Key example_key

    For details on the command options, refer to "racli add cloud_key".

  2. Open the OCI console, and sign in. The console is located at https://console.<region>.oraclecloud.com. If you don't have a login and password for the Console, contact an administrator.
  3. From the OCI console, acquire the key's fingerprint.
    1. View the details for the user who will be calling the API with the key pair.

      • If you're signed in as this user, click your username in the top-right corner of the Console, and then click User Settings.
      • If you're an administrator doing this for another user, instead click Identity, click Users, and then select the user from the list.
    2. Click Add Public Key.

    3. Paste the contents of the PEM public key in the dialog box and click Add.

    4. Important: Copy the key's fingerprint, because it is needed in later steps.

    The key's fingerprint is displayed (for example, 12:34:56:78:90:ab:cd:ef:12:34:56:78:90:ab:cd:ef).

  4. (Optional) After you've uploaded your first public key, you can upload additional keys. You can have up to three API key pairs per user. In an API request, you specify the key's fingerprint to indicate which key you're using to sign the request.
  5. Modify Cloud_Key by adding the fingerprint.
    [root@myComputeNodeX ~]# racli alter cloud_key 
    --key_name=example_key
    --fingerprint=12:34:56:78:90:ab:cd:ef:12:34:56:78:90:ab:cd:ef
    
    Tue Jul  2 05:40:06 2019:   Start: Alter Cloud Key example_key
    Tue Jul  2 05:40:08 2019:   End: Alter Cloud Key example_key
  6. Add Cloud_User object.
    [root@myComputeNodeX ~]# racli add cloud_user 
    --user_name=sample_user
    --key_name=example_key
    --user_ocid=ocid1.user.oc1..abcedfghijklmnopqrstuvwxyz0124567901
    --tenancy_ocid=ocid1.tenancy.oc1..abcedfghijklmnopqrstuvwxyz0124567902
    --compartment_ocid=ocid1.compartment.oc1..abcedfghijklmnopqrstuvwxyz0124567903
    
    Tue Jun 18 13:28:45 2019: Using log file /opt/oracle.RecoveryAppliance/log/racli.log
    Tue Jun 18 13:28:45 2019: Start: Add Cloud User sample_user
    Tue Jun 18 13:28:46 2019: End: Add Cloud User sample_user
    --user_name

    The name to be associated with this particular cloud user. This is a logical name for the Recovery Appliance; it will be used in the Recovery Appliance cloud_location. It does not have to match the actual ZFS user name

    --key_name

    The specific cloud key to be associated with this cloud user. This is the cloud_key object created in step #1.

    --tenancy_ocid

    The tenancy OCID for the Oracle Bare Metal Cloud account. This is the value to be used and does not change.

    --user_ocid

    The user OCID for the Oracle Bare Metal Cloud account. This is the OCID for the object storage user on the ZFS. It is always in the form ocid1.user.oc1..<zfs_username>.

    --compartment_ocid

    The compartment OCID within the tenancy of the Oracle Bare Metal Cloud Account. The compartment OCID is always the ZFS share name.

    For details on the command options, refer to "racli add cloud_user".

  7. Verify Cloud_User was created by listing it.
    [root@myComputeNodeX ~]# racli list cloud_user --user_name=sample_user
    
    Tue Jul  2 06:45:13 2019: Using log file /opt/oracle.RecoveryAppliance/log/racli.log
    Tue Jul  2 06:45:13 2019: Start: List Cloud User
                  Cloud User:  sample_user
                   User Name: sample_user
                     User ID: 3
                   User OCID: ocid1.user.oc1..abcedfghijklmnopqrstuvwxyz0124567901
                Tenancy OCID: ocid1.tenancy.oc1..abcedfghijklmnopqrstuvwxyz0124567902
            Compartment OCID: ocid1.compartment.oc1..abcedfghijklmnopqrstuvwxyz0124567903
              Cloud Key Name: hk_key_1
    
    Tue Jul  2 06:45:14 2019: End: List Cloud User

Adding Cloud Location

This task configures a cloud bucket location for archive-to-cloud.

Creation of a cloud_location requires that a cloud_user object has already been created. Each cloud_location creation is tied to a singular, specified cloud_user. Resulting object name translates to cloud sbt_library name, such as bucket_cloud_user. In this model, each cloud location is one-to-one cloud_user to cloud_location.

The options given to RACLI are passed to the installer, which handles setting lifecycle management for the bucket.

When completed, Object Storage is authorized to move backups to Archive Storage, as per Configuring Automatic Archival to Oracle Cloud Infrastructure.

  1. Add cloud location to the Recovery Appliance. This creates a sbt_library for archive-to-cloud.
    [root@myComputeNodeX ~]# racli add cloud_location 
    
    --cloud_user=CLOUD_USER_NAME
    --host=HOST_URL 
    --bucket=OCI_BUCKET_NAME 
    [--enable_archive |  --disable_archive]
    [--archive_after_backup=NUMBER:{DAYS|YEARS}  --streams=NUMBER --proxy_host=HTTP_SERVER
    --proxy_port=HTTP_PORT  --proxy_id=HTTP_USER --proxy_pass=HTTP_PASS
    --import_all_trustcert=X509_CERT_PATH  --retain_after_restore=NUMBER:HOURS]
    [-guaranteed={yes|no}] 
    [--immutable
    --temp_metadata_bucket=METADATA_BUCKET_NAME]
    
    
    Tue Jun 18 13:30:51 2019: Using log file /opt/oracle.RecoveryAppliance/log/racli.log
    Tue Jun 18 13:30:51 2019: Start: Add Cloud Location <OCI_BUCKET_NAME>_<CLOUD_USER_NAME>
    Tue Jun 18 13:30:57 2019: End: Add Cloud Location <OCI_BUCKET_NAME>_<CLOUD_USER_NAME>
    --bucket

    The name of the bucket where the backup will go. Note that the install tool will create the specified bucket if it does not exist.

    The bucket name is the directory which will be created in the --compartment_ocid ZFS share in step #2.

    Bucket names are case sensitive, allowed characters are alphanumeric characters, /, -, _ and period (.), other special characters are not allowed. Bucket name max length is 255 characters (one less than OCI 256).

    --cloud_user

    Previously configured cloud_user object with all authentication requirements. This is the same logical name used for the cloud_user creation in step #2

    --host

    Host name for the Oracle Bare Metal Cloud account. This is the ZFS hostname or IP address always followed by /oci - Do not use https.

    --streams

    The maximum number of streams used during data send/receive operations between the ZFS and Recovery Appliance. The specific stream count will be configured when defining the copy job template in a later step below. It is not recommended to exceed 256 total open connections to Object Storage on a single ZFS appliance.

    • Just like OCI public cloud buckets, the cloud_location will be used as a Media Management Library (MML) in the ZDLRA. The MML will appear as <bucket_name>_<user_name>.

    • Attribute sets will be created on the Recovery Appliance based on the number of --steams specified above

    Note:

    Validating that the cloud object was created properly is critical. If --enable_archive=TRUE (listed as Archive: TRUE), the cloud bucket can perform archive-to-cloud operations. If --enable_archive is not provided, the default is FALSE, which means the created cloud location cannot perform archive-to-cloud operations and becomes cold storage.
  2. List cloud_location object(s) to verify they were created correctly.
    [root@myComputeNodeX ~]# racli list cloud_location --location_name=<CLOUD_LOCATION_NAME>
    Fri Oct 25 06:27:18 2019: Using log file /opt/oracle.RecoveryAppliance/log/racli.log
    Fri Oct 25 06:27:18 2019: Start: List Cloud Location
    Cloud Location <CLOUD_LOCATION_NAME>
               Location Name: <CLOUD_LOCATION_NAME>
                     Archive: TRUE
        Archive After Backup: 7:Days
                        Host: https://<HOST_URL>
                      Bucket: <OCI_BUCKET_NAME>
                 Location ID: 21
                  Proxy Host: 127.0.0.1
                  Proxy Port: 80
        Retain After Restore: 1:Hours
                     Streams: 6
                     User ID: 1
                 SBT Library: <CLOUD_LOCATION_NAME>
          Attribute Set Name: <CLOUD_LOCATION_NAME>_1
               Backup Stream: 1
          Attribute Set Name: <CLOUD_LOCATION_NAME>_2
               Backup Stream: 2
          Attribute Set Name: <CLOUD_LOCATION_NAME>_3
               Backup Stream: 3
          Attribute Set Name: <CLOUD_LOCATION_NAME>_4
               Backup Stream: 4
          Attribute Set Name: <CLOUD_LOCATION_NAME>_5
               Backup Stream: 5
          Attribute Set Name: <CLOUD_LOCATION_NAME>_6
               Backup Stream: 6
    Fri Oct 25 06:27:18 2019: End: List Cloud Location
    

    If the cloud location was created improperly based on this verification step, use racli remove cloud_location and run with the correct arguments racli add cloud_location.

In later steps, you need the name of the attribute set to create a sbt_job_template. This can be derived from the "racli list cloud_location --long" output. The SBT library and attribute sets created by racli can be displayed using dbms_ra, but should not be modified.

Adding an Immutable Cloud Location

This task configures an immutable cloud bucket location for archive-to-cloud.

An immutable bucket is one that retains backups in cloud storage for a period specified by the KEEP UNTIL attribute of the backup. An immutable cloud location requires two buckets that must be created in advance using the OCI Console, the ZFS console, or the OCI command line interface. The cloud buckets are:

  • Regulatory Compliance Bucket has retention rule set and locked.

  • Temporary Metadata Bucket without retention rules.

The retention rules apply to the whole bucket. Therefore, it should not use automatic lifecycle rules triggering Delete. The recommendation is one database per immutable cloud location.

  1. Configure the database client with a Recovery Appliance and take a backup on the client.
  2. Install OKV endpoint on the Recovery Appliance.
  3. Create an immutable bucket on OCI console. Add a bucket on OCI console, and create retention policy for the bucket.
  4. Create a temporary metadata bucket using OCI console.
  5. Add the immutable bucket created in step 3.
    [root@myComputeNodeX ~]# racli add cloud_location 
    --cloud_user=<CLOUD_USER_NAME> 
    --host=https://<OPC_STORAGE_LOCATION> 
    --bucket=<OCI_BUCKET_NAME> 
    --proxy_port=<HOST_PORT> 
    --proxy_host=<PROXY_URL> 
    --proxy_id=<PROXY_ID>
    --proxy_pass=<PROXY_PASS>
    --streams=<NUM_STREAMS> 
    [--enable_archive=TRUE]
    --archive_after_backup=<number>:[YEARS | DAYS]
    [--retain_after_restore=<number_hours>:HOURS]
    --import_all_trustcert=<X509_CERT_PATH>
    --immutable 
    --temp_metadata_bucket=<metadata_bucket> 
    [--enable_archive=true --archive_after_backup=2:DAYS --retain_after_restore=8:HOURS]
    
  6. Create SBT_JOB_TEMPLATE for archive to cloud.

Creating a Job Template

This task creates a job template for archive-to-cloud.

The options given to RACLI are passed to the installer, which handles setting lifecycle management for the bucket.

  1. Log in to SQL*Plus with an admin db_user user.
  2. Create a SBT_JOB_TEMPLATE for archive-to-cloud. The supported algorithms are 'AES128', 'AES192', and 'AES256'. The attribute set name is either <CLOUD_LOCATION_NAME>_1 for 1 stream or <CLOUD_LOCATION_NAME>_2 for two (2) streams in parallel.
    SQL> exec dbms_ra.create_sbt_job_template(template_name=>'<COPY_TO_CLOUD_TEMPLATE_NAME>', 
    protection_policy_name=>'BRONZE', 
    attribute_set_name=>'< Attribute Set Name >', 
    backup_type=>'ALL', 
    full_template_name=>'<COPY_TO_CLOUD_TEMPLATE_NAME>', 
    from_tag=>NULL, 
    priority=>100, 
    copies=>1, 
    window=>NULL, 
    compression_algorithm=>'<SUPPORTED_COMPRESSION>',
    encryption_algorithm=>'<SUPPORTED_ALGO>');

    Note:

    When using compliance, Oracle recommends having one bucket per database. When you create a job template in a compliance environment, use db_unique_name instead of protection_policy_name in your job template, unless the protection policy is used by a single database.

    SQL> exec dbms_ra.create_sbt_job_template(template_name=>'<COPY_TO_CLOUD_TEMPLATE_NAME>', 
    db_unique_name=> '< Database Name>', 
    attribute_set_name=>'< Attribute Set Name >', 
    backup_type=>'ALL', 
    full_template_name=>'<COPY_TO_CLOUD_TEMPLATE_NAME>', 
    from_tag=>NULL, 
    priority=>100, 
    copies=>1, 
    window=>NULL, 
    compression_algorithm=>'<SUPPORTED_COMPRESSION>',
    encryption_algorithm=>'<SUPPORTED_ALGO>');

    For details on the command options, refer to "CREATE_SBT_JOB_TEMPLATE".

  3. Run the archive-to-cloud job..
    SQL> exec dbms_ra.queue_sbt_backup_task('<COPY_TO_CLOUD_TEMPLATE_NAME>');
    
    PL/SQL procedure successfully completed.
  4. Verify backup initiation.
    SQL> SELECT task_type, state, TRUNC(last_execute_time), COUNT(*)
    FROM ra_task
    WHERE state IN ('RUNNING','EXECUTABLE','WAITING','LIBRARY_WAIT')
    AND archived = 'N'
    GROUP BY task_type, state, TRUNC(last_execute_time);
     
    
    TASK_TYPE      STATE         TRUNC(LAS  COUNT(*)
    -------------- ------------- ---------  ----------
    BACKUP_SBT     EXECUTABLE    18-JUN-18  18
    BACKUP_SBT     RUNNING       18-JUN-18  2

Creating or Re-Creating Protected Database TDE Master Keys

This step creates or recreates the TDE master keys used from that point forward for encrypting the DEK keys used on protected databases.

Security policies specify the frequency or circumstances for the creation of new TDE master keys for protected databases. This operation is called "re-key", and is performed as user rasys in PL/SQL on the Recovery Appliance.

The following re-key options are available.

  • Re-key ~all~ protected databases.

    SQL> exec dbms_ra.key_rekey;
  • Re-key specific a protected database.

    SQL> exec dbms_ra.key_rekey (db_unique_name=>'< DB UNIQUE NAME >');
  • Re-key ~all~ protected databases for a specific protection policy.

    SQL> exec dbms_ra.key_rekey (protection_policy_name=>'< PROTECTION POLICY >>');

Re-keying creates new TDE master keys that are used from that point in time forward. Re-keying does not affect the availability of older master keys in the keystore.