Before you Begin
This tutorial guides you through the required steps for patching an Oracle database using Oracle Enterprise Manager Fleet Maintenance User interface. The time to complete this task is approximately 1 hour.
Background
Database Lifecycle Management Pack, allows administrators to maintain versioned sets of database images, for various supported platforms, that can later be used to effectively patch database, Grid Infrastructure (GI), Single Instance High Availability (SIHA), and RAC configurations.
Terminology for this tutorial:
- Image: This represents the versioned set of images, all belonging to the same release and platform.
- Version:This represents a version of the gold image created over time. Whenever the user creates a new gold image, it will get added to the Image as a new Version.
- Gold image: The current version of the Image that represents the gold standard for this Image.
- Running on a particular version of the image: Databases running on the current version are labelled compliant, others are not compliant
- Not running on any version: These databases considered drifters and not compliant.
For more information on Fleet Maintenance see Database Fleet Maintenance in Oracle Enterprise Manager Cloud Control Database Lifecycle Management Administrator's Guide.
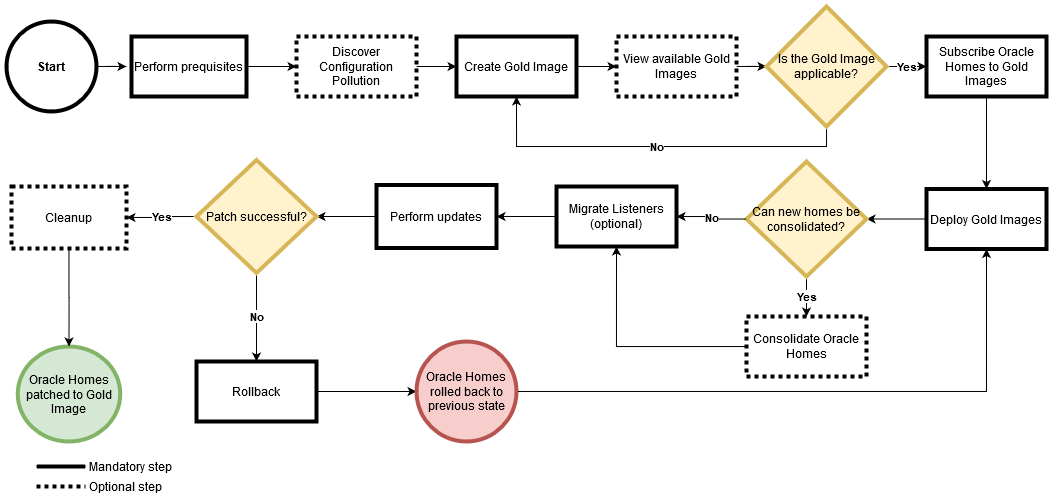
Process Overview
What Do You Need?
- Enterprise Manager version 13.5 Release Update 1 or higher. For the latest Enterprise Manager Release Updates, see Installation and Upgrade.
- An Oracle database discovered in Enterprise Manager. This tutorial uses an Oracle database 19c named
roracdb1, version 19.7.0.0.0, running on a Linux system. - A reference Oracle database home, which is a database Oracle Home already patched to the desired patch level. This reference home will be used to create the Gold Image. This tutorial is using an existing Oracle Home, patched to the level version 19.10.0.0.0 and discovered in EM. For more information on how to discover an oracle home see this Discovery section. For concepts and supported image creation tasks, see also Creating a Gold Image and Fleet Maintenance Emergency Patching.
- Access to the target database and its host. In this example, the EM administrator has root access to the host the database resides on and privileged credentials set up for the database. For more information on how to set up your access see Checking Host Readiness Before Provisioning or Patching.
- Access to the Enterprise Manager command line interface utility,
emcli. For more information on how to set up EM CLI see Getting Started with EM CLI. - Access to the Enterprise Manager console.
Credentials that will be used in this tutorial:
| Credential | Description |
|---|---|
| Name | User specified unique name of the operation |
| Normal Credential | Enter in the format of <Named Credential: Credential Owner>
<Named Credential>: Named credential that enables host access as the operating system user used for installing the Oracle Home <Credential Owner>: The Enterprise Manager user who owns this Named Credential |
| Privilege Credential | Enter in the format of <Named Credential: Credential Owner>
<Named Credential>: Named credential that enables host access as root for running root scripts <Credential Owner>: The Enterprise Manager user who owns this Named Credential |
| Database Credential | Enter in the format of <Database Credential: Credential Owner>
Named SYSDBA credentials that enable database actions |
This tutorial will use Preferred Credentials as the best practice way of performing Fleet Maintenance via the UI, the preferred credentials must be set for all targets.
Step 1: Analyze Your Environment
Before you start a patching task, run an analysis of your environment and check the access to the host you will be patching.
- First, check your access to the database host. Log into to the Enterprise Manager console as an Administrator and navigate to Setup, then Security, then Named Credentials. Select the credential for the database host and click Edit. Click on Test and Save, to test your access.
- Analyze yor database estate for configuration sprawl using the Software Standardization Advisor. Click Targets, then Databases. Under Administration, click Software Standardization Advisor. The resulting graphics depict the current configuration and the recommended configuration. To generate reports, click Generate Report. The Recommended Configuration spreadsheet shows you the recommended database versions to standardize on. In this case, the recommended patch level is 19.10.0.0.0.
- Review the status of your database targets. Ensure that the target database to be patched shows as UP in the status field, represented by a green arrow.
Step 2: Create the Gold Image
- Log in to the host where you have set up EM CLI and create an input file with the details of your reference Oracle Home. In this case, the input file is called
db19c.inp, saved in the/home/oracle/patch_filesdirectory. This file includes the exact name of the reference Oracle Home as it is discovered in EM and it looks like this:IMAGE_NAME=DB19 IMAGE_DESCRIPTION=Gold Image 19c REF_TARGET_NAME=refdb19c_home1_2021_05_13_04_10_9.sample.com IMAGE_SWLIB_LOC=Fleet Maintenance/ STORAGE_TYPE_FOR_SWLIB=OmsShared STORAGE_NAME_FOR_SWLIB=default_loc REF_HOST_CREDENTIALS=ORACLE:MYADMIN WORKING_DIRECTORY=/patch_dir VERSION_NAME=19.7
Description of Input File Parameters
Parameter Description IMAGE_NAME, IMAGE_DESCRIPTION, VERSION_NAME User specified unique name for the operation REF_TARGET_NAME The Oracle home in Enterprise Manager that has all current patches applied and can be used as reference Oracle home. IMAGE_SWLIB_LOC The path in the software library(Enterprise, then Provisioning and Patching, then Software Library) where the gold image will be stored. This should be created by the SYSMAN user. STORAGE_TYPE_FOR_SWLIB Storage type configured for software library. STORAGE_NAME_FOR_SWLIB Storage name for the software library, located at: Setup > Provisioning and Patching > Software Library. REF_HOST_CREDENTIALS The credentials used to connect to the target host. The format for the credential is: <name:credential owner> workingDir Path of temp directory accessible to all hosts if the location needs to be different from /tmp. For this example we will use/patch_dir - A standard software configuration is referred to as a Gold Image. Create a new Gold Image based on your reference Oracle Home:
emcli login -username=SYSMAN
emcli db_software_maintenance -createSoftwareImage -input_file="data:/home/oracle/patch_files/db19c.inp"
Output:
Create Gold Image operation has been submitted successfully with the instance name : 'CreateGoldImageProfile_SYSMAN__21_2021_06_45_AM' and execution_guid='AAFAB54748EF28A0E0533400000A43D6'
You can track the status of operation using the following:
EMCLI: emcli get_instance_status -exec=AAFAB54748EF28A0E0533400000A43D6
Browser: https://EM Host:EM Port/em/faces/core-jobs-procedureExecutionTracking?executionGUID=AAFAB54748EF28A0E0533400000A43D6
Verb createSoftwareImage completed successfullyTip:
To review the execution activity details in Enterprise Manager navigate, Enterprise, then Provisioning and Patching, then Procedure Activity. Click on your execution under the Run column. - Check the list of all Gold Images available for deployment. Your newly created image should be on this list:
emcli db_software_maintenance -getImages
Output:
===================================================================================================

IMAGE ID                    IMAGE NAME     DESCRIPTION     VERSION     CREATION DATE    OWNER

===================================================================================================
AAFAB54748EF28A0E0533400000A43D6    DB19            Gold Image 19c    19.7.0.0.0    2021-07-21 20:45:50.0     MYADMIN

---------------------------------------------------------------------------------------------------
Total Rows: 1

Verb getImages completed successfully
Step 3: Subscribe the database to the Gold Image
- View the software version available for a specific image:
emcli db_software_maintenance -getVersions -image_id=AAFAB54748EF28A0E0533400000A43D6
Output:
=================================================================================================== POSITION VERSION ID VERSION NAME DATE CREATED EXTERNAL ID HASH CODE STATUS =================================================================================================== 1 A5F368AF3DE87756E053 19.10 2021-05-18 21:28:43. oracle:default[...] C2891773972:B5D7872C CURRENT -
Verify that the newly created Gold Image is applicable. Execute the following command to perform a check to identify the patch conflicts:
emcli db_software_maintenance -checkApplicability -image_id="AAFAB54748EF28A0E0533400000A43D6" -target_list=roracdb1 -target_type=rac_database > /home/oracle/patch_files/applicability.out
cat /home/oracle/patch_files/applicability.out
Output:
Checking applicability for target [roracdb1]...


Image is applicable

More Information: Image has 996 additional bugs fixed.

Following are the bugs list:


===================================================================================================
#    BUG#       PATCH#       PATCH UPI        BUG DESCRIPTION
===================================================================================================
1      27006120       30872794              INFRASTRUCTURE FOR BACKPORTING


[...]

Total Rows: 996


Following are the patches:


===================================================================================================
PATCH#        PATCH DESCRIPTION
===================================================================================================
30872794        Database Release Update : 19.10.0.0.200414 (30872794)
---------------------------------------------------------------------------------------------------
30112122        Database Release Update : 19.7.0.0.200414 (30403662)
---------------------------------------------------------------------------------------------------
30805598        OJVM RELEASE UPDATE: 19.10.0.0.200414 (30805598)
---------------------------------------------------------------------------------------------------
Total Rows: 3
The report typically shows three distinct categories:- Applicable: The image and database target contain the same set of bug fixes. This image can be applied to the specified target.
- Applicable and Image has more bug fixes: The image contains more bug fixes than those applied on the database, the list of extra bugs is displayed. The image can be applied to the specified target.
- Not Applicable: The database contains more bug fixes than those included in the image, the list of missing bugs is displayed. In this case, you have to create a new version of the image that includes the missing bug fixes. In this scenario, the image is applicable.
- Subscribe the database target
roracdb1to the Gold Image you created:emcli db_software_maintenance -subscribeTarget -target_name=roracdb1 -target_type=rac_database -image_id="AAFAB54748EF28A0E0533400000A43D6"
Output:
Target 'roracdb1' subscribed successfully. Verb subscribeTarget completed successfullyNote:
Multiple databases can be subscribed to one image. EM CLI allows subscribing one database as a time. - Verify the subscription:
emcli db_software_maintenance -getImageSubscriptions -image_id=AAFAB54748EF28A0E0533400000A43D6
Output:
**************************************************************************************
TARGETNAME   TARGETTYPE   VERSIONNAME    DATESUBSCRIBED


CLUSTER1    CLUSTER    81044 Version   2021-05-18 21:29:08.0

**************************************************************************************


Total Rows:1
Step 3: Schedule the Patch Flow
In this step you will use the Enterprise Manager UI to schedule the entire patching operation in one flow: Deploy Software, Migrate Listener and Update Database. This gives you the convenience of scheduling all three operations in one flow.
Log into Enterprise Manager and navigate to Targets select, Databases select, Administration select, Fleet Maintenance. This will take you to the main Fleet Maintenance screen.
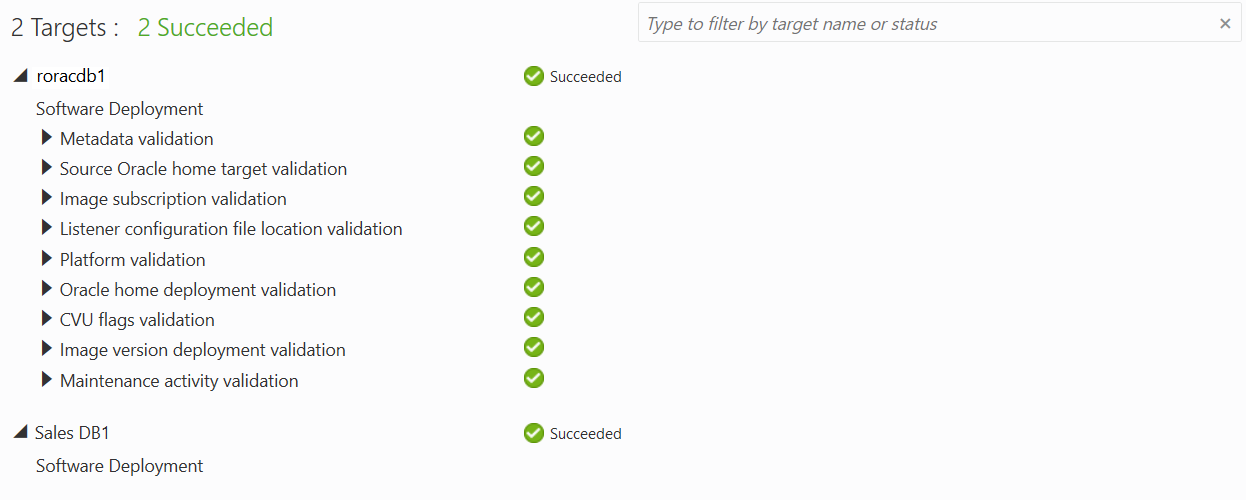
- Targets: In this step select the RAC database targets to be patched (roracdb1) by checkmarking them. Databases can be filtered by the Image, Target Type, Operation and Filter boxes.
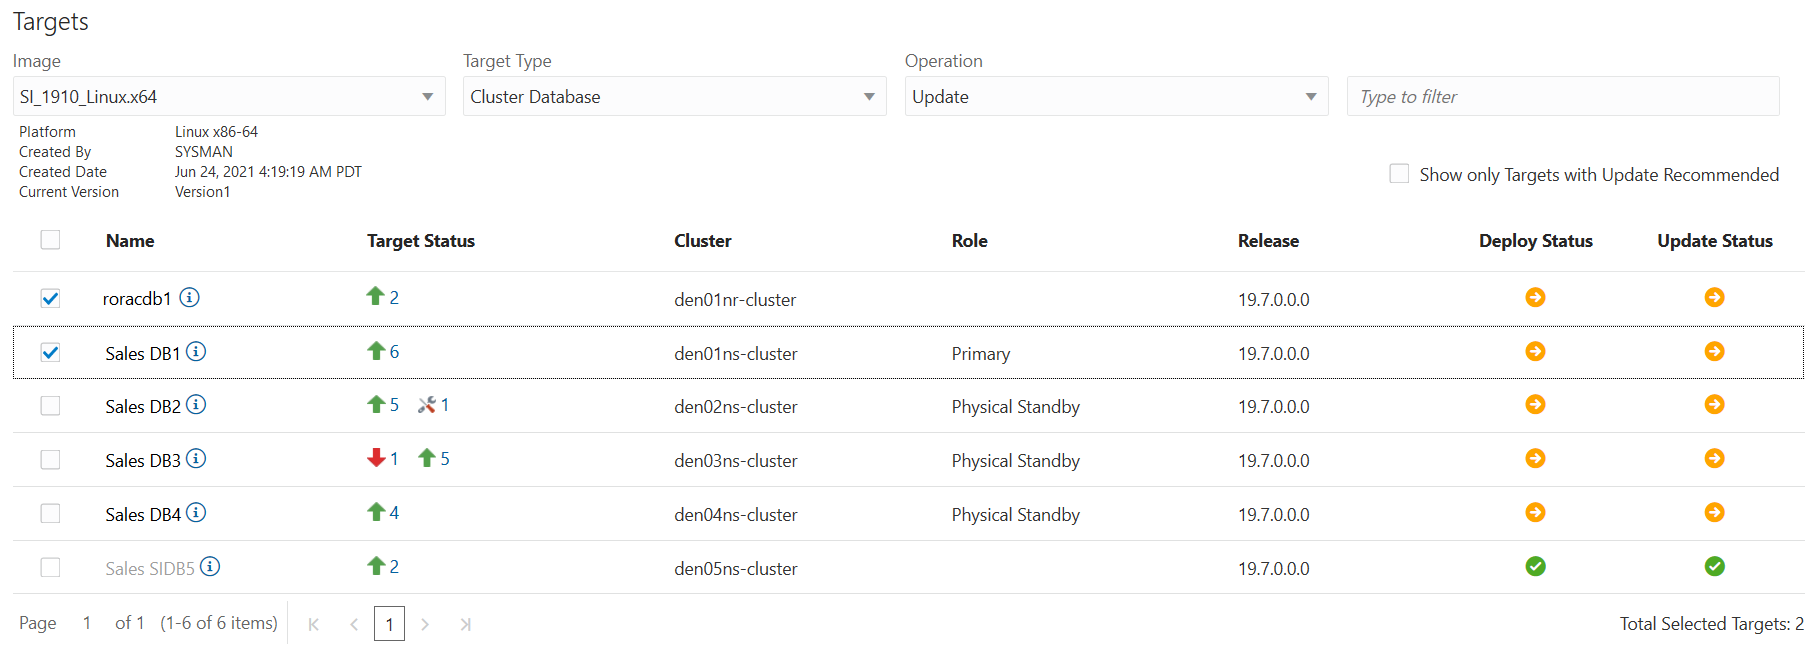
Description of the illustration Targets.png Once the target databases have been selected click Next.
- Operations: The second step you will select the Fleet Maintenance Tasks, to be performed on the previously selected database.
- Software Deployment: Specify the Destination Oracle Home location:
/u01/app/oracle/product/19/db_home2and select Immediately as the Start Time.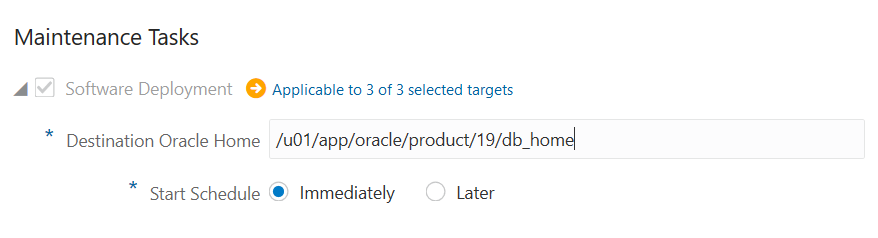
Description of the illustration mainttask.png - Update Databases: Set the time for the database update to start, select Later and enter a later start time that reflects the time usually taken for software deployment in your environment.
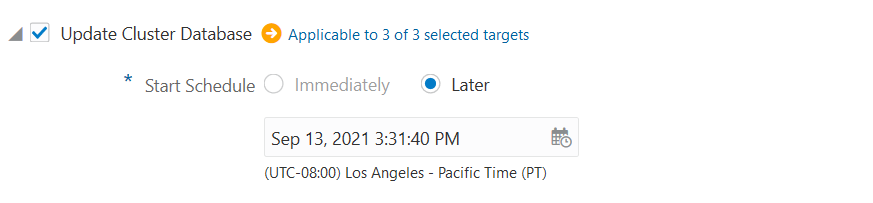
Description of the illustration updatedb.png - Migrate the Listener: Set the time for the listener migration to start, select Later and enter a later start time that reflects the time usually taken for software deployment in your environment.
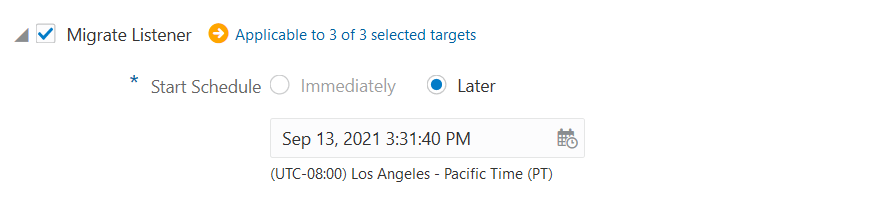
Description of the illustration updatedb.png - Enter the required Credentials, by selecting Preferred Credentials for all three (Normal Host, Privileged Host and SYSDBA Database). This is the recommended best practices for Credentials when using the Fleet Management UI.
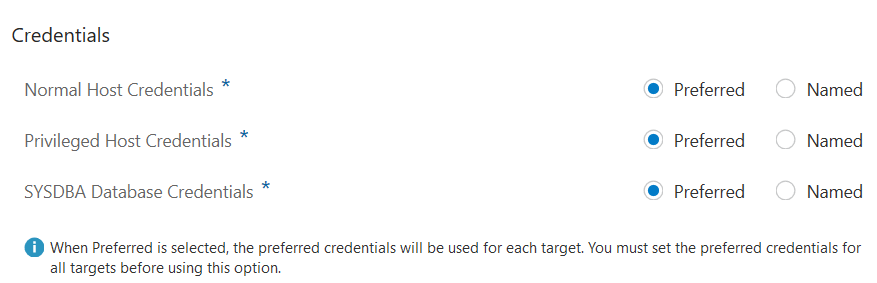
Description of the illustration credentials.png - Options: Make sure the work directory is located in an easily accessed location across all hosts. For this example we will use:
/tmp.Select No for Skip Cluster Verification Utility Checks.
Set the Pre-staged Location for Root Scripts path to:
/u01/fleetscripts.Listener Options will remain blank (default value) for this example.
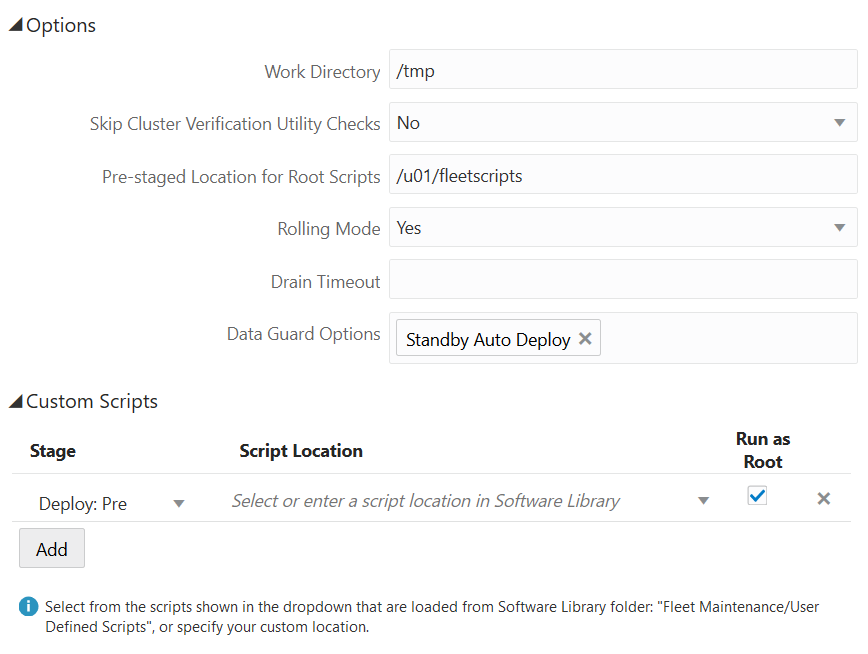
Description of the illustration options_scripts2.png - Scripts: Click on Add to add a Pre-staged script. then select Update Pre under Stage, click on and select script
PREunder Script Location and checkmark Run as Root.
- Software Deployment: Specify the Destination Oracle Home location:
- Review: that the information entered in the previous steps is correct. Make sure all targets are added and that their Target Status shows with a green up arrow. Verify that Deploy, Update and Migrate show blue checkmarks for all databases.

Description of the illustration review1.png
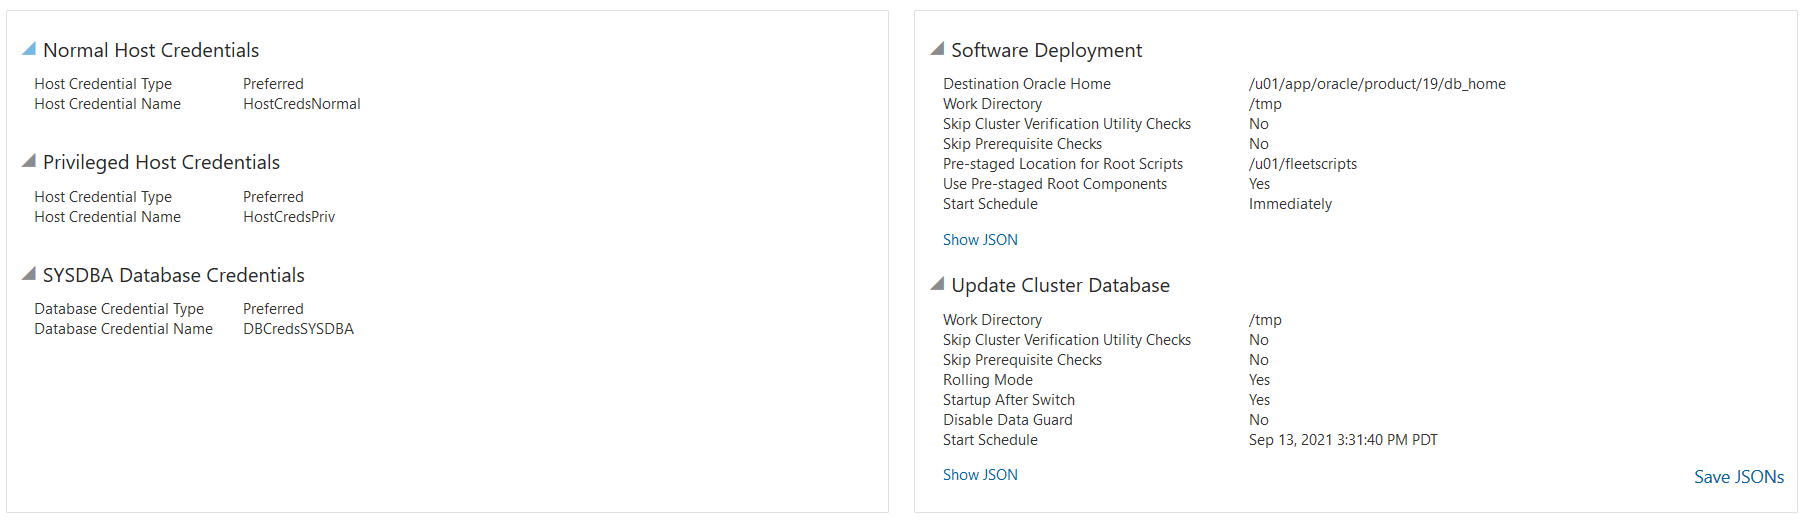
In the lower section of the Review screen, verify that credential information is set to Preferred. Review that the information for Software Deployment, Migrate Listener and Update Database are correct.
Description of the illustration review2.png Once you have verified all settings are correct in the review screen click Validate and select a Quick validation from the pop-up.
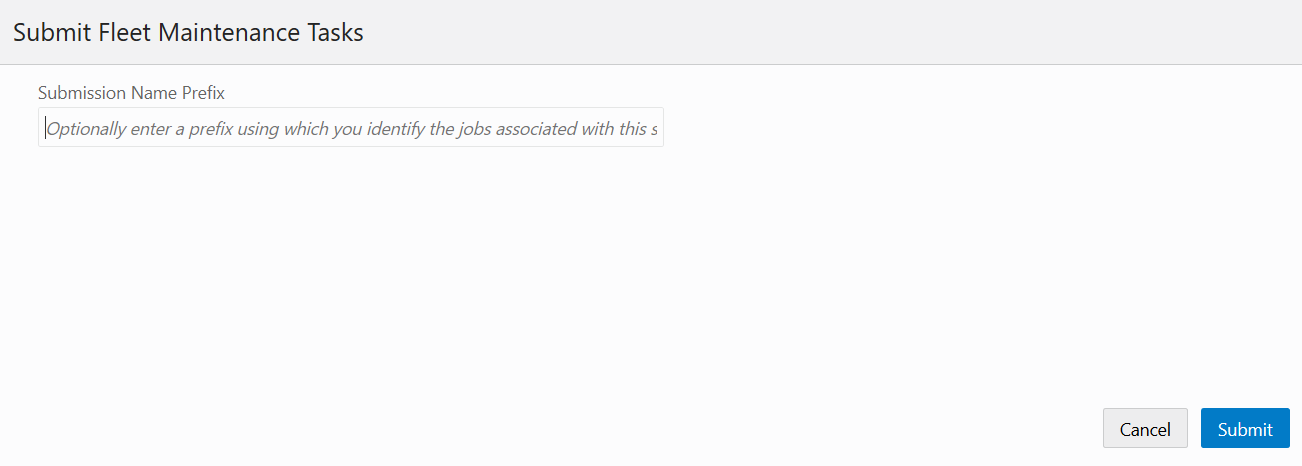
Description of the illustration validation.png Once the Quick validation is successful, click Close to return to the Review screen. To run the Fleet Maintenance tasks click on Submit, this will open a pop-up where you can optionally enter a name for this Fleet Maintenance Operation. To launch the operation click Submit.
Description of the illustration submit.png - To review the progress of the Fleet Maintenance Operation, go to Enterprise, then Provisioning and Patching and click on Procedure Activity.
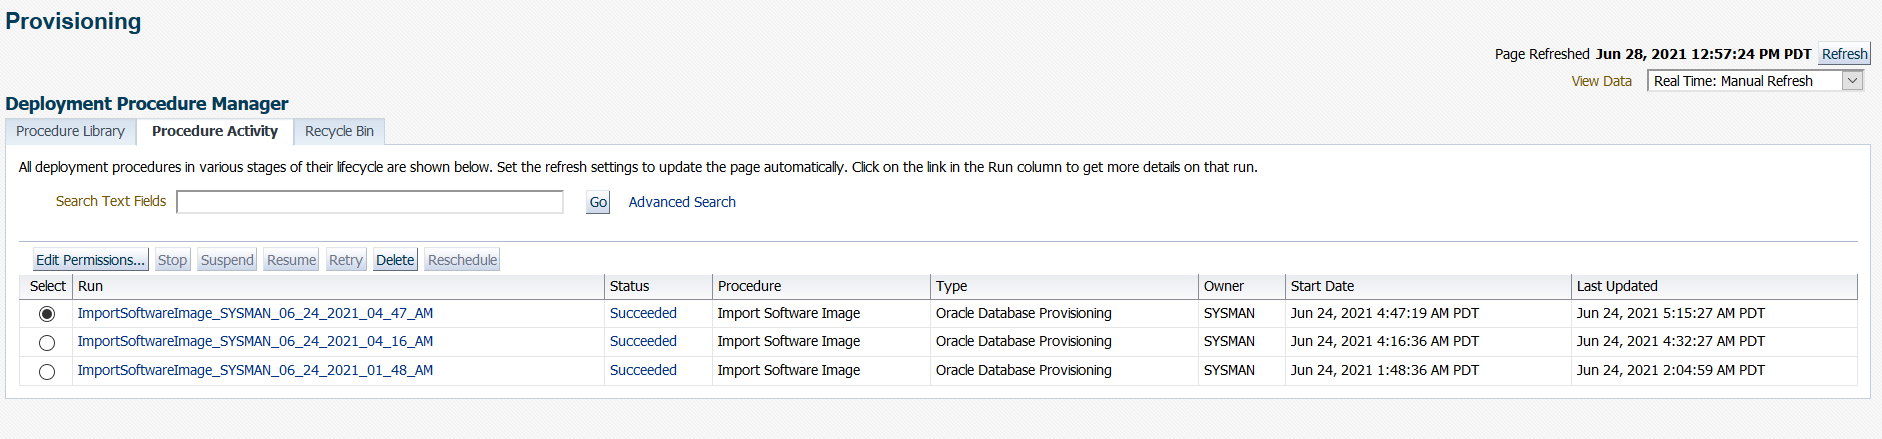
Description of the illustration activity.png
Step 5: Cleanup the Old Oracle Homes
A cleanup operation is recommended to remove old Oracle Home that is no longer used. This will remove old Oracle Home and free up valuable disk space.
- Run a report to list the possible Oracle Homes to be cleaned up:
emcli db_software_maintenance -performOperation -name="Cleanup old oracle homes" -purpose=CLEANUP_SOFTWARE -target_type=rac_database -normal_credential=ORACLE:MYADMIN -privilege_credential=ROOT:MYADMIN -target_list=roracdb1 -workDir=/tmp -reportOnly=true
Output:
Processing cleanup database software.

The following Oracle homes are chosen for removal by policy.

===================================================================================================
NO.      HOST      ORACLE HOME    TARGET NAME    NO. OF ASSOCIATED TARGETS
===================================================================================================
1   roracdb1  /u01/app/1907/hr  roracdb1   0
---------------------------------------------------------------------------------------------------
Total Rows: 1


Verb performOperation completed successfully - Cleanup the Oracle Home listed in the report:
emcli db_software_maintenance -performOperation -name="Cleanup old oracle homes" -purpose=CLEANUP_SOFTWARE -target_type=rac_database -normal_credential=ORACLE:MYADMIN -privilege_credential=ROOT:MYADMIN -target_list=roracdb1 -workDir=/tmp
Output:
Processing cleanup database software.

The following Oracle homes are chosen for removal by policy.

===================================================================================================
NO.     HOST         ORACLE HOME   TARGET NAME   NO. OF ASSOCIATED TARGETS
===================================================================================================
1   roracdb1   /u01/app/1907/hr   roracdb1   0
---------------------------------------------------------------------------------------------------
Total Rows: 1

Cleaning up targets roracdb1.sample.com_3478
To review the cleanup activity details in Enterprise Manager, go to Enterprise, then Provisioning and Patching, then Procedure Activity. Click on
CLEANUP_SOFTWARE_(date and time)under the Run column.
Tip:
By default, Enterprise Manager retains the latest three Oracle Homes. This provides opportunity for you to rollback the database.This tutorial uses only one home in its example.
Learn More
- Oracle Enterprise Manager general information
- Oracle Enterprise Manager Documentation Library
- Oracle Enterprise Manager Command Line Interface
- Database Fleet Maintenance
- For a complete list and definition of all parameters and variables used in this tutorial see:
db_software_maintenance and Fleet Management Software
Patching an Oracle Database RAC Container Database Using Oracle Enterprise Manager's Fleet Maintenance Graphic User Interface
F43065-02
April 2022
Copyright © 2022, Oracle and/or its affiliates.
Step by Step example of patching an Oracle RAC Container Database Using Oracle Enterprise Manager's Fleet Maintenance Graphic User Interface.
This software and related documentation are provided under a license agreement containing restrictions on use and disclosure and are protected by intellectual property laws. Except as expressly permitted in your license agreement or allowed by law, you may not use, copy, reproduce, translate, broadcast, modify, license, transmit, distribute, exhibit, perform, publish, or display any part, in any form, or by any means. Reverse engineering, disassembly, or decompilation of this software, unless required by law for interoperability, is prohibited.
If this is software or related documentation that is delivered to the U.S. Government or anyone licensing it on behalf of the U.S. Government, then the following notice is applicable:
U.S. GOVERNMENT END USERS: Oracle programs (including any operating system, integrated software, any programs embedded, installed or activated on delivered hardware, and modifications of such programs) and Oracle computer documentation or other Oracle data delivered to or accessed by U.S. Government end users are "commercial computer software" or "commercial computer software documentation" pursuant to the applicable Federal Acquisition Regulation and agency-specific supplemental regulations. As such, the use, reproduction, duplication, release, display, disclosure, modification, preparation of derivative works, and/or adaptation of i) Oracle programs (including any operating system, integrated software, any programs embedded, installed or activated on delivered hardware, and modifications of such programs), ii) Oracle computer documentation and/or iii) other Oracle data, is subject to the rights and limitations specified in the license contained in the applicable contract. The terms governing the U.S. Government's use of Oracle cloud services are defined by the applicable contract for such services. No other rights are granted to the U.S. Government.
This software or hardware is developed for general use in a variety of information management applications. It is not developed or intended for use in any inherently dangerous applications, including applications that may create a risk of personal injury. If you use this software or hardware in dangerous applications, then you shall be responsible to take all appropriate fail-safe, backup, redundancy, and other measures to ensure its safe use. Oracle Corporation and its affiliates disclaim any liability for any damages caused by use of this software or hardware in dangerous applications.
Oracle and Java are registered trademarks of Oracle and/or its affiliates. Other names may be trademarks of their respective owners.
Intel and Intel Inside are trademarks or registered trademarks of Intel Corporation. All SPARC trademarks are used under license and are trademarks or registered trademarks of SPARC International, Inc. AMD, Epyc, and the AMD logo are trademarks or registered trademarks of Advanced Micro Devices. UNIX is a registered trademark of The Open Group.
This software or hardware and documentation may provide access to or information about content, products, and services from third parties. Oracle Corporation and its affiliates are not responsible for and expressly disclaim all warranties of any kind with respect to third-party content, products, and services unless otherwise set forth in an applicable agreement between you and Oracle. Oracle Corporation and its affiliates will not be responsible for any loss, costs, or damages incurred due to your access to or use of third-party content, products, or services, except as set forth in an applicable agreement between you and Oracle.