Using Dynamic Runbooks
As a Runbook user, you can create a Runbook session from Incident Manager or from the All Metrics page.
How to start a Dynamic Runbook Session - YouTube Video
- Navigate to the Runbook Sessions region, and click Start Runbook Session.
The Start a Runbook Session page appears and displays a table where you can select a Runbook with which to start a session.
Note:
From the Incident Manager Runbook Sessions region, you can also view a list of Runbooks that may be relevant to the specific incident (see Relevant Runbooks for more information). To access one of the Relevant Runbooks, click All Relevant Runbooks… to display the Start a Runbook Session page listing the Relevant Runbooks.
- Click Start Session. The Runbook session page opens for that incident or metric. Incident or metric context details are listed at the top of the page.
- The Overview & Prerequisites step is intended to show what the Runbook is used for and any prerequisites required of the user before executing subsequent steps in the Runbook. Ensure all prerequisites are met before beginning the Runbook session. Once you've completed this step, you can click on the checkbox to indicate the step has been completed.
- For each step, review the instructions and output. Starting with Enterprise Manager 24ai Release 1 Update 9 (24.1.0.9), any steps that the Runbook author configured for automatic execution start running automatically when the Runbook session is created. A panel on the right displays the automatic execution status for the Runbook steps, including steps that are running, waiting to run, completed, stopped, or not configured for automatic execution. Steps that can run independently will run in parallel. If an automatically executed step depends on output from an earlier step, such as a Runbook variable populated by that earlier step, the dependent step runs after the required step completes. The session user can continue to review the Runbook while automatic execution is in progress. Steps that are running show a processing indicator. Steps that complete automatically display their results in the same way as steps run manually. The session user can rerun an automatically executed step later, if needed. The session user can stop automatic execution for steps that have not started yet. If the browser tab is closed before all automatically executed steps have run, the session resumes automatic execution the next time the session is opened. Steps that the user stopped do not automatically run again.
Note:
Steps that require credentials or other user input must be fully configured before they can run automatically. If a step requires Runbook variables extracted from another step, enable automatic execution for that prerequisite step as well. If the required credentials, input values, or Runbook variables are not available when the session starts, the step cannot complete automatically and may require user action. - If a step has not run automatically, click the play icon to execute the operation and review live diagnostic information produced by the step. If you see a gear icon next to a Runbook step, that means user input is required before the step can be executed. An example of user input is a named credential for the target database. Once the input is specified, the gear icon will change to the play icon, which will indicate the step can be executed.
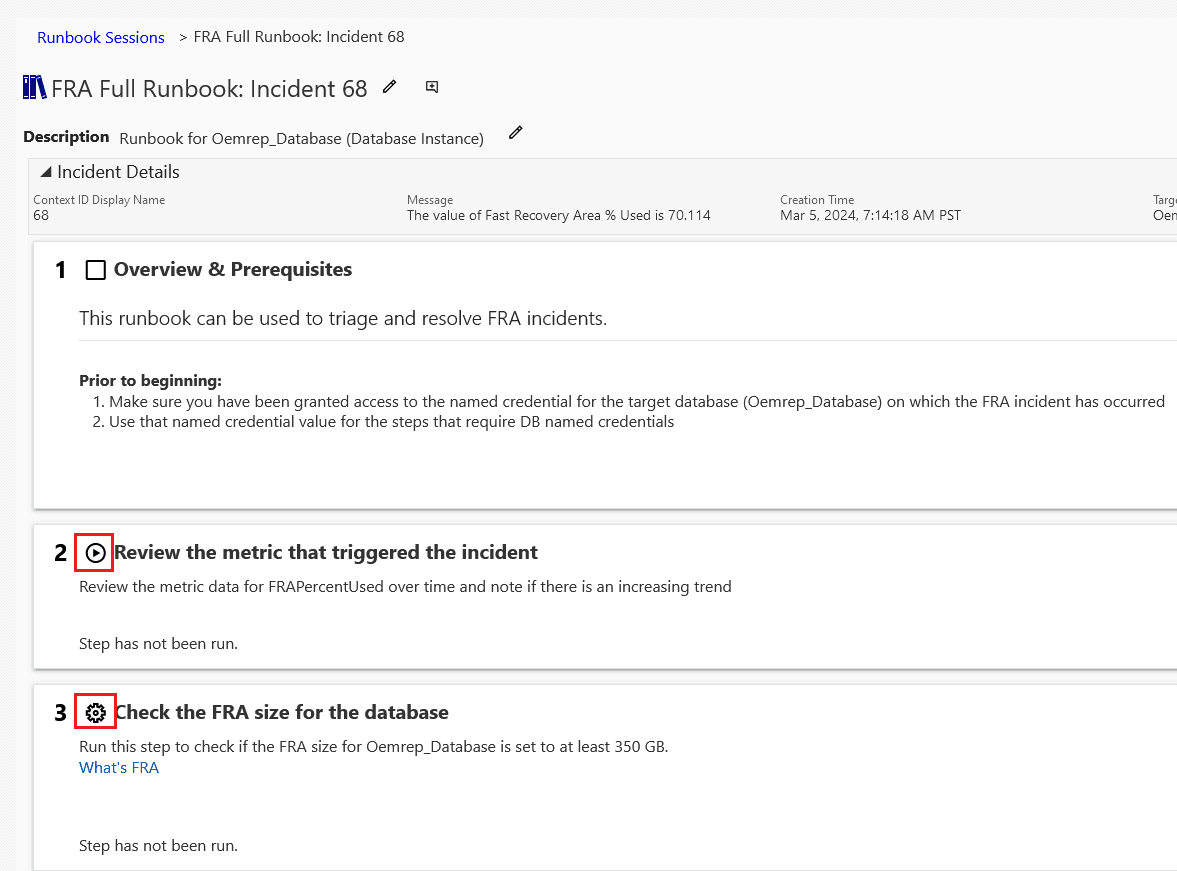
At the right is a list of Runbook Variables that pertain to the incident context.
Starting with Enterprise Manager 13c Release 5 Update 21 (13.5.0.21) metric steps for other target instances will be available.
Note:
The final step should be a Success Criteria step to allow the session user to verify that the Runbook steps performed by the user resolved the issue. - If you don’t complete the Runbook session, you can leave it open and come back to it. Only you, as the session owner will be able to return to continue running steps and complete the Runbook session. Note that there is a 14 day purge policy, which means you have 14 days to complete the Runbook session before it is purged from the system.
Note:
The default purge policy can be increased by setting theoracle.sysman.core.runbooks.runbookSessionMinLifeDaysOMS property. - Once you have finished with the Runbook session, Click Mark as Done.
- This places the Runbook session into read-only mode. No more edits or running steps allowed.
- Once marked done, the session can be saved for a longer period of time by extending the expiration date in the Runbooks Sessions list page.
Extend the Expiry Date
- Sessions are kept for a default amount of time and automatically purged
- The time can be extended if the session is marked as done.
- The default time a session is saved is 14 days, default extended time is 45 days from when session is started.
Note:
The default purge policy can be increased by setting theoracle.sysman.core.runbooks.runbookSessionMaxLifeDaysOMS property.