Installation on Windows Platforms
Oracle GraalVM is available for Windows on the x64 architecture.
Follow these steps to install Oracle GraalVM:
-
Navigate to Oracle Java Downloads. Select the preferred Oracle GraalVM version, 21 for the Java version, and Windows for the operating system. Start downloading.
-
Change the directory to the location where you want to install GraalVM, then move the .zip archive file to it.
-
Unzip the archive to your file system.
- There can be multiple JDKs installed on the machine. The next step is to configure the runtime environment. Setting environment variables via the command line will work the same way for Windows 8, 10, and 11.
- Set the
JAVA_HOMEenvironment variable to resolve to the installation directory:setx /M JAVA_HOME "C:\Progra~1\Java\<graalvm>" - Set the value of the
PATHenvironment variable to the GraalVM bin directory:setx /M PATH "C:\Progra~1\Java\<graalvm>\bin;%PATH%"Note that the
/Mflag, equivalent to-m, requires elevated user privileges.
- Set the
- Restart Command Prompt to reload the environment variables. Then use the following command to check whether the variables were set correctly:
 echo %PATH%
 echo %JAVA_HOME%
Alternatively, you can set up environment variables through a Windows GUI:
- Go to Windows Start Menu, then Settings, then Advanced.
- Click Environment Variables. In the section labeled “System Variables” find the
JAVA_HOMEvariable and select it. - Click Edit.
- Click New.
- Click Browse to find the directory to add. Confirm by clicking OK.
- Restart Command Prompt to reload the environment variables.
Repeat the same for the PATH environment variable.
Prerequisites for Native Image on Windows
On Windows, Native Image requires Visual Studio and Microsoft Visual C++(MSVC). You can use Visual Studio 2022 version 17.1.0 or later.
Install Visual Studio Build Tools and Windows SDK
-
Download the Visual Studio Build Tools (C development environment) from visualstudio.microsoft.com.
-
Start the Visual Studio Build Tools installation by clicking on the .exe file, and then press Continue:

-
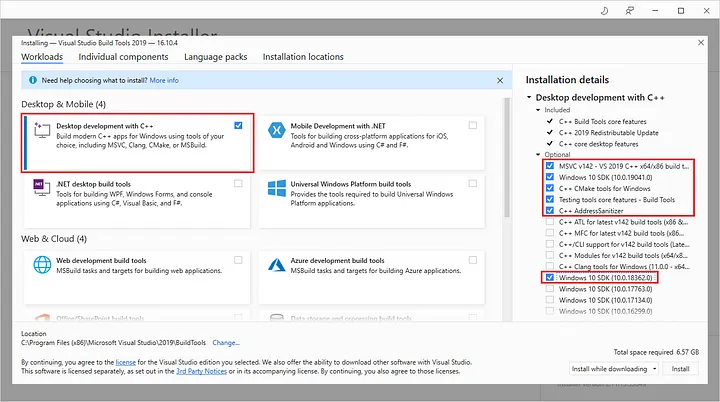
Check the Desktop development with C++ box in the main window. Also, on the right side under Installation Details, choose Windows SDK, and click the Install button.
-
After the installation completes, reboot your system.
-
Next ensure Windows SDK is indeed available. Open the Visual Studio Installer:

-
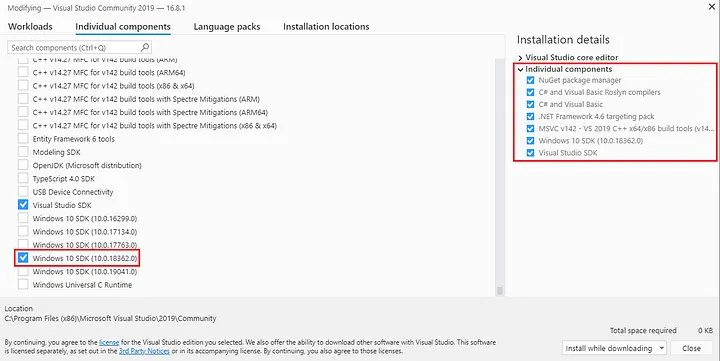
Under the Installed tab, click Modify and choose Individual Components:

-
Then scroll to the bottom and check if Windows SDK is installed and confirm the build tools are checked:
Now that you have the Windows SDK and Visual Studio tooling installed, you can start using Oracle GraalVM Native Image.
Start Using Native Image
Native Image sets up build environments automatically if it can find an appropriate Visual Studio installation in a known location.
With the GraalVM JDK on your PATH, you can therefore now run the native-image utility in a Command Prompt (cmd) or a PowerShell (pwsh).
To check the native-image version, run:
C:\> native-image.cmd --version
To build a project using the Native Build Tools Maven plugin, run:
mvnw.cmd native:compile
To build a project using the Native Build Tools Gradle plugin, run:
gradlew.bat nativeCompile
This guide was written for Windows 10, but should be valid for Windows 8 and 11.