A.1 Certificate Configuration Examples
A.1.1 Creating End Entity (NF) Certificate Using OCCM - Sample Configuration
This section describes the sequence of steps to be performed to generate a signed certificate (NF certificate) using OCCM
- Create the Issuer:
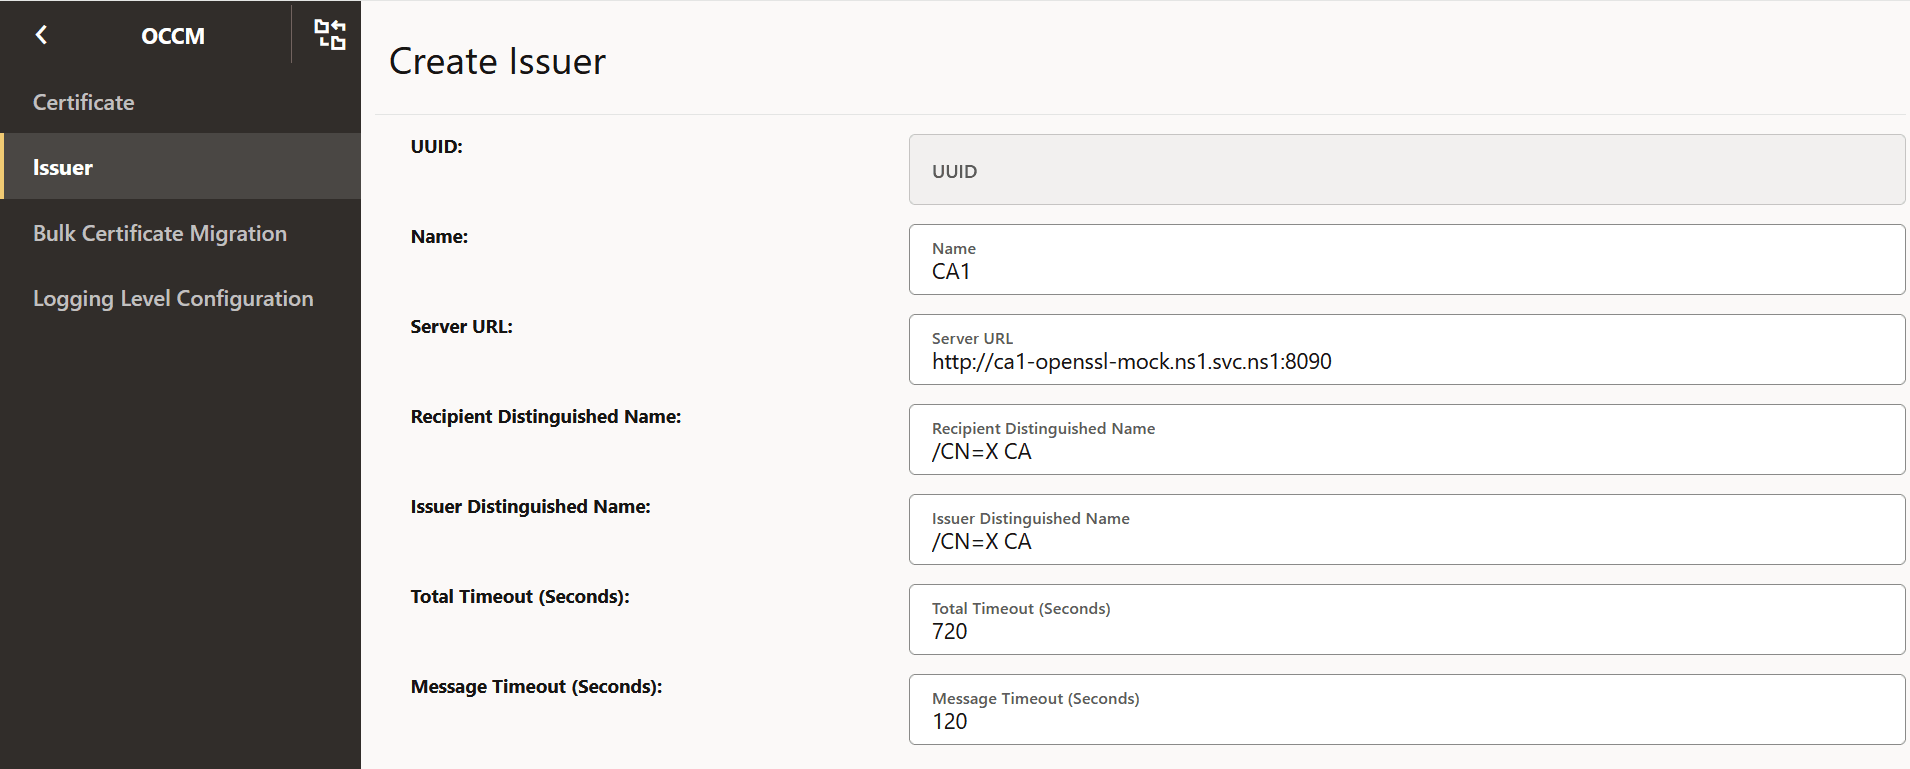
The following screenshots provide a sample configuration for creating the issuer using CNC Console GUI
-
Figure -7 Create Issuer
-
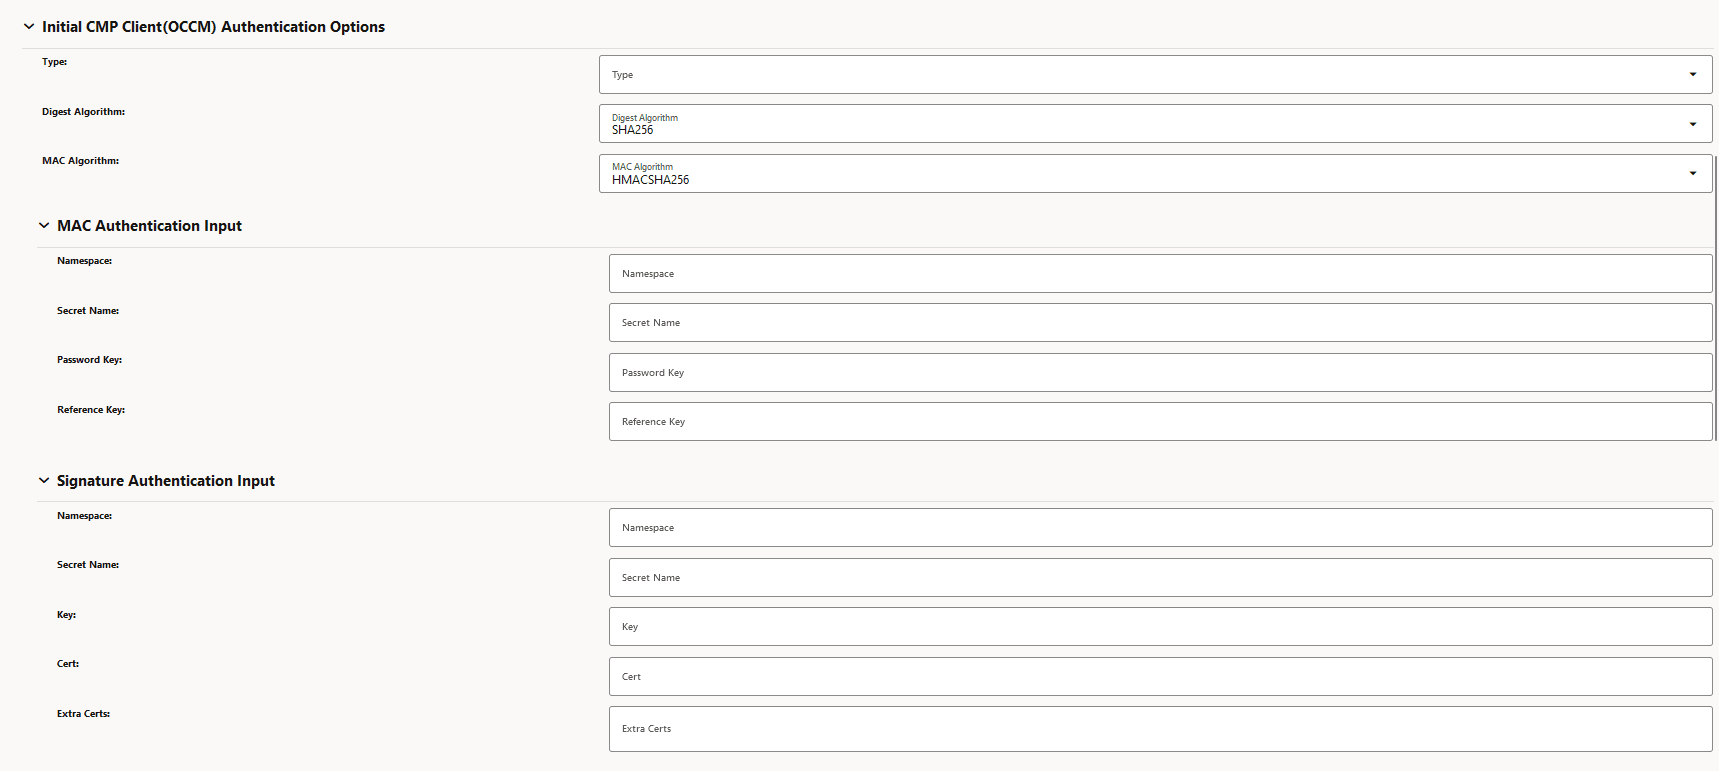
Figure -8 Initial CMP Client (OCCM) Authentication Options
-
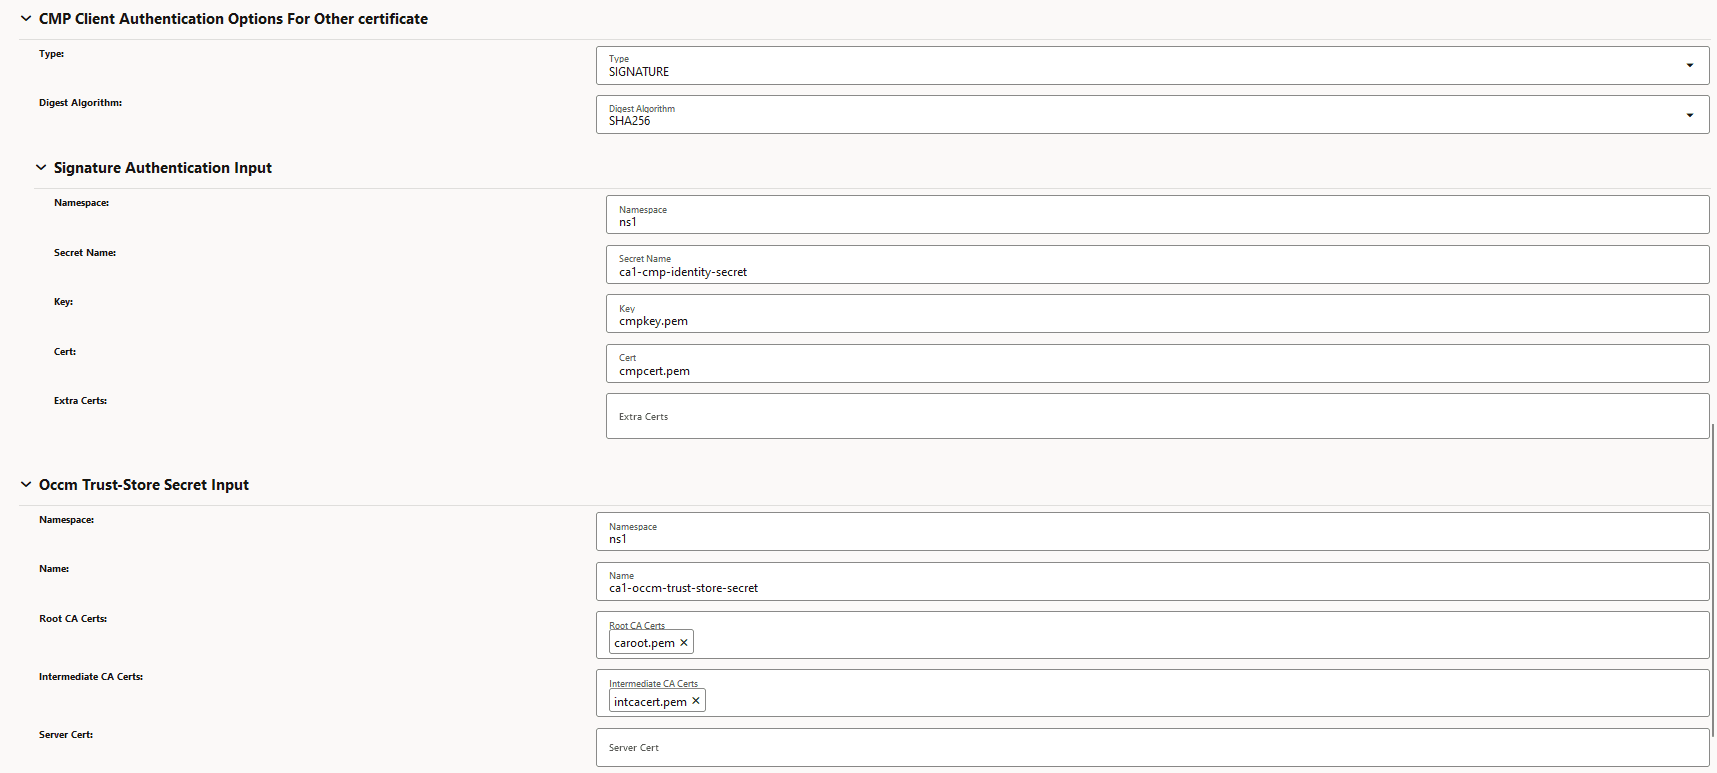
Figure -9 CMP Client Authentication Options for Other Certificate
- To enable HTTPS communication, provide HTTPS scheme in the server URL field
and provide the TLS trust store certificates under TLS config.
Figure -10 HTTPS Scheme

Figure -11 Enable TLS Config

-
- Create CMP Identity (OCCM) Certificate:
The following screenshots provide a sample configuration for creating CMP Identity (OCCM) certificate using CNC Console GUI. Here, OCCM certificate is configured manually.
-
Figure -12 Create CMP Identity (OCCM) Certificate

-
Figure -13 Private Key Options

-
Figure -14 Public Key Certificate Options

-
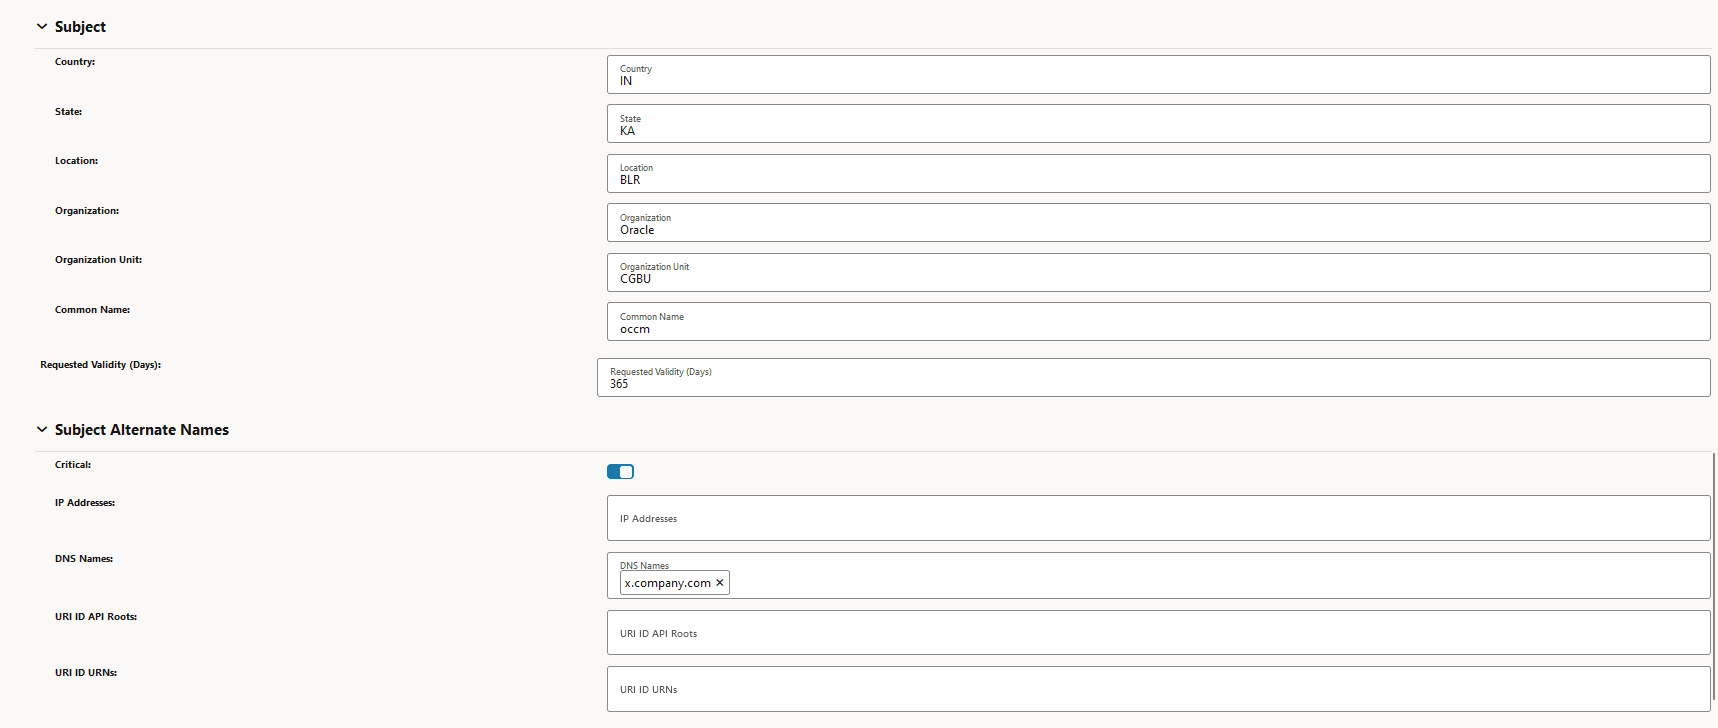
Figure -15 Subject and Subject Alternate Name
-
Figure -16 Certificate Output and Certificate Chain Output

-
- Create End Entity (NF) Certificate: (PEM encoding):
The following screenshots provide a sample configuration for creating NF Certificate using CNC Console GUI.
-
Figure -17 Create End Entity (NF) Certificate

-
Figure -18 Private Key Options

-
Figure -19 Public Key Options

-
Figure -20 Subject and Subject Alternate Names
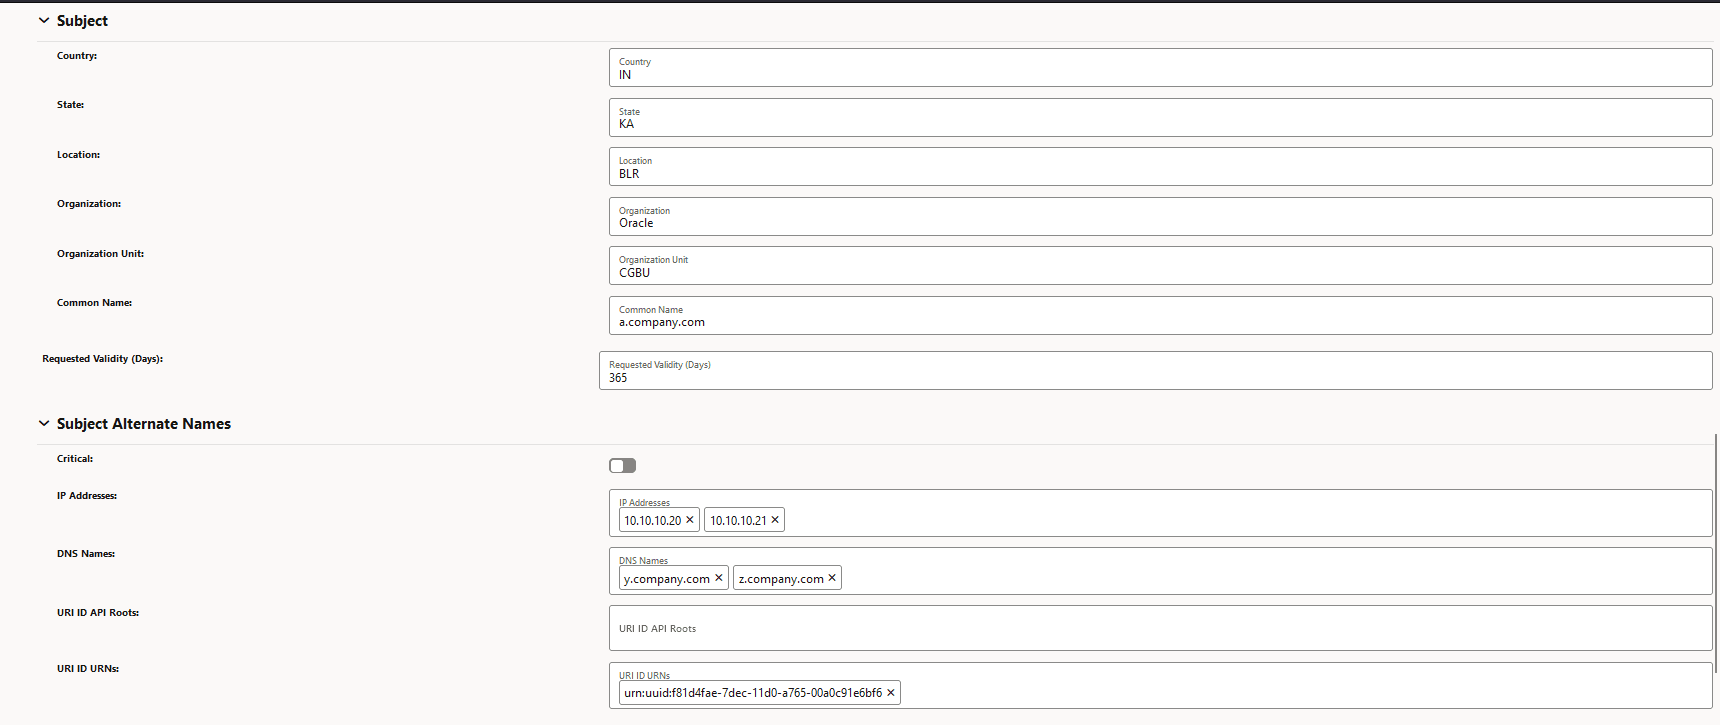
-
Figure -21 Certificate Output
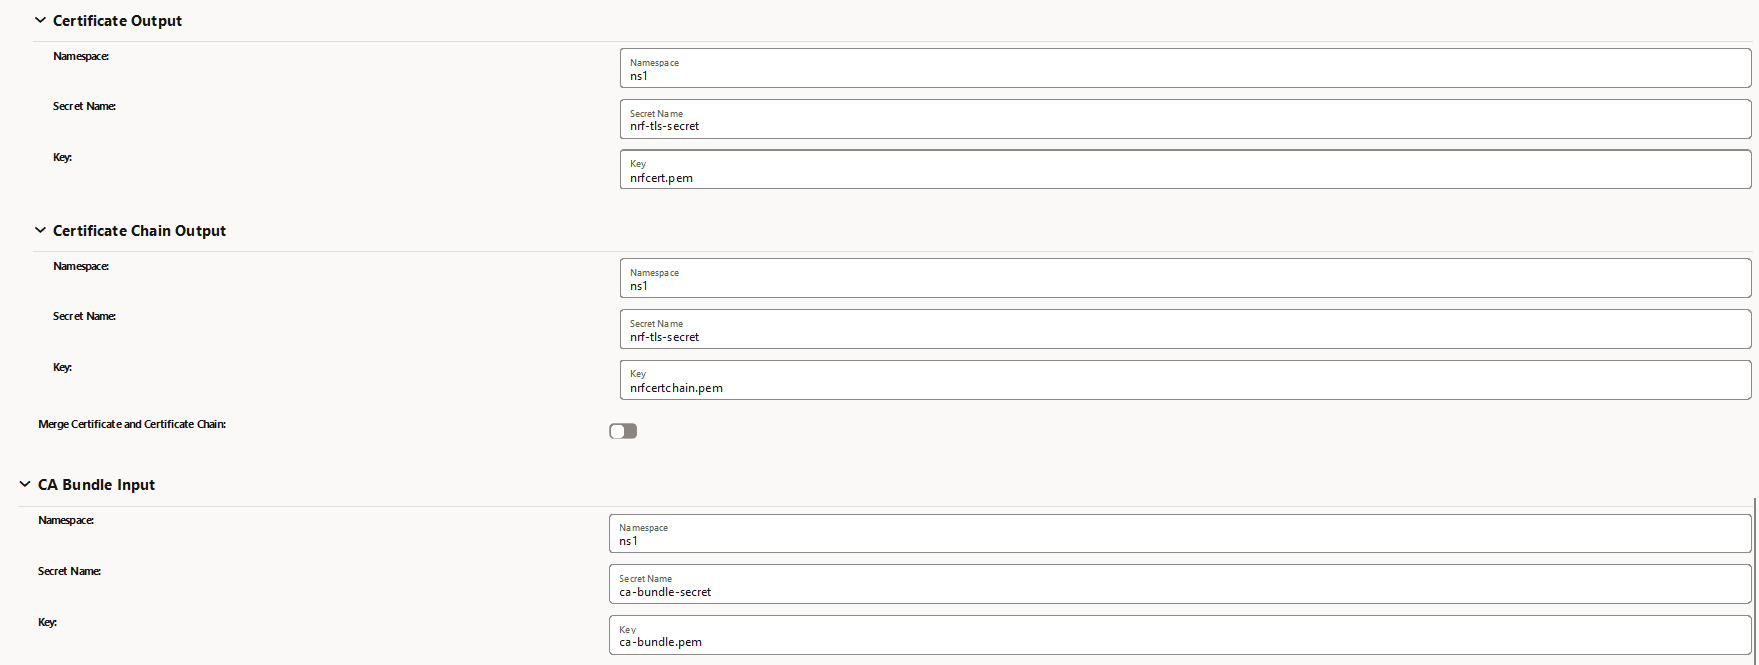
-
- Check Grafana Dashboard
Check the grafana dashboard to view the certificates created.
Figure -22 End Entity (NF) Sample Grafana Dasboard

Figure -23 CMP Identity (OCCM) Sample Grafana Dasboard

The screenshot shows that NRF TLS Cert and CA1 certificates are created successfully. The left panel indicates their expiry time and the right panel shows that both are ready to be consumed.
- Verify Kubernetes Secret
After the certificate request is submitted, verify whether the k8s secret specified under private key output and certificate output location is created or not.
Run the following command to get the content of the Kubernetes secret:kubectl get secret <k8s-secret-name> -n <namespace> -o yamlFor example:$ kubectl get secret nrf-tls-secret -n ns1 -o yaml apiVersion: v1 data: nrfcert.pem: LS0tLS1CRUdJTiBDRVJUSUZJQ0FURS0tLS0tCkXXXXXXXXXX nrfcertchain.pem: LS0tLS1CRUdJTiBDRVJUSUZJQ0FURS0tXXXXXXXXXXX nrfkey.pem: LS0tLS1CRUdJTiBQUklWQVRFIEtFWS0tLS0tCk1XXXXXXXXXXX kind: Secret metadata: creationTimestamp: "2024-12-10T07:31:21Z" name: nrf-tls-secret namespace: ns1 resourceVersion: "563348905" uid: f0eb452d-e977-4809-99b0-c541b154dabe type: OpaqueOutput of openssl x509 command for the certificate:kubectl get secret <k8s-secret-name> -n <namespace> -o=go-template='{{index .data "<certificate-output-K8s-secret-key>"}}' | base64 -d | openssl x509 -text -nooutFor example:$ kubectl get secret nrf-tls-secret -n ns1 -o=go-template='{{index .data "nrfcert.pem"}}' | base64 -d | openssl x509 -text -noout Certificate: Data: Version: 3 (0x2) Serial Number: XXXXXXXXX Signature Algorithm: sha256WithRSAEncryption Issuer: CN = x.company.com Validity Not Before: Dec 10 07:31:22 2024 GMT Not After : Dec 10 07:31:21 2025 GMT Subject: C = IN, ST = KA, L = BLR, O = Oracle, OU = CGBU, CN = a.company.com Subject Public Key Info: Public Key Algorithm: rsaEncryption Public-Key: (2048 bit) Modulus: 00:c9:1b:35:bf:21:e6:1f:69:9e:78:25:07:4b:6e: XXXXXXXXX Exponent: 65537 (0x10001) X509v3 extensions: X509v3 Key Usage: Digital Signature X509v3 Extended Key Usage: TLS Web Client Authentication, TLS Web Server Authentication X509v3 Basic Constraints: CA:FALSE X509v3 Subject Alternative Name: IP Address:10.10.10.20, IP Address:10.10.10.21, DNS:y.commpany.com, DNS:z.commpany.com, URI:urn:uuid:f81d4fae-7dec-11d0-a765-00a0c91e6bf6 X509v3 Subject Key Identifier: 2B:0D:XXXXXXXXXXXX X509v3 Authority Key Identifier: 20:03:XXXXXXXXXXX Signature Algorithm: sha256WithRSAEncryption Signature Value: XXXXXXXXXXXXXXXXXXXXXXX
Create NF Certificate (DER encoding):
The following screenshots provide a sample configuration for creating DER encoded NF Certificate using CNC Console GUI.
- Certificate metadata
Figure -24 Certificate Metadata

-
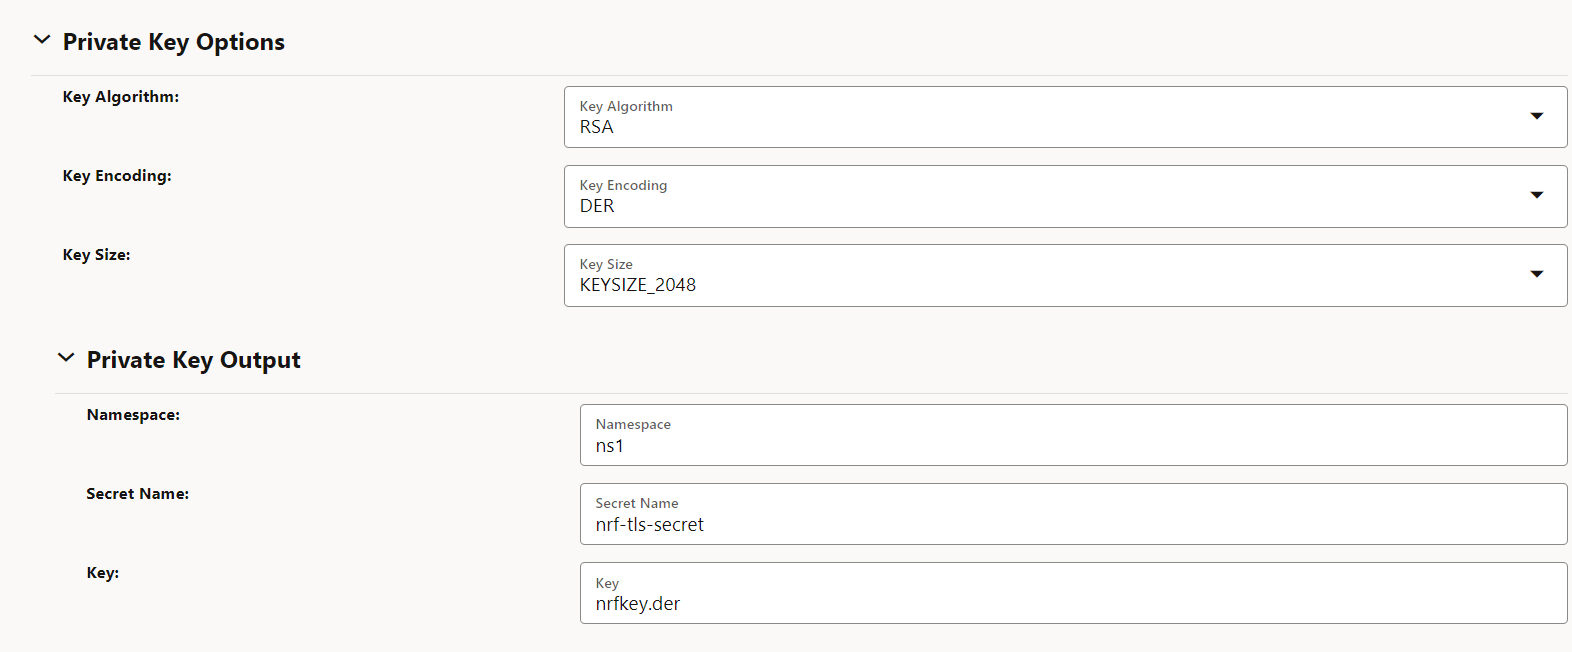
Private Key Options
Figure -25 Private Key Options
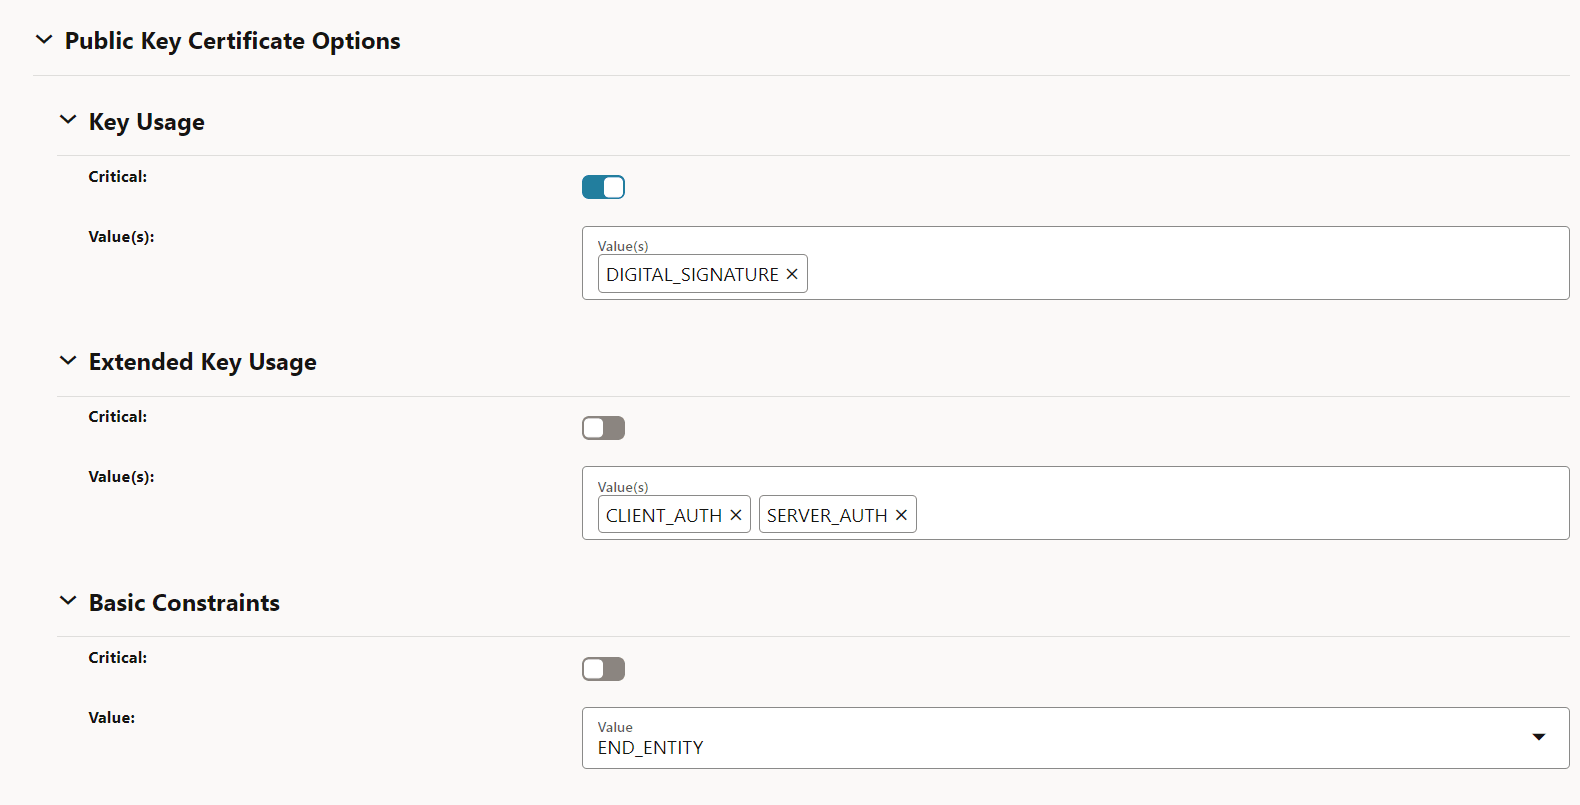
- Public Key Certificate Options
Figure -26 Public Key Certificate Options
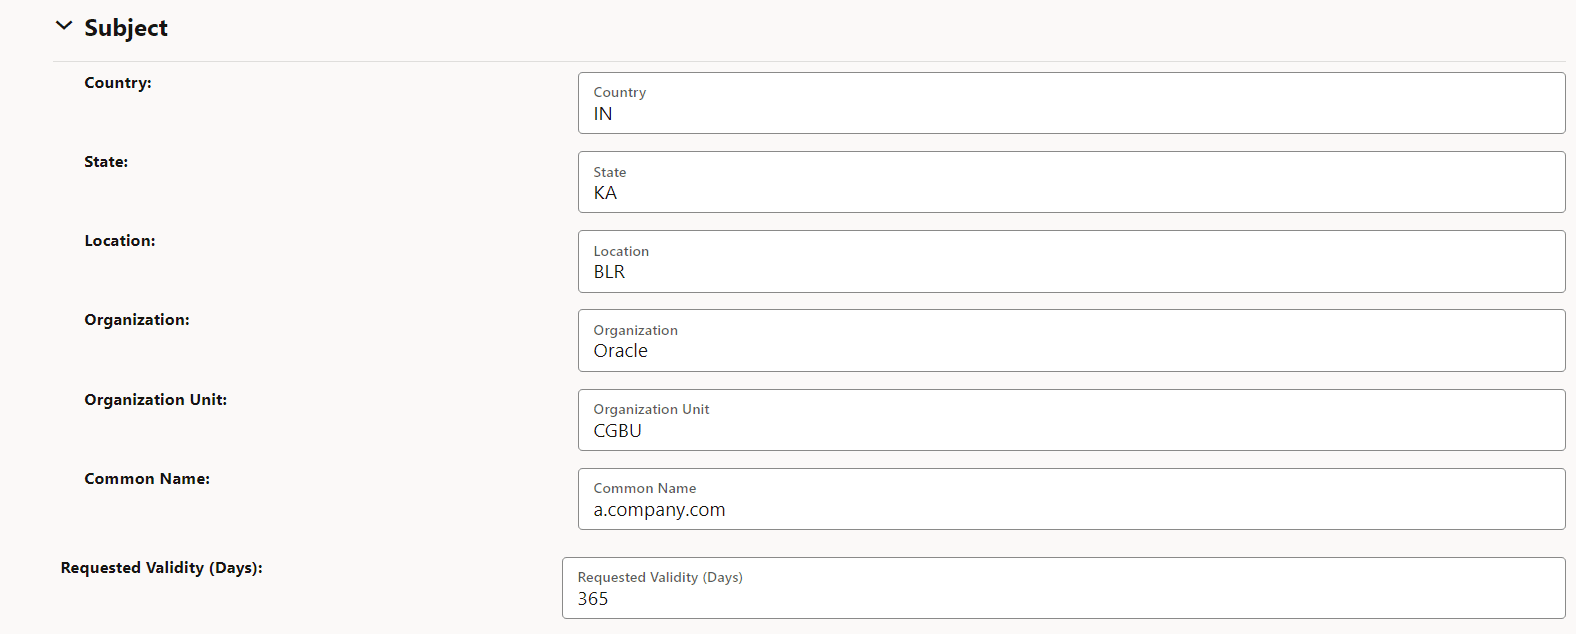
- Subject
Figure -27 Subject
-
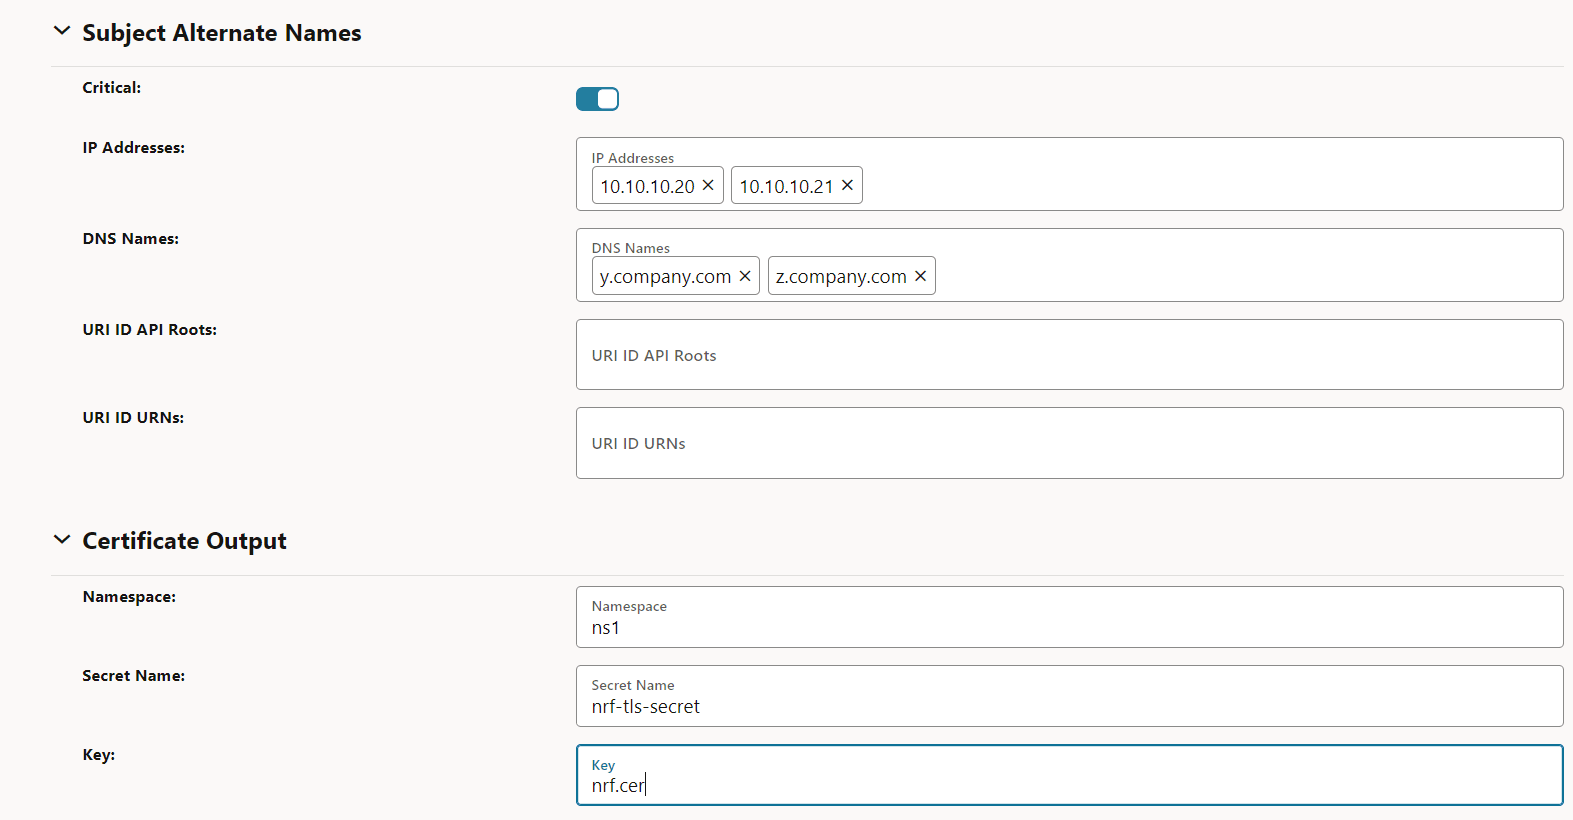
Subject Alternate names
Figure -28 Subject Alternate names
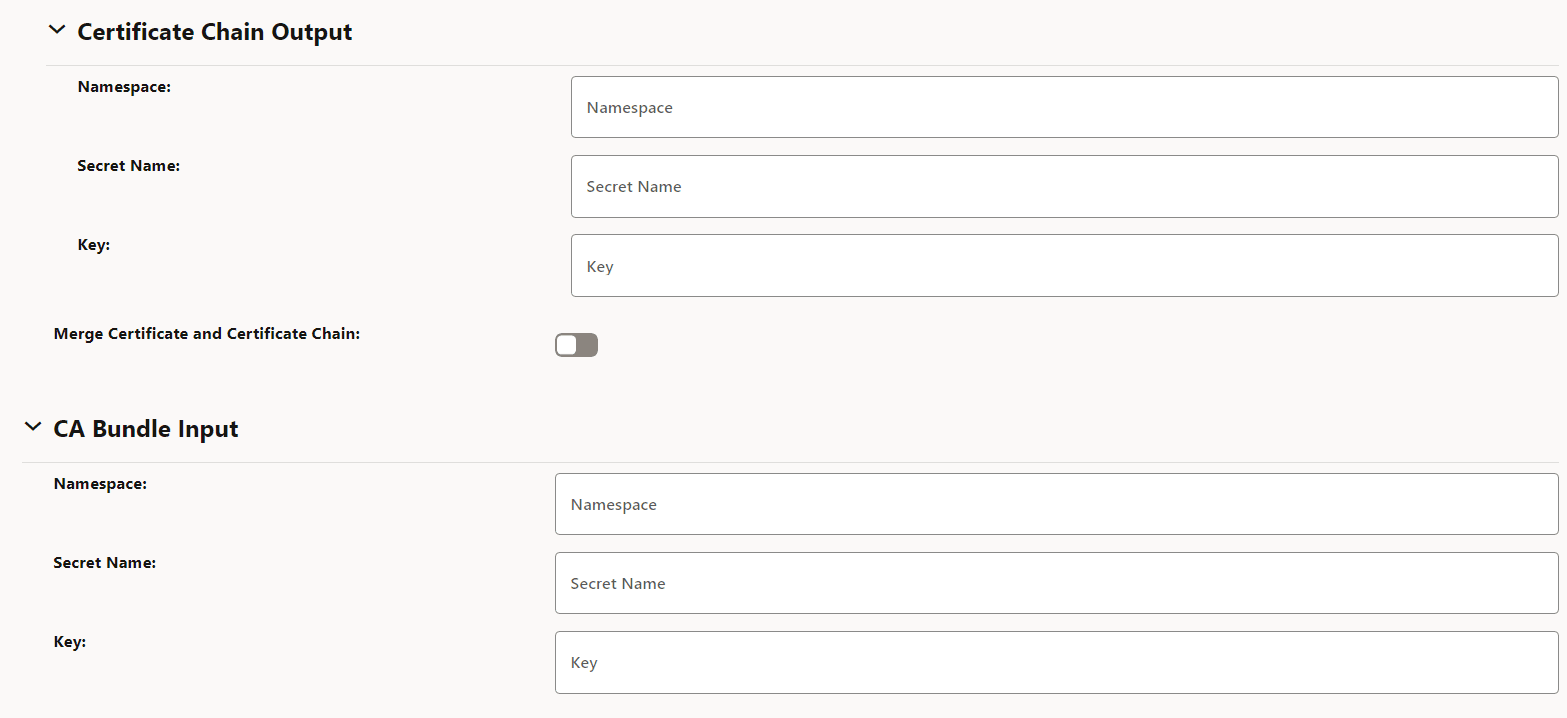
- Optional Certificate chain output and CA bundle input fields
Figure -29 Optional Certificate chain output and CA bundle input fields
Check Grafana dashboard
Figure -30 End Entity (NF) Sample Grafana Dasboard

The screenshot shows that NRF-TLS Certificate is created successfully. The left panel indicates its expiry time and the right panel shows that it is ready to be consumed.
Verify Kubernetes secret
After the certificate request is submitted, verify whether the Kubernetes secret specified under private key output and certificate output location is created or not.
Run the following command to get the content of the Kubernetes secret:
kubectl get secret <k8s-secret-name> -n <namespace> -o yaml$ kubectl get secret nrf-tls-secret -n ns1 -o yaml
apiVersion: v1
data:
nrf.cer: MIIDrTCCApWgAwIBXXXXXXXXXXXXXXXXXXXXXXXXXXXXXXX
nrfkey.der: MIIEogIBAAKXXXXXXXXXXXXXXXXXXXXXXXXXXXXXXXX
kind: Secret
metadata:
creationTimestamp: "2024-12-10T07:31:21Z"
name: nrf-tls-secret
namespace: ns1
resourceVersion: "346496359"
uid: 2dbdb2d7-313d-45d9-a634-642d14f01fa5
type: Opaquekubectl get secret <k8s-secret-name> -n <namespace> -o=go-template='{{index .data "<certificate-output-K8s-secret-key>"}}' | base64 -d | openssl x509 -text -noout -inform DER$ kubectl get secret nrf-tls-secret -n ns1 -o=go-template='{{index .data "nrf.cer"}}' | base64 -d | openssl x509 -text -noout -inform DER
Certificate:
Data:
Version: 3 (0x2)
Serial Number:
3c:47:05:d7:ee:4c:ce:bb:8f:26:07:c2:a1:9b:92:2c:87:e1:7c:3f
Signature Algorithm: sha256WithRSAEncryption
Issuer: CN = x.company.com
Validity
Not Before: Dec 10 07:31:22 2024 GMT
Not After : Dec 10 07:31:21 2025 GMT
Subject: C = IN, ST = KA, L = BLR, O = Oracle, OU = CGBU, CN = a.company.com
Subject Public Key Info:
Public Key Algorithm: rsaEncryption
RSA Public-Key: (2048 bit)
Modulus:
00:ba:95:23:61:2f:31:55:e3:06:7b:b6:b7:67:cd:
XXXXXXX
Exponent: 65537 (0x10001)
X509v3 extensions:
X509v3 Key Usage: critical
Digital Signature
X509v3 Extended Key Usage:
TLS Web Client Authentication, TLS Web Server Authentication
X509v3 Basic Constraints:
CA:FALSE
X509v3 Subject Alternative Name: critical
IP Address:10.10.10.20, IP Address:10.10.10.21, DNS:y.company.com, DNS:z.company.com
X509v3 Authority Key Identifier:
keyid:FB:4A:01:07:D4:8D:BB:0B:E4:50:72:75:10:8E:81:57:33:66:0D:3E
X509v3 Subject Key Identifier:
A3:82:F6:67:94:35:37:A6:0B:4B:03:9C:0D:B9:A8:72:8D:59:73:85
Signature Algorithm: sha256WithRSAEncryption
0a:c2:81:ec:89:91:b4:aa:24:22:33:54:e1:92:db:07:cf:6f:
XXXXXXXXA.1.2 Updating Certificates - Sample Configuration
The following procedure provides an example on how to update certificates:
- Navigate to the Certificate page and select
the certificate to be edited. View the current configuration before editing.
Figure -31 Certificate Page

Figure -32 View Certificate
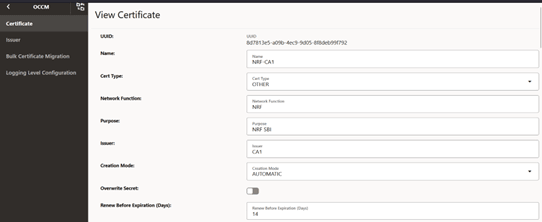
Figure -33 View Certificate: Private Key Options

Figure -34 View Certificate: Public Key Certificate Options

Figure -35 View Certificate: Subject

Figure -36 View Certificate: Subject Alternate Names (SANs)

Figure -37 View Certificate: Certificate Output

- Edit scenarios are applicable based on the field to be updated and whether the
certificate (secret) exists in the system. Here, in the example the certificate
to be updated is NRF-CA1 and field tobe updated is
SAN (Subject alternate names). To check if the
certificate exists, see the expiry panel in the Grafana dashboard. If the
certificate exists, it will be listed there. The panel displays that the
certificate exists in the system.
Figure -38 Grafana Dashboard

- If the certificate (secret) exists in the system, verify its secret
content with respect to current configuration before editing. Here in the
example, no SAN entry can be seen on the certificate as certificate
configuration related to SAN are missing.
Figure -39 Missing SANs

- Edit the certificate configuration field(s) and click
Save.
Figure -40 Certificate

Figure -41 Edit Certificate
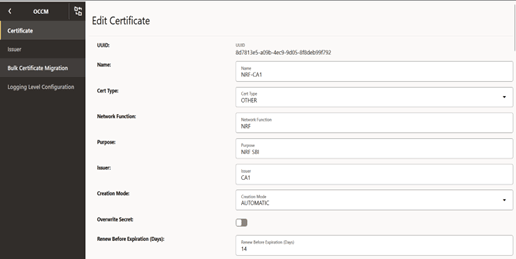
Figure -42 Edit Certificate: Private Key Options

Figure -43 Edit Certificate: Public Key Certificate Options

Figure -44 Edit Certificate: Subject

Figure -45 Edit Certificate: Subject ALternate Names (SANs)

Figure -46 Updated IP address and DNS Names

Figure -47 Click Save

- The updated configuration appears when you view the edited certificate.
Figure -48 Certificate Page

Figure -49 View Certificate
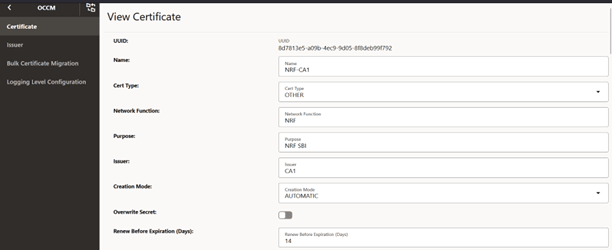
Figure -50 View Certificate: Private Key Options

Figure -51 View Certificate: Public Key Certificate Options

Figure -52 View Certificate: Subject

Figure -53 Updated Subject Alternate Names (SANs)

Figure -54 View Certificate: Certificate Output

- If the field update triggers recreation, verify that certificate
recreation with updated configuration is successful. See the Grafana dashboard
to verify that the certificate expiry has been extended, the certificate status
is ready, and the secret content has been updated as per the new configuration.
In the following screenshot, the certificate expiry has been extended as shown
in the End Entity Certificate Expiry Time panel.
Verify that the secret content is updated as per the edited configuration.
Figure -55 End Entity Certificate Expiry Time panel

Figure -56 Secret Updated with SAN

Note:
If certificate recreation fails,- OCCM will continue to reattempt certificate recreation with the updated configuration.
- Certificate expiry will not be extended.
- Certificate status will be set to FAILED.
- Certificate Errors table in the Grafana dashboard will list the certificate and the cause of failure.
A.1.3 Recreating Certificates - Sample Configuration
This section describes the procedure to recreate a certificate.
- Log in to CNC Console using your login credentials and select the OCCM Instance.
- Click OCCM from the left pane and then click Certificate.
- Click the Recreate Icon next to the
certificate that you want to recreate. For example, to recreate NRF-CA1, click
the recreate button for NRF-CA1.
The Recreate Certificate dialog box appears.
Figure -57 Recreate Icon
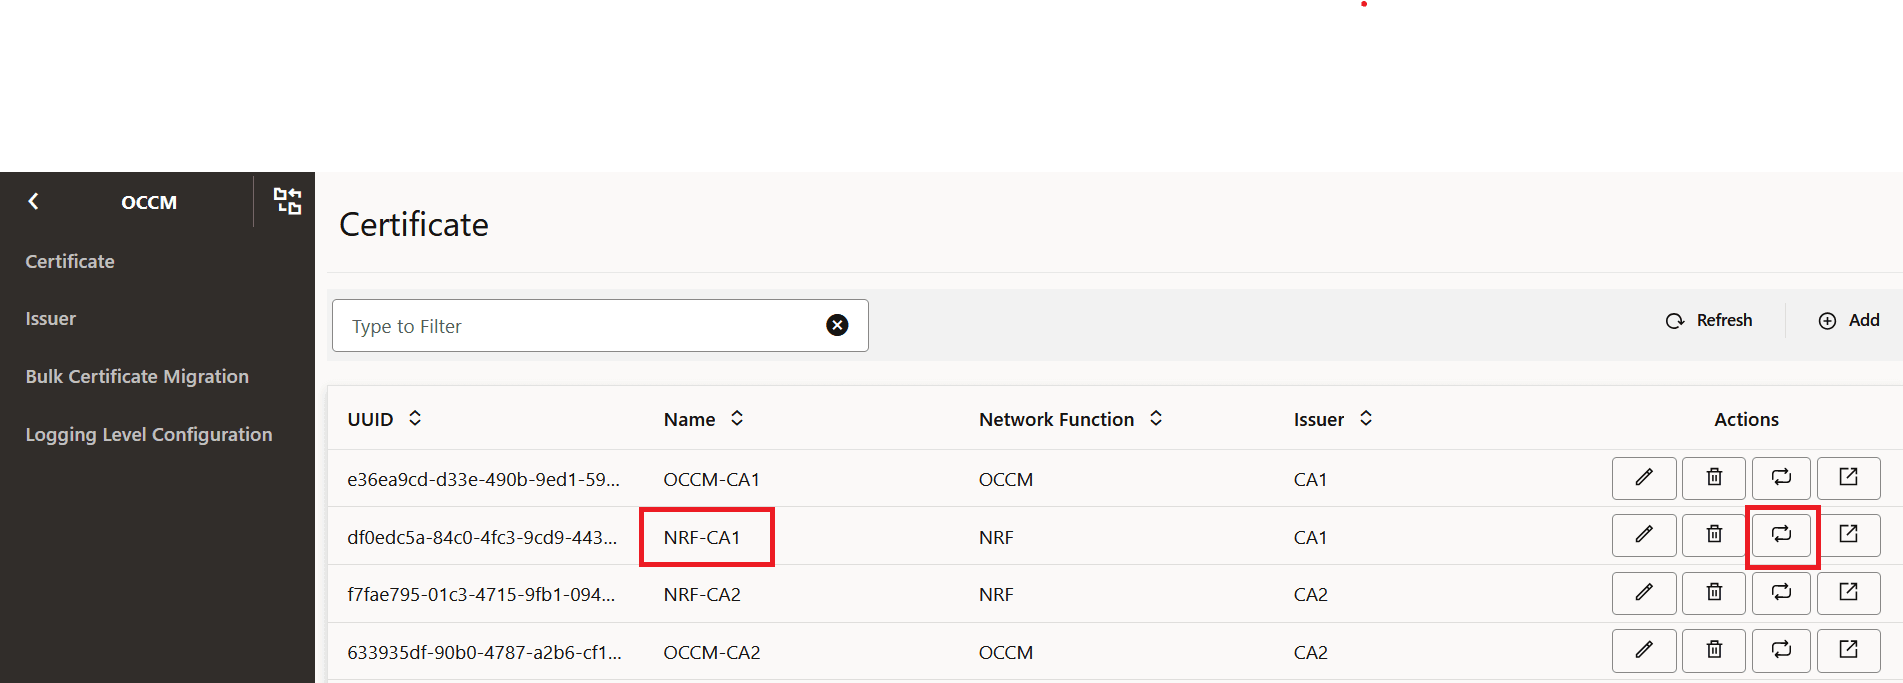
Figure -58 Recreate Certificate

- Click Recreate to proceed. Click Cancel to discard your progress and close the dialog box.
- Check the Grafana dashboard to view the recreated certificate
- Check the 'End Entity Certificate Expiry Time' panel to verify that the
certificate expiry date has extended after successful recreation. In
case the recreation fails, the certificate expiry date will not be
extended and will display the remaining validity.
Figure -59 End Entity Certificate Expiry Time

- Check the 'End Entity Certificate Readiness Status' panel to verify the
certificate status. If recreation succeeds, the status will be set to
READY, otherwise the status will be set to FAILED.
Figure -60 End Entity Certificate Readiness Status

- Check the 'End Entity Certificate Expiry Time' panel to verify that the
certificate expiry date has extended after successful recreation. In
case the recreation fails, the certificate expiry date will not be
extended and will display the remaining validity.
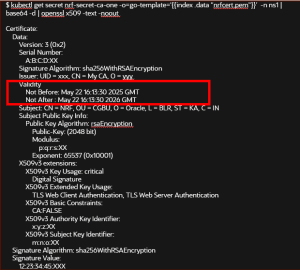
- Optionally, verify that the certificate validity has been extended
by checking the content of the kubernetes secret corresponding to the
configuration. Run the following command to verify the Kubernetes
secret:
$ kubectl get secret nrf-secret-ca-one -o=go-template='{{index .data "nrfcert.pem"}}' -n ns1 | base64 -d | openssl x509 -text -nooutA sample response is as follows:Figure -61 Secret with Extended Validity
A.1.4 Initiating Bulk Certificate Migration - Sample Configuration
- Create the destination issuer CA2 with the requisite configuration. For more
information about the steps, see Managing Issuers.
-
Figure -62 Create Issuer

-
Figure -63 Initial CMP Client (OCCM) Authentication Options
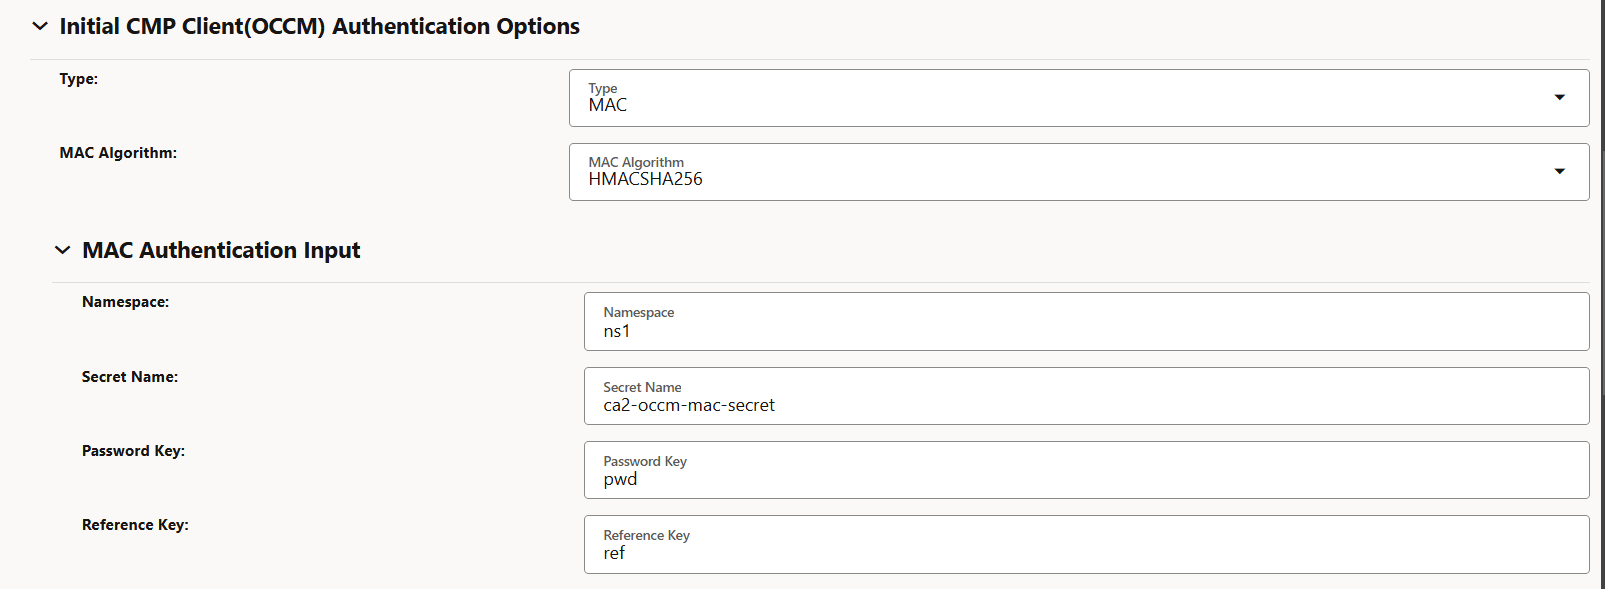
-
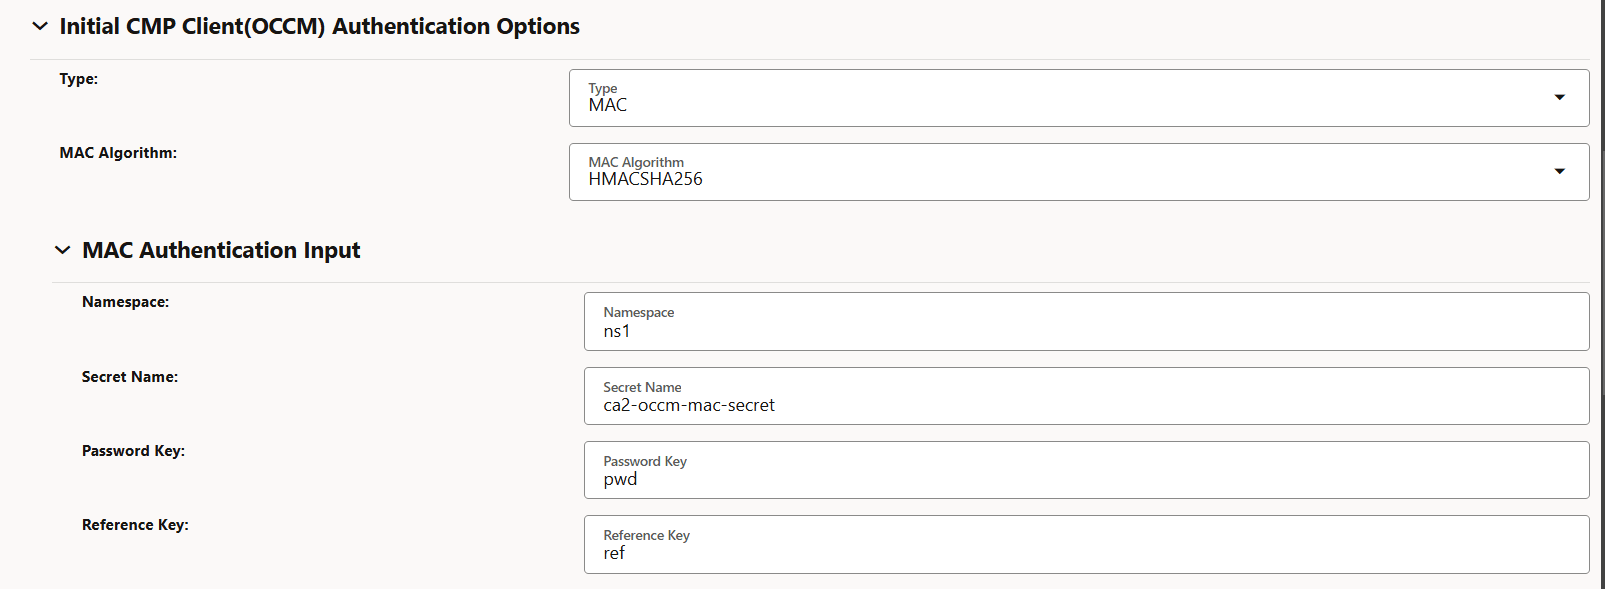
Figure -64 MAC Authentication Input
-
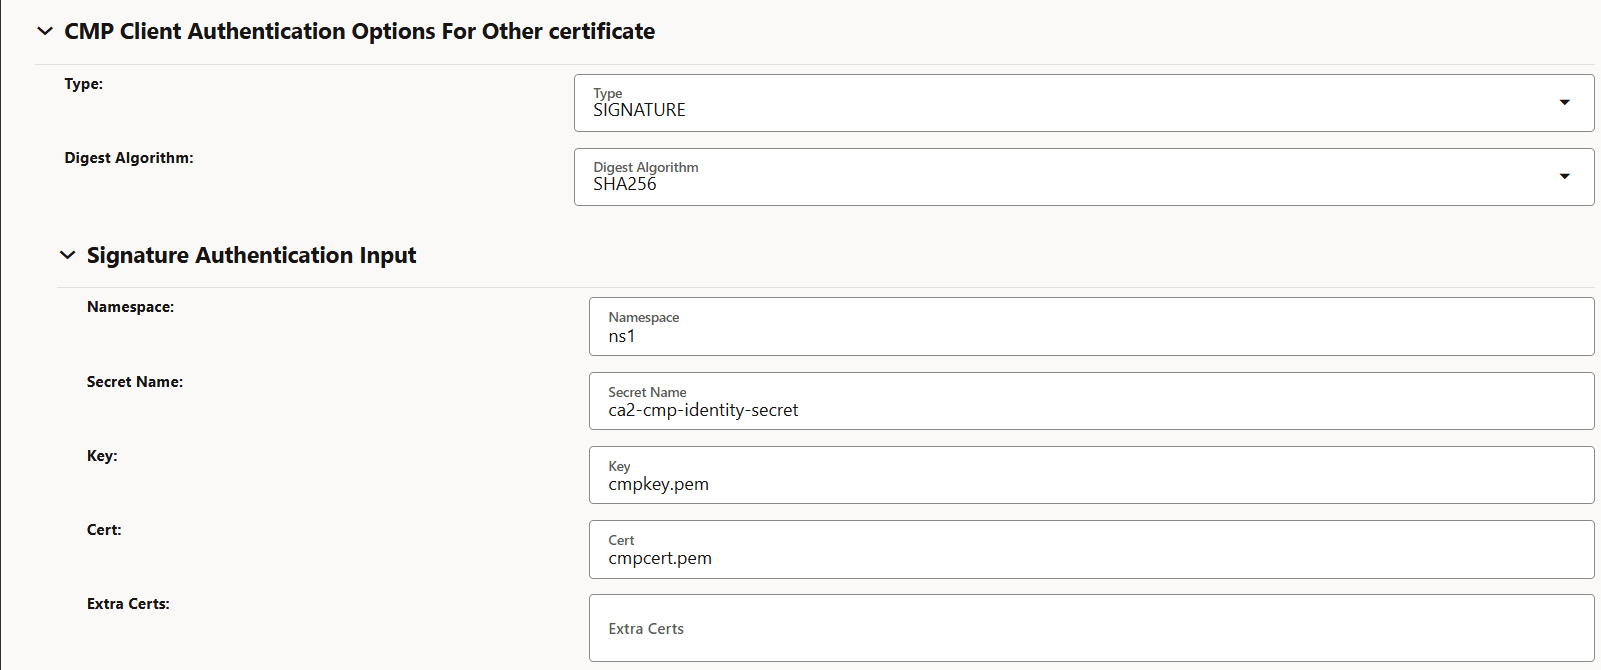
Figure -65 CMP Client Authentication Options For Other certificate
-
Figure -66 Occm Trust-Store Secret Input

-
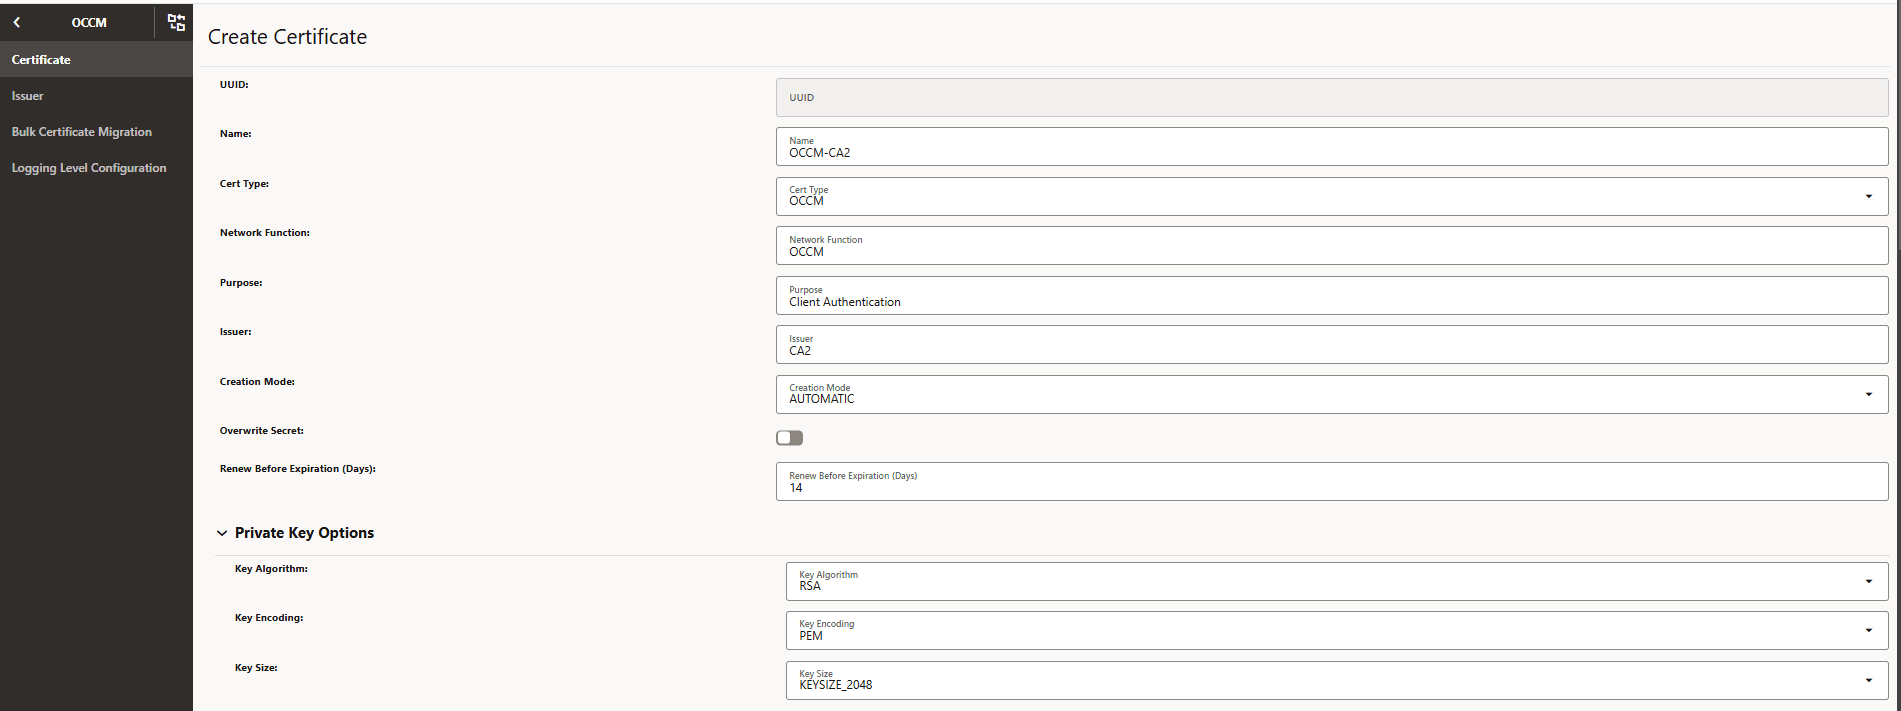
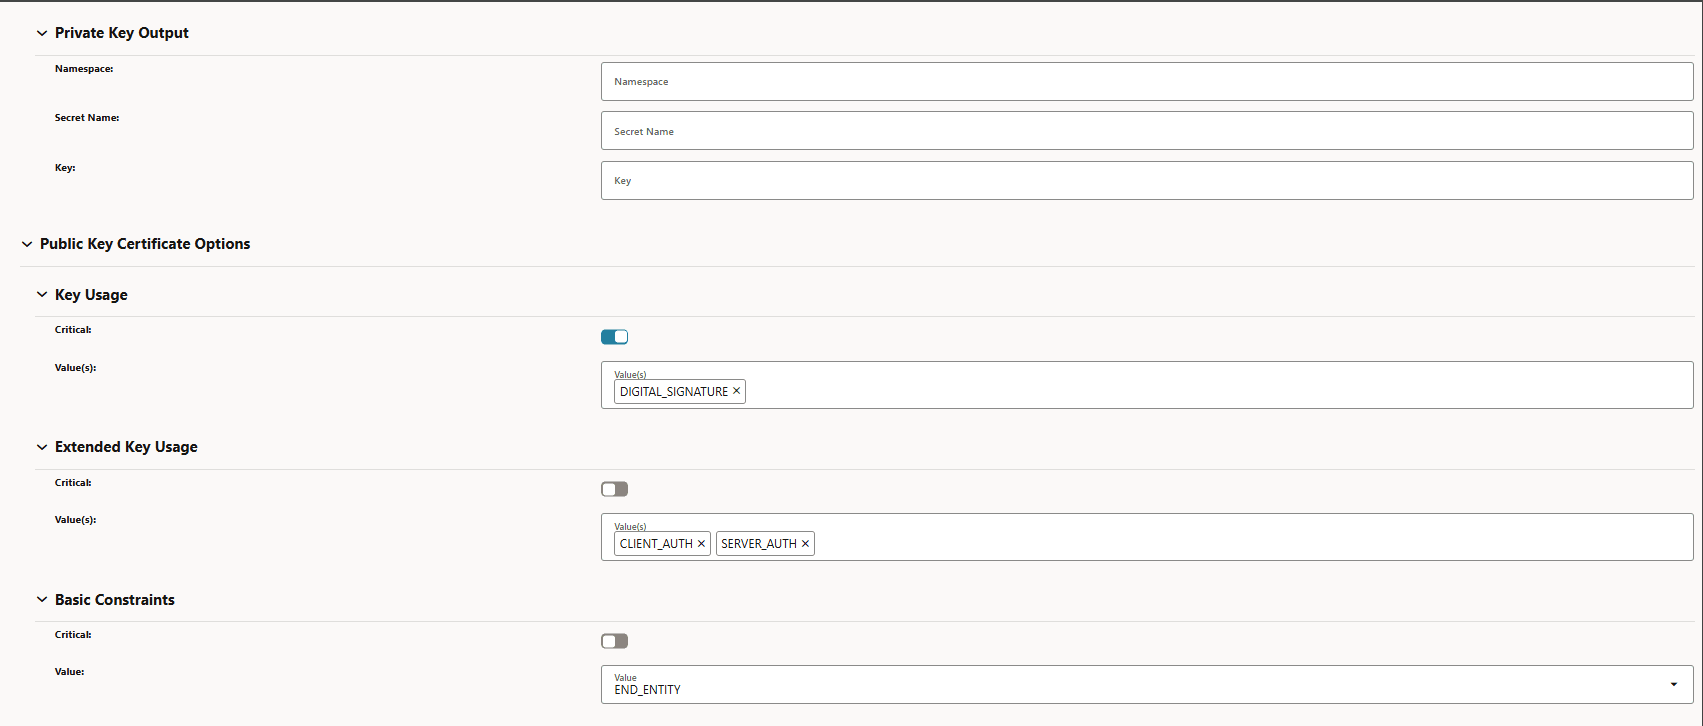
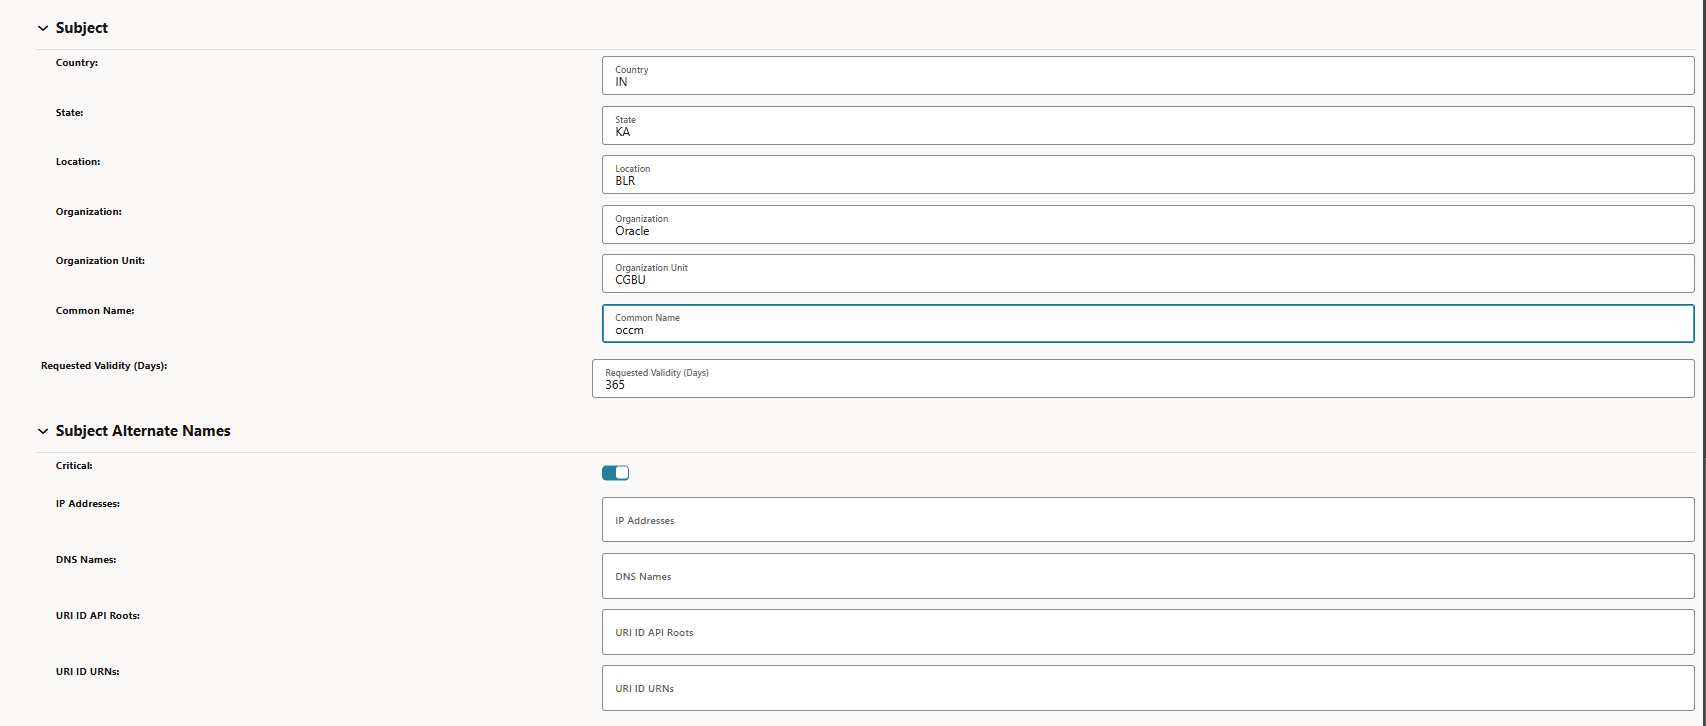
- Create CMP (OCCM) Identity certificate OCCM-CA2 corresponding to the
destination issuer CA2. For more information about the steps, see Managing Certificates.
-
Figure -67 Create Certificate
-
Figure -68 Private Key
-
Figure -69 Subject
-
Figure -70 Certificate Output

-
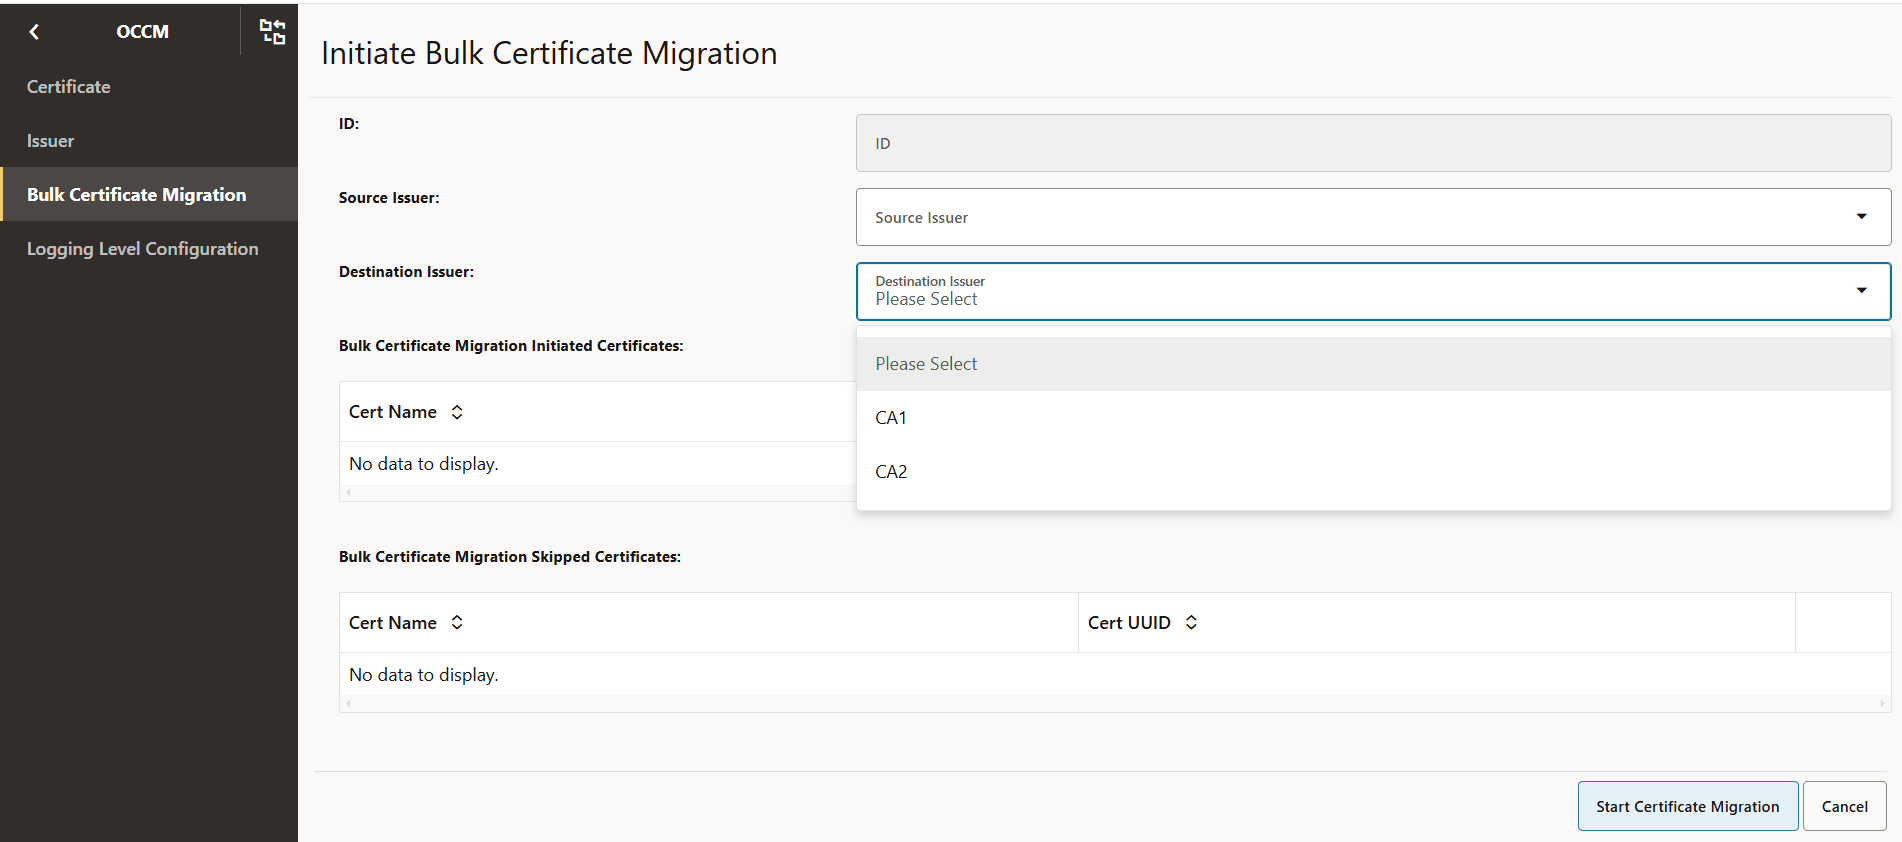
- Initiate the bulk certificate migration by choosing the source
issuer as CA1 and destination issuer as CA2 from the drop downs list. Other
fields must be empty.
- Log in to CNC Console using your login credentials and select the OCCM Instance.
- Click OCCM from the left pane and then click Bulk Certificate Migration.
- The Bulk Certificate Migration page appears. Click Add. The Initiate Bulk Certificate Migration page appears.
- Choose the source and destination issuer from the drop-down
list and click on Start Certificate
Migration.
Figure -71 Initiate Bulk Certificate Migration
- A configuration is created and displayed as follows. This
configuration can be viewed to know on which certificates migration was
triggered and if it is skipped on any certificate.
Figure -72 Bulk Certificate Migration

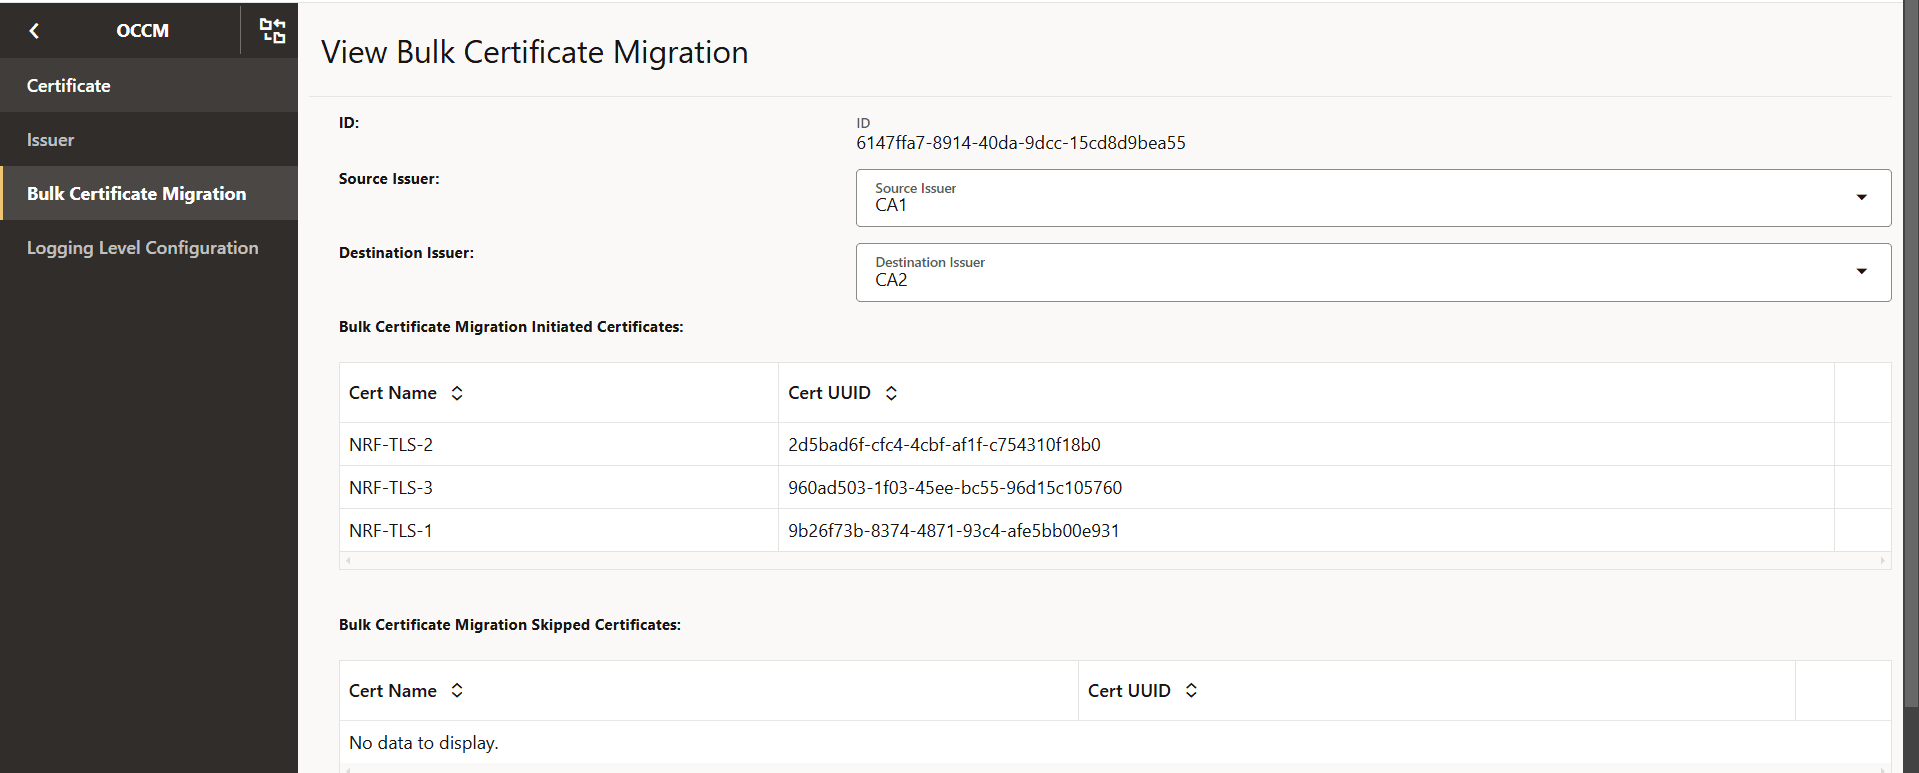
- View the configuration to check the certificates on which migration
is initiated.
Figure -73 View Bulk Certificate Migration
- Check the Grafana dashboard to verify the migration status of each
certificate displayed under the field Bulk Certificate Migration Initiated
certificates:
- When the migration is successful on a certificate.
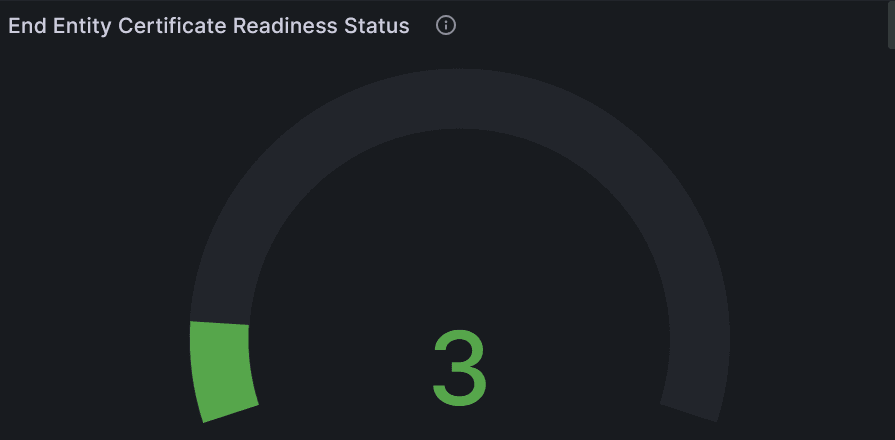
- To verify the migration status for each certificate refer to the End Entity Certificate Expiry Time and the End Entity Certificate Readiness Status panels .
- On the End Entity Certificate Expiry Time the corresponding issuer of the certificate considered in bulk migration is updated to the destination issuer (CA2) and the expiry date will be extended based on the configuration.
- On the End Entity Certificate Readiness Status the certificate will be in the READY state.
In the following example, the bulk migration is triggered on three certificates. The updated issuer, expiry, and the readiness status are shown as follows:Figure -74 End Entity Certificate Expiry Time
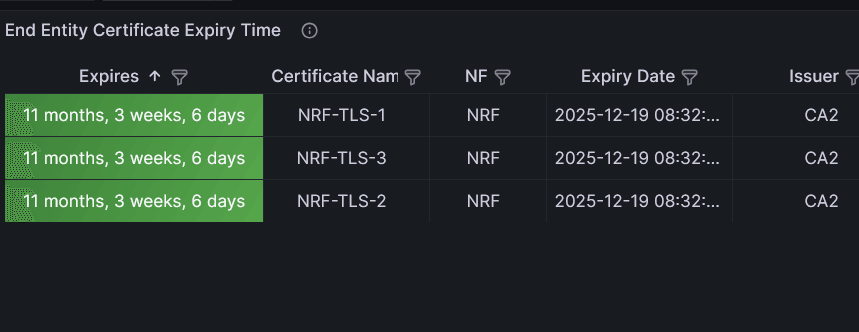
Figure -75 End Entity Certificate Readiness Status
- When the migration fails on a certificate.
- The corresponding issuer of the certificate will NOT
be updated to the destination issuer on the End Entity
Certificate Expiry Time panel and it will keep pointing
to the source issuer (CA1). The expiry will not be updated since
recreation has failed. Similarly, the end entity certificate
readiness status will also preserve the previous status. The
failed migration on all the three certificates are as
follows:
Figure -76 End Entity Certificate Expiry Time Failed

- The Bulk Cert Migrations Error panel will
have an entry of the certificate whose migration has failed. To
check for a given migration, you must filter on the Bulk
Migration UUID field. The issuer displayed is the configured
destination issuer. The failed migration on all the three
certificates for the given bulk migration are as follows.
Figure -77 Bulk Cert Migrations Error

- Logs must be checked to find out the reason of the failure and corrective action must be taken.
- Another migration can be initiated to retry for all the failed certificates from the source to the destination issuer.
- The corresponding issuer of the certificate will NOT
be updated to the destination issuer on the End Entity
Certificate Expiry Time panel and it will keep pointing
to the source issuer (CA1). The expiry will not be updated since
recreation has failed. Similarly, the end entity certificate
readiness status will also preserve the previous status. The
failed migration on all the three certificates are as
follows:
- When the migration is successful on a certificate.