DNS ALG

The Oracle® Enterprise Session Border Controller’s DNS Application Layer Gateway (ALG) feature provides an application layer gateway for DNS transactions on the Oracle® Enterprise Session Border Controller. With DNS ALG service configured, the Oracle® Enterprise Session Border Controller can support the appearance of multiple DNS servers on one side and a single DNS client on the other.

Overview

DNS ALG service provides an application layer gateway for use with DNS clients. DNS ALG service allows a client to access multiple DNS servers in different networks and provides routing to/from those servers. It also supports flexible address translation of the DNS query/response packets. These functions allow the DNS client to query many different domains from a single DNS server instance on the client side of the network.

The Oracle® Enterprise Session Border Controller’s DNS ALG service is commonly used when a DNS client (such as a call agent) needs to authenticate users. In this case, the DNS client that received a message from a certain network would need to authenticate the endpoint in a remote network. Since the DNS client and the sender of the message are on different networks, the Oracle® Enterprise Session Border Controller acts as an intermediary by interoperating with both.

In the following diagram, the DNS client has received a message from an endpoint in Network A. Since the DNS client is in a different realm, however, the DNS client receives the message after the Oracle® Enterprise Session Border Controller has performed address translation. Then the DNS client initiates a DNS query on the translated address. The Oracle® Enterprise Session Border Controller forwards the DNS request to the DNS server in Network A, using the domain suffix to find the appropriate server. Network A’s DNS server returns a response containing its IPv4 address, and then the Oracle® Enterprise Session Border Controller takes that reply and performs a NAT on the private address. The private address is turned into a public one that the DNS client can use to authenticate the endpoint.
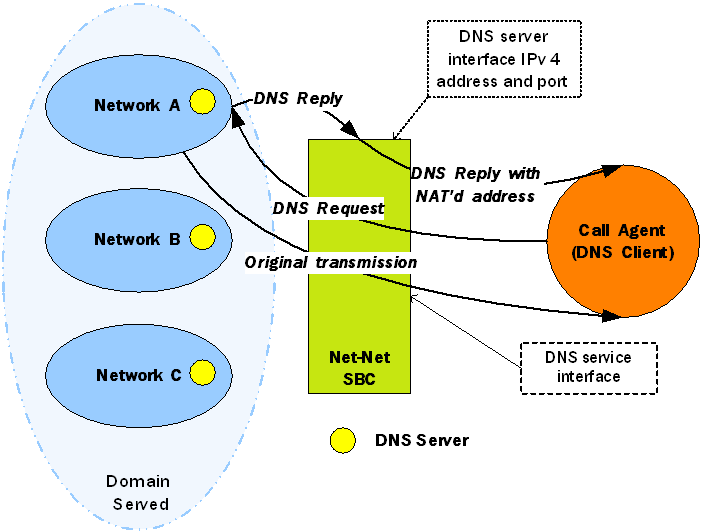
The DNS ALG service diagram is described above.

Configuring DNS ALG Service

This section tells you how to access and set the values you need depending on the configuration mechanism you choose. It also provides sample configurations for your reference.

Configuring DNS ALG service requires that you carry out two main procedures:

  • Setting the name, realm, and DNS service IP interfaces
  • Setting the appropriate parameters for DNS servers to use in other realms

Before You Configure

Before you begin to configure DNS ALG service on the Oracle® Enterprise Session Border Controller, complete the following steps.

  1. Configure the client realm that you are going to use in the main DNS ALG profile and note its name to use in this chapter’s configuration process.
  2. Configure the server realm that contains the DNS servers and note its name to use in this chapter’s configuration process.
  3. Determine the domain suffixes for the network where the DNS servers are located so that you can enter them in the domain suffix parameter.
  4. Devise the NAT scheme that you want to use when the DNS reply transits the Oracle® Enterprise Session Border Controller.

DNS ALG Service Name Configuration

This section explains how to configure the name of the DNS ALG service you are configuring and set its realm.

To add DNS ALG service:

  1. In Superuser mode, type configure terminal and press Enter.
    ORACLE# configure terminal
  2. Type media-manager and press Enter.
    ORACLE(configure)# media-manager
  3. Type dns-config and press Enter. The system prompt changes to let you know that you can begin configuring individual parameters.
    ORACLE(media-manager)# dns-config
    ORACLE(dns-config)#

    From this point, you can configure DNS ALG parameters and access this configuration’s DNS server subelement. To view all DNS ALG service parameters and the DNS server subelement, enter a ? at the system prompt.

    dns-config
            client-realm
            description                    dns-alg1
            client-address-list
            last-modified-date             2005-02-15 10:50:07
            server-dns-attributes
                    server-realm
                    domain-suffix
                    server-address-list
                    source-address
                    source-port                    53
                    transaction-timeout            10
                            address-translation
                                    server-prefix                  10.3.0.0/16
                                    client-prefix                  192.168.0.0/16

Identity Realm and Interface Addresses

To configure the identity, realm, and IPv4 interface addresses for your DNS ALG profile:

  1. description—Set a name for the DNS ALG profile using any combination of characters entered without spaces. You can also enter any combination with spaces if you enclose the whole value in quotation marks. For example: DNS ALG service.
  2. client-realm—Enter the name of the realm from which DNS queries are received. If you do not set this parameter, the DNS ALG service will not work.
  3. client-address-list—Configure a list of one or more addresses for the DNS server interface. These are the addresses on the Oracle® Enterprise Session Border Controller to which DNS clients send queries.

    To enter one address in this list, type client-address-list at the system prompt, a Space, the IPv4 address, and then press Enter

    ORACLE(dns-config)# client-address-list 192.168.0.2

    To enter more than one address in this list, type client-address-list at the system prompt, and a Space. Then type an open parenthesis ( ( ), each IPv4 address you want to use separated by a Space, and closed parenthesis ( ) ), and then press Enter.

    ORACLE(dns-config)# client-address-list (192.168.0.2 196.168.1.1 192.168.1.2)

DNS Server Attributes

To configure attributes for the DNS servers that you want to use in the DNS ALG profile:

  1. In Superuser mode, type configure terminal and press Enter.
    ORACLE# configure terminal
  2. Type media-manager and press Enter.
    ORACLE(configure)# media-manager
  3. Type dns-config and press Enter. The system prompt changes to let you know that you can begin configuring individual parameters.
    ORACLE(media-manager)# dns-config
  4. Type server-dns-attributes and then press Enter.
    ORACLE(dns-config)# server-dns-attributes

    From this point, you can configure DNS server parameters. To see all parameters for the DNS server, enter a ? at the system prompt.

  5. server-realm—Enter the name of the realm in which the DNS server is located. This value is the name of a configured realm.
  6. domain-suffix—Enter a list of one or more domain suffixes to indicate the domains you want to serve. These values are matched when a request is sent to a specific DNS server. If you leave this list empty (default), then your configuration will not work.

    Note:

    If you want to use a wildcard value, you can start your entry to an asterisk ( * ) (e.g. *.com). You can also start this value with a dot (e.g., .com).

    To enter one address in this list, type client-address-list at the system prompt, a Space, the domain suffix, and then press Enter

    ORACLE(server-dns-attributes)# domain-suffix acmepacket.com

    To enter more than one address in this list, type domain-suffix at the system prompt, and a Space. Then type an open parenthesis ( ( ), each IPv4 address you want to use separated by a Space, and closed parenthesis ( ) ), and then press Enter.

    ORACLE(server-dns-attributes)# domain-suffix (acmepacket.com acmepacket1.com acmepacket2.com)
  7. server-address-list—Enter a list of one or more DNS IPv4 addresses for DNS servers. These DNS servers can be used for the domains you specified in the domain suffix parameter. Each domain can have several DNS servers associated with it, and so you can populate this list with multiple IPv4 addresses. If you leave this list empty (default), your configuration will not work.
  8. source-address—Enter the IPv4 address for the DNS client interface on the Oracle® Enterprise Session Border Controller. If you leave this parameter empty (default), your configuration will not work.
  9. source-port—Enter the number of the port for the DNS client interface on the Oracle® Enterprise Session Border Controller. The default value is 53. The valid range is:
    • Minimum—1025

    • Maximum—65535

  10. transaction-timeout—Enter the time in seconds that the ALG should keep information to map a DNS server response back to the appropriate client request. After the transaction times out, further response to the original request will be discarded. The default value is 10. The valid range is:
    • Minimum—0

    • Maximum—999999999

  11. address-translation—Enter a list of address translations that define the NAT function for the DNS servers.

    You can access the NAT parameters for the DNS servers by typing address-translation and pressing enter within the DNS server attributes configuration.

    ORACLE(dns-config)# server-dns-attributes
    ORACLE(server-dns-attributes)# address-translation

    To configure the NAT, enter two values:

    • server-prefix: address/prefix that will be returned by the DNS server

    • client-prefix: address/prefix that to which a response is returned

      Each of these is a two-part value:

    • IPv4 address

    • Number of bits indicating how much of the IPv4 address to match

      If you do not specify the number of bits, then all 32 bits of the IPv4 address will be used for matching. If you set the number of bits to 0, then the address will simply be copied.

      For example, if you set the server prefix to 10.3.17.2/16 and the client prefix to 192.168.0.0/16, then the Oracle® Enterprise Session Border Controller will return an address of 192.168.17.2 to the DNS client.

      ORACLE(server-dns-attributes)# address-translation
      ORACLE(address-translation)# server-prefix 10.3.17.2/16
      ORACLE(address-translation)# client-prefix 192.168.0.0/16

DNS Transaction Timeout

To provide resiliency during DNS server failover, you can now enable a transaction timeout for DNS servers. If you have endpoints that are only capable of being configured with a single DNS server, this can allow DNS queries to be sent to the next configured server—even when contacting the Oracle® Enterprise Session Border Controller’s DNS ALG on a single IP address. So when the first server in the list times out, the request is sent to the next server in the list.

The Oracle® Enterprise Session Border Controller uses the transaction timeout value set in the dns-server-attributes configuration (part of the dns-config).

DNS Transaction Timeout Configuration

To enable the DNS transaction timeout:

  1. In Superuser mode, type configure terminal and press Enter.
    ORACLE# configure terminal
    ORACLE(configure)#
  2. Type media-manager and press Enter
    ORACLE(configure)# media-manager
    ORACLE(media-manager)#
  3. Type media-manager and press Enter.
    ORACLE(media-manager)# media-manager
    ORACLE(media-manager-config)#
  4. dnsalg-server-failover—Change this parameter from disabled (default) to enabled to allow DNS queries to be sent to the next configured server—even when contacting the Oracle® Enterprise Session Border Controller’s DNS ALG on a single IP address. So when the first server in the list times out, the request is sent to the next server in the list. The Oracle® Enterprise Session Border Controller uses the transaction timeout value set in the dns-server-attributes configuration (part of the dns-config).
  5. Save your work.

Documentation Change to Dynamic ACL for HTTP ALG Documentation

This content is moved to the Personal Profile Manager Chapter.