Surrogate Agents and the ESBC
In the case where a surrogate-agent is configured for the IP-PBX, you do not have to configure digest authentication attributes in the session-agent object for the same IP-PBX. The surrogate-agent authentication configuration takes precedence over the session-agent authentication configuration and so it is ignored.
The following illustration shows an example of a surrogate-agent with a session-agent in the network.

Surrogate Registration
The Oracle® Enterprise Session Border Controller surrogate registration feature lets the Oracle® Enterprise Session Border Controller explicitly register on behalf of a Internet Protocol Private Branch Exchange (IP-PBX). After you configure a surrogate agent, the Oracle® Enterprise Session Border Controller periodically generates a REGISTER request and authenticates itself using a locally configured username and password, with the Oracle® Enterprise Session Border Controller as the contact address. Surrogate registration also manages the routing of class from the IP-PBX to the core and from the core to the IP-PBX.
Registration
The Oracle® Enterprise Session Border Controller uses the configuration information of the surrogate agent that corresponds to a specific IP-PBX. After the surrogate agents are loaded, the Oracle® Enterprise Session Border Controller starts sending the REGISTER requests on their behalf. (You can configure how many requests are sent.)
The SIP surrogate agent supports the ability to cache authorization or proxy-authorization header values from a REGISTER 401, 407, and 200 OK messages and reuse it in subsequent requests, such as in an INVITE. This allows the Oracle Communications Session Delivery Manager to support authorization of subsequent requests in cases such as, when a customer PBX doesn't support registration and authentication. It also supports the generation of authorization/proxy-authorization header if subsequent requests get challenged with a 401/407 response.
If the Oracle® Enterprise Session Border Controller receives 401 or 407 responses to REGISTER, requests, it will use the Message Digest algorithm 5 (MD5) digest authentication to generate the authentication information. You need to specify the password. The Oracle® Enterprise Session Border Controller also supports authentication challenge responses with the quality of protection code set to auth (qop=auth), by supporting the client nonce (cnonce) and nonce count parameters.
The Oracle® Enterprise Session Border Controller creates a registration cache entry for each of the AoRs for which it is sending the REGISTER requests. When the Oracle® Enterprise Session Border Controller receives the associated URIs, it checks whether the customer host parameter is configured. If it is configured, the Oracle® Enterprise Session Border Controller changes the host in the received Associated-URI to the customer host. If it is not configured, the Oracle® Enterprise Session Border Controller does not change the Associated-URI. It makes the registration cache entries that correspond to each of the Associated-URIs. The From header in the INVITE for calls coming from the IP-PBX should have one of the Associated-URIs (URI for a specific phone). If the Oracle® Enterprise Session Border Controller receives a Service-Route in the 200 (OK) response, it stores that as well.
The Oracle® Enterprise Session Border Controller uses the expire value configured for the REGISTER requests. When it receives a different expire value in the 200 OK response to the registration, it stores the value and continues sending the REGISTER requests once half the expiry time has elapsed.
REGISTER requests are routed to the registrar based on the configuration. The Oracle® Enterprise Session Border Controller can use the local policy, registrar host and the SIP configuration’s registrar port for routing.
If the Oracle® Enterprise Session Border Controller is generating more than one register on behalf of the IP-PBX, the user part of the AoR is incremented by 1 and the register contact-user parameter will also be incremented by 1. For example, if you configure the register-user parameter as caller, the Oracle® Enterprise Session Border Controller uses caller, caller1, caller2 and so on as the AoR user.
Authenticating Registrations
There are two ways to configure the ESBC to authenticate a registration using a surrogate agent. These include defining authentication criteria within a realm configuration and within the surrogate agent itself. Surrogate agent authentication, for both register requests and for call methods, are applications of digest authentication.
The first method uses surrogate-agent and realm-config configuration. This method is considered more robust, supporting multi-tenant, diverse IP-IPXs, and intra-realm registration support. The second method refers to the surrogate-agent configuration alone, applying to simpler deployments that, for example, do not request registration from a registrar outside of the IP-PBX's realm. The first method takes precedence, if configured, and also works when registrars and IP-IPXs reside on the same realm. The second method is considered a legacy configuration maintained for ESBC deployments that have been using it. These methods are considered exclusive and the ESBC throws a configuration verification error when it finds you have set up both methods on a surrogate agent.
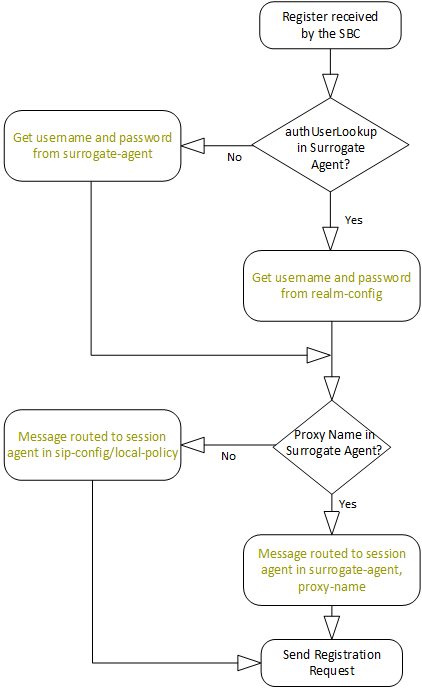
When confronted with an authentication challenge to a surrogate agent's registration request, the ESBC:
- Checks whether you have configured the
auth-user-lookup attribute in the
surrogate-agent. If so, the ESBC :
- Searches for a realm-config that contains
an auth-attribute object with an
auth-user-lookup value that is the same as the
auth-user-lookup value in the
surrogate-agent. An example
auth-user-lookup setting is shown
below.
ORACLE(surrogate-agent)# auth-user-lookup TargetRealmAuthUser - If found, the ESBC issues a response to the challenge using the username and password values in the auth-attribute presented within the realm-config.
- If not found, the registration fails.
- Searches for a realm-config that contains
an auth-attribute object with an
auth-user-lookup value that is the same as the
auth-user-lookup value in the
surrogate-agent. An example
auth-user-lookup setting is shown
below.
- If the auth-user-lookup is empty, the ESBC:
- Refers to the auth-user and password parameters in the surrogate configuration.
- If found, Issues a response to the challenge using those auth-user and password values.
- If not found, the registration fails.
The ESBC also has multiple means of routing the response to the correct registrar. The ESBC follows this process to route the registration as well as the challenge response. To route to the correct registrar, the ESBC:
- Checks to see if you have configured the
proxy-name parameter in the
surrogate-agent. This proxy-name
setting must match the name parameter in a
session-agent you have configured for the registrar. An
example proxy-name setting is shown
below.
ORACLE(surrogate-agent)# proxy-name MyProxyNameIf you have configured this parameter correctly, the ESBC routes to that proxy.
- If you not have configured the proxy-name parameter, the ESBC routes the REGISTER using the registrar-host and registrar-port parameters in the sip-config.
- If the system cannot route using the sip-config, the ESBC attempts to route the response to the next-hop in a matching local-policy attribute.
- If there is no match in any local-policy, the ESBC replies to the source that the registration has failed.
Setting the un-register Parameter
Additional applicable surrogate-agent configuration allows you to enable the un-register parameter. Enabling this parameter causes the ESBC to send the all REGISTER requests generated from this surrogate agent with Expires: 0 to the REGISTRAR, and remove all associated entries from the ESBC registration-cache upon each registration.
ORACLE(surrogate-agent)# un-register enabledSurrogate Agent Authentication Across Realms
The ESBC uses an authentication attribute element in realms to support surrogate agent authentication requests initiated from other realms. This is a multi-instance element that supports the authentication of non-REGISTER traffic to surrogate agents with different authentication detail. The key for these lookups is the combination of the authentication realm and the authentication user lookup configurations. If you do not configure authentication attribute element in the realm, the ESBC handles surrogate agent authentication using the authentication table setup on the IP-PBX session agent, which supports this traffic in a single realm only.
This feature resolves two key surrogate agent authentication issues:
- In a multi-tenanted environment, there might be multiple IP-PBX systems or realms trying to use the same surrogate agent function. Therefore, there is a need to authenticate traffic to surrogate agents by the ESBC on the SIP Trunk Realm with no association or relation to the IP-PBX system or realm.
- In addition, some SIP Trunk providers send 401/407 challenges to all outbound calls. The ESBC utilizes the authentication table setup on the session-agent for username/password to response to the 401/407 challenge. However, if the auth-realm value is the same for all customers, then the ESBC cannot provide the correct username/password in response to the 401/407 challenge. When this feature is not set up, the ESBC always uses the first entry on the auth-attributes in the session agent's table for all outbound calls.
You configure the ESBC to populate the authentication headers using your configuration from either the softswitch's surrogate agent or realm during a 401/407 authentication challenge. The ESBC uses these tables to look up the authentication realm and obtain the username and password. The ESBC uses the username and password to authenticate the request.
Note:
The device initiating the authentication challenge to the surrogate agent does not need to be a softswitch.The ESBC chooses the table based on your configuration:
- If you have configured the auth-user-lookup parameter in the local-policy attribute, then the ESBC builds the authentication headers from the realm-config configuration.
- If the auth-user-lookup parameter in the local-policy attribute is empty, then the ESBC builds the authentication headers from the IP-PBX session-agent configuration.
- A local-policy that forwards traffic to the target softswitch, which may or may not reside in a different realm from the source traffic. Further configuration supports intra-realm surrogate agent authentication.
- The policy-attributes within that local-policy that includes the target auth-user-lookup value and the target realm of the surrogate agent.
- An auth-attributes sub-element in the target
realm-config. This sub-element includes:
- The realm of the surrogate agent. This is the host realm initiating the authentication challenge. This value defines the protected space in which the digest authentication is performed.
- An auth-user-lookup value that matches the auth-user-lookup in the local-policy.
- The username and password that provide access to the target surrogate agent.
Cross Realm Surrogate Agent Authentication Operation
After configuration, the ESBC authenticates applicable cross-realm surrogate agent authentication, allowing registration and call traffic.
When the ESBC receives traffic that triggers your local-policy, it uses the policy's auth-user-lookup value in combination with the target realm of the local-policy to prepare for authentication.
The key used for these lookups is a combination of the authentication realm and the user lookup. Typical behavior during operation includes:
- If the auth-user-lookup in the policy-attribute is empty, the ESBC gets the configured password for authorization from the softswitch session-agent configuration.
- If the auth-user-lookup in the policy-attribute is not empty, the ESBC selects the AuthAttributes (username/password) for the matching auth-user-lookup in the realm-config.
- If the auth-user-lookup in policy-attribute is not empty, but there is no corresponding entry in realm-config, then the call fails as unauthorized. Additionally, the ESBC displays a warning during verify-config.
When operating with the auth-user-lookup from the local-policy attributes, the ESBC uses the returned value of username and password for authenticating the request. During the processing of the INVITE request, a reference to the selected local policy route is stored along with the route.
Additional Notes on Operation
The following are additional notes that describe the digest authentication process:
- The ESBC always challenges the first LOGIN request, and initial authentication begins with that request. The selected authorization key — the credentials — are then included in every subsequent request.
- If the ESBC does not receive any communication from the client within the expiration period, the ESBC logs the client out and tears down the transport connection. Faced with interface loss, the ESBC default behavior is to flush all warrant information from the target database. This response necessitates that the client first login/re-register with the ESBC, and then repopulate the empty database using a series of ADD requests. This behavior ensures that client and ESBC target databases are synchronized. Alternatively, when faced with interface loss, the ESBC can retain all warrant information within the target database. This response necessitates only that the client first login/re-register with the ESBC. After successful registration the client should, but is not required to, use a series of GET, ADD, and DELETE requests to ensure that the ESBC and client target databases are synchronized.
- The ESBC ignores the Authentication-Info header that comes in the 200OK response after digest authentication is complete. The ESBC receives a 401/407 response from the client. However, some surrogate-agents may process the Authentication-Info header in a single challenge.
Routing Calls from an IP-PBX
When it receives a call from an IP-PBX configured as a surrogate agent, the ESBC attempts to route, and if challenged, perform authentication on behalf of the IP-PBX to authorize the call. It does this by validating the request with your configuration. After routing the call to its destination, the callee may challenge the call, in which case the ESBC has an opportunity to authenticate the call. If the ESBC cannot authenticate the call, it leaves authentication procedures to other devices, such as the IP-PBX itself.
The process of routing a call from an IP-PBX using a Surrogate Agent fits within the overall routing process, as shown in the following diagram. While determining a route, the ESBC also determines whether the call may be authenticated using the ESBC as a surrogate. The call may be routed by multiple processes, each of which can include a surrogate-agent match and specifying that the ESBC can trust the caller.
To route the call, the ESBC looks for a service route. After finding the corresponding registration Service-Route entry, the ESBC uses the Service-Route for this endpoint to route the call, if it exists.
If no Service-Route exists, but the route-to-registrar parameter is enabled on the sip-interface, the ESBC tries to route the call to the registrar. If route-to-registrar is disabled, the ESBC refers to local-policy for routing.
At this point, the ESBC routes the call, and is prepared if it needs to respond to an authentication challenge.
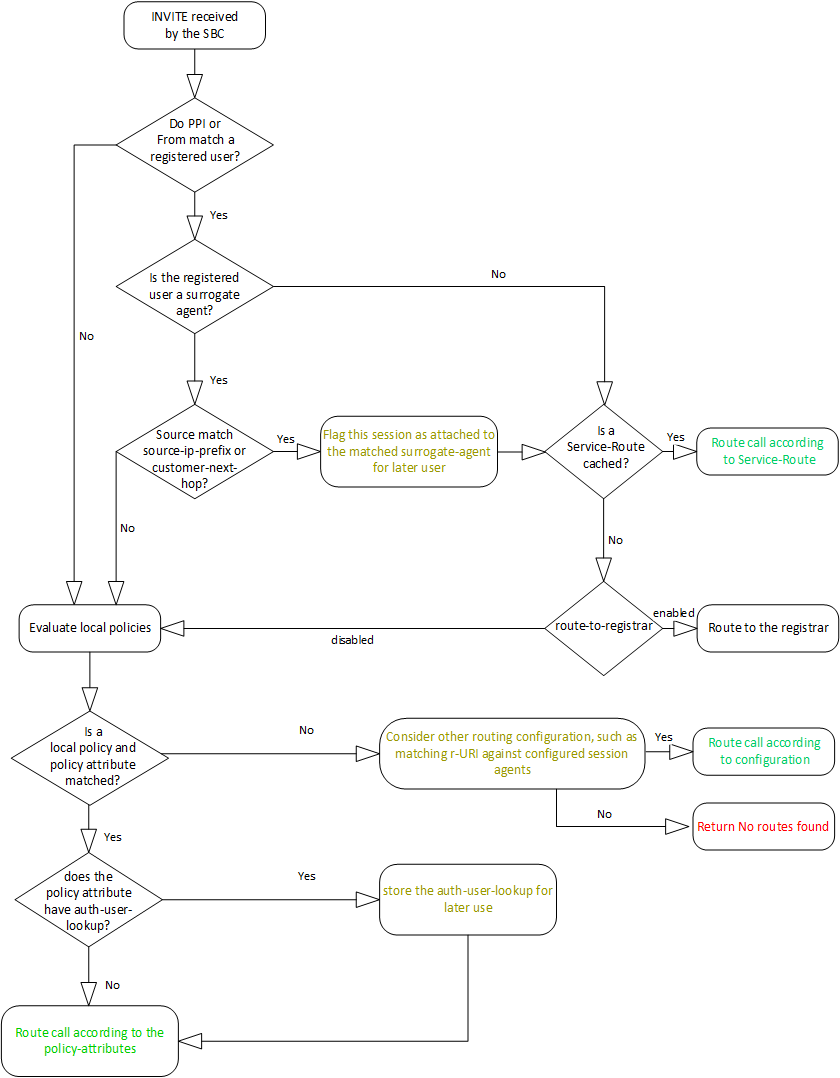
Having received a challenge, the ESBC matches the challenge with source and SIP information presented by the caller and stored by the ESBC. This matching process is explained below. If the match is successful, the ESBC authenticates the call on behalf of the IP-PBX. After authentication succeeds, media between the caller and callee may proceed.
Note:
You can configure the surrogate-agent to override the sip-interface, route-to-register setting. If the surrogate agent’s route-to-registrar parameter is set to disable, it takes precedence over the sip-interface setting. In this case, the ESBC does not try to route the call to the registrar.Matching an INVITE to a Surrogate Agent
You can configure the ESBC to perform authentication for an end station sending an INVITE through its surrogate agent in two ways. These methods match information in your surrogate-agent, and in some cases session-agent configurations, with source information in the request. The ESBC uses this function for requests needing authentication, except REGISTERs. This processing is not relevant to calls sent to a surrogate-agent.
Assuming configuration, to confirm and authenticate requests originating from a surrogate agent, the ESBC matches:
- Information in the FROM header in the
request to a registered user, and then your register-user and
register-host configuration in your
surrogate-agent. These matches confirm the
surrogate-agent from which the request came. If these do
not match, the ESBC does not continue with
authentication.
Note:
The FROM header should contain the user portion of one of the Associated-URIs that it received from the registrar in the 200 (OK) responses to REGISTER requests. It should also have a hostname.Note:
Should the register-host match fail, the ESBC tries to match the host portion with your customer-host configuration. - IP source addressing to the source-ip-prefix parameter within the surrogate-agent element. This confirms that the ESBC can perform the authentication. If you have configured this parameter and there is no match, the ESBC does not authenticate the request.
- If there is no source-ip-prefix configuration, the ESBC tries to match the customer-next-hop configuration in the surrogate-agent with the source of the incoming request. This can also confirm that the ESBC can perform the authentication.
To perform this step, the ESBC compares the source IP of the request with the customer-next-hop parameter. You can configure the customer-next-hop parameter with a session-agent name, a session-agent-group or any IP address. That value must match:
- The hostname Session Agent, or the group-name of the Session Agent Group.
- If configured with an IP address, your value must match the source IP of the request.
The source-ip-prefix configuration provides the ESBC with the flexibility to perform the authentication against specific IP addresses, multiple prefixes and/or IP ranges. The customer-next-hop configuration allows for only a single entry, attempting to match to a single address, a hostname configuration on a corresponding session-agent or the group name of the SAG to which the session agent belongs.
Note:
If source-ip-prefix is not configured and the customer-next-hop matches a session-agent-group, the ESBC uses that group to choose a specific session-agent.Process Detail
The steps below present ESBC behavior when it receives a request from a surrogate-agent that needs authentication, other than a REGISTER. The steps use an INVITE as an example. To support these calls the ESBC:
- Determines if there is a
surrogate-agent match by ensuring the FROM matches
the register-user and the
register-host or customer-host
in the surrogate-agent agent configuration.
Note:
If there is no match with the register-host, the ESBC attempts to match the applicable host portion with the customer-host configuration.- If not, the ESBC attempts to use other configuration to proceed with the call, such as local policy. If those processes do not find a route, the ESBC sends the caller with a 480 - No routes found message.
- If so, the ESBC attempts to verify the source of the INVITE to determine whether or not it can perform the authentication on behalf of the IP-PBX.
- To determine if it should perform the authentication, the ESBC checks whether the
surrogate-agent has a
source-ip-prefix configuration:
- If so, the ESBC
matches the source IP address with any of your
source-ip-prefix settings in the
surrogate-agent.
- If there is a match, the ESBC considers the INVITE as originated from a trusted source and it can perform authentication on behalf of the surrogate-agent.
- If it does not match, the ESBC does not perform authentication on behalf of the surrogate-agent, and forwards a 401 with challenge towards the IP-PBX.
- If so, the ESBC
matches the source IP address with any of your
source-ip-prefix settings in the
surrogate-agent.
- If you have not configured the
source-ip-prefix, the ESBC can next refer to your
customer-next-hop configuration and check for a
match. to the surrogate-agent. Detail on matching
criteria is above.
- If there is a match, the ESBC considers the INVITE as originated from a trusted source and performs authentication on behalf of surrogate-agent.
- If it does not match, the ESBC does not perform authentication on behalf of surrogate-agent, and forwards 401 with challenge towards the endpoint.
- If there is a match, the ESBC generates an INVITE with authentication parameters and sends it to the REGISTRAR to confirm the authentication.
- If the authentication is successful, the ESBC sends a 200 OK to the IP-PBX, and routes the call to the callee.
- If the authentication fails, the ESBC sends a 401 with challenge to the IP-PBX.
- At this point, the endpoint may or may not attempt to authenticate
itself directly with the REGISTRAR.
- If not, the call does not proceed.
- If so, and the authentication is successful, media may proceed between the caller and callee.
- If so, and the authentication fails, the REGISTRAR replies to the IP-PBX directly with (an authentication failed message), and the call does not proceed.
Configuration Detail on Verifying Source IP
You configure the source-ip-prefix and the customer-next-hop parameters on the applicable surrogate-agent. The source-ip-prefix accepts any number of IP addresses and IP address prefixes in the format <ip>/<subnet>. If you set multiple values, separate them with a space and enclose them with parenthesis (). Addressing can be IPv4, IPv6 or a combination of both. The ESBC performs individual match checks in the same order as your configuration.
For example, to configure the agent to trust IPs 192.168.1.0, 172.16.10.10 and 172.168.x.x, you can configure the parameter as follows.
ORACLE(surrogate-agent)#source-ip-prefix (192.168.1.0 172.168.0.0/16 172.16.10.10)In contrast, the customer-next-hop parameter accepts a single entry as an IP address, FQDN, Session Agent name, or Session Agent Group name.
ORACLE(surrogate-agent)#customer-next-hop 192.168.1.0The ESBC prevents you from configuring parameters using an incorrect format.
Related Configuration
Note the following configurations and their impact on this authentication process.
- This feature fully supports HA deployments.
Call Flow Examples
The call flows in this topic demonstrate how the ESBC identifies the surrogate-agent for an incoming call for the purpose of authentication. Your surrogate-agent, session-agent, and sip-interface configuration are key to processing these calls.
Call Flow 1
This first call flow depicts the ESBC successfully handling the end station authentication. In this case, the ESBC identifies the surrogate-agent by matching the FROM header with the register-user and register-host parameters in the surrogate-agent configuration.
surrogate-agent:
      register-host: oracle.com
      register-user: 123
      source-ip-prefix: 192.168.0.0/16
Next, the ESBC matches the source IP of the INVITE request with the source-ip-prefix parameter in the surrogate-agent configuration to determine if it should perform surrogate authentication. Note the source IP address, 192.168.1.1 falls in the range of the setting, 192.168.0.0/16.
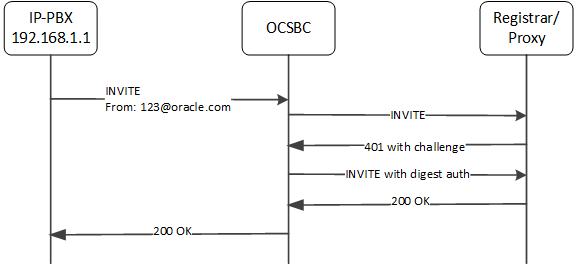
The ESBC does not reference the customer-next-hop parameter because you have configured the source-ip-prefix with some value.
Call Flow 2
This next call flow depicts the ESBC not handling an end station authentication. In this case, the source-ip-prefix, configured to 172.16.0.0/16, does not match the source IP address.
surrogate-agent:
      register-host: oracle.com
      register-user: 123
      source-ip-prefix: 172.16.0.0/16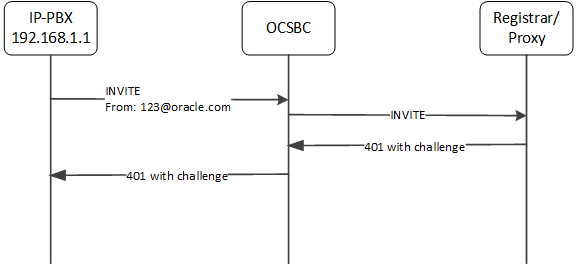
Again, the ESBC does not reference the customer-next-hop parameter.
Call Flow 3
Consider this next case, wherein the source-ip-prefix is not configured. But the relevant configuration, shown below, includes a customer-next-hop configuration that provides a match.
surrogate-agent:
      register-host: oracle.com
      register-user: 123
      customer-next-hop: SA1
      source-ip-prefix: <empty>
session-agent:
      hostname: SA1
      ip-address: 192.168.1.1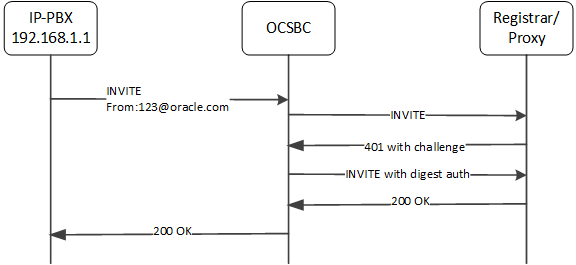
Call Flow 4
Consider this next case, wherein the surrogate-agent configuration fails to identify the source correctly. Because the register-host and register-user values do not match either the FROM presented in the INVITE, the ESBC does not have a means of forwarding the INVITE, so it replies with '480 - No Routes Found' message.
surrogate-agent:
      register-host: acmepacket.com
      register-user: 486
      customer-next-hop: <any value>
      source-ip-prefix: <any value>
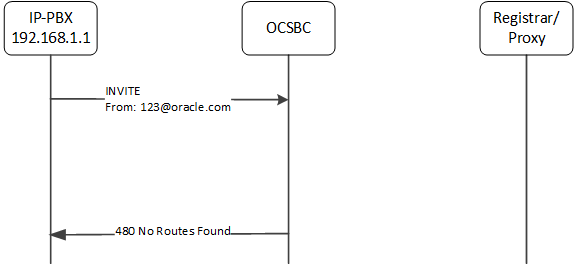
Separate from the surrogate agent feature, the ESBC could use a local-policy or other routing configuration, to route this call.
Surrogate Agent Refresh on Invalidate
Surrogate agent registrations normally only re-register when nearing their expiration time. When a registrar fails, the surrogate agent will wait until the expiration time to refresh the registration with an in-service registrar.
You can configure your Oracle® Enterprise Session Border Controller to immediately refresh the surrogate agent registrar with an in-service registrar by enabling the existing parameter invalidate-registrations.
Invalidate Registrations
An existing feature called invalidate-registrations located in the session agent keeps track of when surrogate agents go out of service. When REGISTER messages are received, registration entries that had out-of-service session agents since the last REGISTER will always allow the message through to the registrar (as opposed to responding directly from the cache).
The invalidate-registrations parameter in session agent configuration enables the Oracle® Enterprise Session Border Controller to detect failed Registrar session agents.
If invalidate-registrations is enabled for the session agent, a response from a surrogate REGISTER that contains a service-route header that corresponds to a session-agent is installed to the registration cache entry.
The surrogate-agents are scanned. Surrogate agents with registration entries matching the out-of-service registrar have their timer reset to initiate a refresh. For an immediate refresh, the registration entry will only be considered when the service-route session agent goes out-of-service. The service-route session agent takes precedence and any previous registrar session agent w ill not be considered for an immediate refresh of the surrogate-agent registration.
Surrogate Registration Configuration
Surrogate registration allows the ESBC to explicitly register endstations on behalf of an IP-PBX. Surrogate registration also manages the routing of calls to and from the IP-PBX and core (registrar).
Configure multiple elements depending on your deployment's design for establishing IP-PBX proxies that you want the ESBC to register. Elements include:
- surrogate-agent
- realm-config
- session-agent
- local-policy
Configuring Surrogate Registration
You can configure surrogate registration using the ACLI. You need to configure a surrogate agent for each IP-PBX proxy for which the ESBC registers. Those parameters that are optional are marked, the rest are mandatory.
To configure the surrogate agent:
Example
The following example shows the surrogate agent configuration.
surrogate-agent
register-host	acmepacket.com
register-user	234567
state	enabled
realm-id	public
description
customer-host	acmepacket.com
customer-next-hop	111.222.33.44
register-contact-host	111.222.5.68
register-contact-user	eng
password
register-expires	600000
replace-contact	disabled
route-to-registrar	enabled
aor-count	1
source-ip-prefix
options
auth-user
max-register-attempts   10
register-retry-time   30
count-start   1
register-mode   automatic
triggered-inactivity-interval   30
triggered-oos-response   503
auth-user-lookup
proxy-name charlie
un-register disabled
last-modified-date	2006-05-04 16:01:35
Configure Authentication Attributes on a Realm
In the ESBC ACLI, you can access authentication parameters applicable to surrogate agent operation using the path media-manager, realm-config, auth-attributes. If using this authentication method for register requests, this feature uses the attributes and values listed in this table. You perform this configuration to the realm-config on which the registrar resides.
Note:
If enabling this means of authentication, all the auth-attributes listed below are required except for the in-dialog-methods attribute, which is optional.To configure authentication on the ESBC:
Configure a Local Policy for Authenticating Surrogate Agent Traffic
To configure a local policy to support intra-realm surrogate agent authentication, you configure the local policy that directs traffic from the surrogate agent to the softswitch, which initiates the authentication challenge for any traffic coming from the surrogate agent (usually a PBX without the ability to authenticate itself).