Managing Realms
A realm is a logical way of identifying a domain, a network, a collection of networks, or a set of addresses. Realms are used when an SBC communicates with multiple network elements over a shared intermediate connection. Realms allow for flows to pass through a connection point between two networks.
From an external perspective, a realm is a collection of systems that generates realtime interactive communication sessions comprised of signaling messages and media flows, or a group of multiple networks containing these systems.
From an internal perspective, a realm is associated with SBC configurations to define interfaces and resources in a logical way. Realms are used to support policies that control the collection of systems or networks that generate media sessions.
In the ISR Dashboard, an Administrator can now add, edit, and delete realms using the Manage Realms option on the Admin Menu. After adding a realm, you can then associate an account to that realm. An account can have multiple associated realms and a realm can have multiple associated accounts.
Note:
The configured realm must already exist in the SBC before adding it to the ISR.How Realm-based Recording Works
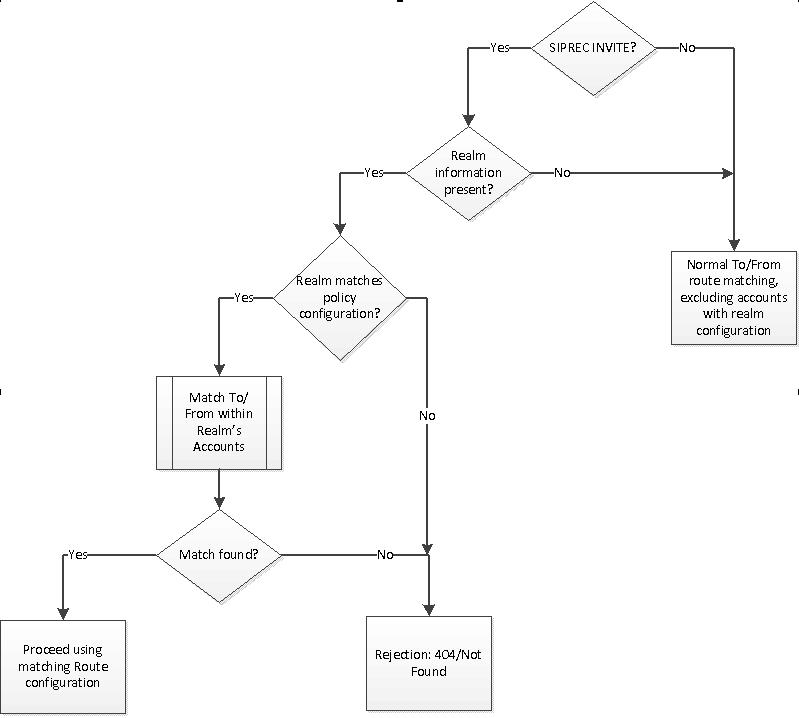
The ISR performs recording affiliation and route-matching based on the configured route pattern and the associated realm. The ISR only inspects incoming SIPREC INVITEs for the inclusion of a realm label within the SIPREC extension data. If a realm label exists, it is used to search any configured routes associated with an account(s) in the matching realm. The RSS looks for a To/From match (similar to the way lookups are performed) in the realm's configured accounts and routes.
The following flow diagram illustrates how the ISR performs realm-based recording.

When adding a realm, the ISR checks for a wildcard "%" character in the Realm Label. If the wildcard exists, an error message displays. If a wildcard does not exist, the realm is added.
Deleting a realm removes all associations to accounts in the ISR database. The ISR compares the routes of the deleted realm with the routes not in a realm. If there are routes of the same type and pattern in both locations, an error displays and the delete function fails.
In Realm edit view, the associated account(s) in the realm display. In the Accounts edit view, the realm(s) associated with the account display only after adding an associated realm(s) to the ISR.
The following rules apply when associating an account(s) to a realm:
- You can associate multiple accounts to a single realm. Routes created on these accounts must have unique route patterns across the related accounts.
- Wildcard routes:
- are treated like normal 'pattern' routes. They are unique across realms and accounts.
- can have any priority.
- if set with a higher priority than a 'distinct' route, the Dashboard displays a warning that the user is about to set a wildcard route higher than the list of lower priority routes, and prompts the user to confirm whether or not to continue.
- You cannot configure wildcard realms.
- Associating a realm with an account(s) is optional. Routes created across accounts with no realms must be unique. This allows the ISR to support legacy (non-SIPREC) installations, as well as maintain compatibility with other SIPREC compliant Session Recording Clients (SRCs).
Use the Realms option on the Admin page to manage Realms.
Realms Page

The following table describes the information displayed on the Realms page.
| Column | Description |
|---|---|
| Label | Label name assigned to the Realm. |
| Description | Description of the Realm. |

