Manage Routes

Use the Routes link on the Admin page of the ISR Dashboard to manage routes in the ISR network.

A route on the ISR defines the parameters to evaluate and invoke recording, as well as the recording rules to apply for all calls received by the ISR. You can set a specific account to have one route or multiple routes, depending on the subscriber’s business requirements.

  • If you make changes to a route associated with an account, the changes apply to that route only and do not affect other routes associated with the same account.
  • Super Users and Account Administrators can add routes to all existing accounts. Tenant Administrators can add routes to their own accounts only.

Select Routes from the Admin page to manage Routes.

Routes Page

This screenshot shows the Routes page.

The following table describes the information displayed on the Routes page.

Column Description
Account Name of the Account associated with the route.
Type Specifies the type of route:

From - The incoming call’s From SIP URI is compared with the value in the Route Pattern field and must match.

To (default) - The incoming call’s To SIP URI is compared with the value in the Route Pattern field and must match.

From/To - The incoming call’s From and To SIP URIs are compared with the value in the Route Pattern field and both must match.

Pattern Specifies the value to match an incoming call's From, To or From/To value, for applying the appropriate rules of the route and account.
Virtual Pattern Specifies the destination where the calls matching the route pattern are forwarded once recording rules have been evaluated.
Recording is Identifies whether or not recording is enabled or disabled on the route.

enabled - Recording is enabled.

disabled - Recording is disabled.

Percent to Record Percentage of calls that are allowed to be recorded on this route.

Adding a Route

To add a route:

When adding a new route to an account, by default, the parameters on the Route page are defined from the focused account’s Account page details. For example, if you are adding a route to Account A (which already exists with details configured), by default, the new route takes on the configured details from Account A.

Note:

You can create a route using any application that can save to a comma separated value (CSV) file (i.e., Microsoft® Excel, Notepad®, etc.). Using the ISR Dashboard, you can then import the route information from the file (<filename>.csv) to the ISR database.

For more information about importing route information into the ISR database, see Importing a Route CSV File.

A Superuser and Account Administrator can add new routes to all accounts. A Tenant Administrator can add new routes to their own accounts only.

Use the following procedure to add a route and associate an account with that route.

  1. After logging into the ISR Dashboard, click Admin in the main menu (or Edit System Configurations on the Home page).
  2. Click Routes. The Routes page displays.
  3. Click Create . The Create Route page displays.
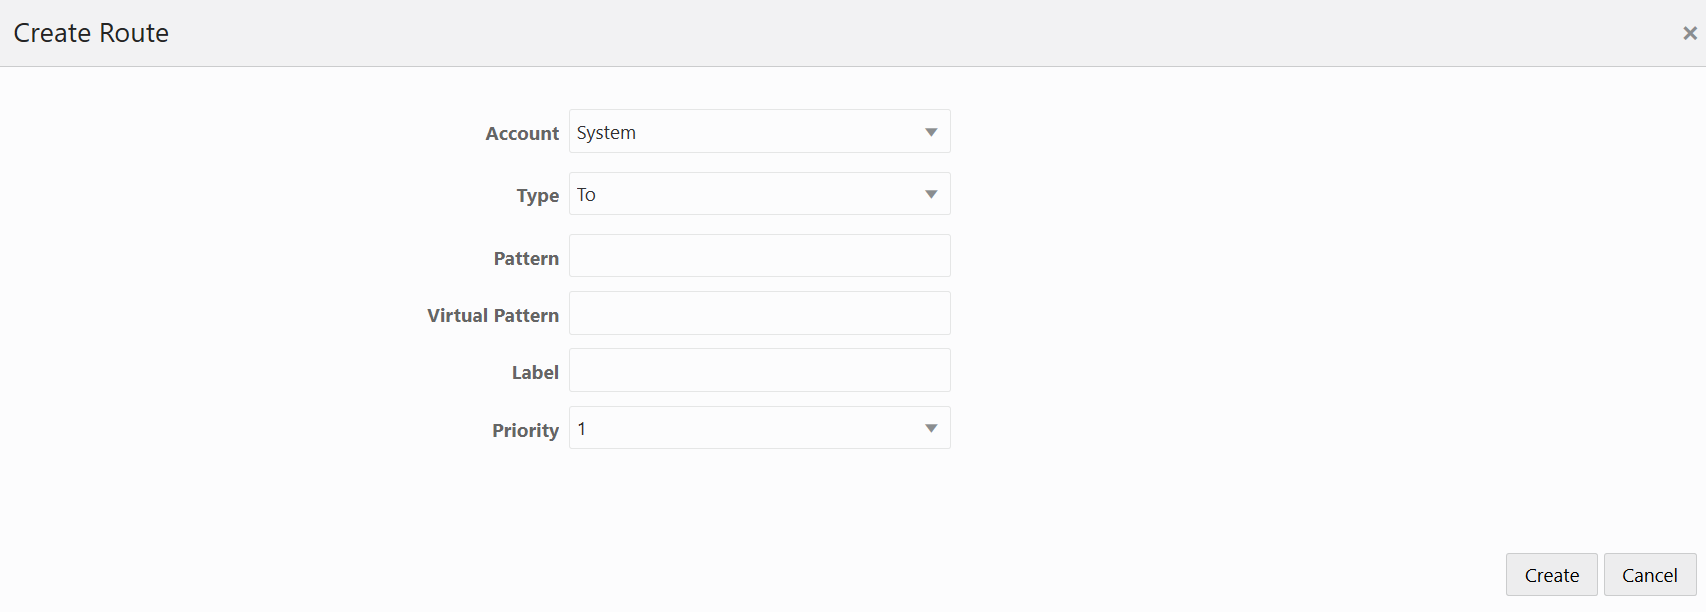
    This screenshot shows the route dialog box.
  4. Account—Select the account name to associate with this new route. Valid values are dependent on the accounts currently configured in the ISR database, and the User’s permission level. The default is System.

    Note:

    Once a route is added and assigned to an account, it cannot be reassigned to other accounts. If you attempt to reassign a route to another account, the following message displays:

    Another route with this pattern already exists.

  5. Type—Select the type of route to use for this account. This field is used to compare with the value in the Route Pattern field. Valid values are:
    • From - The incoming call’s From SIP URI is compared with the value in the Route Pattern field and must match.

    • To (default) - The incoming call’s To SIP URI is compared with the value in the Route Pattern field and must match.

    • From/To - The incoming call’s From and To SIP URIs are compared with the value in the Route Pattern field and both must match.

  6. Pattern—Specify the route pattern to use for this account. This field is based on the Route Type selected in step 5 (the SIP URI that triggers this rule set). Use the route pattern value to match an incoming call's From, To or From/To value, and apply the appropriate rules of the route and account. For examples of route patterns, see Examples of Route Patterns.
  7. Virtual Pattern—Clicking this field automatically updates the field with the value from the Route Pattern field. To change this value, specify the virtual route pattern to use for the current route. This value specifies the destination where the calls matching the route pattern are forwarded once recording rules have been evaluated. The Virtual Pattern is used in conjunction with the Session Agent defined in Managing Sites. A full SIP URI can be provided to override this value. For examples of virtual route patterns, see Examples of Route Patterns.

    Note:

    The Virtual Pattern parameter is only used for application types of Default Pass-Through and Record and Save.
  8. Label—Enter a name to assign to this route. For display, such as in the recordings view, the route label replaces the value corresponding to the Route Type. For example, in a 'To' route, the 'To' value is replaced with the route label. This may be useful to replace the number given by the service provider with a number more familiar to the users.
  9. Priority—Select a priority to assign to this route. Routes with a higher priority number are matched before routes with a lower priority number. Valid values are 1 through 9. Default is 5.
  10. Click Create. The new route displays on the Routes page.

Examples of Route Patterns

SIP INVITES arrive with the following information:

To: user@hostname:port
From: user@hostname:port

You can create routes based on either the From value, the To value, or both, by specifying only the user portion of the URI. The following are examples for setting up route patterns.

Example 1. You want to set up recording rules for calls that come in on a specific 800 number for your billing department, which are answered by a queue at extension 4334.

Since you are evaluating the address the call is sent TO. You need to know what To value your 800 number maps to in your telephony environment. Often, the To is the last 4 digits of the 800 number. To 1234 is the number used in the following example that the 800 number maps to.

a. Select the Account for which this route applies.

b. Select Route Type of To.

c. Set Route Pattern as 1234.

d. Set Virtual Route Pattern to 4334.

For calls that arrive on To 1234, the ISR applies the rules defined in this route, and then forwards the caller to the value in the virtual route pattern field, extension 4334.

Example 2. You have a high priority customer that you want to make sure gets exceptional service. You know their primary phone number is (333) 555-1234 and you want to be sure to record any call from that number and send that call to your high priority queue at 5445.

Since you want to set the rules based on where the incoming call is coming FROM.

a. Select the Account for which this route applies.

b. Select Route Type of From.

c. Set Route Pattern as 3335551234.

d. Set Virtual Route Pattern to 5445 (high priority queue).

Example 3. Your largest customer is disputing the number of support tickets they've called in to date, so you'd like to start recording them for future reference. You know their main number is (866) 444-1234 and your customer service To value is 9988. You want to be sure to record any call from that number and send that call to your high priority queue at 5445.

Since you're only interested in calls from a particular number made to your support line, this is a From/To route.

a. Select the Account for which this route applies.

b. Select Route Type of From/To

c. Set Route Pattern as 8664441234/9988.

d. Set Virtual Route Pattern to 5445 (high priority queue). To override the outbound Session Agent, use sip:5445@10.85.122.15:5060 which sends these calls out their own Session Agent.

Example 4. You want to set up general recording rules for all calls that come in with To numbers to your billing department, and forward them to a destination in your network.

a. Select the Account for which this route applies.

b. Select Route Type of To.

c. Set Route Pattern as %.

The % (wild card) indicates matching of any value for the specified Route Type on the incoming call. In this example, since Route Type is To, any incoming call with a To value will match.

Note:

Wild card routes are typically set to a low priority in order to allow other routes with the same route type to be matched.

Configuring and Editing Details of a Route

Super Users and Account Administrators can configure or edit the details for any of the routes on the Routes page. Tenant Administrators can configure or edit the details for their own Routes only.

After selecting a Route on the Routes page, you can perform the following:

  • Edit general Route information
  • Configure or edit advanced parameters for a Route
  • Upgrade to a Route Group

Edit General Route Information

You can edit the general information for a route when required.

To edit the general route information:

  1. On the Admin page, click Routes. The Routes page displays.
  2. Select a route from the list and click Details. The Edit Route page displays.
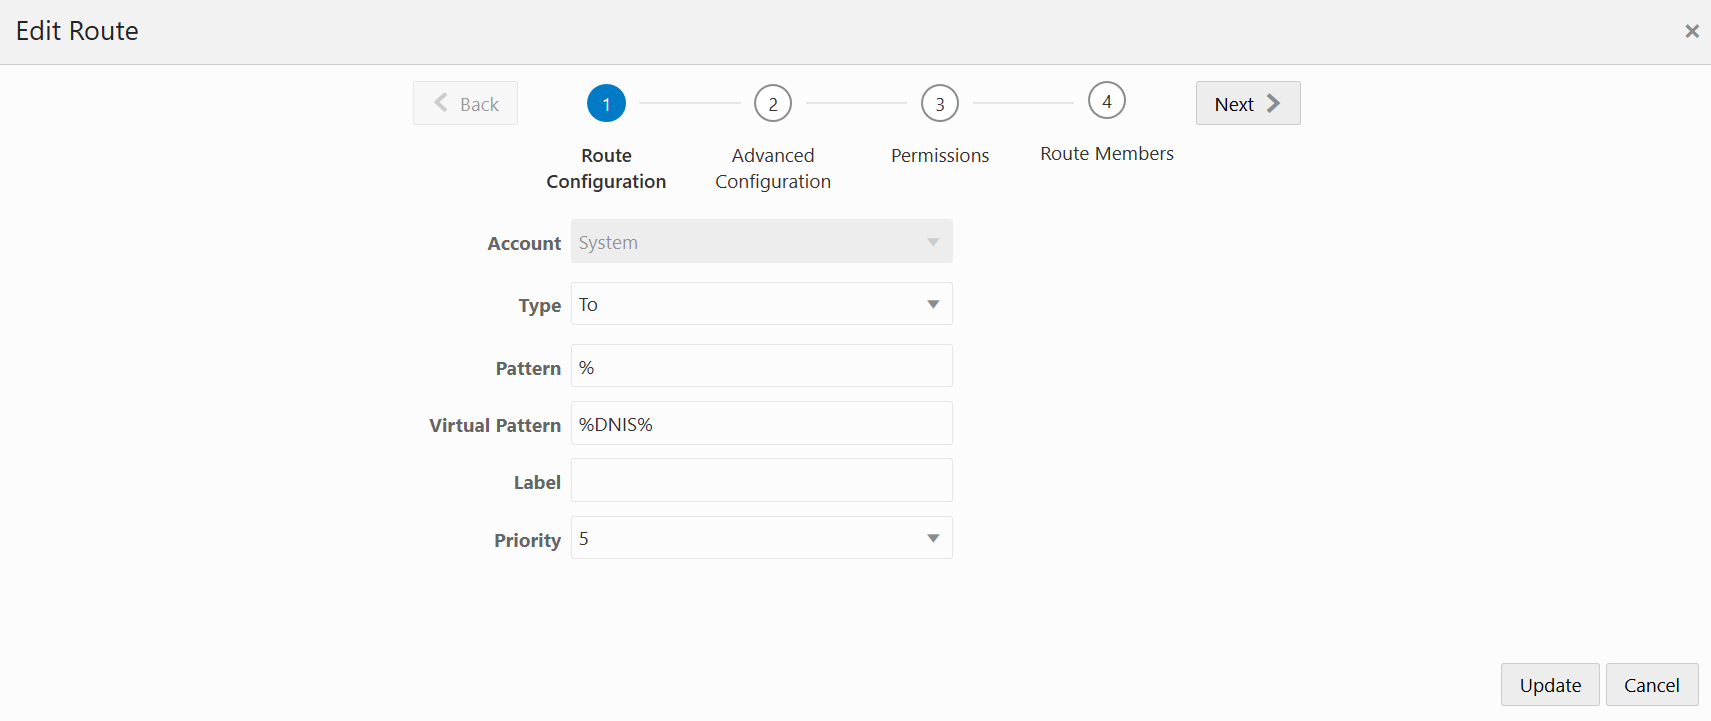
    This screenshot shows the Edit Route page.
  3. Type—Edit the type of route to use for this account. This field is used to compare with the value in the Route Pattern field. Valid values are:
    • From - The incoming call’s From SIP URI is compared with the value in the Route Pattern field and must match.

    • To (default) - The incoming call’s To SIP URI is compared with the value in the Route Pattern field and must match.

    • From/To - The incoming call’s From and To SIP URIs are compared with the value in the Route Pattern field and both must match.

  4. Pattern—Edit the route pattern to use for this account. This field is based on the Route Type selected in step 3 (the SIP URI that triggers this rule set). Use the route pattern value to match an incoming call's From, To or From/To value, and apply the appropriate rules of the route and account. For examples of route patterns, see Examples of Route Patterns.
  5. Virtual Pattern—Clicking in this field automatically updates the field with the value from the Route Pattern field. To change this value, specify the virtual route pattern to use for the current route. This value specifies the destination where the calls matching the route pattern are forwarded once recording rules have been evaluated. The Virtual Route Pattern is used in conjunction with the Session Agent defined in Manage Sites. A full SIP URI can be provided to override this value. For examples of virtual route patterns, see Examples of Route Patterns.

    Note:

    The Virtual Pattern parameter is used only for application types of Default Pass-Through and Record and Save.
  6. Label—Edit the name of this route. For display, such as in the recordings view, the route label replaces the value corresponding to the Route Type. For example, in a 'To' route, the 'To' value is replaced with the route label. This may be useful to replace the number given by the service provider with a number more familiar to the users.
  7. Priority—Edit the priority for this route. Routes with a higher priority number are matched before routes with a lower priority number. Valid values are 1 through 9. Default is 5.
  8. Click Update to save the changes.

Route Advanced Configurations

The Route Advanced Configurations on the Routes page allows you to configure:

  • Recording parameters
  • Video Recording parameters
  • Recording Editing Permissions
  • Record and Save Mode parameters
  • Archiving parameters
  • Capacity parameters
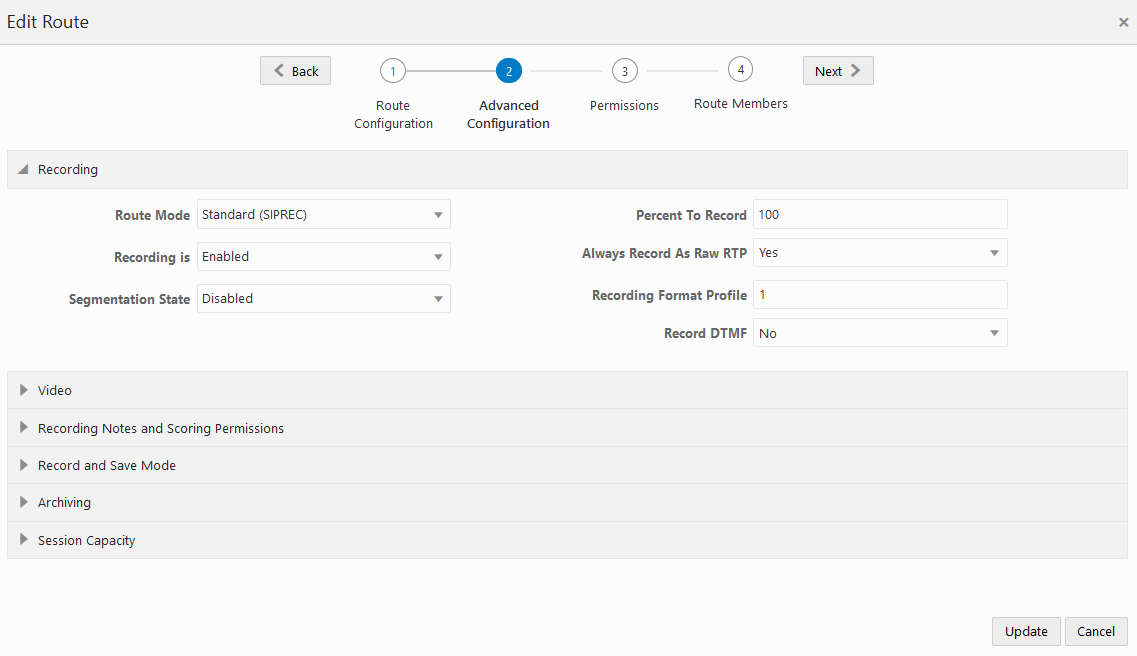
This screenshot shows the routes' page's advanced configuration details.

Recording

The Recording section of the Edit Route page allows you to configure recording properties for a particular route.

To configure the route recording properties:
  1. From the Routes page, select a route and click Edit.

    The Edit Routes page displays.

  2. Click Advanced Configuration.
  3. Click Recording.
  4. Route mode—Select the type of recording you want this route to perform. Valid values are:
    • Standard (SIPREC)—ISR records as the Session Recording Server (SRS) in a SIPREC architecture.
    • Record and Save—The ISR records calls and only saves them if the Record and Save on DTMF key (see Record and Save Mode Defaults) is pressed by one of the parties on the call. If no key is pressed, the recording is automatically discarded. When you select this option, the Percent to Record, Route Can Record, and Default Recording State parameters become grayed-out.
  5. Recording is—Select whether or not calls on this route are recorded. This parameter is enabled by default.
  6. Segmentation State—Specify the type of segmentation recording you want to use for this route.
    • Enabled—Segmentation is always on
    • Disabled—Segmentation is always off
    • Ad-Hoc Only—Segmentation may only occur in the "ad-hoc" recording mode
    • Default to Account—Segmentation follows the Route's Account configuration.
  7. Percent To Record—Specify a value for the percentage of calls to record on this route. Valid values are 0 - 100. The default value is 25.
  8. Always Record As Raw RTP—Select Yes when multiple transmission codecs are present in a session. If set to No with multiple transmission codecs present in a session, the ISR does not record the call properly.
  9. Recording Format Profile—Select the recording format profile you want to assign to this account. The default value is Use System Account’s Profile.
  10. Record DTMF—Select whether routes for this account record DTMF digit presses by default. The default value is Use System Account's Setting.
  11. Click Update.

For information on the remaining "Recording Advanced Configuration" fields, see "Recording Defaults".

Video

You can enable or disable video recording for a Route.

  1. On the Admin page, click Routes.
  2. Select a route from the Routes page and click Edit.
  3. Click Video to expand the video information.
  4. In the Video recording is field, enable or disable video recording. By default, video recording is disabled.
  5. In the Video Access Permissions field, specify whether users are allowed to access video recordings. By default, users are enabled.
  6. Click Update.

Recording Notes and Scoring Permissions

The Recording Notes and Scoring Permissions section of the Edit route, Advanced Configuration page allows you to set permissions for recording notes and scoring. You can configure the following:
  • Editing of the Agent ID
  • Editing of a Rating
  • Editing of a Completed Transaction
  • Editing of Notes

Record and Save Mode

For information about configuring the Record and Save Mode fields, see Record and Save Mode Defaults.

Archiving

The ISR allows you to specify the minimum number of days to store the recordings associated with a route and account. From the Routes, Advanced Configuration, Archiving page, set this value using the Keep Recordings for parameter. The Recording and Storage Server (RSS) in the ISR manages the storage of the recordings.

Capacity

For information about configuring the Capacity fields, see Sessions Capacity Defaults.

Route Members

A Route Group is a group of routes for a specific account, with the same parameters that are associated with the route in focus (Master Route). You can add or delete multiple routes to/from a Route Group as required. Adding routes to a Route Group ensures that all of the routes in the group have the same rules as the Master Route. All routes in the group must be of the same type (To, From, From/To).

To set up a Route Group, you must have a Master Route previously created with the desired parameters (recording percentage, file formats, announcements, custom data fields, etc.). To create a Master Route, see "Adding a Route".

Note:

All Changes made to a Master Route apply to all of the routes in the Route Group.

Adding a Route to a Route Group

To add a route to a Route Group:

  1. Ensure you have a route configured that you want to use as the Master Route.
  2. On the Admin page, click Routes. The Routes page displays.
  3. Select the route that you want to use as the Master Route, and click Details. The following page displays.
    This screenshot shows the routes' page.
  4. Click Create. The Create Route Member dialog box displays.
  5. Pattern—Specify a route pattern to use for this route. This field is based on the Route Type currently set for the Master Route. Use the route pattern value to match an incoming call's From, To or From/To and apply the appropriate rules of the route and account. For examples of route patterns, see Examples of Route Patterns.
  6. Virtual Pattern—Specify the value of the destination where the calls matching the route pattern are forwarded once recording rules have been evaluated. This value can be a To number. If you defined a Session Agent at Manage Sites, a full SIP URI can override this number. For example of route patterns, see Examples of Route Patterns.

    Note:

    The Virtual Pattern parameter is used only for application types of Default Pass-Through and Record and Save.
  7. Click Create to add the Route to the Route Group. The Edit Route page displays with a Route Members tab available.
  8. Add additional Member Routes to the Route Group if required by clicking New Member Route and repeat Steps 5, 6, and 7.

Deleting a Route

You can delete routes in the ISR Dashboard as required.

To delete a route:

  1. On the Admin page, click Routes.
  2. Select a Route from the Routes page and click Delete. The following message and prompt displays.
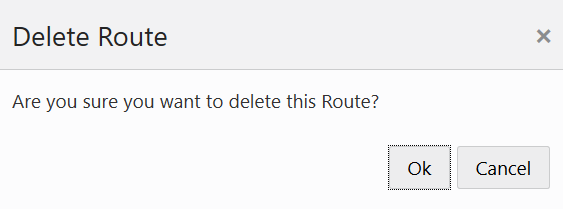
    This screenshot shows the delete route dialog box.

    Note:

    When you delete a route, the recordings associated with the route continue to exist in the system and are not removed by Archiver retention policies. If these recordings need to be deleted, it must be done manually.
  3. Click OK to continue and delete the route and all associated web service appliances and data or click Cancel to cancel the delete function.

    Note:

    Once you delete a route, it cannot 
be recovered. All associated web service appliances 
and data, as well as any associated route group 
members are deleted.

Importing a Route CSV File

You can create routes for an account(s) in a CSV file and import the data from the file into the ISR database.

Note:

Ensure the values provided in the CSV file match the values in the table provided or the ISR displays an error message.

To import route information from a CSV file:
  1. Using any application that can save to a CSV file, create a file that contains the parameters required for creating a route.
    • Boolean (yes/no) values must be entered using 0 (yes or enabled) and/or 1 (false or disabled).

    • The ISR does not ignore any leading and/or trailing spaces, so ensure your CSV does not have any.

      The following table provides the parameters you must enter in the CSV file. Parameters must be entered in the same order presented below.

      Parameter Heading Valid Values
      route_type 0 From

      1 To

      2 From/To

      route_pattern text
      virtual_route_pattern text
      label text
      priority 0.1 to 0.9
      account_name alpha-numeric characters
      percent_to_record 0 to 100
      recording_enabled 0 | 1
      default_recording_type 1 None: Account or System default (default)

      2 WAVE Linear/8bit/8KHz stereo

      3 WAVE Linear/16bit/8KHz stereo

      4 WAVE Linear/8bit/8KHz mono

      5 WAVE Linear/16bit/8KHz mono

      6 WAVE uLaw 8bit/8Khz stereo

      7 WAVE aLaw 8bit/8Khz stereo

      8 WAVE uLaw 8bit/8Khz mono

      9 WAVE aLaw 8bit/8Khz mono

      10 Raw uLaw 8bit/8Khz mono

      11 Raw aLaw 8bit/8Khz mono

      12 Raw PCM 8bit/8KHz mono

      13 WAVE ADPCM 4bit/8KHz mono

      14 WAVE ADPCM 8bit/8KHz stereo

      agent_id_editable_flag 0 | 1
      rating_editable_flag 0 | 1
      completed_editable_flag 0 | 1
      notes_editable_flag 0 | 1
      application pass_through

      conference

      record_and_save

      call_parking

      vam_sip_test

      maximum number of ports digits (-1 for no limit)
      number_of_burst_ports digits (-1 for no limit)
      minimum_storage_days 0 to 365

      Example File with Parameters and Values

      This image shows an example CSV file with parameters and values.
  2. Save the file as a <filename>.csv file (for example, RouteB.csv).
  3. Login to the ISR Dashboard.
  4. Click Admin in the main menu (or Edit System Configurations on the Home page).
  5. Click Routes. The Route page displays.
  6. Click Import. The following dialog box displays.
    This screenshot shows the routes page's import dialog box.
  7. CSV File to Upload—Click Choose File and navigate to the CSV file you are importing, select the file and click Open to populate the field.
  8. Click Upload to upload the route CSV file to the ISR database.

    Note:

    The new route is added to your Routes page and displays the values that correspond to the values you specified in the CSV file.

    The dashboard also provides guidelines for creating your file and a working sample. Click on Guidelines to display the parameter names you can use in a CSV file when creating a route.

    Click on Sample File, and then click on routes.csv to download an example of a route CSV file you can use as a guideline.