Manage Users

Use the Users link on the Admin page of the ISR Dashboard to manage User profiles in the ISR network.

An Administrator can add, delete, edit, and view users on the ISR. Applicable user functions are dependent on the user access level assigned to the Administrator. Super Users, Account Administrators, and Tenant Administrators have permissions to manage Users.

Select Users from the Admin page to manage Users.

Users Page

This screenshot shows the Users page.

The following table describes the information displayed on the Users Page.

Column Description
User Name Name currently assigned to each User.
User Email Email address of the User. The User enters this email address on the login page. Email address is usually a domain name in the format: <username>@<host server>.<domain name system (.com, .org, .net, .edu, etc.)>
ISR Access Indicates the current status of the User. Status can be:

enabled - Status is active. User can perform functions associated with its user type.

disabled - Status is inactive. User cannot perform functions associated with its user type.

This image shows the error icon. Status detected that an error occurred for this User profile.

Account Primary Account name for which the user is associated.
User Type User level assigned to this user (Super User, Account Administrator, Tenant Administrator, Tenant User, API User).

User Access Levels

The display of information in the ISR Dashboard is dependent on your user level access. Each user has specific permissions and privileges based on their level of access.

The following table indicates the Dashboard features available for each User type.

Functionality Super User Account Administrator Tenant Administratof Tenant User API Users
View/Play Recordings Yes Yes Own Recordings only Own Recordings only No
Generate Reports Yes Yes Reports for own Accts only Reports for own Accts only No
Edit Dashboard Settings Yes Yes Yes Yes No
Manage Realms Yes Yes No No No
Manage Accounts Yes Yes Own Accts only No No
Manage Routes Yes Yes Routes for own Accts only No No
Manage Authorization Services Yes Yes No No No
Manage Users Yes Yes Users for own Accts only No No
Manage Sites Yes View only No No No
View Live Sessions Yes Yes No No -

Note:An API User is specific to the FACE REST API and cannot log into the ISR Dashboard.

Adding a User

Adding a User to the ISR is dependent on your access level permissions. Super Users and Account Administrators can add Users to any account. Tenant Administrators can add Users for their own accounts only. Tenant Users cannot access the Administrator features of the ISR Dashboard.

Use the following procedure to add a user to an account(s).

Note:

You can create a User profile using any application that can save to a comma separated value (CSV) file (i.e., Microsoft® Excel, Notepad®, etc.). Using the ISR Dashboard, you can then import the User profile information from the file (<filename>.csv) to the ISR database.

For more information about importing a User profile into the ISR database, see "Importing a User Profile CSV File".

To add a user:

  1. After logging into the ISR Dashboard, click Admin.
  2. Click Users. The Users page displays.
  3. Click Create. The following page displays.
    This screenshot shows the Create User page.
  4. Primary Account—Select the primary account to assign to this User. Valid values are dependent on the accounts currently configured in the ISR, and the permission level of the User. Default is System.
  5. Name—Enter a name for the user.
  6. Email—Enter the user’s email address. This is the value the User enters in the Email field on the login page.

    For example, smith@acmepacket.com.

  7. Description—Provide a brief description of the user.
  8. Password—Enter a password for the user to specify when logging into the ISR Dashboard. When a user logs into the Dashboard for the first time with their assigned password, the Dashboard prompts the user to change the password for security purposes.
    • Both letters and numbers
    • At least one case-sensitive letter or special character
    • At least 8 characters long

    Note:

    This password expires based on the value you configure in the Dashboard Security Settings' Users Password Expires in parameter. For more information on configuring this value, see "Managing User Dashboard Security Settings" in this guide.
  9. Confirm Password—Re-enter the password from Step 7 to verify you entered the password correctly.
  10. Disable Password Expiry—Specify whether or not this user's password expires.
  11. Preferred Language—Select the language the user uses. The following are the supported options:
    • en—English (default)
    • es—Spanish
  12. Preferred Time Zone Locale—Select the time zone locale or the location closest to the user.
  13. Preferred Time Format—Specify the time format to use.
    • 12 Hours (default)
    • 24 Hours
  14. Type—Select the user type from the drop-down list to assign to this user. Valid values are
    • Super User
    • Account Admin
    • Tenant Admin
    • Tenant User
    • API User

      Available selections in the User Type field are dependent on the permission level of the current user. The following table identifies the values available for each level of access.

      User Type Available User Type Values
      Super User Super User

      Account Admin

      Tenant Admin

      Tenant User

      Account Administrator Account Admin

      Tenant Admin

      Tenant User

      Tenant Administrator Tenant Admin

      Tenant User

      Tenant User N/A
      API User N/A
  15. ISR Access—Specify whether the user is allowed access to the ISR.
  16. Click Create to add the new User. The Edit User page displays.

Editing a User Profile

You can edit a User’s profile as required. Access to a User profile is dependent on your access privileges.

To edit a User profile:

  1. Click Admin.
  2. Click Users. The Users page displays.
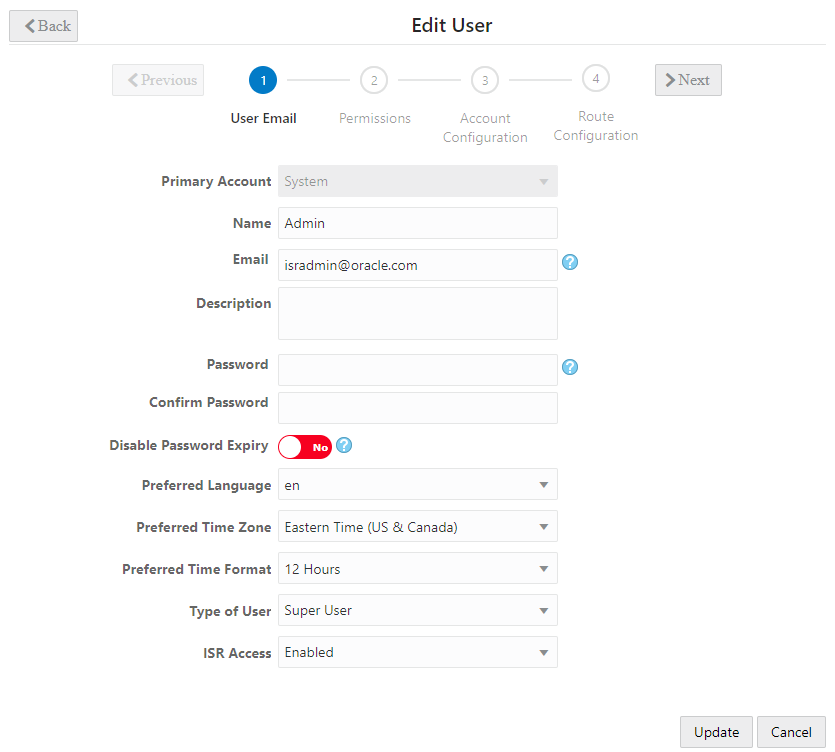
  3. Choose a User and click Edit. The Edit User page displays.
    This screenshot shows the Edit User page.
  4. Edit the parameters for the User as applicable using the procedures defined in "Adding a User".

    Note:

    For an existing user, if you toggle the Disable Password Expiry parameter from No to Yes, the password expiration time is calculated based on the time the password was last changed.
  5. When you are finished editing the User profile, click Update. The changes are saved to the ISR database for this User. The following message displays:

    Successfully saved.

Showing User Activity

The ISR keeps track of a user’s activities while logged into the ISR Dashboard. It logs the following information into a User Audit Trail log:

  • Date and time (based on time zone) that the User performed an action.
  • Specific action that the User performed.
  • Object upon which the action was performed.
  • IP address of the User.

You can view the contents of the User Audit Log by clicking the View User Audit Trail icon for a User on the Users page.

To display the User Audit Trail:

  1. Click Admin.
  2. Click Users. The Users page displays.
  3. Choose a User from the Users page and click Audit Logs. The User Audit Trail for that User displays.
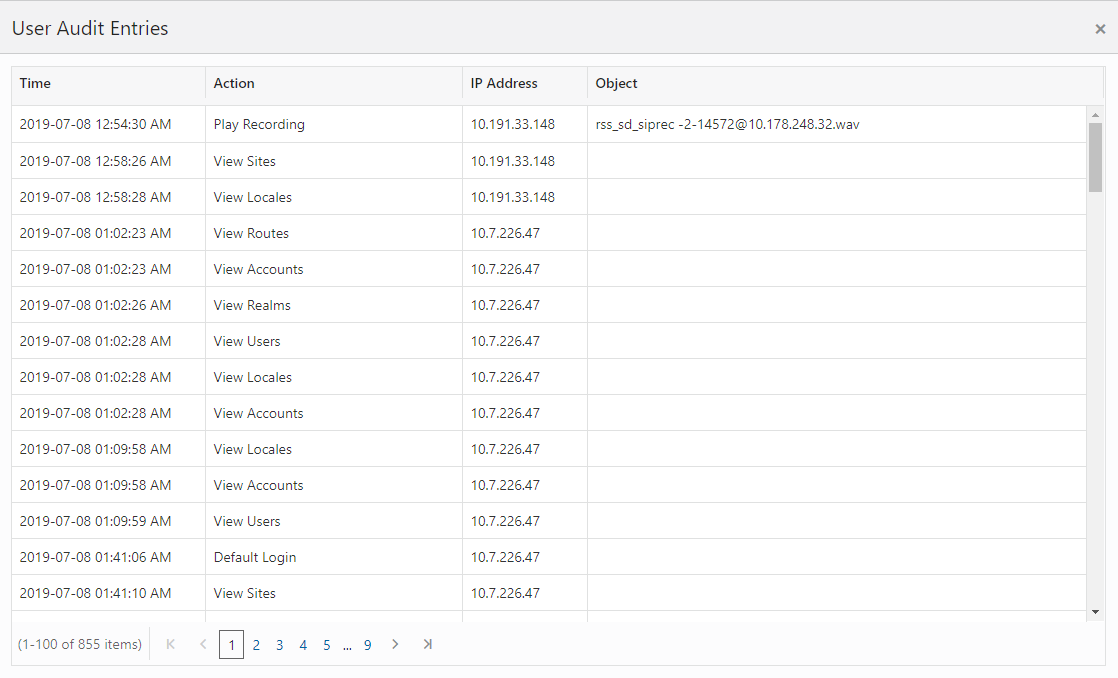
    This screenshot shows the User Audit Entries table.

    The following table describes the information displayed in this User Audit Trail log.

    Column Heading Description
    Time Date and time (based on the time zone of the currently logged in user) when the user performed an action.
    Action Specific action that the user performed.
    IP Address IP address of the User
    Object The file on which the action was performed.

    If more entries exist than can appear in the User Audit Trail log, you can use the scroll bar on the right side of the window to scroll through the list of entries.

  4. To close the User Audit Trail, click the X in the upper-right corner of the window. The Users page displays.

Deleting a User

You can delete users from the ISR database as required.

To delete a User:

  1. Click Admin.
  2. Click Users. The Users page displays.
  3. Select a User from the Users page and click Delete. The following prompt displays:

    Are you sure you want to delete this user?

  4. Click Continue to delete the User from the ISR database. Or click the X in the upper-right corner of the box to cancel the delete function.

Importing a User Profile CSV File

You can create user profiles and assign an account to these users using a CSV file. You can then import the data from the file into the ISR database.

Note:

Ensure the values provides in the CSV file match the values in the table provided or the ISR displays an error message.

To import a user profile from a CSV file:

  1. Using any application that can save to a CSV file, create a file that contains the parameters required for creating a user profile.
    • Boolean (yes/no) values must be entered using 0 (yes or enabled) and/or 1 (false or disabled).

    • The ISR does not ignore any leading and/or trailing spaces, so ensure your CSV does not have any.

      The following table provides the parameters you must enter in the CSV file. Parameters must be entered in the same order presented below.

      Note:

      At the time a user is created, the ISR saves their email address and no one else can create a user with the same email address, regardless of whether it is uppercase or lowercase.
      Parameter Heading Valid Values
      user_name text
      user_email Usually a domain name in the format <username>@<host server>.<domain name system (.com, .org, .net, .edu, etc)>.

      For example: sample_email@abc.com

      description text
      password text
      disable_password_expiry yes | no
      user_type Super User

      Account Admin

      Tenant Admin

      Tenant User

      API User

      account_name text
      login_disabled 0 | 1
      time_zone_locale Name of the Time Zone Locale (for more information, see "Adding a User")
      audit_view_permission 0 | 1
      call_control_permission 0 | 1
      edit_recording_data_permission 0 | 1
      notes_and_scoring_permission 0 | 1
      access_to_all_routes_in_account 0 | 1

      Example File with Parameters and Values

      This image shows a sample spreadsheet file with parameters and values.
  2. Save the file as a <filename>.csv file (for example, RouteB.csv).
  3. Login to the ISR Dashboard.
  4. Click Admin.
  5. Click Users. The Users page displays.
  6. Click Import. The following dialog box displays.
    This screenshot shows the Import dialog box.
  7. Click Choose File and navigate to the CSV file you want to import, select the file, and click Open to populate the field.
  8. Click Import to upload the User Profile CSV file to the ISR database.

    The new user is added to your Users page and displays the values that correspond to the values you specified in the CSV file.

    The dashboard also provides guidelines for creating your file and a working sample. Click Guidelines to display the parameter names you can use in a CSV file when creating a route.

    Click on Sample File, then click users.csv to download an example of a route CSV file you can use as a guideline.