3.4.2 Procedure 2 PRE-FULL UPGRADE SYSTEM HEALTH CHECK
Note:
This procedure may be executed outside of the maintenance window.Table 3-7 Procedure 2 PRE-FULL UPGRADE SYSTEM HEALTH CHECK
| STEP # | This procedure determines the health of the MPS before and after full upgrade. Estimated time: 5 minutes | |
|---|---|---|
|
☐1. |
MPS A and B: Log in to the server as the user “root”. |
|
|
☐2. |
MPS A and B: Validate date, time and time zone to ensure accuracy. |
|
|
☐3. |
MPS A and B: Run the “hastatus” command to verify the HA state of this server. |
Run the following command on both LSMS A and B to verify the HA state of mated LSMS pair. Verify that the hastatus of one of the servers is Active and the other is Standby. WARNING: If the output from the above command is anything else other than “ACTIVE” and “STANDBY”, do not proceed with this procedure and contact My Oracle Support following the instructions on the Appendix E. |
|
☐4. |
LSMS Standby server: Verify that the STANDBY server’s MySQL replication is functioning properly. |
Run the following command to verify that MySQL replication is working correctly on the STANDBY LSMS server: If MySQL replication is functioning correctly then the following output will be observed, make sure that at least the last line of your output matches the lines below. WARNING: If at least the last line of your output does not match the lines above then do not proceed with this upgrade and contact My Oracle Support following the instructions on the Appendix E. |
|
5. |
LSMS Active server: Verify that the ACTIVE server’s MySQL replication is functioning properly. |
Run the following command to verify that MySQL replication is working correctly on the ACTIVE LSMS server: If MySQL replication is functioning correctly then the following output will be observed, make sure that at least the last line of your output matches the lines below. |
|
WARNING: If at least the last line of your output does not match the lines above then do not proceed with this upgrade and contact My Oracle Support following the instructions on the Appendix E. |
||
|
☐6. |
MPS A and B: Execute syscheck |
|
|
☐7. |
LSMS Active server: Capture the output of ‘sentry status’ command |
Run the following command on the ACTIVE LSMS server to display the current LSMS sentry status: Note: Verify that the output displays a Status of “running” for all processes; the regional processes (npacagents) may or may not be associated in the Comment field. If the output from this command displays any other Status than “running” contact My Oracle Support following the instructions on the Appendix E. Capture the output from this command and make it available to Oracle Technical Services if required. |
|
8. |
LSMS Active server: SSH to NAS server and execute syscheck. |
|
|
||
|
☐9. |
Note down the Time zone |
Note the time zone which will be required to be configured post upgrade. Select Server Configuration and press [ENTER]. 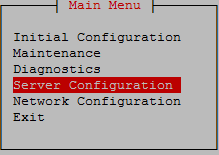 Select Time Zone and press [ENTER]. 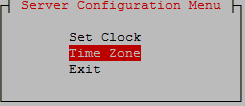 The screen shows the current time zone setting. |
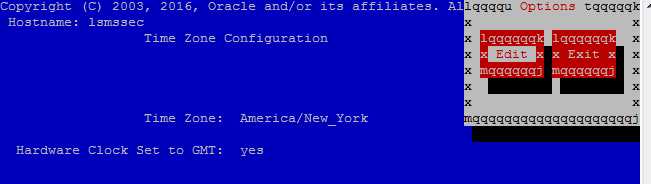 |
||
|
10. |
Repeat on the day of the scheduled full upgrade |
All Health Checks should be repeated the day of the full upgrade. If any problems are encountered, resolve before proceeding further. |
|
This procedure is complete! |
||