Cable the Oracle X7-2
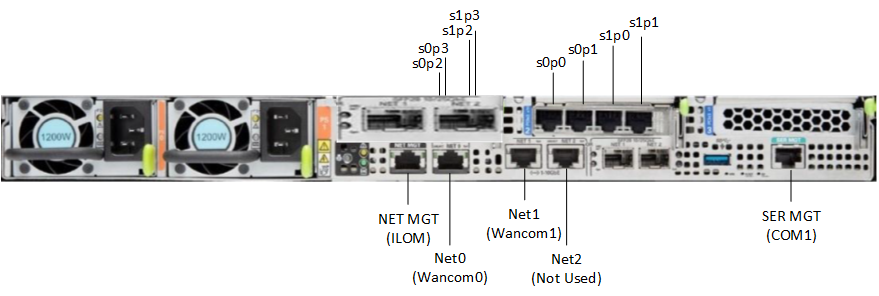
After mounting the Oracle X7-2 in an equipment rack and installing all components, use the following instructions to connect all appropriate data cables to the ports before powering the system up and beginning the configuration.
Oracle has qualified the following configurations of the Oracle X7-2:
- Configuration A: One Four-port 10 GigE NIC
- Configuration B: Two Four-port 10 GigE NICs (each of the three slots are qualified)
- Configuration C: One QSFP
NIC (in quad port mode only) and ONE Four-port 10 GigE NIC
Note:
The 40G interface speed is not supported.
On board interfaces for all configurations include:
- One RJ-45 serial management (SER MGT) port
- One 10/100/1000BASE-T RJ-45 Oracle Integrated Lights Out Manager (ILOM) service processor (SP) network management (NET MGT) port
- One 1000BASE-T RJ-45 Gigabit Ethernet (GbE) port, labeled NET 0
- Two 10/25GbE SFP+ Ethernet ports, labeled NET 1 and NET 2
- Two 10GBASE-T RJ-45 Gigabit Ethernet (GbE) ports, labeled NET 1 and NET 2
Note:
The 10/25GbE SFP+ Ethernet NET 1 port is the HA port. When using an SFP+ port, network connectivity is disabled on the 10GBASE-T RJ-45 GbE (NET 1) Ethernet port.Figure 3-11 Oracle X7-2 Configuration A (4x10 GigE NIC)

Figure 3-12 Oracle X7-2 Configuration B (Two 4x10 GigE NICs)

Figure 3-13 Oracle X7-2 Configuration B (One QSFP and One 4x10 GigE NICs)

Caution:
Please review your Oracle X7-2 Product Notes. Notes for release 1.1.2 describes physical issues with some optical transceivers installed into an SFP28 port.Oracle recommends using Category 6 (or better) for all Ethernet connections.
You do not need to use every port for proper operation.
Available Connections
Please read all of the information for each of the available connections prior to cabling the Oracle X7-2.
| Port | Description | You Need: |
|---|---|---|
| NET (0-2) |
From left to right:
Enables you to connect the Netra X7-2 to your network. |
A Category 6 (or better) Ethernet cable to
connect to the NET 0 port to your network
Network parameters such as an IP address (can be provided by DHCP services or assigned a static address in the OS) Additional Category 6 (or better) Ethernet cables and Ethernet addresses as needed for additional connections to NET 0, 1 and 2. |
| NET MGT | Provides a 10/100/1000 BASE-T Ethernet connection to the Service Processor (SP) through an RJ-45 connector. The NET MGT port provides support connections to the SP using the Oracle Integrated Lights Out Manager (ILOM) CLI and Web interface. By default, the NET MGT port is configured to use DHCP to automatically obtain an IP address. Alternatively, you can assign a static IP address to the NET MGT port. To use the NET MGT port, you must configure its network settings. Once configured, use the NET MGT port IP address to log on to the device using a browser or secure shell. | Category 6 (or better) Ethernet cable to
connect the NET MGT port to your network
IP address for this port (required from DHCP or a static address) |
| SER MGT (COM1) | Provides a TIA/EIA-232 serial Oracle/Cisco
standard connection to the SP through an RJ-45 connector.
This interface connects to either Service Processor by default, but can be redirected to the host. Default settings:
|
A terminal device (e.g., terminal, connection
to a terminal server, or computer such as a laptop running terminal emulation
software)
A cable to connect the terminal device to the SER MGT (COM1) port |
| USB | Provides USB3.0 connection to the computer. The USB port is hot pluggable, so you can connect and disconnect USB cables without affecting server operations. | Installation media
Note: Maximum USB cable length: 5 meters |
Cable the Local Console
You can connect the Administration console to the local SER MGT (COM1) serial console port. You can also operate the console using serial emulation over ILOM.
- Connect a serial console cable with an RJ-45 connector to the SER MGT port.
- Connect ethernet to the ILOM port and use serial emulation.
When configuring boot loader parameters, set the Console Device to COM1. Never use COM2 or VGA. The Oracle X7-2 server cannot boot the system when set to the default of VGA. You must change this bootparameter when deploying over this platform.
Refer to the section "Change Boot Parameters by Interrupting a Boot in Progress" within the Installation and Platform Preparation Guide to learn how to set your Console Device bootparameter to "COM1". Refer to (http://docs.oracle.com/cd/E93361_01/html/E93392/gtibt.html) to learn how to run an SSH session via iLOM using Virtual Serial Port Emulation.
Follow this procedure to cable your console:
Connect ILOM to the Oracle X7-2
Use the following procedure to make a connection to the Oracle X7-2 Oracle Integrated Lights Out Manager (ILOM) port. For a remote permanent connection to the Service Processor over the ILOM connection, use the rear panel NET MGT port.
Note:
Keep Ethernet cables separated from power cables by at least 60mm where possible and never run them in the same channel of the rack without segregation.- Category 6 (or better) Ethernet
- Refer to the Oracle X7-2 hardware documentation (https://docs.oracle.com/cd/E72435_01/html/E72440/index.html) for information on how to configure the Web browser application to connect to the console, and how to establish communications with the Oracle X7-2.