Follow the steps below to deploy the
Oracle Communications Session Border Controller (SBC) on Hyper-V on
Windows 2012 R2 (Generation 1). This procedure assumes you understand
deployment with Hyper-V hypervisor and that the majority of deployment tasks,
from hardware installation and startup to Virtual Machine (VM) resource and
management setup, are complete.
For information on Hyper-V, refer to the following link.
https://docs.microsoft.com/en-us/windows-server/virtualization/virtualization
Before You Begin:
- Refer to your
SBC version's Release
Notes for minimum required memory and CPUs.
- Confirm that the Hyper-V
hypervisor is installed on an appropriate network server.
- Confirm that the server
has 40GB of space for this installation.
- Confirm the number of
network interfaces needed for your deployment. (Wancom0, wancom1 and wancom2
should be Legacy Network Adapters; all others should be Network Adapters (PV).
- Confirm the amount of
memory needed for your deployment.
- Confirm the number of
processors to use for your deployment.
- Confirm your .vhd (Virtual
Hard Drive) file is available to Hyper-V in a permanent location. Keeping this
Oracle distribution on the same physical server as the Hyper-V manager ensures
the best access to it during
SBC operation.
The following procedure describes an example that provides basic
deployment guidelines. Steps for deploying your system may differ. You may, for
example, decide not to use the wizard. In addition, the Hyper-V Manager
provides access to its controls and wizards from multiple entry points.
Instances of Hyper-V Manager may display the
Actions dialog in
the upper-right pane of the manager's main window, but you may find your
Actions controls
elsewhere in your manager. Regardless of access, you use this dialog to start
and run the
New,
Virtual
Machine wizards used in this procedure.
- Start the Hyper-V
Manager.
- Start the
Virtual
Switch Manager from the
Actions dialog.
Hyper-V displays the
Virtual
Switch Manager dialog.
- Click the
Create
Virtual Switch button.
Hyper-V modifies the
Virtual
Switch Manager dialog, presenting fields within which you specify
your new switch.
- Add virtual
networks for each management and media interface. Set the following on the
Create
Virtual Switch dialog for each switch you create:
- Virtual switch
Name
- Uncheck
Allow
management operating system to share this network adapter
- The switch for
wancom1, wancom2 can be
internal or
external. High
availability via external (eg, separate hypervisor platforms) is preferred.
- All other
switches must be
external.
During installation, the
SBC enumerates and
binds network interfaces in the order presented by the hypervisor to the
SBC. This "presented"
order is the same order in which you create networks. If the manager presents 3
or less interfaces, the bind order is wancom0, s0p0, s1p0. If it presents more
than 3 interfaces, the bind order is:
- wancom0
- wancom1
- wancom2
- spare
- s0p0
- s1p0
- s0p1
- s1p1
- Click
New,
Virtual
Machine
Hyper-V displays the introductory page of the
New Virtual
Machine Wizard.
- Click
Next.
Hyper-V advances through the
New Virtual
Machine Wizard pages each time you click
Next. The wizard
allows you to go back to the Previous page, Cancel the wizard, or Finish the
wizard with the respective buttons. Your procedure through the wizard may vary,
depending on your infrastructure and intent.
- Enter or select at
least the following as you progress through the wizard.
- Type a name for
your VM in the
Name field.
- Select
Generation 1 as your
machine type.
- Assign the
desired memory.
- Click
Next, skipping the
Configure Networking dialog. You add networks later in the process.
- Connect to the
Virtual Hard Disk you downloaded by selecting the
Use an
existing virtual hard disk radio button and browsing to your .vhd
file.
- Finish
The Hyper-V Manager returns to the main dialog, displaying
your new machine in the Virtual Machine list.
- Right click the VM.
The Hyper-V Manager displays a pop-up menu.
- Click
Settings
....
The Hyper-V Manager displays the
Settings dialog for
your Virtual Machine displaying the
Add
Hardware controls in the right-hand pane.
- Select
Legacy
Network Adapter and click the
Add button.
The Hyper-V Manager displays the
Legacy
Network Adapter dialog.
- Select wancom0 you
configured for your Virtual Machine from the drop-down listbox and click the
Apply, then the
OK buttons. Repeat
this step for wancom1 and wancom2 if you are using these interfaces.
The Hyper-V Manager returns to the initial Settings dialog
and adds this adapter to your machine's component list in the left-side pane.
Only configure wancom0, wancom1 and wancom2 as
Legacy
Network Adapters.
- Select
Network
Adapter and click the
Add button.
The Hyper-V Manager displays the
Network
Adapter dialog.
- Select the first
adapter after wancom0 that you configured for your Virtual Machine from the
drop-down listbox and click the
Apply, then the
OK buttons.
- Repeat the previous
step for the rest of your adapters, referring to the order described above.
- Re-Open the
Settings
... dialog.
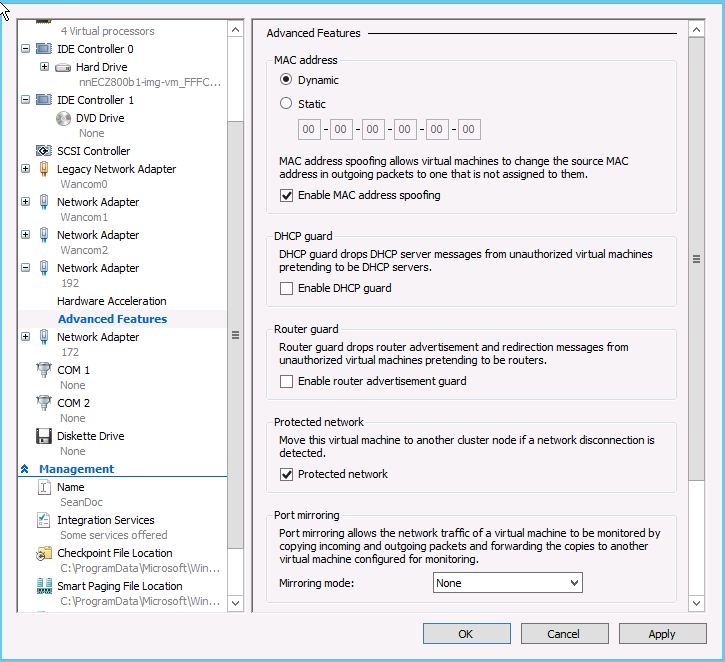
- For each
Network
Adapter, click the
+ sign beneath it to
display the
Hardware
Acceleration
Advancedlinks.
- For each
Network
Adapter's,
Hardware
Acceleration settings, uncheck the
Enable
virtual machine queue checkbox.
Apply and
OK these changes.
- For each media
interface's
Network
Adapter,
Advanced settings,
check the
Enable MAC
address spoofing checkbox.
Apply and
OK these changes.
- Select
Processor from the
left-side pane, increase the number of processors for your deployment and click
Apply, then
OK to close the VM
Settings dialog.
- Right click your
SBC VM and Click
connect.
The Hyper-V Manager displays a VM connection dialog.
- Click the
Power
Button icon to turn on your
SBC VM.
- Observe the machine
boot process via the connection window until the boot finishes.
Note:
If your
hypervisor randomly allocates addresses for network interfaces, the interface
order at the hypervisor may not match that at the
SBC. If necessary, you
can use the
interface-mapping
show command to determine the MAC address-to-interface order and
adjust it using the
interface-mapping
swap command.
- Proceed with
SBC configuration.
