- Installation Guide for Oracle Fusion Middleware 11g
- Install the Oracle Database Software
- Install the Oracle Database Software
Install the Oracle Database Software
- In the Configure Security Updates window, provide an e-mail address in the Email field if you want to receive security updates from Oracle. If you want to receive security updates from My Oracle Support, check the checkbox, and enter your password in the My Oracle Support Password field.
- Click Next.
- Click Yes to confirm.
- In the Select Installation Option window, select Create and configure a database and click Next.
- In the
Select
System Class window, select
Desktop
Class and click
Next.
Note:
The Desktop Class is sufficient for Report Manager and BI Publisher to use the Oracle database. - In the
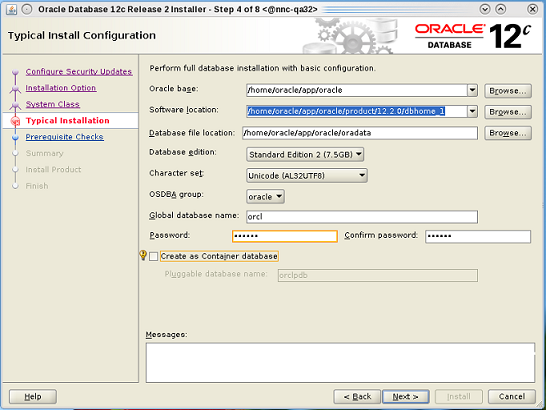
Typical
Installation Configuration window, keep the fields identified with
default values and change any of the fields as required below:
Oracle base field (Default) /home/oracle/app/oracle Software Location field (Default) /home/oracle/app/oracle/product/12.2.0/dbhome_1 Database file location field (Default) /home/oracle/app/oracle/oradata Database edition drop-down list Select Standard Edition 2. Character Set drop-down list Select Unicode (AL32UTF8). OSDBA Group drop-down list (Default) oracle If the OSDBA Group is specified with another group by default, you must change it to oracle.
Global database name field (Default) orcl Password field Enter the password for the Global Database name. Create as Container database checkbox Uncheck the checkbox. The following example shows the completed Typical Installation Configuration window.

- Click Next.
- If the
Create
Inventory window displays, accept the default values. For example:
Inventory Directory /home/oracle/app/oraInventory oraInventory Group Name oracle - In the Perform Prerequisite Checks window, you may encounter error messages, take the appropriate actions. However, if you do not want to correct them, check Ignore All, and click Next.
- In the
Summary window,
click
Install.
A default database is created. The global database name is orcl and its SID is orcl.The Install Product window appears and shows the progress of your installation. At some point in the installation, the Execute Configuration Scripts dialog box appears. Proceed to the next section for more information.