Updating Unified Assurance
Learn about how to update Oracle Communications Unified Assurance packages to the latest version.
About Updating Unified Assurance
The Unified Assurance package system allows for near seamless installation of new packages and updates to installed packages. Installing updates is first done on the primary presentation server, then other servers can be updated as well.
The image shows the update process for four individual servers running Unified Assurance: a presentation server, a database server, a processing server, and a collection server. For simplicity, the example shows a non-redundant setup. You perform an update in the following order:
-
First, update the primary presentation server, as shown in the second column.
-
Next, update all the other servers at the same time, as shown in the third column.
-
When the update is being installed, the database, processing, and collection servers check the primary presentation server's version and update to the same version.
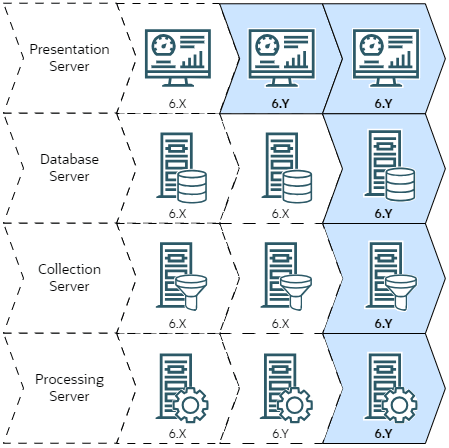
Description of illustration update-path.png
Updating Unified Assurance
To update Unified Assurance:
-
On the primary presentation server, download the latest available Unified Assurance patch, and extract the contents of the collection file to the installation directory where you initially installed Unified Assurance. This is typically /opt/install, and is referred to as <installation_directory> in the documentation.
See Downloading the Latest Unified Assurance Software for more information about where to get the software and how to extract the collection file.
-
In the Unified Assurance UI, from the Configuration menu, select Broker Control, then Servers.
-
In the grid, select the primary presentation server.
-
From the Version menu, select the version you want to install.
-
Click Update Server(s) and wait for the Status column to show Complete.
Updated packages are copied from the directory where they were extracted into the internal package location on the primary presentation server. After the package files are copied, packages that have updates on the primary presentation server are installed.
-
Select all other servers by holding Ctrl or Shift and clicking the servers.
-
Click Update Server(s).
Packages that have updates available are downloaded from the primary presentation server to the other servers. After the packages are downloaded, packages that have updates on the server are installed.
When all servers show Complete, the package update process is complete.
Proceed to Post-Update Tasks.
Post-Update Tasks
After updating Unified Assurance, complete post-update tasks:
-
If you have any microservice clusters, you must update them and all deployed microservices. See Updating Microservice Clusters and Microservices
-
If you are updating from any version to 6.1.1.X.X (including updating to 6.1.1.5.0 or later in preparation to upgrade to version 7), if you want to use an Oracle or PostgreSQL database with Unified Assurance, see Adding Libraries for Oracle and PostgreSQL Databases.
-
If you want to enable SELinux when it was previously disabled, see Enabling SELinux After Updating.
Updating Microservice Clusters and Microservices
After updating from and to any version of Unified Assurance, you must upgrade the microservice cluster and all deployed microservices on all microservice cluster servers by using the clusterctl upgrade and a1helm upgrade commands.
After updating all servers in the microservice cluster, do the following on the server with the Cluster.Master role where you first created the cluster:
-
As the assure1 user, update the Helm repository:
a1helm repo update -
As the root user, upgrade the cluster:
$A1BASEDIR/bin/cluster/clusterctl upgrade -
Upgrade all microservices by repeating the following command for each deployed microservice:
a1helm upgrade <microservice-release-name> assure1/<microservice-name> -n <namespace>where:
-
<microservice-release-name> is the release name for the microservice deployment. For example, pulsar.
In most cases, this is the same name as the microservice, but you may have used a different value if you deployed multiple instances of a microservice in the same cluster.
-
<microservice-name> is the name of the microservice. This is also the name of the Helm chart for the microservice. In most cases, it is the same as the microservice release name.
-
<namespace> is the namespace where the microservice is deployed. For example, a1-messaging.
Note:
You can only use a1helm upgrade to upgrade microservices that do not have configuration changes. You cannot use it to update configuration parameters in the Helm charts of running microservices.
-
Adding Libraries for Oracle and PostgreSQL Databases
If you are updating to version 6.1.1.X.X from any previous version, and you want to use an Oracle or PostgreSQL database with Unified Assurance, you must add required libraries. This includes updating to version 6.1.1.5.0 in preparation to upgrade to version 7.
-
On all servers:
-
Run the following commands as the root user:
-
For an Oracle database:
dnf install libnsl -
For a PostgreSQL database:
dnf install libpq
-
-
For Oracle databases only, copy over the library files:
-
Switch to the assure1 user and create the following directory:
su - assure1 mkdir -p $A1BASEDIR/lib/oracle/lib -
Copy the following files to the new directory from their location on your Oracle Database installation:
-
libclntshcore.so.19.1
-
libclntsh.so.19.1
-
libnnz19.so
-
libociicus.so
-
-
Run the following command to confirm the directory structure:
ls -al $A1BASEDIR/lib/oracle/lib/The output should look similar to this:
drwxr-xr-x 2 assure1 assure1      100 Sep 22 16:07 .
drwxr-xr-x 3 assure1 assure1       17 Sep 22 16:07 ..
-rwxr-xr-x 1 assure1 assure1  8040416 Feb 17  2023 libclntshcore.so.19.1
-rwxr-xr-x 1 assure1 assure1 79927312 Feb 17  2023 libclntsh.so.19.1
-rw-r--r-- 1 assure1 assure1  6587832 Feb 17  2023 libnnz19.so
-rwxr-xr-x 1 assure1 assure1  6599152 Jun 17 08:48 libociicus.so
-
-
-
(Optional) If you want to use the Databases UI to create and manage the databases, on each presentation server (primary, secondary, and external), edit the php.ini file:
-
Switch to the assure1 user, if you did not already:
su - assure1 -
Open the php.ini file located in the $A1BASEDIR/etc directory.
-
Locate the following lines and uncomment them by removing the leading ;:
-
For an Oracle database, change the following:
;extension=pdo_ociTo:
extension=pdo_oci -
For a PostgreSQL database, change the following:
;extension=pdo_pgsqlTo:
extension=pdo_pgsql
-
-
Save and close the file.
-
-
On the internal presentation server:
-
Switch to the root user, if you did not already, and restart the Unified Assurance web service:
systemctl restart assure1-web -
Stop and restart the DatabaseWatchdog service:
-
Get the ID for the DatabaseWatchdog service:
$A1BASEDIR/bin/BrokerControl --batch listservices | grep DatabaseWatchdog -
Stop and then start DatabaseWatchdog, using the returned ID:
$A1BASEDIR/bin/BrokerControl --batch stopservice <ID>
$A1BASEDIR/bin/BrokerControl --batch startservice <ID>
Tip:
You can alternatively use the Services UI to restart the service.
-
-
Enabling SELinux After Updating
Unified Assurance version 6.0.5 and later is supported on systems where SELinux is enabled and set to enforcing.
To enable SELinux after updating, do the following on all servers in the environment:
-
Update the servers as described in Updating Unified Assurance, which includes performing the prerequisite steps described in Configuring SELinux and Installing Required Package Dependencies.
-
Open the /etc/selinux/config file.
Note:
This is the core Linux etc directory, not the Unified Assurance $A1BASEDIR/etc directory.
-
Change the SELINUX= line to SELINUX=enforcing.
-
Save and close the file.
-
Reboot the server.
-
Run the ConfigSELinux application:
$A1BASEDIR/bin/ConfigSELinux enableConfigSELinux confirms that the required dependencies are met and sets up SELinux for the Unified Assurance instance.