Calcs
Calcs are algorithms that define logical and mathematical operations to be performed on data (as defined by a dataset). Calcs take the form of a directed acyclic graph (DAG) that consist of nodes, which provide instructions for individual processes within the calc, and edges, which provides the order of processing for the nodes.
On this page:
Manage Calcs Page
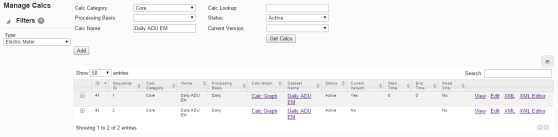
Navigate to the Manage Calcs page by selecting Calcs from the Analytics section of the Manage menu. The Manage Calcs page allows you to add a new calc, view existing calcs, and edit calcs with the Calc XML Editor.
Fields
The top section of the Manage Calcs page allows you to search for calcs matching criteria in the fields.
- Calc Category: Find calcs that belong to the selected Calc Category.
- Processing Basis: Find calcs when you know the calc's processing basis (for example, WEEKLY).
- Calc Name: Find a calc based on its name.
- Calc Lookup: Find a calc based on its lookup value.
- Status: Whether the calc's status is set to Active or Inactive.
- Current Version: Whether the calc is the current version in use.
Buttons
- Get Calcs: Initiates the search for calcs matching the criteria set in the fields. Alternately, you may press Enter when you finish adding content to a field and then click Submit when the system displays a message that the search parameters have changed.
- Add: Opens the Create Calcs dialog box from which you may build a new calc.
Data Table
The data table contains information about the calcs.
- ID: System generated calc ID
- Sequence ID: Calc's sequence ID.
- Calc Category: Category that a calc is assigned to.
- Name: Calc name.
- Processing Basis: Calc's processing basis.
- Calc Graph: Provides a link to open a graphical view of the calc.
- Dataset Name: Name of the dataset used in the calc.
- Status: Whether the dataset's status is set to Active or Inactive.
- Current Version: Whether the dataset is the current version in use.
- Start Time: The date/time when the calc was set to current.
- End Time: End date for the calc. For current version calcs, the end time is set to an arbitrary end date used in the system; when a new version of the calc becomes current, the end time is updated to equal the start time of the new version.
- Read Only: Whether the calc is read-only or may be edited.
Links
- View: Opens the View Calcs dialog box, which displays the same data as provided in the data table row as well as buttons and links that allow you to work with the calc.
- Edit: Opens the Manage Calcs dialog box, which provides the same fields as the View Calcs dialog box, but allows you to edit Category, Name, Time Basis, Calc Description, Dataset Name, Status, and Lock Status.
- XML: Displays the Calcs Definition dialog box, which shows the configuration XML for the calc.
- XML Editor: Displays the Calcs XML Editor.
Buttons
- Expand button: Reveals the data in the data table
row plus the following additional data:
- Calc Role: An optional setting for a role that is applicable to the calc.
- Calc Description: An optional setting that describes the calc purpose.
- Lock Status: Whether the calc is locked to editing.
- Calc Lookup: The alphanumeric lookup value, which is typically the name in all caps without spaces.
- Calc Role: An optional setting for a role that is applicable to the calc.
Note: The data table may be exported by clicking the export data icon above the table's Search field.
Adding Calcs
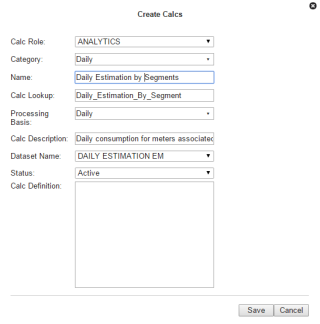
The Create Calcs dialog box opens from the Manage Calcs page.
Fields
A calc is primarily configured with the following attributes:
- Calc Role: A calc can be created with the role selected in the Drawer menu or with an n/a (empty role).
- Category: A category allows calcs to be grouped together for quick viewing from the UI. There is no special significance of the category field from a processing standpoint.
- Name: A user friendly name describing the calc.
- Calc Lookup: A standardized formatted name that is used by calc engines.
- Processing Basis: When running a calc for an extended time period this property controls how the bigger time frame gets sliced into smaller time slices. The calc processing basis should match with the dataset processing basis that it is bound to. Valid time basis examples are: Hourly, Daily, Weekly, Monthly.
- Calc Description: Description of the calc with comments.
- Dataset Name: The drop-down list shows all datasets whose processing basis matches that of the calc. Every calc is bound to a dataset and that a dataset provides all input data to a calc.
- Status: Enable or disable a calc from showing up in the calc list. In addition, an inactive calc (Status = Inactive) cannot be launched from the system's backend.
- Calc Definition: The XML that is generated by building a calc. An existing calc definition may be copied and pasted to this field as a starting point for a new calc.
Buttons
- Save: Saves the calc.
- Cancel: Closes the dialog box without saving the calc.
Creating a Calc
To create a calc:
- On the Manage Calcs page, click Add Calc:
- In the Create Calcs dialog box, do the following:
- Select an appropriate role from the Calc Role drop-down.
- Select an appropriate category from the Category drop-down.
- Enter a descriptive name in the Name field.
- Enter a value
for calc lookup in the Calc Lookup field.
Note: The calc lookup value can be any unique alphanumeric value without spaces. A common practice is to use the calc name without spaces.
- Select a processing basis for the calc from the Processing Basis drop-down list. For example, Weekly.
- Enter a short description of the calc function in the Calc Description field.
- Select whether the calc is Active or Inactive from the Status drop-down list.
- Click Save, and the Create Calcs dialog box will close.
Note: When you click Save, a row is added in drm., calc table. The calc definition, however, is stored in a different table (calc_seq); the sequence table allows multiple versions of the calc to be stored, with one version being the locked calc that will get processed when a calc is launched.
Viewing Calc Information
The View link in a calc data table row launches the View Calc dialog box, which displays the calc information and allows you to view the calc definition, edit the calc information, create a new version of the calc (clone), copy the calc, or run the calc.
Fields
- ID: System generated calc ID.
- Sequence ID: Calc's sequence ID, which is its version number.
- Calc Role: Optional setting for a role that is applicable to the calc.
- Point Type Code: Code representing the object type (for example, EM for electric meter).
- Category: Category that a calc is assigned to. [Editable]
- Name: Calc name. [Editable]
- Calc Lookup: Database lookup value; usually the calc name without spaces in all caps. [Editable]
- Processing Basis: Specifies the time interval data to be analyzed (for example, Daily, Monthly, Weekly). [Editable]
- Calc Description: Optional setting that describes the calc purpose. [Editable]
- Status: Whether the calc's status is set to Active or Inactive. [Editable]
- Lock Status: Whether the calc is locked to editing.
- Start Time: Date and time when the calc became active.
- End Time: End date for the calc. For active calcs, the end time is set to an arbitrary end date used in the system; when a new version of the calc becomes active, the end time is updated to equal the start time of the new version.
- Read Only: Whether the calc is read-only or may be edited.
- Calc Definition: Contains the XML link, which opens the Dataset Definition dialog box.
Buttons and Links
- Edit: Opens the Manage Calcs dialog box.
- Clone: Creates a new version of the calc. The clone's Sequence ID is the original calc's Sequence ID plus one; all other calc information is the same. Cloning allows you to keep the initial calc active while working on modifications to the calc parameters.
- Copy: creates a copy of the calc having a unique ID.
- Set Current: Sets the Current Version flag to Yes.
- Cancel: Closes the dialog box.
- Execute Now: Processes the calc.
Managing Calc Information
The Manage Calcs dialog box opens when you click the Edit link on the calc data table row or the Edit button on the View Calcs dialog box.
Fields
- ID: System generated calc ID.
- Sequence ID: Calc's sequence ID, which is its version number.
- Calc Role: Optional setting for a role that is applicable to the calc.
- Point Type Code: Code representing the object type (for example, EM for electric meter).
- Category: Category that a calc is assigned to.
- Name: Calc name.
- Calc Lookup: Database lookup value; usually the calc name without spaces in all caps. [Editable]
- Processing Basis: Specifies the time interval data to be analyzed (for example, Daily, Monthly, Weekly).
- Calc Description: Optional setting that describes the calc purpose.
- Status: Whether the calc's status is set to Active or Inactive.
- Lock Status: Whether the calc is locked to editing.
- Start Time: Date and time when the calc became active.
- End Time: End date for the calc. For active calcs, the end time is set to an arbitrary end date used in the system; when a new version of the calc becomes active, the end time is updated to equal the start time of the new version.
- Read Only: Whether the calc is read-only or may be edited.
- Calc Definition: Contains the XML link, which opens the Dataset Definition dialog box.
Buttons and Links
- Clone: Creates a new version of the calc. The clone's Sequence ID is the original calc's Sequence ID plus one; all other calc information is the same. Cloning allows you to keep the initial calc active while working on modifications to the calc parameters.
- Copy: Creates a copy of the calc having a unique ID.
- Set Current: Sets the Current Version flag to Yes.
- Cancel: Closes the dialog box.
- Execute Now: Processes the calc.
Defining and Editing XML with the Calcs XML Editor
Once the calc has been added, a row appears in the data table on the Manage Calcs page. There are additional action link buttons that allow a user to view the Calc XML, edit the raw XML, or view the calc.
Note: A calc that is added from the Create Calcs dialog box does not have a calc definition.
The Calcs XML Editor allows you to add nodes and connect them with edges. There are two types of edges: an ordinary edge and a decision edge, which connects a decision node to another node (for example, a save node). A decision edge has a special property (Yes Edge) that allows you to control downstream processing based on the output of the connected decision nodes.
Note: The calc configuration gets saved in drm.calc_seq table as XML.
Buttons
- Save & Close: Save the calc in its current state and closes the editor. If the calc is structurally invalid, it will show a warning indicating that the Calc was saved, but it will fail processing.
- Validate & Save: Validate the calc to make sure it is syntactically valid and shows validation errors, if any exist.
- Preview & Save: View and save a calc image based on the nodes and its connectivity.
- Close: Close the Calcs XML Editor without saving changes.
Graph Components
The Calcs XML Editor uses graph terminology to describe the structure of the calc. The configuration is defined in the Graph Type, which contains Graph Header, Time Windows, Nodes, and Edges.
Graph Header
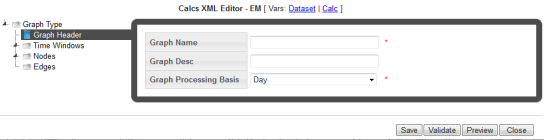
The Graph Header of the includes the following components:
- Header: The header of the Calc Graph where name, description, and processing basis are defined.
- Graph Name: A user friendly name for the Calc Graph
- Graph Desc: The graph description allows users to add valuable documentation information regarding the calc. It can be used as a placeholder to annotate information related to the calc logic, etc.
- Graph Processing Basis: The graph processing basis is the same as the time basis/processing basis field that was earlier defined in the calc table. This information is redundant. This property comes into play when a task is run for an extended period of time. For example, a calc defined with a processing basis of daily is run for a week or a month, it will actually be run once for every day of the week or month. Also, the processing basis of a calc must match with the processing basis of the dataset that it is bound to. This check is ensured when the calc is defined and the dataset name selected from the drop-down.
Time Windows
The Time Windows section allows time windows to be added that are referenced by nodes in the calc. The need for a time window in a calc is limited. A time window is required only for Save Nodes.
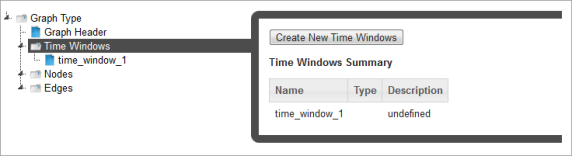
Note: While the schema (XSD) dictates that all nodes of a calc reference a time window, the Calcs XML Editor hides this requirement by making the time window available only when configuring a save node. Behind the scenes, default time windows get added to other nodes.
While saving data as the process date is the most common use case, there are situations where data needs to be saved as a different date that is offset from the process date. A time window helps achieve that. Using a time window attached to a save node data can be saved to any date.
For example, a daily process that would run and derive Average Daily Usage (ADU) over the month and save it as the ADU for the month (Month start Date). In this case you would have an offset based time window with start date = offset of start, unit = month.
Nodes
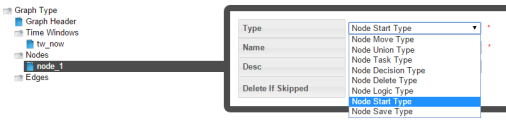
Nodes define what a calc can do. The Nodes section allows nodes to be added. There are several nodes that can be used in a calc:
- Start Node: Where the calc starts processing. Any preceding nodes or any nodes that are not connected to a
tree containing the start node will not be processed. The start node represents the head of the
graph. It serves no purpose other than being the start point of the calc. The start node only requires the Name to be entered; the description
(Desc) is optional.

- Decision Node: Contains custom code. If expression evaluates to TRUE, “yes” edges will be traversed. If not, “no” edges will be traversed. In the decision node, custom code can be written that will dictate branching of the calc logic. A decision node should always return a Boolean value (True/False). Based on the output of the decision node children node will be skipped or processed. A decision node has two required fields Name and an Expression. The expression consists of free form code where variables from the dataset or other upstream nodes can be accessed.
- Union Node: Children nodes will process if at least ONE parent node processes. A union node requires no configuration. When the calc engine encounters a union node, it will check its parent and process children if at least one of the parent were processed, not skipped.
- Logic Node: Contains custom code. What the expression evaluates to has no effect over what nodes are traversed (in contrast to decision node). A logic node in calc is to setup initial variables or temporary variables that get accessed later by downstream child nodes. There is no restriction on the number of logic nodes but as a good practice, add a logic node right after the start node and initialize all temporary data upfront so that it is accessible by all other downstream nodes. The configuration of a logic node is similar to that of the decision node. However, unlike decision node, logic node has no direct output, but rather creates data that can be accessed elsewhere in the program. A logic node requires an expression field to be populated. Within the expression field, you may access dataset variables and other calc variables.
- Save Node: A save node allows data to be saved for any fact type. When
saving data we are concerned about several things:
- Point ID: This is the calc point id for which processing takes place. Remember that every calc requires a dataset. The dataset returns iterators of points and the calc loops over this iterators. The point ID is thus the current point that the iterators returns.
- Fact ID: In order to save data for the correct Fact ID, the Fact
Attr attribute group needs to be configured. The save node is fact type code
sensitive and provides options that match the fact type code being saved. For example, when
saving a relation Parent Point Type Code needs to be specified while it is not a requirement
for other fact types. In the save node, we do not specify the fact ID directly rather provide fact metadata via
fact attributes that are then parsed by the calc engine and get resolved to a Fact ID.
The following is the list of Fact attributes required for non relation facts:- Fact Lookup: A standardized lookup to uniquely identify a fact.
- Fact Name: A unique user friendly name to identify a fact.
- Fact Category: A logical group of facts.
- Fact Sequence: Priority of facts within a category.
- Time Basis: This in most cases should match the processing basis of the calc.
- Role Type Code: Role that was used to define the calc. The role should be inherited from the role used when adding a calc.
- Value: When saving a relation fact Parent Point Name and Lookup are needed, while others require a value source. Value source could point to any dataset variable or a temporary variable that was set within the calc. There is no requirement that the value be set in the parent node of the save node.
- Time Int: Time can be specified using a time window or by setting the Time source
property of the save node. Refer to the earlier section about Time Windows
Note: Time can be specified using time window source or time window. When a time source is provided it will always be chosen over the time returned by the time window. The Delete If Skipped checkbox provides a mechanism to avoid conflicts from "old" data by deleting previously saved data.
- Delete Node: A delete node allows data to be deleted. Just like the save node a delete node requires
configuring the fact attr attribute group, specifying a time int (using time source or time
window). Value source is ignored.
Note: The Delete node is available for use, but it should only be used in rare circumstances; for example, if extraneous data was created due to a problem with a calc, you could use a delete node to remove the data.
- Move Node: A move node allows data from a source fact to be moved to a different fact.
The main purpose of a move node is to remove data from a fact without deleting it. If there is "bad" data that needs to be cleaned up, the data can be moved to a "bad" fact. Other than in rare circumstances where the Delete node could be used, the Move node provides a method to set aside bad data, but keep it available for audit reasons.
Since moving involves two facts, a source fact and a target fact the configuration of move node requires specifying fact attrs separately for the source and target fact attrs.
Creating a Node
To create a node:
- Click Create New Nodes, then select the branch with the new node in the tree view.
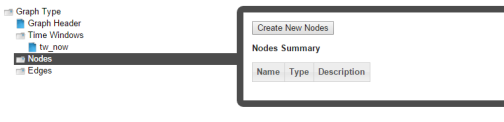
- Select the node type from the Type drop-down list.
Edges
Edges connect two nodes together to create a sequence for node processing. Edge types include:
- Edge: An edge that connects two nodes.
- Decision Edge: An edge that connects a decision node to another node. If Yes is selected, the edge will be traversed when the decision is true.
Variable References
Free form Java code may be written within a decision or logic node; this code can access dataset variables as well as calc variables. In order to assist with calc development and provide a ready reference of all dataset variables and calc variables, two links are available at the top of the Calcs XML Editor: Dataset and Calc.

- Dataset: Opens a dialog box with fully qualified dataset variables and their description along with datatype information.
- Calc: Opens a dialog box with fully qualified calc variables with a usage summary for the variables within different calc nodes.
Accessing Variables
Dataset Variables: The notation followed in accessing a dataset variable is:
context.ds.<field_name>.<metric_name>
For example, if the dataset bound to the calc has a field called Account with a metric called Name, this variable would be accessed in the python expression as:
context.ds.Account.Name
Calc Variables
Getting Calc Variable: The notation followed in accessing a calc variable is:
context.nodes.<node_name>.<variable_name>
For example, if a calc has a node called vars with a temporary variable called average, this variable would be accessed as:
context.nodes.vars.average
Setting Calc Variables: When setting a calc variable the notation to be followed is:
context.self.<variable_name> = xyz
Where self represents that node that you are within.
Cloning a Calc
The clone function, which is found in the View Calcs and Manage Calcs dialogs, creates a new version of the calc; the Sequence ID will be incremented by 1. The clone is unlocked, which allows it to be edited while the original is locked and ready to be processed (Copying a Calc). Once the new version is ready to be put in production, the previous version's End Time is set to the new version's Start Time.
To clone a calc:
- In the View Calcs or Manage Calcs dialog, click Clone to edit the clone.
- When the clone is ready to be deployed, the Manage Calcs dialog will open. Click Set Current to set the original calc's Locked status to Unlocked and the clone's Locked status to Locked.
Copying a Calc
The copy function, which is found in the View Calcs and Manage Calcs dialogs, creates a new calc with a unique ID. Copying allows you to start a new calc from an existing one. The copy has a Sequence ID of 1 since it is the first version of a new calc.
Viewing the Calc Definition XML
From the Calc Definition dialog box, you can view or edit the XML that specifies the calc parameters. The XML is typically defined with the Calc XML Editor, but the Calc Definition allows you to quickly modify XML parameters or define a calc using XML from a similar calc.
Viewing a Calc Graph
Calc graphs provide a flowchart-like view of the calc. Each edge (node connection) is displayed as the node symbols connected by an arrow representing a path in the calc. For example, you could create a calc that creates two lists based on whether consumption is below a value or not.
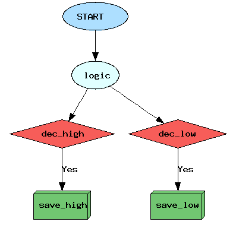
Logic Node: The logic node first creates a logic bucket named 'High' and then tests if the value of consumption data (based on the dataset looking for daily kWh) is below 7 (kWh).
context.self.bucket = 'HIGH'
if context.ds.basic.firstValue < 7: context.self.bucket = 'LOW'
- If the data value is below 7, the bucket will be set to 'LOW'.
- If not, the bucket will remain 'HIGH'.
Decision Nodes: The logic-dec_high edge checks to see if the dec_high node criteria is met.
if context.nodes.logic.bucket == 'HIGH': return TrueThe logic-dec_low edge checks to see if the dec_low node criteria is met.
if context.nodes.logic.bucket == 'LOW': return TrueSave Nodes: The save nodes collect values meeting the criteria for the decision nodes. In this case, lists are created with values meeting the criteria:
- The dec_high-save_high decision edge saves all values in the HIGH bucket.
- The dec_low-save_low decision edge saves all values in the LOW bucket.
Running Calcs
You can run a calc from the View Calcs and Manage Calcs dialog boxes.
To run a calc:
- Click Execute Now to open the Execute Calcs Details dialog box:

- Enter the filter that the calc should operate on and the dates, then do one of the following:
- Click OK to run the calc.
- Click Cancel to close the dialog box without running.