Scenarios
Scenarios act as a wrapper for a collection of calcs to be ran sequentially on a population found using a filter, and run using a scenario task.
On this page:
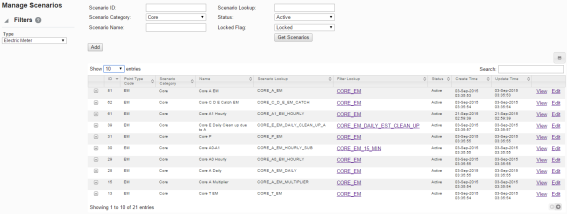
Manage Scenarios Page
The Manage Scenarios page allows you to create, view, and edit scenarios. To navigate to the Manage Scenarios page, select Scenarios from the Analytics section of the Manage menu. The scenarios data table will load with the scenarios that match the selected type .
Fields
The top section of the Manage Scenarios page allows you to search for scenarios matching criteria added to the following fields:
- Scenario ID: System-generated scenario ID.
- Scenario Category : Category that a scenario is assigned to.
- Scenario Name : Scenario name.
- Scenario Lookup : Alphanumeric lookup code for the scenario.
- Status: Scenario status (Active/Inactive).
- Locked Flag : Whether the scenario is locked or unlocked.
Buttons
- Get Scenarios: Initiate the search for scenarios matching the criteria set in the fields.
Note: Alternatively, you may press Enter when you finish adding content to a field and then click the Submit link when the system displays a message that the search criteria has changed.
- Add: Opens the Create Scenarios dialog box from which you may create a new scenario.
Data Table
The data table contains information about the scenarios. The table contains the following columns:
- ID: System generated scenario ID.
- Point Type Code : Code representing the object type (for example, EM for electric meter).
- Scenario Category : Category that a scenario is assigned to.
- Name: Scenario name.
- Scenario Lookup : Alphanumeric lookup code for the scenario.
- Filter Lookup : Alphanumeric lookup code for the filter used in the scenario.
- Status : Scenario status (Active or Inactive).
- Create Time : Date and time when the scenario was created.
- Update Time : Date and time when the scenario was updated.
- View: Opens the View Scenarios dialog box, which displays the same data as provided in the data table row as well as buttons and links that allow you to edit the scenario.
- Edit: Opens the Manage Scenario dialog box, which displays an editable view of the scenario information.
- Expand : Reveals the data for each data table row plus the following additional data:
- Scenario Role : An optional setting for a role that is applicable to the scenario.
- Calc List: Lists the calcs associated with the scenario.
- Scenario Description: An optional setting that describes the scenario purpose.
- Lock Flag: Whether the scenario is locked to editing.
- Minimize: Hide the extra information for each table row.
Note: The data table may be exported by clicking the export data icon located above the table's search field.
Adding Scenarios
Scenarios can be added using the Create Scenarios dialog box from the Manage Scenarios page. You can modify the scenario using the fields and buttons of the Create Scenarios dialog box.
Fields
- Scenario Role: A scenario role may be created with the role selected in the or an empty role (such as, n/a ).
- Category: Groups scenarios together for quick viewing from the UI. There is no special significance of the category field from a processing standpoint.
- Name: A user friendly name describing the scenario.
- Scenario Lookup: Standardized database lookup name without spaces or lowercase letters.
- Scenario Description: Description of the scenario with comments.
- Filter Lookup: Shows all filters created for the role and point type.
- Status: Enable or disable a scenario. Enabled scenarios will appear in the data table; disabled scenarios will be hidden.
- Locked Flag: Scenario lock status. Unlocked scenarios cannot be run.
Buttons
- Save: Save the scenario.
- Cancel: Closes the dialog box without saving the scenario.
Creating a Scenario
To create a scenario:
- On the Manage Scenarios page, click Add Scenario. The Create Scenarios dialog box will open.
- Do the following:
- (Optional) Select a role from the Scenario Role drop-down list.
- Select an appropriate category from the Category drop-down list.
- Enter a descriptive name in the Name field.
- Enter a value for the scenario lookup in the Scenario Lookup field.
Note: The scenario lookup value can be any unique alphanumeric value without spaces in all caps.
- Enter a short description of the scenario features In the Scenario Description field.
- Select a filter to run the scenario against from the Filter Lookup drop-down list.
- Select whether the scenario is Active or Inactive from the Status drop-down list.
- Select whether the scenario is Locked or Unlocked from the Locked Flag drop-down list.
- Click Save. The Create Scenarios dialog box will close.
Viewing Scenario Information
The View link in a dataset data table row launches the View Dataset dialog box, which displays the dataset information and allows you to view the dataset definition, edit the dataset information, clone the dataset, or process the dataset.
Fields
- ID: System-generated scenario ID.
- Point Type Code: Code representing the object type (for example, EM for electric meter).
- Category: Category that a scenario is assigned to.
- Name: Scenario name. This may be modified in the Manage Scenarios dialog.
- Scenario Lookup: Alphanumeric lookup code for the scenario.
- Calc List: Lists the calcs associated with the scenario. This may be modified in the Manage Scenarios dialog.
- Scenario Description: Optional setting that describes the scenario purpose. This may be modified in the Manage Scenarios dialog.
- Filter Lookup: Alphanumeric lookup code for the filter used in the scenario.
- Status: Scenario status (Active or Inactive). This may be modified in the Manage Scenarios dialog.
- Lock Flag: Whether the scenario is locked to editing. This may be modified in the Manage Scenarios dialog.
- Create Time: Date/time when the scenario was created.
- Update Time: Date/time when the scenario was updated.
Buttons
- Edit: Opens the Manage Scenarios dialog box.
- Cancel: Closes the dialog box.
Managing Scenario Information
The Manage Scenarios dialog box opens when you click the Edit link on the scenario data table row or the Edit button on the View Scenarios dialog box. In addition to editing the editable fields, it provides the Add Calc field, which allows you to add the calcs that will be run in the scenario.
Fields
- ID: System-generated scenario ID.
- Point Type Code: Code representing the object type (for example, EM for electric meter).
- Category: Category that a scenario is assigned to.
- Name: Scenario name. This may be modified in the Manage Scenarios dialog.
- Scenario Lookup: Alphanumeric lookup code for the scenario.
- Calc List: Lists the calcs associated with the scenario. This may be modified in the Manage Scenarios dialog.
- Scenario Description: Optional setting that describes the scenario purpose. This may be modified in the Manage Scenarios dialog.
- Filter Lookup: Alphanumeric lookup code for the filter used in the scenario.
- Status: Scenario status (Active or Inactive). This may be modified in the Manage Scenarios dialog.
- Lock Flag: Whether the scenario is locked to editing. This may be modified in the Manage Scenarios dialog.
- Create Time: Date/time when the scenario was created.
- Update Time: Date/time when the scenario was updated.
Buttons
- Assign Additional Calc: Activates the Add Calc drop-down list.
- Save : Saves changes.
- Cancel : Closes the dialog box without saving changes.
Adding Calcs to a Scenario
To add a calc to a scenario:
- Click Assign Additional Calc located in the Manage Scenarios dialog box.
- Select a calc from the Add Calc field drop-down.
Note: When you click the Assign Additional Calc link, the Add Calc field becomes an active drop-down containing cals options appropriate to the scenario role and point type.
- Click the Save. The calc will be listed in the Calc List field.
Note: If you need to remove the calc from the scenario, click the Remove link.