Manage Filters
You can access Manage Filters from the Manage menu. Filters reduce the scope of points when you search for and analyze data. When you define a filter, it may be selected from the Search pane and applied to scenarios.
On this page:
Manage Filters Page
The Manage Filters page provides a data table of existing filters and controls for managing them. The Manage Filters data table displays filters based on the point type selected in the Type drop-down. To navigate to the Manage Filters page, select click Manage from the toolbar, select Analytics and then Filters.


Filter Fields and Buttons
The following filters and buttons are available:
- Filter ID: System generated numeric identifier.
- Filter Category: Grouping of like filters.
- Filter Name: Filter's "friendly" name, which may contain spaces.
- Filter Lookup: Alternate name for the filter without spaces in uppercase text.
- Status: Indicates whether the filter's status is set to Active or Inactive.
- Current Version: Indicates whether the filter is the current version in use.
- Get Filters button: Initiates a search for filters matching criteria set
in the fields.
Note: You can also press Enter when you finish adding content to the fields and click Submit when prompted to submit or reset.
- Add: Opens the Create Filters dialog box that allows you to define a new filter.
Data Table
The data table contains information about the filters:
- ID: System generated numeric identifier.
- Sequence ID: System generated number that is assigned based on whether the filter is original (Sequence ID = 1) or a cloned version (Sequence ID = 2 or higher).
- Filter Category: Grouping of like filters.
- Name: Filter's "friendly" name, which may contain spaces.
- Filter Lookup: Alternate name for the filter without spaces in uppercase text.
- Role: Role, if any, associated with the filter. Filters without an assigned role will have an n/a value.
- Status: Indicates whether the filter's status is set to Active or Inactive.
- Current Version: Indicates whether the filter is the current version in use.
- Start Time: Date when the filter was set to current.
- End Time: End date for the filter. For current version filters, the end time is set to an arbitrary end date used in the system; when a new version of the filter becomes current, the end time is updated to equal the start time of the new version.
- Read Only: Indicates whether the filter is read-only or may be edited.
- View: Opens the View Filters dialog box, which displays the same filter data as provided in the data table row as well as buttons and links that allow you to edit or configure the filter.
- Edit: Opens the Manage Filters dialog box, which displays an editable view of the filter information shown in the View Filters dialog.
Note: It is possible to directly access and edit the filter criteria (XML) from the Manage Filters dialog; however, the primary intent of the Edit features is to enter or updated information about the filter.
- XML: Displays the Filter Definition dialog box, which shows the configuration XML for the filter.
- XML Editor: Opens the filter definition XML in the filters XML Editor.
- Search field: Allows you to search for a value in the table.
- Expand button: Reveals a list view of the row values and information on the associated point type code.
- Minimize button: Hides the extra
information. The information contains the data found in the table plus:
- Point Type Code: Point type for the filter.
- Filter Description: Description of the filter purpose.
- Lock Status: Indicates whether the filter is locked to editing.
- Export data icon: Opens export data table options.
Add Filters
When creating a filter, you must know three of the following four data attributes:
- Point ID: Object you need.
- Fact: Fact you need.
- Time: Time frame for your analysis.
- Value: Data value, which typically is associated with a fact.
For example, if you are looking for the consumption value for an electric meter on a given day, you need to provide the meter identifier, the consumption fact category, and the time, which (in this case) is the date.
Seeking daily kWh derived on 2/2/2014 for EM point_name = EM-123
- Time: 02-Feb-2014
- Fact: fact_lookup = DAILY_KWH_USAGE_DERIVED
- Point: point_name = EM-123
To add a filter:
- Click Add Filter on the Manage Filters page.
- Enter the following in the Create Filters dialog box:
- Click the Filter Category drop-down and select an appropriate category.
- Enter a descriptive name in the Name field. For example, EM Zero Consumption.
- Enter a value for filter lookup in the Filter Lookup field, . The filter lookup value can be any unique alphanumeric value with uppercase text and without spaces. A common practice is to use the filter name without spaces. For example, EM_ZERO_CONSUMPTION.
- Do one of the following to set the Filter Role drop-down:
Note: This drop-down allows you to specify if the filter is applicable to all roles or to the role selected in the Drawer menu.
- To make the filter role applicable to all roles, leave the selection blank.
- To make the filter role applicable to a specific role, select the role (lookup value) from the drop-down.
- Enter a short description of the filter function in the Filter Description field. For example, This filter finds electric meters with zero consumption.
- Click the Status drop-down and select a filter status of Active or Inactive.
Note: Filters cannot be deleted through the user interface, but may be set to inactive.
- Do one of the following:
- Click Save to save your filter changes. The Create Filters dialog box will close.
- Click Cancel to close the dialog box without saving the filter. A dialog will open asking you to confirm that you want to close the Create Filters dialog.
Note: Leave the Filter Definition blank. The Filter Definition XML is typically defined with the Filter XML Editor. However if you wish to start with the Filter Definition XML from another filter, you may copy it and paste it in the Filter Definition field.
View Filter Information
The View link, in the filter data table row, launches the View Filters dialog box, which displays filter properties and allows you to view the filter definition XML, edit the filter properties, create a new version of the filter, create a copy of the filter, or process the filter.
Fields and Buttons
- ID: System generated numeric identifier.
- Sequence ID: System generated number that is assigned based on whether the filter is original (Sequence ID = 1) or a cloned version (Sequence ID = 2 or higher).
- Point Type Code: Code for the object type.
- Filter Category: Grouping of like filters.
- Name: Filter's "friendly" name, which may contain spaces.
- Filter Lookup: Alternate name for the filter without spaces in uppercase text.
- Filter Description: Optional description of the filter.
- Status: Indicates whether the filter's status is set to Active or Inactive.
- Lock Status: Indicates whether the filter is locked to editing; only locked filters may be processed.
- Start Time: Date when the filter was set to current.
- End Time: End date for the filter. For current version filters, the end time is set to an arbitrary end date used in the system; when a new version of the filter becomes current, the end time is updated to equal the start time of the new version.
- Read Only: Indicates whether the filter is read-only (not editable).
- Filter Definition: contains the XML link, which opens the Filter Definition dialog box. Viewing the Filter Definition XML.
- Edit: Opens the Manage Filters dialog box. Filters for more information.
- Clone: Creates a new version of the filter. The clone's Sequence ID is the original filter's Sequence ID plus one; all other filter information is the same. Cloning allows you to keep the initial filter active while working on modifications to the filter parameters.
- Copy: Creates a copy of the filter having a unique ID.
- Set Current: Sets the Current Version flag to Yes. Set Current Version Flag for more information.
- Cancel: Closes the dialog box.
- Execute Now: Runs the filter.
Manage Filter Information
The Manage Filters dialog box opens when you click the Edit link on the filter data table row or the Edit button on the View Filters dialog box. From this dialog box, you may edit the filter information.
Note: The Manage Filters dialog is an editable version of the View Filters dialog.
Fields and Buttons
- ID: System generated numeric identifier.
- Sequence ID: Filter's version number.
- Point Type Code: Object type code.
- Filter Category: Select a filter category, which is a grouping of like filters.
- Name: Edit the filter's name.
- Filter Lookup: Edit the filter's lookup value.
- Filter Description: Edit the optional description of the filter.
- Status: Set whether the filter is active or inactive. If it is active, it will be available to use in advanced searches and to assign to scenarios.
- Lock Status: Indicates whether the filter is locked to editing.
- Start Time: Date when the filter was set to current.
- End Time: End date for the filter. For current version filters, the end time is set to an arbitrary end date used in the system; when a new version of the filter becomes current, the end time is updated to equal the start time of the new version.
- Read Only: Indicates whether the filter is read-only.
- Filter Definition: Opens the Filter Definition dialog box.
- Save: Saves any changes to the filter information; the button is only active when a change has been made in one or more of the editable fields.
- Clone: Creates a new version of the filter. The clone's Sequence ID is the original filter's Sequence ID plus one; all other filter information is the same. Cloning allows you to keep the initial filter active while working on modifications to the filter parameters.
- Copy: Creates a copy of the filter having a unique ID.
- Set Current: Sets the Current Version flag to Yes.
- Cancel: Closes the dialog box.
- Execute Now: Runs the filter.
Define and Edit XML Using the XML Editor
The filter XML Editor provides a user interface for creating and editing the filter definition XML. To create or edit a filter definition, click the XML Editor link in the filter's data table row.
The filter tree-view options are Time Windows and Filter Components.

Buttons
The following buttons are available in the filter XML Editor:
- Save & Close: Save the filter in its current state and closes the editor.
- Validate & Save: Validate and save the filter syntax. Any errors will be displayed.
- Close: Closes the XML Editor without saving changes.
Time Windows
When you select Time Windows in the tree-view, the editor will update with the Create New Time Window button, which allows you to define time windows for the filter.
To create a new time window:
- Click Create New Time Windows, the tree-view will
add a branch for the time window; the name will be in an editable state so you may enter a
name directly in the branch or leave the system defined name.
Note: The system defined time window name is time_window_n, where n is a sequential number indicating the time window's order of creation.

-
Once the time window is created, select the time window name in the tree-view, and then select a time window Type from the drop-down list and set the following parameters:
- Static Time Window: Time window with a defined start and end date.
- Offset Time Window: Time window containing a time offset.

Static Time Windows
Static time windows have fixed start and end dates that are defined in the filter. When you select Static Time Window from the Type drop-down list, you may edit the parameters:
- Name: Automatically populates with the name from the tree-vie. You may change the name in the tree-view or in the static time window Name field.
- Description: (Optional) Enter a description for the time window.
- Start Date: Start date for the filter criteria.
- End Date: End date for the filter criteria.
Offset Time Windows
The offset time window allows you to create a time window that is offset from the start and/or end dates, which are input when the filter is ran.
Note: When you run the filter, you select the start and end dates. For reference purposes, these will be known as Data Start Date and Data End Date.
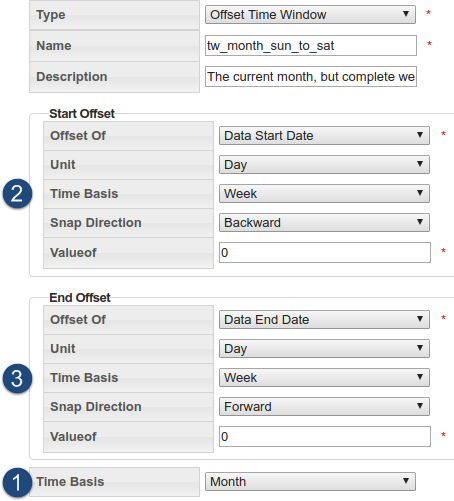
| Image Number | Section | Description |
|---|---|
| 1 | Time Basis |
The Time Basis field sets the data boundary snapping prior to offset snapping. For example, to look at complete weeks (that is, the start date should be a Monday and the end date should be a Sunday) for the current month. |
| 2 | Start Offset |
The Start Offset settings allows you to move the analysis date by a selected time basis unit (for example, day or month). You may also "snap" the offset backward or forward in time.
|
| 3 | End Offset |
The End Offset is similar to the Start Offset with the exception that the resulting date must be later than the Start Offset date.
|
Elements
| Image Number | Element Name | Description |
|---|---|
| 1 | Pre-snapping Time Basis | The pre-snapping time basis snaps the input time range to be a range of months |
| 2 | Start Offset Post Snapping |
The start offset's post that snaps the start date backward to the beginning of the week (Sunday). |
| 3 | Eng Offset Post Snapping |
The end offset's post that snaps the end date forward to the end of the week (Saturday) |
For example, if you were to use the preceding Offset Time Window criteria to input a date range of February 3rd, 2016 (Wednesday) - February 4th, 2016 (Thursday), the resulting date range for analysis would be:
- The Time Basis has a pre-snap of Month, which gives us the month of February.
- The Start Offset Time Basis is Week and it snaps backward to give us Sunday, January 31st.
- The End Offset Time Basis is Week and it snaps forward to the end of the week containing February 29th, which is Saturday, March 5th.
The final date range is then Sunday, January 31st, 2016 - March 5th, 2016.
Filter Components
Filter components describe the criteria (facts) on which data is filtered.
To add filter components:
- Click the Filter Components label in the tree-view. The Filters XML Editor will display the filter components view that provides a button to create new filter components and a table that lists existing components.
-
Click Create New Filter Components. The tree-view will add a branch for the component and the Filters XML Editor will update with component options. You may create a custom component label or leave the system defined component name (filter_component_n, where n is a sequential number indicating the component's order of creation).
Filter Component Fields
The available component fields are dependent on the fact type selection. The following table describes the possible options.
| Field Name | Description |
|---|---|
| Type |
Lists all available fact types. |
| Time Window Name |
Populated with the names of the defined time windows. |
| Time Basis |
Describes the time basis for the chosen fact. This is distinct from the time basis for the time window and describes the granularity of the data which is used to filter results. |
| Fact Category |
Automatically populated with the fact categories belonging to the selected fact type. |
| Fact Name |
Lists possible fact names within the selected fact category. |
| Value A/B |
Metric or attribute data require beginning and ending values.
|
| Parent Point ID |
In a Fact Relation type component, you choose specific parent points based on the fact category and fact name. The Visual selector tab allows you to search for potential points. to open a search dialog
|
| Point ID |
For a Point type component, like the Parent Point ID, you may choose the point to be used in the filter visually by searching (Visual selector) or manually by entering the ID in the field (Manual entry). |
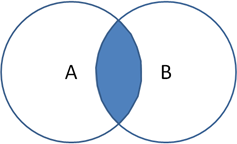
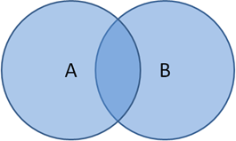
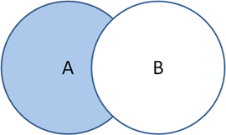
| Set Operation |
Select operators to filter data. Operators include: Intersection (A and B)
Union (A or B)
Difference (A not B)
|
Clone a Filter
The clone function, which is found in the View Filters and Manage Filters dialogs, creates a new version of the filter (that is, the Sequence ID will be incremented by 1). The clone is unlocked when created, which allows it to be edited while the original is locked and ready to be processed. Once the new version is ready to be put in production, the previous version's End Time is set to the new version's Start Time.
To complete cloning function:
- Click Clone in the View Filters or Manage Filters dialog.
- Edit the clone.
- When the clone is ready to be deployed, open the Manage Filters dialog and click Set Current. This will set the original filter's Locked Status to Unlocked and the clone's Locked Status to Locked.
Copy a Filter
The copy function, which is found in the View Filters and Manage Filters dialogs, creates a new filter with a unique ID. Copying allows you to start a new filter from an existing one. The copy has a Sequence ID of 1 since it is the first version of a new filter.
View the Filter Definition XML
From the Filter Definition dialog box, you can view or edit the filter definition XML. This allows you to quickly modify a parameter rather than opening the XML Editor. Define and Edit XML Using the XML Editor
Filter Definition XML
The default filter definition can be copied and used as a starting point for a new filter. The default filter definition is as follows:
<filter xmlns:xsi="http://www.w3.org/2001/XMLSchema-instance"
xmlns:xsd="http://www.w3.org/2001/XMLSchema"
xmlns="http://dataraker.net/filter.xsd" pointTypeCode="SSN_EM">
<time_windows>
<tw xsi:type="time_window_static_type" name="No Consumption">
<start_date>2014-01-01</start_date>
<end_date>2014-03-31</end_date>
</tw>
</time_windows>
<filter_components>
<fact_metric name="Consumption" tw_name="No Consumption"
xsi:type="findPointInt_source_type" factLookup="DAILY_KWH_USAGE_DERIVED"
operator="between" valueA="-10" valueB="1"></fact_metric>
</filter_components>
<set_operations>
<filter_component name="Consumption"></filter_component>
</set_operations>
</filter>Create a New Filter
The filter XML can be copied and used as a starting point for a new filter.
To copy the filter XML to create a new filter:
- Create a new filter.
- Copy and paste the filter XML into the new Filter Definition field.
- Click Save.
Note: The filter can then be edited manually or in the XML Editor.
Run Filters
To run a filter:
- Click View or Edit in the filter row to open the View Filters dialog box or the Manage Filters dialog box, respectively.
- Click Execute Now. The Execute Filters Details dialog box will open.
- Enter the data start and end dates and a limit for the number of results to be returned, then do one of the following:
- Click OK to run the filter.
- Click Cancel to close the dialog box without running the filter.
When you run the filter, the results will be returned in a data table.
