Administration
This page describes the administrative tasks that can be performed using the Oracle Utilities Administration Warehouse (OUAW) tool to configure the out-of-the-box and custom ELT jobs, and to view the configurations made during the installation and source configuration processes.
On this page:
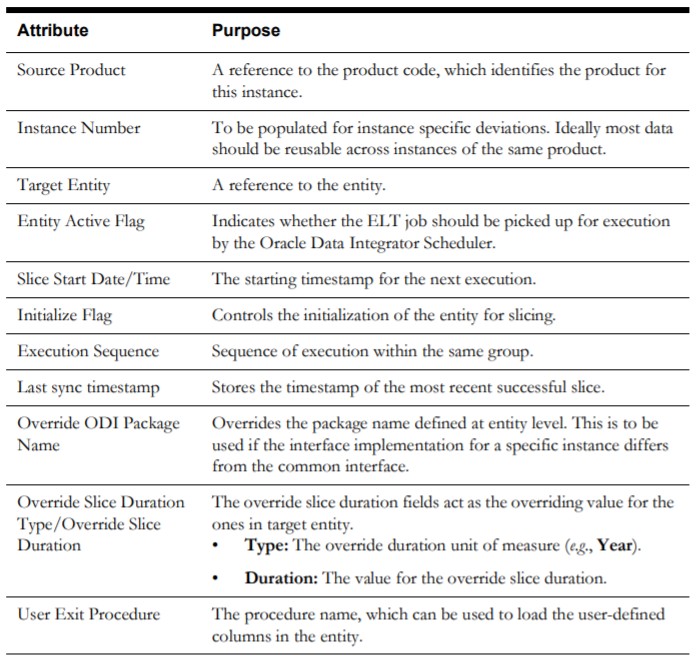
Product Instance Configuration
The product instance represents a specific instance of a source application that can be configured as a source for the Oracle Utilities Analytics Warehouse (OUAW) solution. A record is created for every product instance where ELT is set up to extract data. OUAW delivers a record for the product that uses Oracle Data Integrator for the ELT.
Note: You may have multiple instances of the same source application to integrate with OUAW.
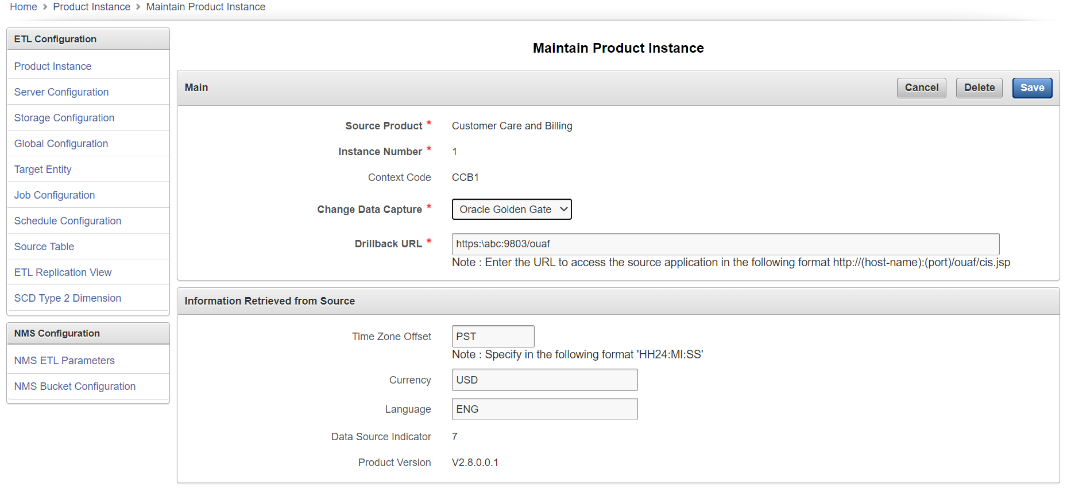
The Product Instance page, accessible through the ETL Configuration tab, displays information about the product instances configured with OUAW.
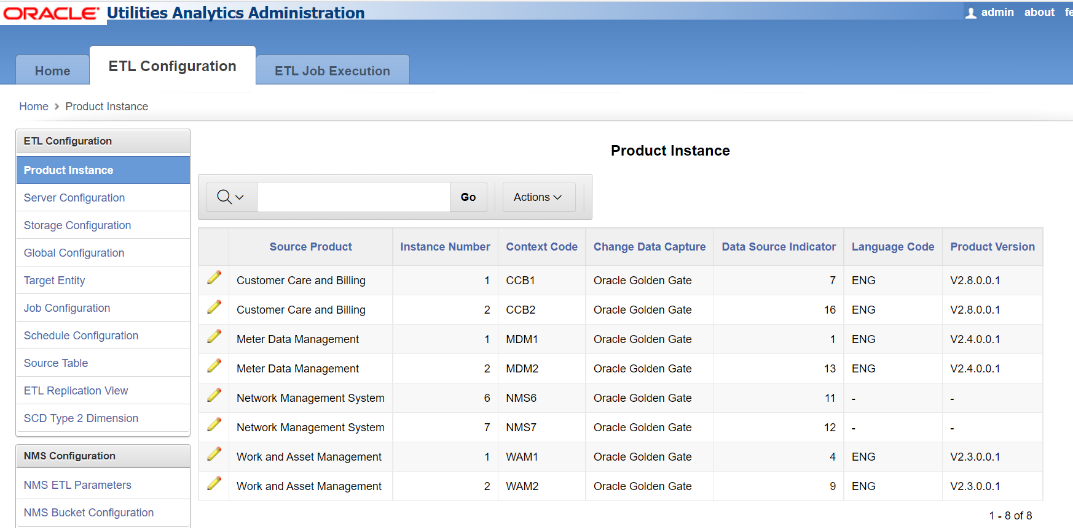
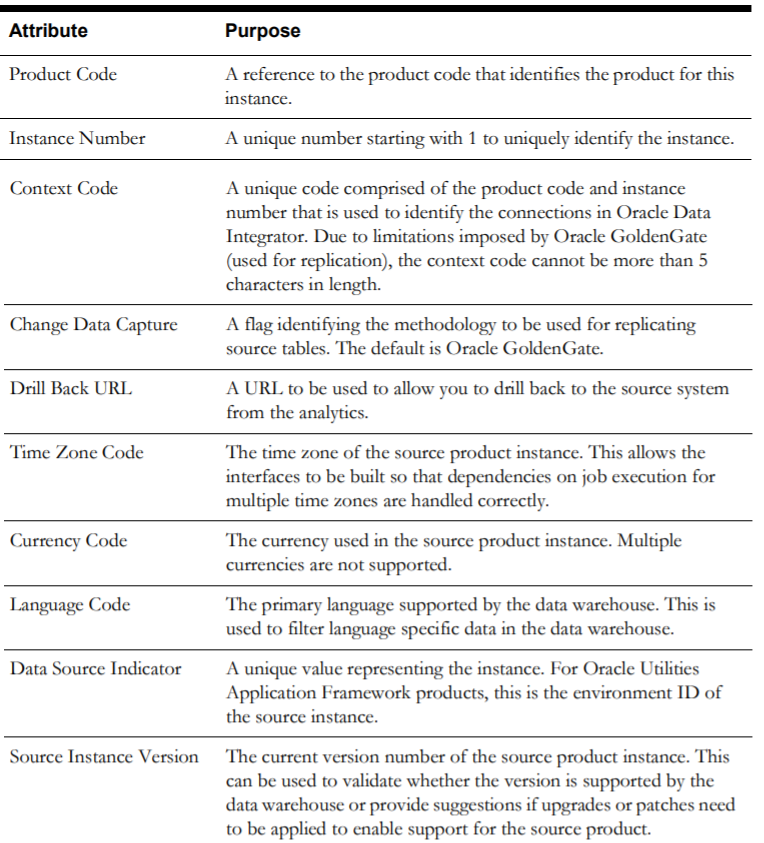
The following attributes are available on the product instance metadata table.
To add a new product instance, use the script delivered as a part of the installation package. For more details, see 'Configuring the Source' under the 'Upgrading Oracle Utilities Analytics Based ELT Component' section in Chapter 5: Upgrading Oracle Utilities Analytics.
Server Configuration View
The Server Configuration page, accessible through the ETL Configuration tab, displays the details of the source and target servers used for configuring Oracle GoldenGate for OUAW.
As part of the OUAW installation process, Oracle GoldenGate, Oracle Database, and JAgent configuration records are generated for the configured source application and the target OUAW application, and are stored in the B1_SERVER_CFG table in MDADM schema. The data from this table are displayed on the Server Configuration page, and its content cannot be edited from the Oracle Utilities Analytics Administration tool.
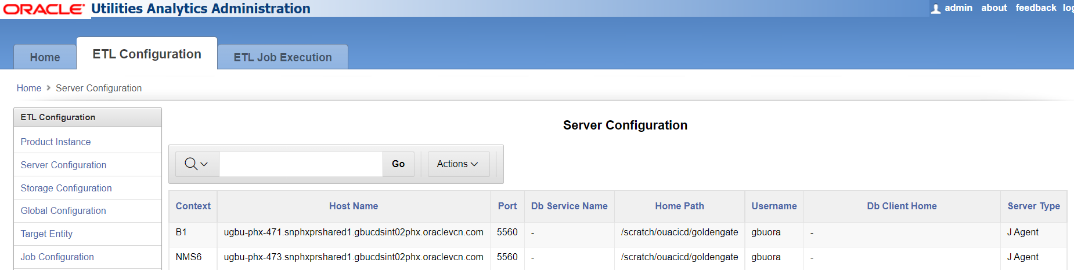
The following attributes are displayed:
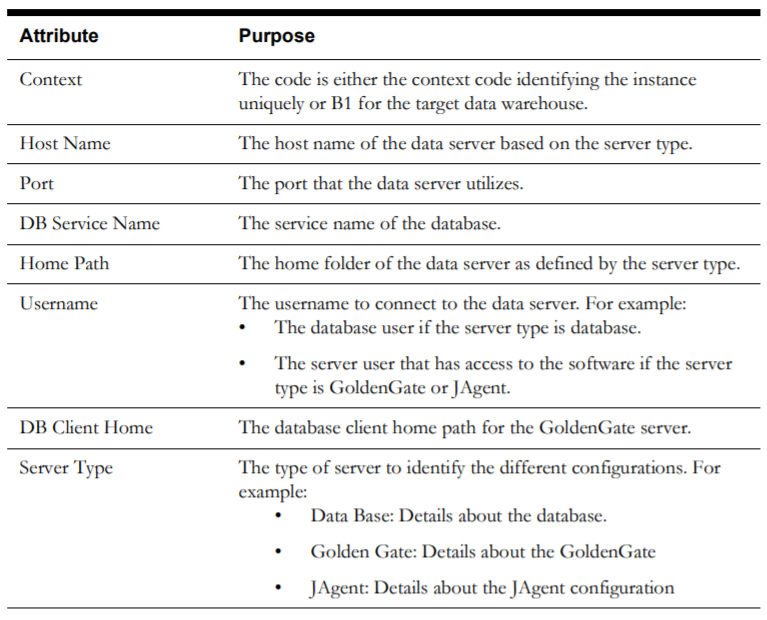
Storage Configuration
The Storage Configuration page, accessible through the ETL Configuration tab, enables you to manage the tablespaces that are used for the database objects created during the execution of the Oracle Data Integrator jobs, which allows you to maintain existing records related to configuration and to add new records.
Note: Base product-owned records are delivered out-of-the-box for the star schemas tables that come with OUAW, and they cannot be deleted. If you want to add any entity to the ELT, you can create a new record, which can be later edited or deleted.
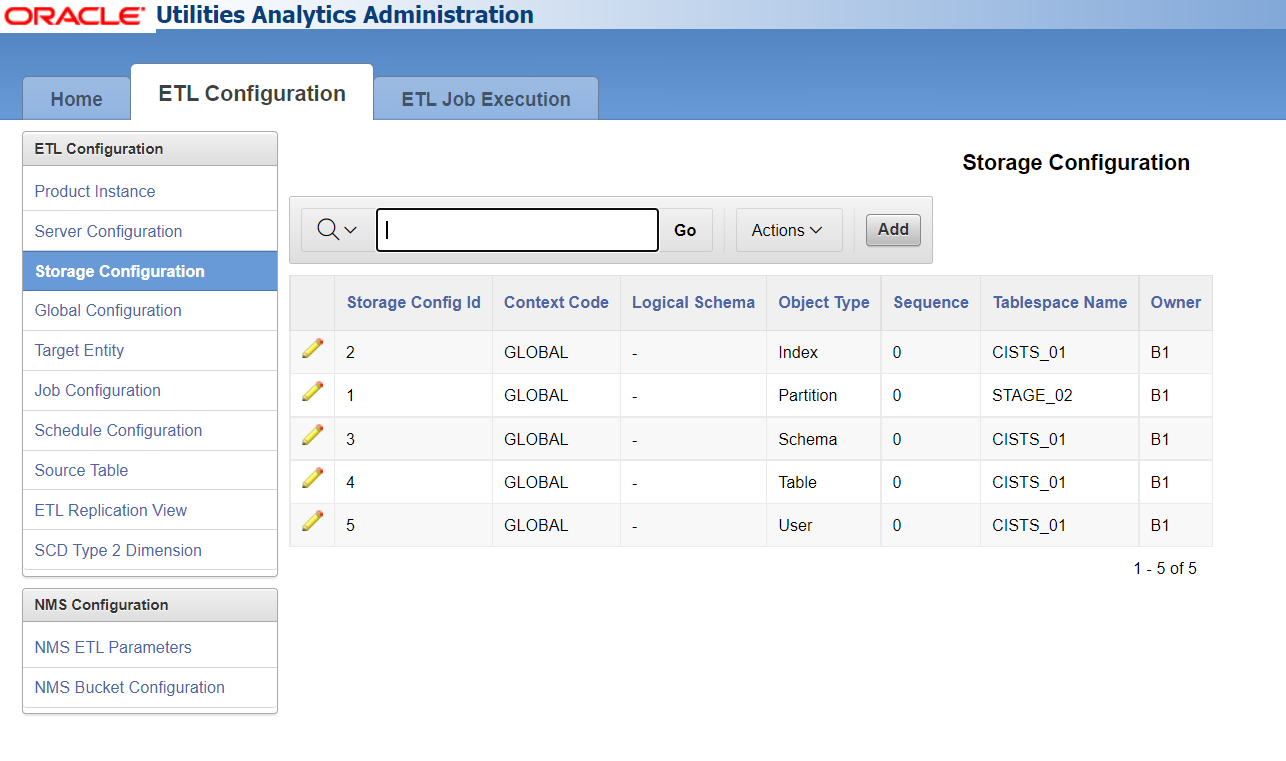
The following are the attributes available on the page:
Global Settings Configuration
The Global Configuration page, accessible through the ETL Configuration tab, is used for setting up the global parameters needed for OUAW, allowing you to enter or edit values for the configuration settings. As a part of the OUAW installation process, the global configuration records are generated for both the configured source application and the target OUAW application. The configuration values must be entered in the specified data format. Entering values in any other format causes errors during ELT processing.
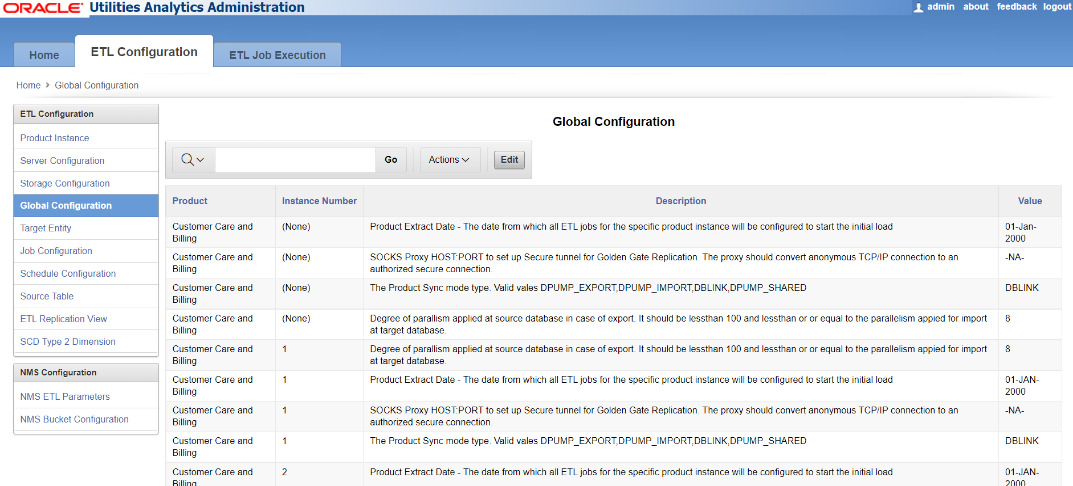
The following are the attributes displayed on the page:
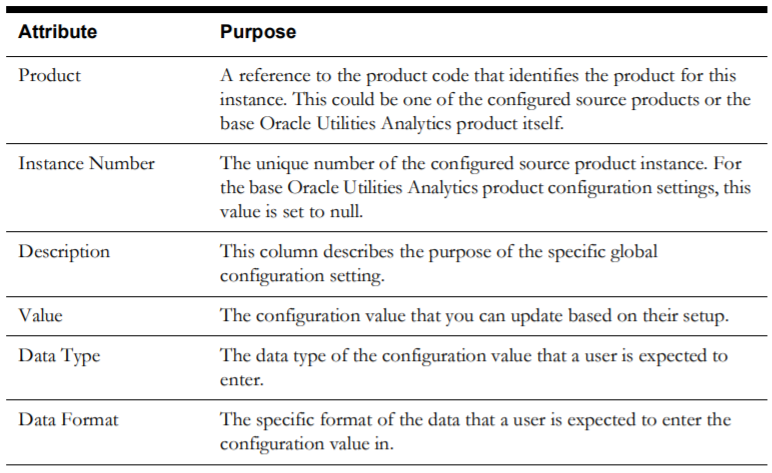
Target Entities Configuration
The Target Entity page, accessible through the ETL Configuration tab, displays the configuration information for the viz. dimensions, facts, and materialized views target entities, which can be loaded for multiple source instances. The configuration that is common across multiple instances is stored in this table. You can add, edit, or delete records on this page.
Note: Base product-owned records are delivered out-of-the-box for the star schemas tables that come with OUAW, and they cannot be deleted. If you want to add any entity to the ELT, you can create a new record, which can be later edited or deleted.
The following are the attributes displayed on this page:

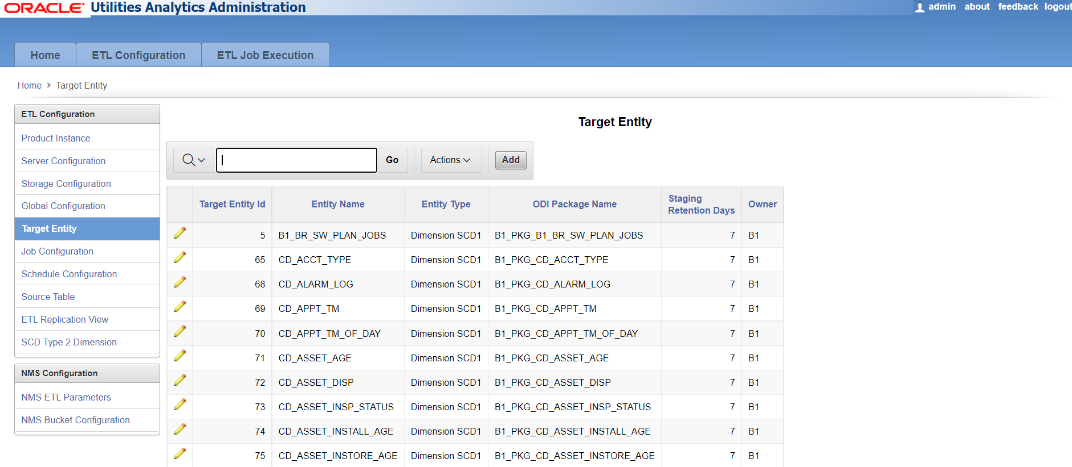
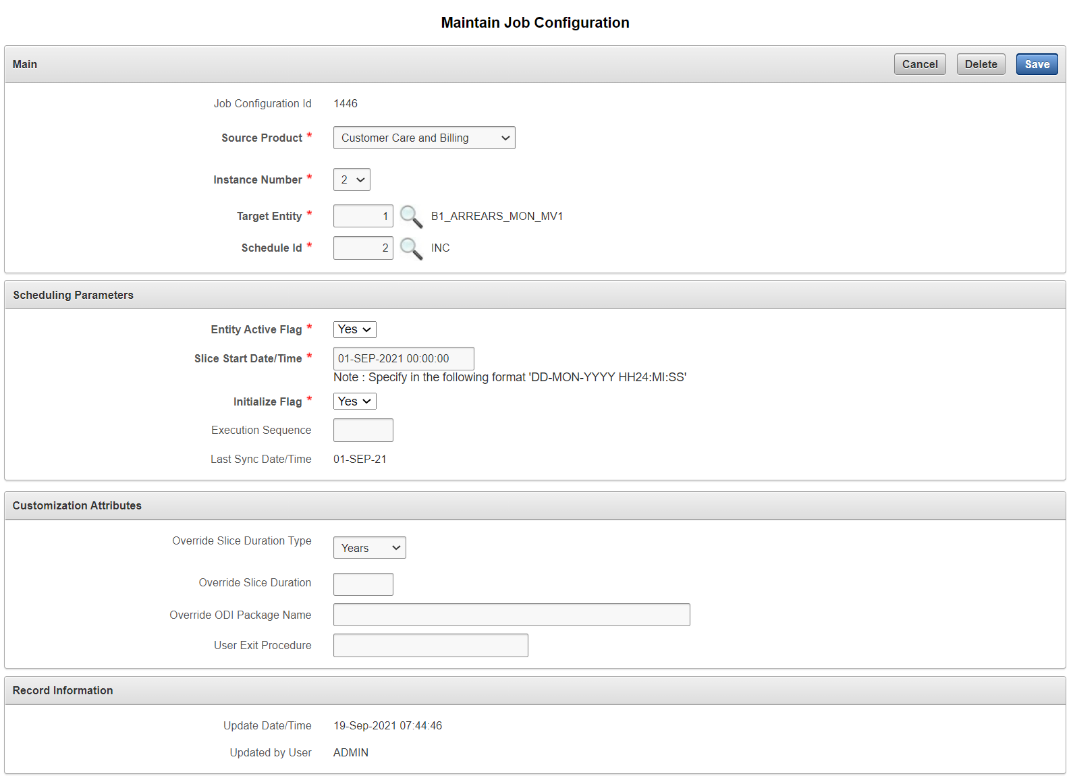
Job Configuration
The Job Configuration page, accessible through the ETL Configuration tab, is used to provide configuration for the package (the executable logic) to populate the target entities for each instance. This page allows you to add, edit, and delete records.
Note: Base product-owned records are delivered out-of-the-box for the star schemas tables that come with OUAW, and they cannot be deleted. If you want to add any entity to the ELT, you can create a new record, which can be later edited or deleted.
The following are the attributes displayed on this page:
Maintain Job Configuration
To specify configuration for a job, open the Maintain Job Configuration page by clicking the Add (+) or the Edit buttons for a selected job record row on the Job Configuration page.
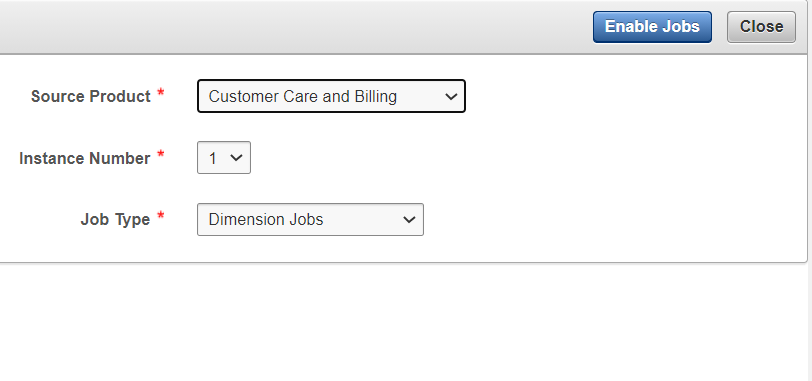
Jobs Enablement
A job can be enabled from the Job Configuration page by clicking its respective Edit button. Alternately, a group of jobs can be enabled together using the Enable Jobs button. There are three job type options:
- Dimension Jobs
- Facts
- Facts and Materialized Views
When the selected job type is either Dimension Jobs or Facts, the replication objects to be loaded with dimensions and facts are also enabled.
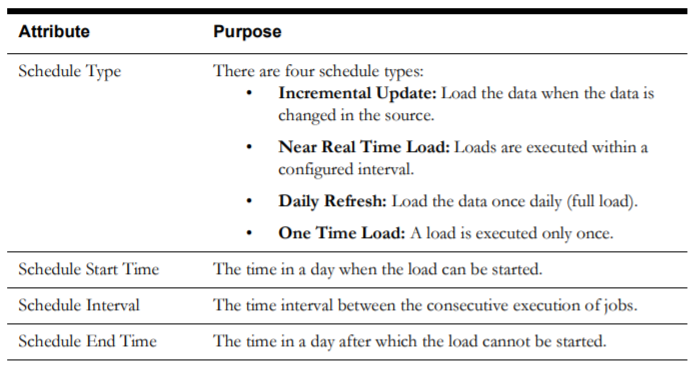
Schedule Configuration
The Schedule Configuration page, accessible through the ETL Configuration tab, is used to configure a job’s scheduled start and interval. Multiple schedule types can be created with different schedule periods and jobs can be assigned to them; the various job schedules may be distributed so multiple jobs do not run simultaneously. The schedule period has to be created first and then it has to be updated in the Job Configuration page. See Job Configuration for details.
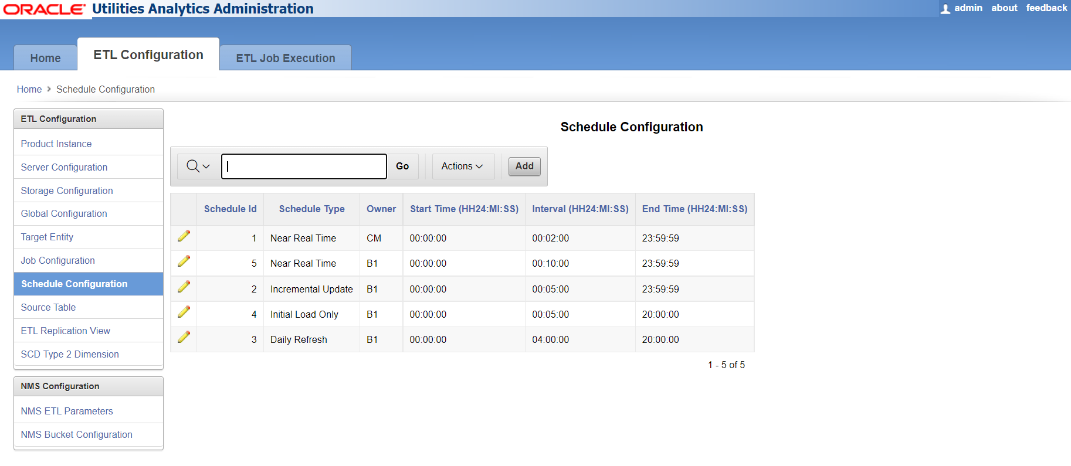
The following are the attributes displayed on the page:
Source Table Configuration
The Source Table page, accessible through the ETL Configuration tab, displays the list of tables from the source applications that are available for replication in Oracle Utilities Analytics Warehouse (OUAW) and their mode of replication. For those tables that are not replicated in the base product, this page allows you to enable custom replication.
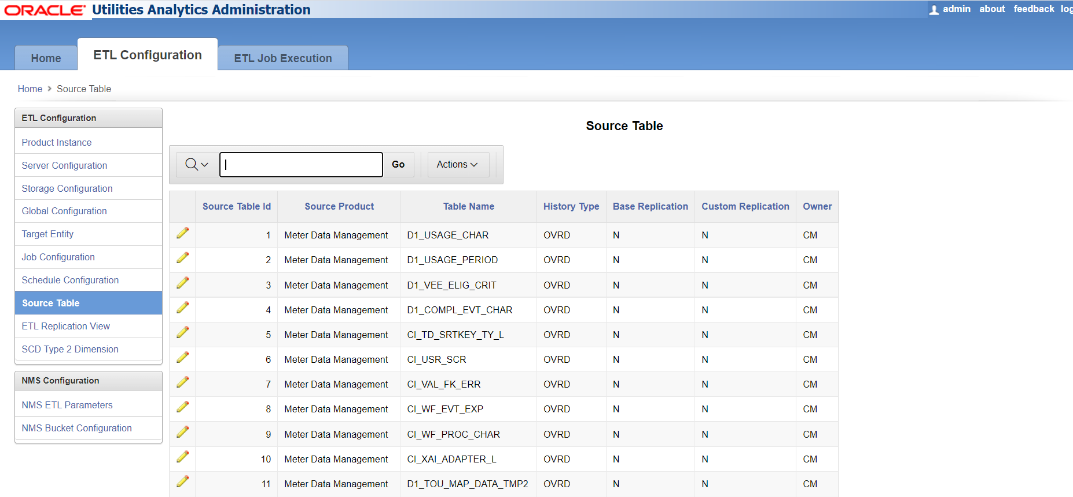
To enable custom replication for a table:
-
Click on the pencil icon on the first column to the left of the table.
-
Set the Custom Replication flag value to Y for the table in the Manage Replication Details section.
-
You may also change the History Type of the table to be replicated.
Note: Changing the history type of a table already configured and replicated may result in error in the processing of ELT jobs and in data processing by GoldenGate.
The following are the attributes of the table:

ETL Replication View
Every ETL job in the data warehouse depends on one or more Oracle Data Integrator interfaces to populate the target fact or dimension tables. The starting point is a view defined for the ETL job in the replication layer of the specific source product. This ETL replication view fetches the base values from the replication tables as a starting point for further transformations to be done by the Oracle Data Integrator interfaces.
In certain business scenarios, it might be necessary for you to override the definition of the provided ETL replication view. For example, in Oracle Utilities Network Management System, a particular type of data may be stored in different tables based on the network model. The base view definitions supplied for Oracle Utilities Network Management System ETL are designed based on the OPAL network model. When you use a different model, you might have to change the definition of some of these views in the replication layer for your network model.
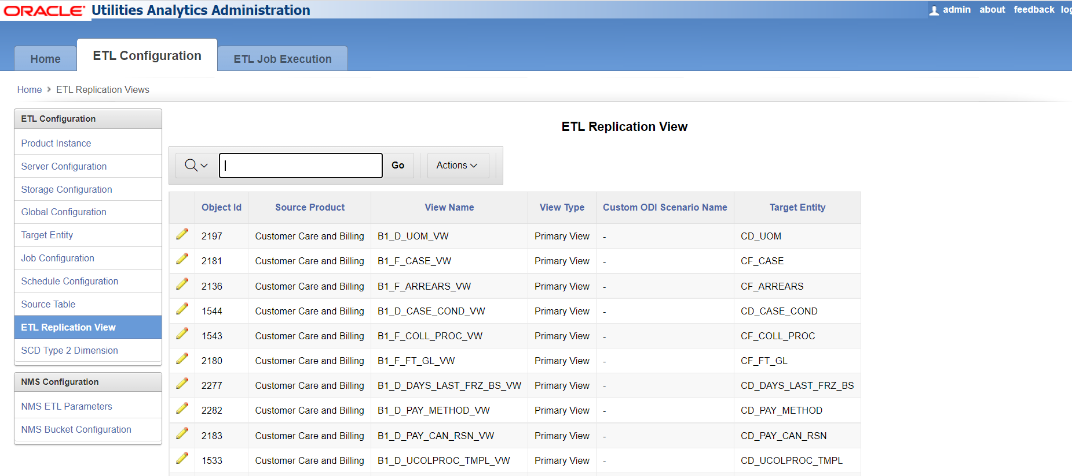
To take a more specific example, the B1_D_ACCT_VW for the account dimension in the Oracle Utilities Network Management System star schema tries to fetch the account-related attributes from the CES_CUSTOMERS_HISTORY table. If your model stores the account attributes in a different table, then the view definition needs to be changed. The Maintain ETL Replication Views page in the Oracle Utilities Analytics Administration Tool allows you to do this by defining a custom Oracle Data Integrator interface to generate the view. The view name and the column names in the view should be exactly as it was delivered. However, the view definition can be changed in accordance with your requirements.
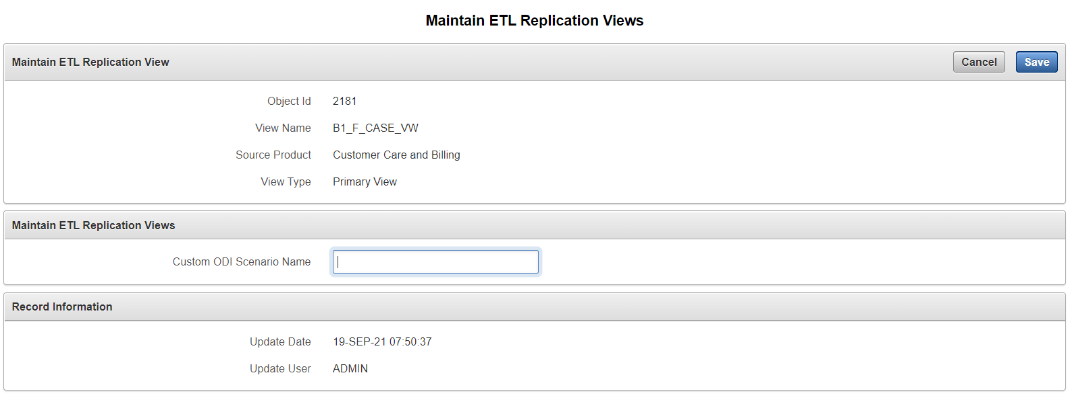
A scenario should be generated for the custom Oracle Data Integrator interface and should be shown in the Oracle Utilities Analytics Administration tool page against the appropriate view name with a definition that needs to be overridden. When views are then generated through the Run View Generator script, the ETL framework creates the view-based Oracle Data Integrator scenario that you entered.
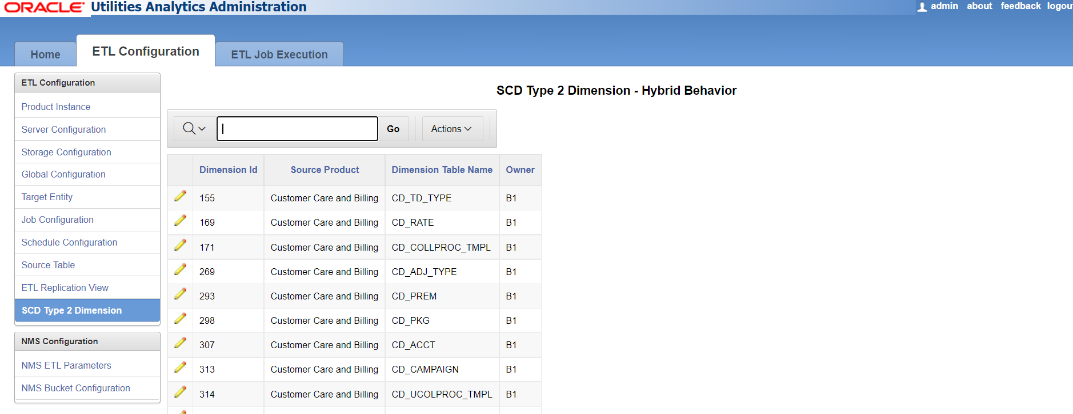
SCD Type 2 Dimension Column Properties of Type 2 Slowly Changing Dimension
A type 2 slowly changing dimension has the following column types:
- Natural Key
- SCD Start
- SCD End
- SCD Flag
Any change in any of the remaining columns is treated as a new history item for the same natural key. You can decide which of the columns should not be considered for creating a new history item. Using Oracle Data Integrator, this is done by changing the corresponding property of the column in the model of the target dimension. However, this change requires regeneration of the dimension load scenario. The customization that you do will get overridden by any future upgrades provided by Oracle. You can control the columns where a change causes a history to be created.
You can change the properties by accessing the administration tool.
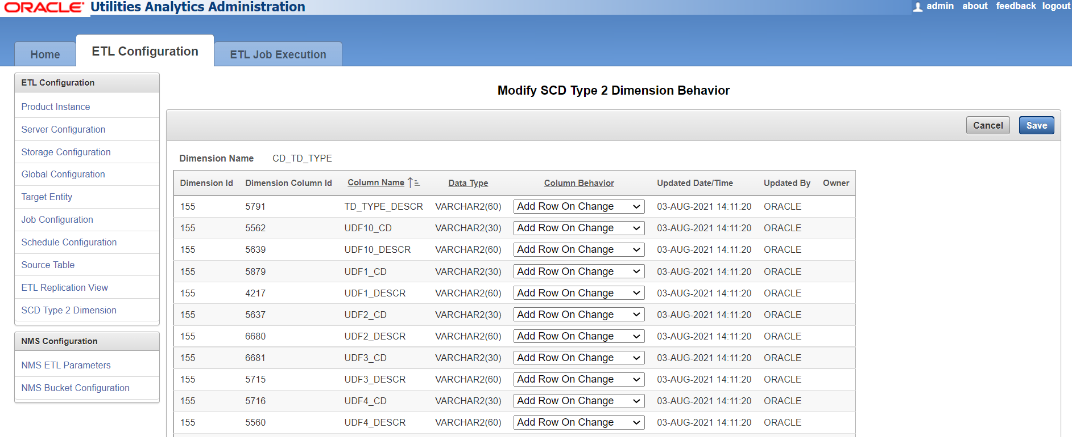
Once the configurations have been changed, a script needs to be executed to ensure the changes have been applied to the appropriate scenarios. For Unix, perform the following steps:
- Navigate to the /bin directory.
- Add Java 8 to the following path variable:
export PATH=/bin:$PATH - Run ksh ./updateODIMetadata.sh.
Note: After the SCD2 dimension behavior is customized, execute the script after every upgrade to retain the customized behavior.
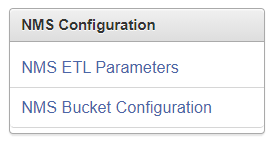
NMS Configuration
Before attaching a specific source system to Oracle Utilities Analytics Administration, there are some configurations that need to be done for every source system for its ETL to function properly. These configurations include setting up certain parameters to be referred to during the extraction or setting up bucket ranges to classify the measures in a fact.
You can set up the configurations needed for the Oracle Utilities Network Management System ETL processes via the Oracle Utilities Analytics Administration Tool using the two pages grouped under the NMS Configuration.
Note: Details are covered in the Configuring Source > Oracle Utilities Network Management System (NMS) section in Chapter 5: Configuring Oracle Utilities Analytics, where the configurations needed for every source system are discussed at length with all necessary details.
ETL Job Execution
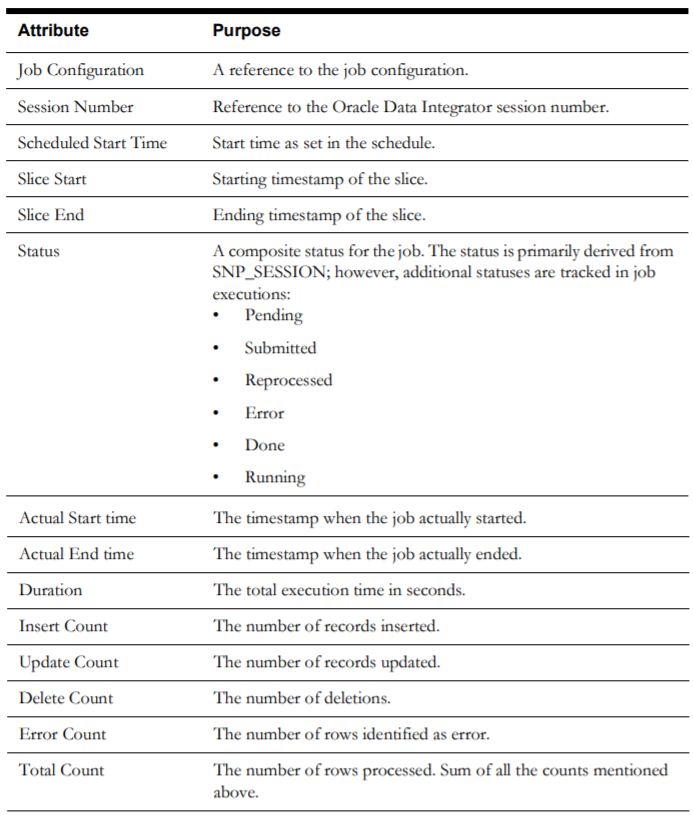
The Job Execution page, accessible through the ETL Job Execution tab, is used for tracking the execution of ETL processes. An entry is created for each execution.
The following image shows an example of the job execution log table.
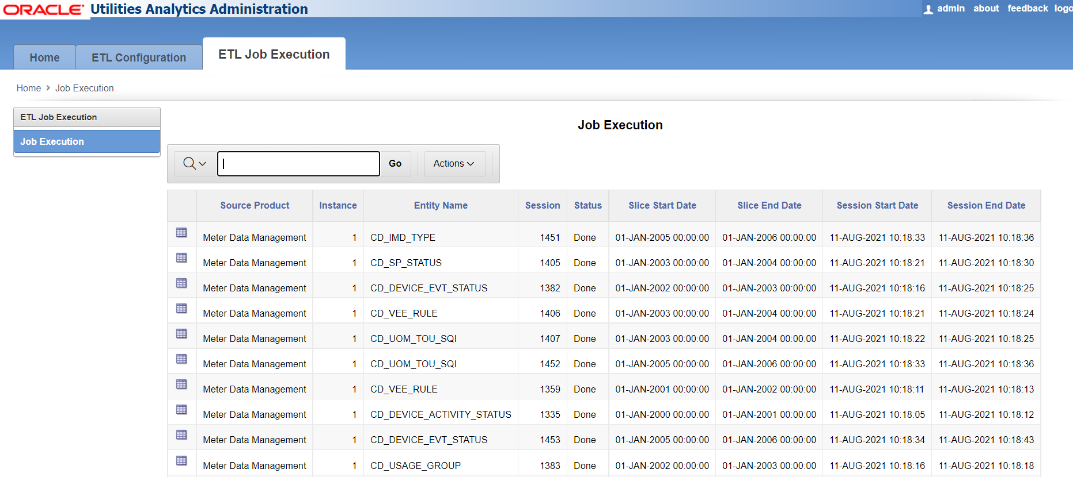
The following are the attributes on this table: