Upgrade OUAW Components
This page details how to upgrade the database, ETL, admin tool, and dashboard components for Oracle Utilities Analytics Warehouse v2.8.0.2.0.
On this page:
Upgrade the Database Component
This section details the steps to upgrade the Oracle Utilities Analytics Warehouse database component.
Copy and Decompress the Install Media
-
Download Oracle Utilities Analytics Warehouse v2.8.0.2.0. Oracle Database part file (Oracle Utilities Analytics v2.8.0.2.0. Oracle Database Multiplatform.zip) from Oracle Software Delivery Cloud onto the target database server.
-
Create a temporary directory (example: </OUA/temp> for a Linux machine). This directory (referred to as <TEMPDIR> below) must be located outside any current working Oracle Utilities application environment. All files that are placed in this directory as a part of the installation can be deleted after completing a successful installation.
-
Unzip Oracle Utilities Analytics Warehouse v2.8.0.2.0. Oracle Database Multiplatform.zip to <TEMPDIR> using any zip utility.
-
Execute the SQL below before installing the RELADM, MDADM, and DWADM Schemas. This provides the required permissions to the users created.
Copy
Usersgrants.sql in <TEMPDIR>/BI2802/Scripts/Usersgrants.sql
Install the RELADM Schema
-
Log in to the target database server.
-
Navigate to the temporary directory into which the Oracle Utilities Analytics Warehouse v2.8.0.2.0. Oracle Database Multiplatform zip file was extracted.
Copy
cd database/BI2802/RELADM/Install-Upgrade - Review Storage.xml to ensure the RELADM user has quota on the mentioned tablespace in file. If not, edit the file with correct tablespace name.
- Add JAVA_HOME/bin to the PATH variable.
-
Set CLASSPATH pointing to the location where OraDBI.jar and all dependency jars exist.
Copy
export CLASSPATH=<TEMPDIR>/BI2802/RELADM/Jarfiles/* -
Execute the command below. Once complete, the utility creates the RELADM schema and system data definitions.
Copy
java com.oracle.ouaf.oem.install.OraDBI -d jdbc:oracle:thin:@<DATABASE SERVER>:<DATABASE PORT>/<ORACLE SERVICENAME>,RELADM,<Password of RELADM User>,,,,,RELADM -l 1,2 -o -q trueNote: If an error occurs while executing a SQL or another utility, it logs and displays the error message and allows you to re-execute the current step.
-
To generate database statistics after connecting to sys user, run the statement below:
Copy
exec DBMS_STATS.GATHER_SCHEMA_STATS('RELADM')
Install the MDADM Schema
-
Log in to the target database server.
-
Navigate to the temporary directory into which the Oracle Utilities Analytics Warehouse v2.8.0.2.0. Oracle Database Multiplatform zip file was extracted.
Copy
cd database/BI2802/MDADM/Install-Upgrade - Review Storage.xml to ensure the MDADM user has quota on the mentioned tablespace in file. If not, edit the file with correct tablespace name.
-
Add JAVA_HOME/bin to the PATH variable.
-
Set CLASSPATH pointing to the location where OraDBI.jar and all dependency jars exist.
Copy
export CLASSPATH=<TEMPDIR>/BI2802/MDADM/Jarfiles/* -
Execute the command below. When completed, the utility creates the MDADM schema and system data definitions.
Copy
java com.oracle.ouaf.oem.install.OraDBI -d jdbc:oracle:thin:@<DATABASE SERVER>:<DATABASE PORT>/<ORACLE SERVICENAME>,MDADM,<Password of MDADM User>,,,,,MDADM -l 1,2 -o -q true -
To generate database statistics after connecting to sys user, run the statement below:
Copy
exec DBMS_STATS.GATHER_SCHEMA_STATS('MDADM');
Note: If an error occurs while executing a SQL or another utility, it logs and displays the error message and allows you to re-execute the current step.
Install the DWADM Schema
-
Log in to the target database server.
- Navigate to the temporary directory into which the Oracle Utilities Analytics Warehouse v2.8.0.2.0 Oracle Database Multiplatform.zip file was extracted.
Copy
cd database/BI2802/DWADM/Install-Upgrade -
Review Storage.xml to ensure the DWADM user has quota on mentioned tablespace in file. If not, edit the file with correct tablespace name.
-
Add JAVA_HOME/bin to the PATH variable.
-
Set CLASSPATH pointing to the location where OraDBI.jar and all dependency jars exist.
Copyexport CLASSPATH=<TEMPDIR>/BI2802/DWADM/Jarfiles/* -
Execute the command below. When completed, the utility creates the DWADM schema and system data definitions.
Copy
java com.oracle.ouaf.oem.install.OraDBI -d jdbc:oracle:thin:@<DATABASE SERVER>:<DATABASE PORT>/<ORACLE SERVICENAME>,DWADM,<Password of DWADM User>,DWUSER,DWREAD,DW_USER,DW_READ,DWADM -p <Password of DWUSER>,<Password of DWREAD> -l 1,2 -o -q trueNote: If an error occurs while executing a SQL or another utility, it logs and displays the error message, allowing you to re-execute the current step.
-
To generate database statistics after connecting to sys user, run the statement below:
Copy
exec DBMS_STATS.GATHER_SCHEMA_STATS('DWADM');
Upgrade the ETL Component
Prerequisites
Before installing the OUAW ETL component, verify the following:
-
Ensure latest Java version (Example: 1.8.391) is installed on the application server.
-
Ensure Oracle Fusion Middleware Infrastructure 12.2.1.4 installation and patches are applied on the target application server.
-
Ensure Oracle Data Integrator (ODI) 12.2.1.4 and patches are applied on the target application server.
-
Ensure GoldenGate MANAGER, JAGENT, PMSRVR process is running in both the source and the target database servers. Do not start any EXTRACT and REPLICATS.
-
Ensure ODI domain admin and managed servers are in stopped state.
-
Purge all the ODI operator logs.
Install the OUAW ETL Component
-
Log in to the application server.
-
Navigate to the temporary directory where the OUAW installer is downloaded.
Example: <TEMPDIR/application>.
-
Set the JAVA HOME and add PATH.
Copy
export JAVA_HOME=<JAVA HOME>
export PATH=$JAVA_HOME/bin:$PATH -
Launch the OUAW installer by running the command below. The OUAW installer Welcome page appears.
Copyjava -jar OUAW_2.8.0.2.0_ETL_generic.jar -logLevel finestNote: For an AIX Operating System, set the following environment variable before starting the Oracle Utilities Analytics Warehouse installation:
Copyexport IBM_JAVA_OPTIONS="-Xmx2g -XX:PermSize=64m -XX:MaxPermSize=3200m" -
Review the information before you begin the installation. Click Next to continue.
Note: If you are installing Oracle software on the server for the first time, provide central inventory details such as the inventory directory location and operating system group.
-
On the Installation Location page, define the installation location in the Oracle Home field and click Next.
Note: The specified Oracle home directory must be an empty directory.
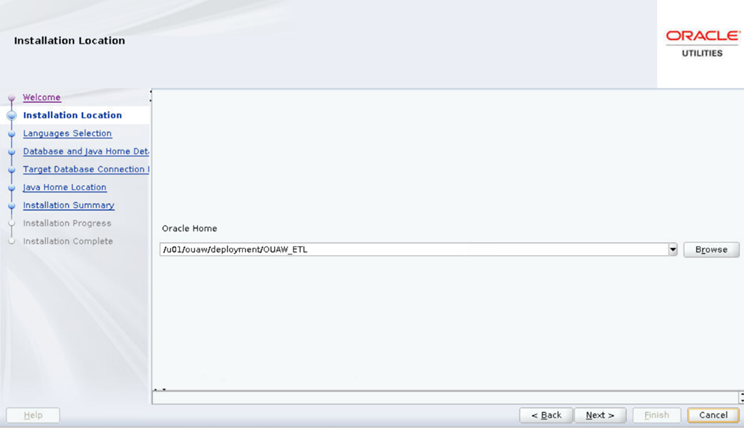
Field Name and Description
Value
Oracle Home: The directory where the Oracle Utilities Analytics Warehouse ETL is going to be installed.
Note: This directory location is called the ETL Home. Keep track of it, as it will be used during some deployment steps.
Example: <ETL Home>
</u01/ouaw/deployment/OUA_ETL>
-
On the Languages Selection page, select English and click Next.
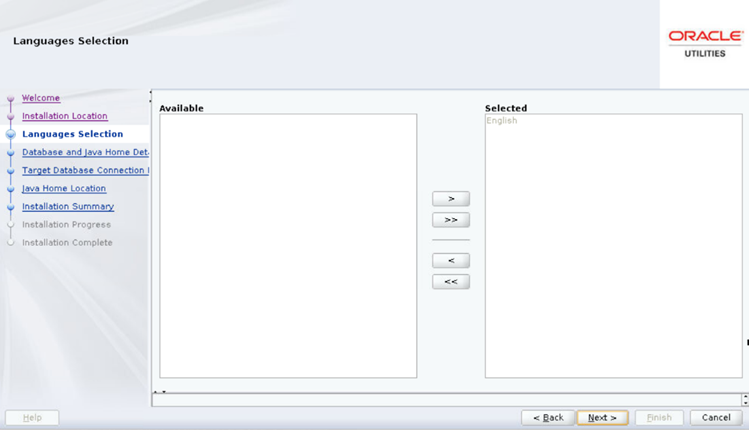
Field Name and Description
Value
Language Selection: The language for the installation process.
English
-
On the Database and Java Home Details page, enter the following and click Next.
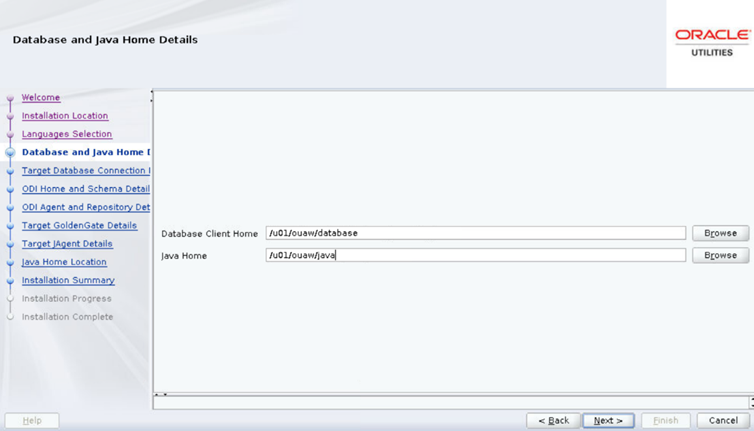
Field Name and Description
Value
Database Client Home: The Oracle Database Client installed location or Database Home location in the case where the same server is being used for both the application and database server.
Example: <Database Client> or <ORACLE_HOME>
</u01/ouaw/dbclient> or </u01/ouaw/database>
Java Home: The location used for the Java install.
Example: <JAVA HOME>
</u01/ouaw/java>
-
On the Target Database Connection Details page, populate the fields as detailed in the table below, and click Next.
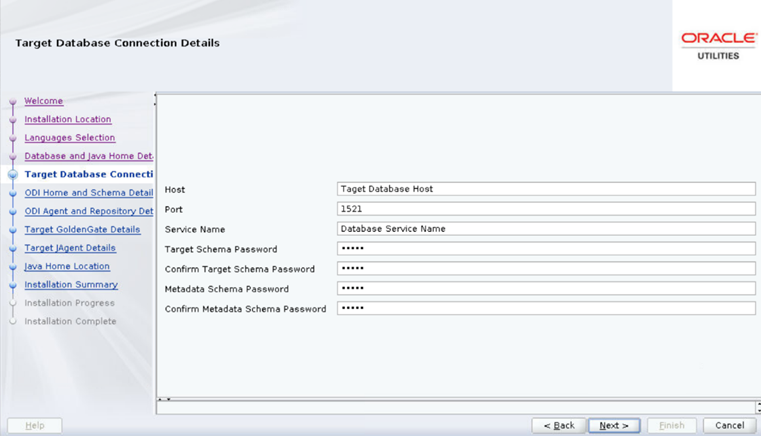
Field Name and Description
Value
Host: The target database server where database resides.
Target Database server host name.
<dbserver.hostname>
Port: The target database server port number.
Target Database port.
Example: <1521>
Service Name: The target database service name.
<Database service name>
Target Schema Password: Password for the target schema (DWADM).
<DWADM user password>
Confirm Target Schema Password: Confirm password for the target schema (DWADM).
<DWADM user password>
Target Schema Password: Password for the metadata schema (MDADM).
<MDADM user password>
Confirm Target Schema Password: Confirm password for the metadata (MDADM) schema.
<MDADM user password>
-
On the ODI Home and Schema Details page, populate the fields as detailed in the table below, and click Next.
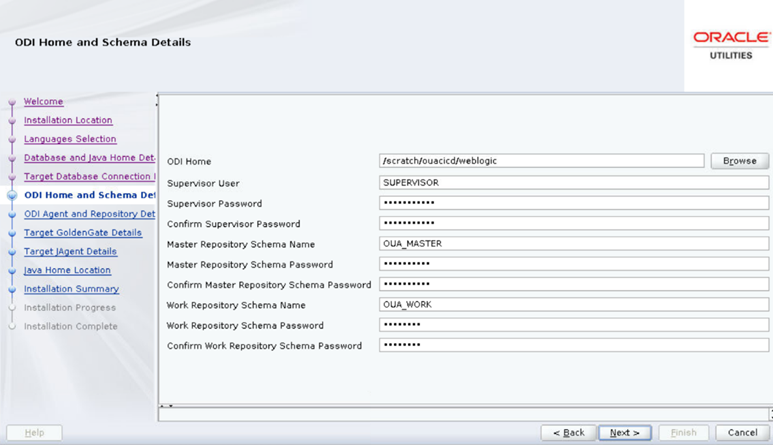
Field Name and Description
Value
ODI Home: The directory where Oracle Data Integrator (ODI) is installed.
Location of new FMW Home
Example: </u01/ouaw/middleware>
Supervisor User: Name of the Oracle Data Integrator Supervisor.
SUPERVISOR
Supervisor Password: The Supervisor Password and store it for future reference.
<Supervisor user password >
Confirm Supervisor Password: Enter same as Supervisor Password.
<Supervisor user password >
Master Repository Schema Name: Oracle Data Integrator master repository schema name.
OUA_MASTER
Master Repository Schema Password: Master Repository schema password.
<OUA_MASTER user password>
Confirm Master Repository Schema Password: Confirm password of the Oracle Data Integrator master repository schema.
<OUA_MASTER user password>
Work Repository Schema Name: Oracle Data Integrator work repository schema name.
OUA_WORK
Work Repository Schema Password: Work Repository schema password.
<OUA_WORK user password>
Confirm Work Repository Schema Password: Confirm password of Oracle Data Integrator work repository schema.
<OUA_WORK user password>
-
On the Oracle Data Integrator Agent and Repository Details page, populate the fields as detailed in the table below, and click Next.
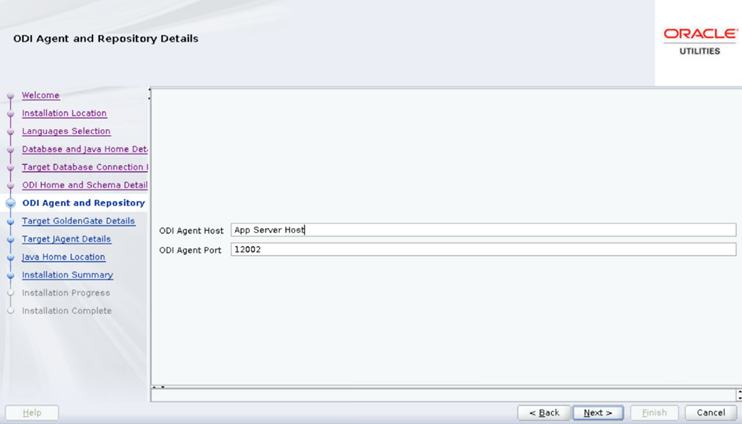
Field Name and Description
Value
ODI Agent Host: The application server hostname where the ODI application server is installed.
Example:
<appserver.hostname>
ODI Agent Port: The Oracle Data Integrator WebLogic Managed Server port. Make sure that you use the same port while creating Oracle Data Integrator managed server.
Example: <11002>
-
On the Target GoldenGate Details page, populate the fields as detailed in the table below, and click Next.
Field Name and Description
Value
GoldenGate Host: The Target database hostname where GoldenGate is installed.
Target database server host name
Example: <dbserver.hostname>
GoldenGate Home: The GoldenGate installed location.
Example: <GoldenGate Home.>
Target Database Home: The target database installed location.
Example: <ORACLE HOME>
GoldenGate Manager Port: The Oracle GoldenGate Manager port which is running on the database server host.
<The default value is 7830>
GoldenGate Algorithm: The algorithm configured in Oracle GoldenGate on the target database server
The default value is "BLOWFISH".
GoldenGate Encryptkey: The Encrypt Key configured in Oracle GoldenGate on the target database server.
The default value is “DEFAULT”
GoldenGate Shared Secret: Shared secret key configured in Oracle GoldenGate on the target database server.
Go to the Oracle GoldenGate prompt and run the command:
encrypt password <password of MDADM user>, encryptkey DEFAULT
Provide the result of the above command as the value.
-
On the Target JAgent Details page, populate the fields as detailed in the table below and click Next.
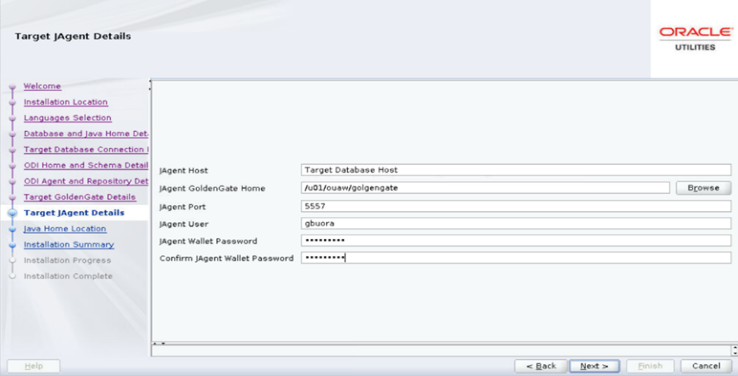
Field Name and Description
Value
JAgent Host: The Target database hostname where GoldenGate JAgent is configured.
The target database server host name
Example: <dbserver.hostname>
JAgent GoldenGate Home: The target database server GoldenGate Home installed location.
Example: <GoldenGate Home>
JAgent Port: The JAgent RMI port defined in the config properties file.
Example: <5557>
JAgent User: The OS user that installed the JAgent.
Example: <oracle>
JAgent Wallet Password: The JAgent Wallet password which was generated in the above steps.
<JAGENT Wallet password>
Confirm JAgent Wallet Password: The same password as above.
<JAGENT Wallet password>
-
On the Java Home Location page, populate the fields as detailed in the table below and click Next.
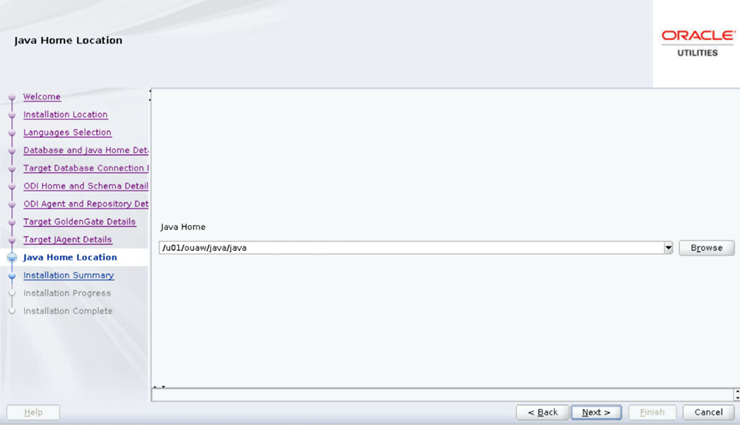
Field Name and Description
Value
Java Home: The Java installed location (on the Application server).
Example: </u01/ouaw/java>
-
On the Installation Summary page, a summary is displayed. Click the Installbutton to proceed.
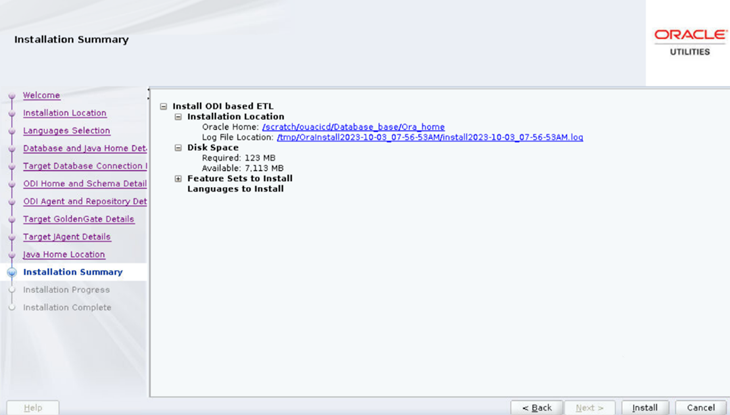
An Installation Progress page displays to track the installation.
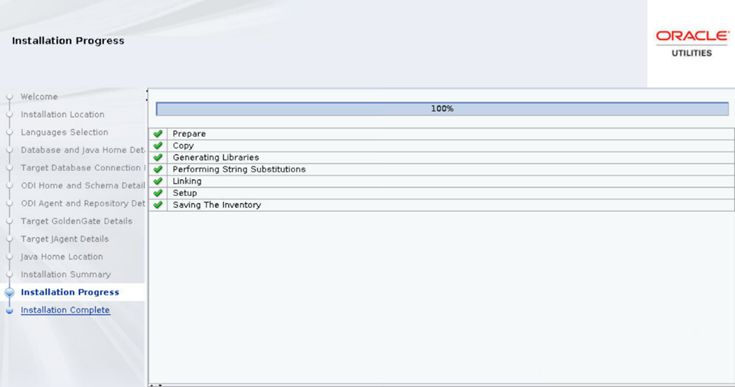
- On the Installation Complete page, note the displayed details and click Finish to close the installer wizard. The ETL is now installed.
-
Start ODI Admin and Managed servers.
Copynohup ./startWebLogic.sh > startWebLogic.log 2>&1 &
nohup ./startManagedWebLogic.sh <ODI_server1> > StartManagedWeblogic.log 2>&1 &
Upgrade the Administration Tool Component
Prerequisites
To remove the previously created Apex workspace from the database:
-
Connect to the target database as SYSTEM user.
Copy
export ORACLE_HOME=<ORACLE_HOME>
export ORACLE_SID=<DATABASE SERVICE NAME>
export PATH=$ORACLE_HOME/bin:$PATH
sqlplus system/<system user password>@<DATABASE SERVICE NAME>
-
Run the following PL/SQL procedure.
Copy
BEGIN
APEX_INSTANCE_ADMIN.REMOVE_WORKSPACE('OBIU_ADM');
END;
/
-
Make sure no workspace with “OBIU” exists in the database.
Copy
select WORKSPACE from APEX_WORKSPACES where WORKSPACE like '%OBIU%';Note: No rows should be returned from this query.
- Start the Apex Admin and Managed server. Copy
nohup ./startWebLogic.sh > startWebLogic.log 2>&1 &
nohup ./startManagedWebLogic.sh <apex_server1> > StartManagedWeblogic.log 2>&1 &
Configure APEX Workspace for OUAW
To import the Admin tool to configure Oracle Data Integrator:
-
Download and unzip the Oracle Utilities Analytics Warehouse v2.8.0.2.0 Multiplatform.zip file, which includes the AdminTool folder.
-
Copy the Multiplatform zip file into a temp directory within the target database server.
Example: </u01/temp>
-
Navigate to the TEMP directory and connect to the database using the system user.
Copy
cd </u01/temp/AdminTool>
sqlplus system/<system user password>@<DATABASE SERVICE NAME>
Access the AdminTool
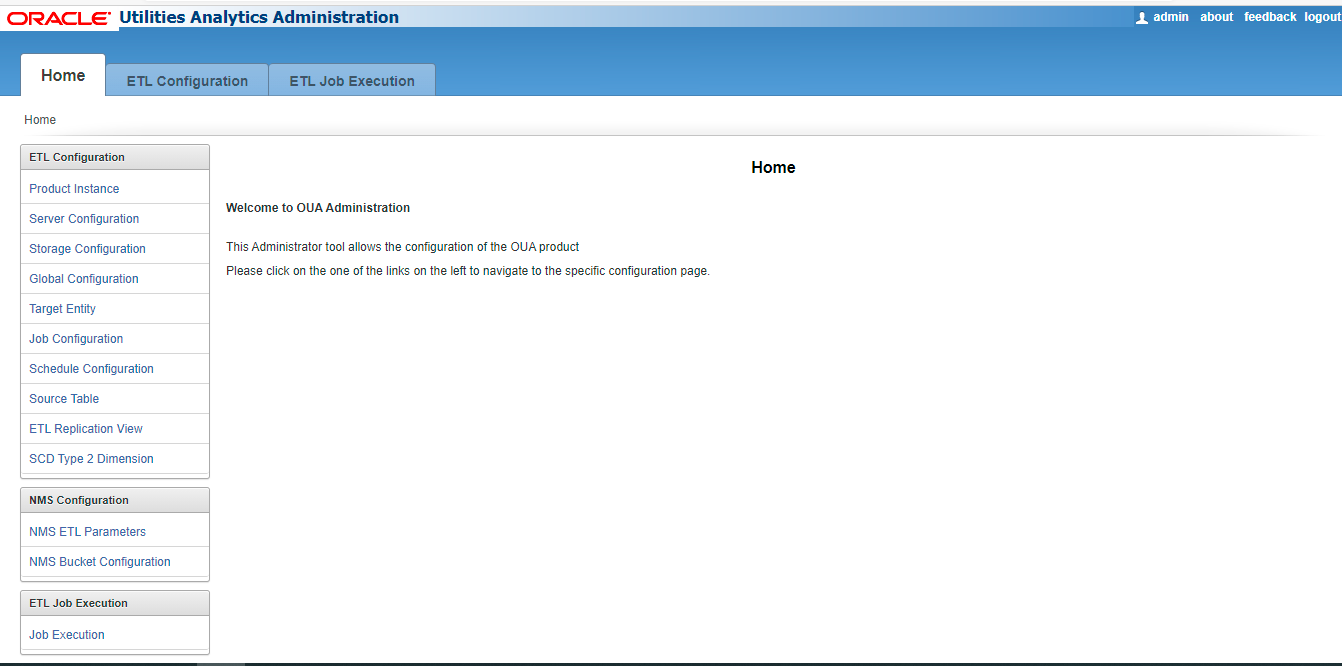
Use this URL to access the administration tool:
http://<hostname>:<apex_server1_port>/ords/f?p=104
-
Provide the following credentials to access the Admintool:
Username: Admin
Password: Admin_123
Note: After logging in to the application for the first time, you will be requested to change the password.
-
After logging in, you can access the ETL Configuration and ETL Job Execution through the respective tabs.
Change the Default Password of Admin User
This section describes the APEX API used to change the admin user's password.
The script below should be run after connecting to the database as user SYSTEM.
Note: Replace the string 'New password' with the new password for the admin account before running the script.
begin
wwv_flow_api.set_security_group_id(p_security_group_id=>nvl(wwv_flow_application_install.get_workspace_id,2090606133849294));
end;
/
begin
apex_util.edit_user(
p_user_id => '1467765078687596',
p_user_name => 'ADMIN',
p_web_password => 'New password',
p_new_password => 'New password'
);
end;
/
commit;
/
Note: It is strongly recommended to change the default password after logging in.
Upgrade the Dashboards Component
Prerequisites
Before you begin installing the OUAW Dashboards component, note the following:
-
A single OS user must install all required software.
-
All required software (such as Java, Oracle Database Client, Oracle Fusion Middleware, Oracle Analytics Server) must be installed.
-
The Oracle Analytics Server (OAS) domain must be installed and configured, and all domain paths must be available.
-
Start the OAS if is not running.
-
Verify that the OUAW Dashboards Components are unzipped and available in the
<TEMPDIR>/applicationdirectory on the application server.
Set Up the Dashboard Environment
- Log in to the application server.
- Create a Dashboard Home directory.
Example:
mkdir -p </u01/ouaw/deployment/OUAW_DASHBOARD>Note: In the documentation, this directory location is referred to as Dashboards Home. Keep note of it because it will be used during some deployment steps.
- Copy catalog, WriteBackTemplates, and rpd folders from <TEMPDIR/application> to Dashboard Home folder. Copy
cp -rp <TEMPDIR>/application/<OAS Version>/* </u01/ouaw/deployment/OUAW_DASHBOARD>
Deploy the Web Catalog
On the Oracle Analytics Server, you can deploy the latest catalogs into the environment using the online mode.
Note: In case you want to take a backup of the deployed catalog, follow the OAS Doc ID 2724149.1 in My Oracle Support.
- Navigate to <DOMAIN DOMAIN>/<OAS_DOMAIN>/bitools/bin.
-
Create a new credentials file called boot.txt and add the following contents to it:
Copy
login=<OAS Weblogc admin user>
pwd=<OAS Weblogic admin password>
For each catalog present under
<Dashboards Home>/catalogdirectory, run the following command from the<OAS DOMAIN HOME>/bitools/binlocation. Replace all parameters enclosed in <> with the appropriate values.Copy./runcat.sh -cmd unarchive -folder "/shared" -online http://<OAS SERVER Host>:<OAS Managed SERVER PORT>/analytics-ws/saw.dll -credentials boot.txt -inputFile "<Dashboards Home>/Catalog/<Catalog Name>" -overwrite allNote: The inputFile parameter must be in double quotes, and the catalog file name must include spaces.
-
Deploy the 'Spatial Metadata Catalog' on the System folder. Replace all parameters enclosed in <> with the appropriate values.
Copy
./runcat.sh -cmd unarchive -folder "/system" -online http://<OAS SERVER Host>:<OAS Managed SERVER PORT>/analytics-ws/saw.dll -credentials boot.txt -inputFile "<Dashboards Home>/catalog/Spatial Metadata.Catalog" -overwrite allNote: The inputFile parameter must be in double quotes, and the catalog filename must include spaces.
Deploy the Merged RPD File
To merge the customized 2.8.0.1.2 RPD file with the 2.8.0.2.0 RPD, which contains the database changes required:
- Copy both 2.8.0.2.0 and 2.8.0.1.2 RPD files to the Windows machine where Oracle Analytics Client Tool 7.0 is installed, then merge it.
Note: RPD file merge steps can be found here: Merging Repositories
-
Once the RPD file merge is complete, copy the modified RPD back to the
<install dir>/rpd/UtilitiesBusinessAnalytics.rpd, where<install_dir>is the Oracle Utilities Analytics Warehouse Dashboard Component installation directory.
Upload the RPD File
-
Log in to the target application server where OAS is installed.
-
Navigate to <DOMAIN HOME>/<OAS DOMAIN>/bitools/bin.
-
Run the following command to deploy the RPD:
Copy./datamodel.sh uploadrpd -I <Dashboards Home>/rpd/UtilitiesBusinessAnalytics.rpd -W <rpd password, defaultpassword is oracle123> -U <Weblogic user name of OAS domain> -P <Weblogic password of OAS domain> -SI ssi -
Run the following commands from the <OAS_DOMAIN>/bitools/bin directory to stop and start the OAS domain services respectively.
Copy
./stop.sh
./start.sh
Deploy Writeback Templates
-
Log in to the application server and run the following commands to deploy writeback templates:
Copy
cp -rp <Dashboards Home>/WriteBackTemplates/* <FMW Home>/bi/bifoundation/web/msgdb/l_en/custommessages/ -
Restart the Oracle Analytics Server services after deploying these writeback templates in the specified path.
Copy
cd <OAS DOMAIN>/bitools/bin
./stop.sh
./start.sh
Configure Spatial Data
-
Log in to the target database server.
-
Navigate to the temporary directory where the Oracle Utilities Analytics Warehouse v2.8.0.2 Oracle Database Multiplatform.zip file was extracted.
Copy
cd database/BI2802/Spatial-Metadata -
Set the following environment variables.
Copy
export ORACLE_SID=<DATABASE SERVICE NAME>
export ORACLE_HOME=<ORACLE HOME>
export PATH=$ORACLE_HOME/bin:$PATH
-
Create the database directory in the database after connecting to sys user.
Copy
sqlplus sys/<sys user password>@<DATABASE SERVICE NAME>Example: Create the directory <dump_dir> as '</u01/dumps>'.
-
Copy the user_sdo.dmp dumpfile from the temporary directory <TEMPDIR>/database/BI2802/Spatial-Metadata to the database directory <dump_dir> location.
Example: </u01/dumps>
-
Execute the impdp command to import the USER_SDO* tables data.
Copy
impdp directory=dump_dir dumpfile=user_sdo.dmp logfile=impdp_user_sdo.log schemas=DWADM remap_tablespace=cists_01:<tablespace_name> -
Provide DWADM username password when prompted.
Note: Ensure to change the tablespace_name to the name on which DWADM has the quota. If DWADM user have quota on cists_01 tablespace, then exclude the whole remap_tablespace clause from the command.
- Review the impdp_user_sdo.log file to ensure the tables are imported successfully.
-
After importing the tables, run the following SQL scripts from the <TEMPDIR>/BI2802/Spatial-Metadata directory.
Copy
sqlplus dwadm/<dwadm user password>@<database service name>
@copy_spatial_metadata.sql
@clean_sdo_release_tbls.sql
-
Review the log files.
Post-Upgrade Steps
Run Post-Upgrade Steps
Note: Steps 2, 3, 10, 11, and 12 are only valid for the Oracle Utilities Network Management System (NMS) Source. Ignore these steps for Oracle Utilities Customer Care and Billing, Meter Data Management, Customer To Meter, and Work and Asset Management.
- Change the value of the parameter Maximum Table Name Length to 128.
- In ODI studio, navigate to Topology > Physical Architecture > Technologies.
- Right-click Oracle and select Open.
- Navigate to the Advanced tab and change the parameter Maximum Table Name Length to 128.
- Click Save.
- Perform the steps below in accordance with the upgraded NMS version in ODI Studio.
Note:
- The following steps are only valid for the NMS source application.
- Ignore these steps in case the names for scenarios, dimensions, or facts are already set to the ones defined throughout this process.
- Navigate to Load Plans and Scenarios > Framework > Data correction.
- Right-click the B1_UPD_NMS_SCEN_FROM_260 scenario.
- Click Run.
- Set Context as "Global".
- Click OK.
- Navigate to Load Plans and Scenarios > Framework > Data correction.
- Right-click the B1_UPD_NMS_SCEN_FROM_2502_UNDER_260 scenario.
- Click Run.
- Set Context as "Global".
- Click OK.
- Navigate to Load Plans and Scenarios > Framework > Data correction.
- Right-click the B1_UPD_NMS_SCEN_FROM_2401_UNDER_2502 scenario.
- Click Run.
- Set Context as "Global".
- Click OK.
- Navigate to Load Plans and Scenarios > Framework > Data correction.
- Right-click the B1_UPD_NMS_SCEN_UNDER_2401 scenario.
- Click Run.
- Set Context as "Global".
- Click OK.
- Rename the Account Dimension View scenario by performing the following steps:
- Navigate to Load Plans and Scenarios > Oracle Utilities BI > Shared > Dimensions > Account Dimension.
- On the Definition tab, double-click B1_NMS_D_ACCT_VW_UPTO_24013 Version 001 and rename it to B1_NMS_D_ACCT_VW Version 001.
- Click Save.
- Make sure that MANAGER, JAGENT, and PMSRVR are running on Source and Target GoldenGate. Do not start any EXTRACT and REPLICAT processes.
- Run the source configuration in UPGRADE mode.
- Make sure that the pump processes transfer all the changes to the target server. Lag at the Chkpt and Time Since Chkpt should be zero (0). This can be confirmed through the info all command after connecting to the ggsci prompt.
- Stop the Golden Gate REPLICAT processes in the target server.
- Run B1_SYNC_CONTEXT Version 001 in ODI studio for the configured product context.
- Start the Golden Gate REPLICAT processes in the target server.
- Perform the following steps for Backfilling of Storm changes in the NMS Star Schema in accordance with the upgraded NMS version.
For NMS Versions 2.6.0.0 and Later:
- Navigate to ODI Designer > Load Plans and Scenarios > Framework > Data correction.
- Right-click B1_STORM_DATA_FIX_2802 Version 001.
- Click Run.
Note: Select the appropriate context. If multiple contexts are configured, execute for each context separately.
-
Disable all NMS facts and dimensions (including B1_BR_SW_PLAN_JOBS). This can be ensured by checking that there is no record for any entity in the B1_READY_VW view in the MDADM schema:
Copyselect distinct entity_name from mdadm.b1_ready_vw; - For Account Dimension (NMS) related changes, perform an incremental or complete load of data FROM NMS_ACCOUNTS_HISTORY table into the Account Dimension.
Option 1: Incremental Data Load
CD_ACCT dimension will load only the incremental data FROM NMS_ACCOUNTS_HISTORY table. The data which is already loaded in the dimension FROM CES_CUSTOMERS_HISTORY table will not be modified or updated and remains the same. The dependent facts will not be impacted while performing initial load.
Ensure the NMS_ACCOUNTS_HISTORY is present in replication layer with data.
Stop the GoldenGate REPLICAT.
To load all the initial and incremental data FROM CES_CUSTOMERS_HISTORY table into the dimension, navigate to: Load Plans and Scenarios > Oracle Utilities BI > Shared > Dimensions > Account Dimension.
On the Definition tab, double-click B1_PKG_NMS_CD_ACCT_UPTO_24013 Version 001 and rename it to B1_PKG_NMS_CD_ACCT Version 001.
On the Definition tab, double-click B1_NMS_D_ACCT_VW_UPTO_24013 Version 001 and rename it (if not already done) to B1_NMS_D_ACCT_VW Version 001.
Click Save.
Run the View generation script for the configured NMS Context.
Enable the entity active flag for CD_ACCT dimension and B1_RUN_ALL to load the Account dimension. This loads data from CES_CUSTOMERS_HISTORY until latest checkpoint.
Ensure that the CD_ACCT dimension data loads are completed until the checkpoint date. The output of below queries should result in same date:
CopySELECT MAX (SLICE_END_DTTM) FROM MDADM.B1_JOBS_VW WHERE CONTEXT_CD= <NMS_context_code> AND ENTITY_NAME='CD_ACCT';
SELECT LAST_UPDATE_TS FROM MDADM.B1_CHECKPOINT WHERE GROUP_NAME LIKE 'NMS%';Revert the changes for scenario names for CD_ACCT dimension upon completion of the job loads by navigating to Load Plans and Scenarios > Oracle Utilities BI > Shared> Dimensions > Account Dimension.
- On the Definition tab, double-click B1_PKG_NMS_CD_ACCT Version 001 and rename it to B1_PKG_NMS_CD_ACCT_UPTO_24013 Version 001.
On the Definition tab, double-click B1_NMS_D_ACCT_VW Version 001 and rename it to B1_NMS_D_ACCT_VW_UPTO_24013 Version 001.
- Click Save.
- Stop B1_RUN_ALL from ODI Studio.
- Start the GoldenGate REPLICAT.
- Load the incremental data into CD_ACCT dimension FROM NMS_ACCOUNTS_HISTORY table by navigating to Load Plans and Scenarios > Oracle Utilities BI > Shared> Dimensions > Account Dimension.
- On the Definition tab, double-click B1_PKG_NMS_CD_ACCT_FROM_24013 Version 001 and rename it to B1_PKG_NMS_CD_ACCT Version 001.
- On the Definition tab, double-click B1_NMS_D_ACCT_VW_FROM_24013 Version 001 and rename it to B1_NMS_D_ACCT_VW Version 001.
- Click Save.
- Run the View generation for the Configured Context.
- Enable B1_RUN_ALL and load the Account dimension. At this point, the data is loaded from NMS_ACCOUNTS_HISTORY.
- Enable all other dimensions and facts, and perform incremental loads.
Option 2: Complete Data Load
CD_ACCT dimension will load the complete data FROM NMS_ACCOUNTS_HISTORY table. The data which is already loaded in the dimension FROM CES_CUSTOMERS_HISTORY table will be updated. All the dependent facts will also be updated with the latest ACCT_KEY values FROM CD_ACCT table. Once the loads are done, the older records in the account dimension (All the data loaded form CES_CUSTOMERS_HISTORY table) will be deleted.
- Stop B1_RUN_ALL from ODI studio. Run this query to ensure no ETL jobs are in the "Running" state:Copy
SELECT * FROM MDADM.B1_JOBS_VW WHERE STATUS_FLG in ('W','P', 'R');Note: If there are entries found, wait for the jobs to finish.
- Ensure that the NMS_ACCOUNTS_HISTORY table is present and with data in the replication layer.
- Ensure the scenario names for the existing CD_ACCT NMS Dimension are renamed (if not already done) with suffix 'UPTO_24013' in ODI by navigating to Load Plans and Scenarios > Oracle Utilities BI > Shared> Dimensions > Account Dimension.
- On the Definition tab, double-click B1_PKG_NMS_CD_ACCT Version 001 and rename it to B1_PKG_NMS_CD_ACCT_UPTO_24013 Version 001.
- On the Definition tab, double-click B1_NMS_D_ACCT_VW Version 001 and rename it to B1_NMS_D_ACCT_VW_UPTO_24013 Version 001.
- Click Save.
- Rename the scenario name for the new CD_ACCT NMS Dimension by navigating to Load Plans and Scenarios > Oracle Utilities BI > Shared> Dimensions > Account Dimension.
- On the Definition tab, double-click B1_PKG_NMS_CD_ACCT_FROM_24013 Version 001 and rename it to B1_PKG_NMS_CD_ACCT Version 001.
- On the Definition tab, double-click B1_NMS_D_ACCT_VW_FROM_24013 Version 001 and rename it to B1_NMS_D_ACCT_VW Version 001.
- Click Save.
- Run the View generation for the Configured NMS Context.
- Run the B1_ACCT_DIM_UPD_28020 scenario for the configured NMS Context by navigating to Load Plans and Scenarios > Framework > Data Correction > B1_ACCT_DIM_UPD_28020.
- Enable the entity active flag of CD_ACCT dimension.
- Enable B1_RUN_ALL and load the Account dimension, where data is loaded from NMS_ACCOUNTS_HISTORY.
- Run the B1_F_ACCT_KEY_UPD_28020 scenario for the configured NMS Context by navigating to Load Plans and Scenarios > Framework > Data Correction > B1_F_ACCT_KEY_UPD_28020.
- Run the B1_ACCT_DIM_DEL_KEYS_28020 scenario for the configured NMS Context by navigating to Load Plans and Scenarios > Framework > Data Correction > B1_ACCT_DIM_DEL_KEYS_28020.
- Enable all other dimensions and facts, and perform incremental loads.
For NMS Versions 2.6.0.0 and Later:
For NMS Versions after 2.5.0.2 and below 2.6.0.0:
For NMS Versions after 2.4.0.1 and below 2.5.0.2:
For NMS Versions below 2.4.0.1: