Upgrade Tech Stack for OUAW
This page details the tasks required to upgrade the services that are used to run Oracle Utilities Analytics Warehouse.
On this page:
GoldenGate Classic Processes Cleanup
Warning: GoldenGate processes cannot be rolled back once these have been cleaned up. Perform the GoldenGate process cleanup only if you have decided to upgrade Oracle Utilities Analytics Warehouse from version 2.8.0.0.1 to version 2.9.0.0.0.
Note: Existing GG classic processes need to be cleaned up in both the source and target databases.
Clean Up the GG Processes on the Source Database
-
On the source database, log in to the GG command line interface (ggsci prompt).
-
Stop all extract and pump processes associated to this instance if they are not already stopped.
-
Unregister the primary extract processes on the source system related to this context.
CopyGGSCI> dblogin userid <gguser name>, password <Password>
GGSCI> unregister extract <primary extract name> databaseNote: Run this command for each primary extract process created for context code. Primary extract process suffix with "X" and pump extract process suffix with "P". Once the extract process is unregistered, make sure that there is no data related to this context in the source database's DBA_CAPTURE view.
Run this query in the source database and verify that no results are displayed.
Copyselect * from dba_capture where capture_name like '%<contextcode>%'; -
Delete each one of the instance's extract and pump processes.
Copy
GGSCI> Delete extract <extract and pump process name> -
Clean up all trail files present in <Source GG Home>/dirdat/<Context Code>.
-
Clean up all instance-related checkpoint files present in <Source GG Home>/dirchk/.
-
Clean up all context-related report files present in <Source GG Home>/dirrpt/.
-
Clean up all context-related temporary files present in <Source GG Home>/dirtmp.
-
Clean up all context-related obey files present in <Source GG Home>/diroby/.
-
Clean up all context-related parameter files present in <Source GG Home>/dirrpm/.
Note: Do not modify or remove any other parameter file. For example, do not modify or remove manager.prm or jagent.prm. But the manager and jagent param files can be removed if you opt to uninstall Goldengate Classic.
-
Check if there is any data in the source GG owner schema B1_OGG_SYNC_LOG table.
If there is data for OGG_MODEL_CD, delete the records pertaining to the instance that is to be de-registered.
Copyselect OGG_MODEL_CD FROM <GG Owner Schema>.B1_OGG_SYNC_LOG WHERE OGG_MODEL_CD like '<context code>%';
DELETE FROM <GG Owner Schema>.B1_OGG_SYNC_LOG WHERE OGG_MODEL_CD like '<context code>%';
COMMIT;
Clean Up the GG Processes on the Target Database
-
On the target database, log in to the GG command line interface (ggsci prompt).
-
Stop all replicat processes associated to this context if they are not already stopped.
-
Log in to the database by using the DBLOGIN command from the GGSCI command prompt.
Use the DBLOGIN credential from the <Context Code>.oby file that is located in the <Goldengate Home>/dirtmp directory.
-
Delete from the target system all replicat processes related to this context.
Copy
GGSCI> Delete replicat <replicat process name> -
Clean up all trail files present in <Source GG Home>/dirdat/<Context Code>.
-
Clean up all instance-related checkpoint files present in <Target GG Home>/dirchk/.
-
Clean up all context-related report files present in <Target GG Home>/dirrpt/.
-
Clean up all context-related temporary files present in <Target GG Home>/dirtmp.
-
Clean up all context-related obey files present in <Target GG Home>/diroby/.
-
Clean up all context-related parameter files present in <Target GG Home>/dirrpm/.
Note: Do not modify or remove any other parameter file. For example, do not modify or remove manager.prm or jagent.prm. But the manager and jagent param files can be removed if you opt to uninstall Goldengate Classic.
-
Ensure that no entry is present in the checkpoint table for the replicat processes related to the current context.
CopySelect * from mdadm.b1_checkPoint where group_name like '<context code>%';
Upgrade the Tech Stack for the Source Database Server
This section covers the instructions for the downloads, installations, and upgrades that can be performed on the source database server.
Notes:
- Before upgrading, back up the current environment and ensure you have a rollback plan.
- Make sure the same OS user installs all software, and that you replace all parameters enclosed in <> with valid values.
- While the table below includes some directory structures as examples, you can choose where to install the software.
|
Task |
Description |
|---|---|
|
Download and Upgrade the Java Development Kit |
|
|
Download and install GoldenGate Microservices |
|
| Apply patch for GoldenGate Microservices |
|
|
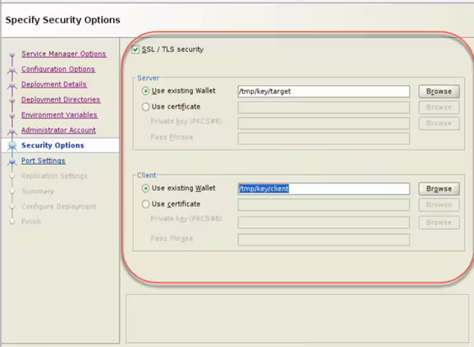
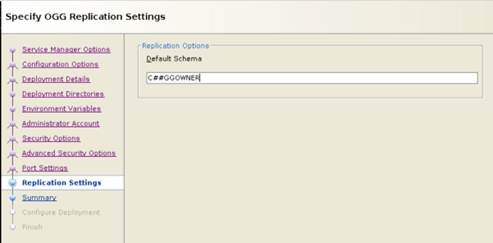
Create Oracle GoldenGate Microservices Deployment |
Note: OUAW only supports GoldenGate Microservice Secure Deployments. Prerequisites:
Add Oracle GoldenGate Microservices Deployment with the following command: Copy Refer to Setting Up Secure or Non-Secure Deployments for more information Examples:
Note:
|
Upgrade the Tech Stack for the Target Database Server
This section covers the instructions for the downloads, installations, and upgrades that can be performed on the Oracle Utilities Analytics Warehouse database server.
Notes:
- Before upgrading, back up the current environment and ensure you have a rollback plan.
- Make sure the same OS user installs all software, and that you replace all parameters enclosed in <> with valid values.
- While the table below includes some directory structures as examples, you can choose where to install the software.
|
Task |
Description |
|---|---|
|
Download and Upgrade the Java Development Kit |
|
|
Download and apply Database Server Patch |
|
|
Download and install GoldenGate Microservices |
|
| Apply patch for GoldenGate Microservices |
|
|
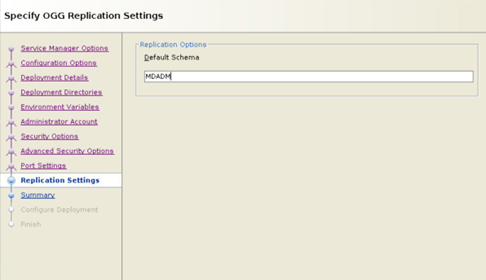
Create Oracle GoldenGate Microservices Deployment |
Note: OUAW only supports GoldenGate Microservice Secure Deployments. Prerequisites:
Add Oracle GoldenGate Microservices Deployment with the following command: Copy Refer to Setting Up Secure or Non-Secure Deployments for more information Examples:
Note:
|
|
Download and extract Oracle APEX |
|
|
Download the OUAW database software |
Note: You can find the OUAW Database Installers at the following location after unzipping the file: |
|
Extract the Admin Tool |
|
Upgrade the Tech Stack for the Target Application Server
This section covers the instructions for the downloads, installations, and upgrades that can be performed on the Oracle Utilities Analytics Warehouse application server.
Notes:
- Before upgrading, back up the current environment and ensure you have a rollback plan.
- Make sure the same OS user installs all software, and that you replace all parameters enclosed in <> with valid values.
- While the table below includes some directory structures as examples, you can choose where to install the software. Make sure to keep track of all the home directories you create, as these will be used for OUAW installation.
|
Task |
Description |
|---|---|
|
Download and Upgrade the Java Development Kit |
Note: Rename the existing JDK path and upgrade/install the new JDK by creating the same JDK path so that JAVA_HOME is the same as the previous. |
|
Download and install Oracle Fusion Middleware Infrastructure |
See Install Oracle Fusion Middleware Infrastructure for more information. |
|
Download and apply Oracle Fusion Middleware Infrastructure Patch |
Note: Apply these patches in both OAS and ODI ORACLE_HOME (FMW Home).
Note: ORACLE_HOME is referred to as <FMW Home location>. |
|
Download and install Oracle Analytics Server (OAS) |
Example: </u01/ouaw/temp/oas>. |
| Download and apply ODI Patches |
Note: Apply this patch in ODI ORACLE_HOME (FMW Home).
Note: For post patch instructions, follow the README file in patch package. |
| Download and Extract APEX |
Download Oracle APEX 23.2 from Oracle Application Express and it to a local directory. Example: </u01/ouaw/apex> After extraction, you can see the apex folder. Example: </u01/ouaw/apex/apex> |
| Download and Extract ORDS |
Download the Oracle REST Data source (ORDS) 21.4.3 version from Oracle REST Data Services Download and extract it to a local directory. Example: </u01/ouaw/ords> After extraction you can see the ords folder. Example: </u01/ouaw/ords> |
| Download the OUAW Application Software |
|
Upgrade the Existing Domains and Repository
This section details how to upgrade the existing domains and the repository in accordance with the in-place upgrade domain strategy.
Note: Before upgrading a repository or domain activity, make sure you have a rollback plan in case it is necessary to revert your changes.
OAS Repository and Domain In-Place Upgrades
For OAS repository and domain in-place upgrades, follow the steps in Upgrading to the Latest Release of Oracle Analytics Server.
Note: The ./reconfig.sh may fail while running it, generating the exception: " CFGFWK-60953: An error in reconfiguration template resulted in the following deployment being left in the original MW home: log4j.jar#1.3@1.2.15". To solve this, follow the steps in the document 2933574.1 available on My Oracle Support.