Federated Web Services
Product based SOAP and REST Web Services are secured and federated using Oracle Web Services Manager (OWSM) and the Oracle Mobile/Social OAuth2 service for the Mobile Framework installed as part of the Oracle Access Manager/Oracle Identity Federation installation.
Note: The product supports OAuth 2.0 and uses the "2-legged" Authorization model. Refer to Understanding OAuth2 with Oracle Web Services Manager and Oracle Access Management OAuth Service for more details.
Overview
The architecture of the Web Services federation is similar in nature to the online federation with the following important differences:
• Oracle HTTP Server and WebGate are used in a similar role but delegate, via exclusion, to Oracle Web Services Manager rather than to the IdP and Oracle Access Manager.
• The architecture has an authorization server to determine the validity of the user. An authorized user is issued an access token that is used for transaction security. In this document, Oracle Identity Federation is used but any OAuth 2.0 compliant authorization server can be used.
• Inbound Web Services and REST use the Oracle Web Service Manager integration to implement OAuth2 with support inline and at the container level.
Process Flow
The flow of the Web Services transaction is as follows:
• The Web Service call is redirected to the Authorization Server to be granted access to the requested resources. Optionally, depending on the policy used access certificates can be used.
• If the Web Service identity is valid on the Authorization Server an Access Token is issued that is used for relevant calls for the Web Services.
• Trust is established between the Authorization Server and Product Server to ensure proper security protocols are maintained between the servers.
• For example: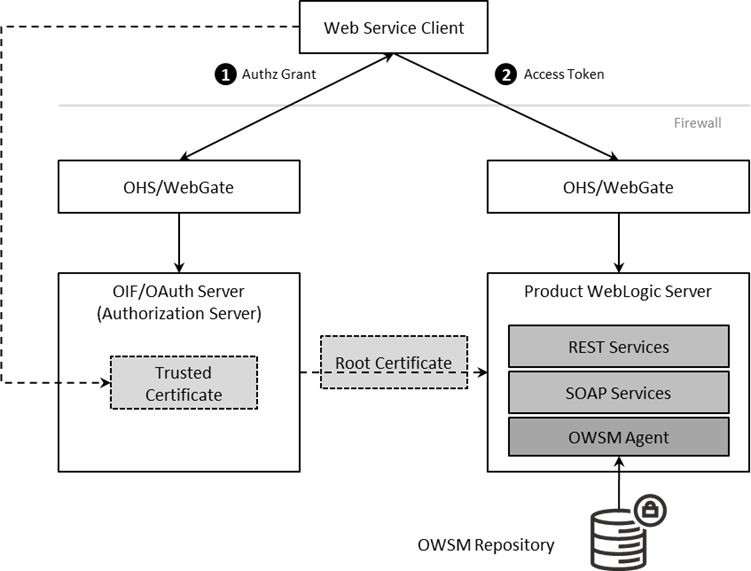
Set Up OAuth Service
The first step in the configuration process is to setup the OAuth component for Oracle Identity Federation in the Authorization Server. Refer to Managing the Oracle Access Management OAuth Service for instructions on this process.
Configure WebGate for SOAP/REST communications
The online WebGate configuration needs to be altered with the following changes for securing SOAP and REST based services:
• Alter the Application domain within the Authorization Server to add the SOAP and REST URLs as separate resources.
Protocol | Resource URL |
|---|---|
SOAP | /<context>/webservices/* |
REST | /<context>/rest/ouaf/** |
Where <context> is the value in WEB_CONTEXT_ROOT variable configured in the ENVIRON.INI.
• Ensure the Protection Level is set to Excluded to delegate the security to Oracle Web Services Manager for these resource URL's. This will disable the Authentication Policy and Authorization Policy for the resource URL's above.
Create OAuth Client
In the online federation, an identity domain was created for use with online users. For integration with Web Services, a new identity domain must be created and configured specifically for Web Services. Refer to Configuring OAuth Services Settings for detailed information on how to create a new domain and generate a new client to interface to the domain.
When creating the new domain, the following recommendations apply to the configuration:
• Ensure the Refresh Token Enabled is set to true.
• Ensure Lifecycle Enabled is set to true.
• Ensure the endpoints are unique across domains. For example, ouafoauthservice
• Set the Attributes to match your site settings:
Attribute | Comments |
|---|---|
jwt.CryptoScheme | To a valid scheme used in your implementation. For example, RS256. |
createdByDefault | Set to true. |
jwt.cert.alias | Set to oauthkey. This alias will be added later to the keystore. |
• In the OAuth Web Service Client for the above domain, specify the default identity, in the Client Id, to be used for Web Services. This user must be defined to the product User object used for authorization. Generate the Client Secret for the identity. Ensure Shown in Clear Text is set for the identity. Under Grant Types under Privileges, ensure Client Credentials is enabled to make sure that, when using a JWT token, the token for the Web Services is generated correctly. Refer to Understanding OAuth2 with Oracle Web Services Manager for additional advice.
Using Keystores and Credentials
As keystores and credentials are typically used, they must match each component of the architecture so that communication can proceed. This subsection will outline the steps to generate, import and configure the various identities in keystores to provide secure communications.
Setup Oracle Web Service Manager Client
The Oracle Web Services Manager must define and generate keys to be used in the architecture:
• Define the OWSM Credential to the Credential Store Framework (CSF) - Add the Client identifier and the Secret generated in the OAuth Web Service Client. using the WLST command below or using Fusion Middleware Control console:
createCred('oracle.wsm.security', key=<key>', user='<user>', password='<secret>', desc='<description>')
Where:
<key> | The key used for the credential. This must match either oauth2.client.csf.key or the override specified in the F1-OAUTH Extended Lookup. For example, f1.oauth2.client.credentials. |
<user> | The product user specified on the OAuth Web Service Client |
<secret> | The value generated for secret on the OAuth Web Service Client. |
<description> | A short description for the key. This can assist in finding the key in the domain. |
• Generate the Client JWT Bearer key pair - Using keytool generate the orakey key pair and certificate into a temporary JKS keystore. For example:
keytool -genkeypair -noprompt -keyalg RSA -keystore /tmp/orakey-keystore.jks -storepass '<pw>' -alias orakey -keypass '<pw>' -validity 7200 -dname "<cn>"
Where:
<pw> | The password to use for the store. These values will be used in the OPSS Keystore Service (KSS) once imported. |
<cn> | CN String for certificate |
Note: This example is for non’production only. Alter command for alternative certificates.
Note: In non-production the WebLogic demo certificate can be used. It is recommended to use a valid third-party certificate be used for production. Refer to Using Third Party CA Signed Certificates to for more information.
• Define the OPSS Keystore Service (KSS) and import keys: Using Fusion Middleware Control or WLST create the KSS and import the orakey pair. For example:
svc = getOpssService(name='KeyStoreService')
svc.createKeyStore(appStripe='owsm', name='keystore', password='<ksspw>')
svc.importKeyStore(appStripe='owsm', name='keystore', password='<pw>', aliases='orakey', keypasswords='<pw>', type='JKS', permission=false, filepath='/tmp/orakey-keystore.jks')
Where:
<ksspw> | Keystore Service Password The password used for generated file to be imported. |
<pw> |
• Export the certificate for use on the Authorization Server using the following WLST command. For example:
svc.exportKeyStoreCertificate(appStripe='owsm', name='keystore', password='', alias='orakey', keypassword='<ksspw>', type='Certificate', filepath='<file>')
Where:
<ksspw> | Keystore Service Password |
<file> | Fully qualified directory and name for exported file. For example: /tmp/orakey.cert |
Setup Authorization Server
On the OAuth Server the following must be performed:
• Import the Certificate: Import the orakey certificate from the client into the OAuth server using the keytool command. For example:
cd $DOMAIN_HOME/config/fmwconfig
keytool -importcert -file <file> -trustcacerts -alias orakey -keystore default-keystore.jks
Where:
<file> | Fully qualified directory and name for file to be imported. For example: /tmp/orakey.cert |
• Generate the JKS Key Pair: Generate the JKS Key Pair to ensure that the tokens used are signed appropriately using the keytool utility. For example:
keytool -genkeypair -noprompt -keyalg RSA -sigalg SHA1withRSA -keystore default-keystore.jks -storepass '<store_password>' -alias oauthkey -keypass '<key_password>' -validity 3600 -dname "<cn>"
Where:
<store_password> | The password for the key store. |
<key_password> | The password assigned to the key. |
<cn> | CN String for key. |
• Update OAuth CSF Credentials: The CSF credentials within Oracle Web Services Manager must be updated to include the private key using the Fusion Middleware Control or a set of WLST commands. For example:
updateCred(map="oracle.wsm.security", key="keystore-csf-key", user="owsm", password="<store_password>", desc="Keystore key")
updateCred(map="oracle.wsm.security", key="sign-csf-key", user="oauthkey", password="<key_password>", desc="Signing key")
updateCred(map="oracle.wsm.security", key="enc-csf-key", user="oauthkey", password="<key_password>", desc="Encryption key")
Where:
<store_password> | The password for the key store. |
<key_password> | The password assigned to the key. |
• Export Certificate for use in product: The final step within the Authorization Server is to export the certificate for use in the product using the keytool utility. For example:
keytool -exportcert -keystore default-keystore.jks -storetype JKS -storepass <store_password> -alias oauthkey -file <file>
Where:
<store_password> | The password for the key store. |
<file> | Fully qualified directory and name for export file. |
Import Certificate into Product
On the product server the certificate and trust from the Authorization Server must be imported so that a trust is established between the servers. To achieve this the following steps are recommended to be performed on the product application server:
• Transfer the exported certificate file from the Authorization Server.
• Convert the format of the certificate file into PEM format. For example:
openssl x509 -inform der -in <file> -out <pemfile>
Where:
<file> | Fully qualified directory and name for exported certificate file. |
<pemfile> | Fully qualified directory and name for generated PEM file. |
• Import the PEM certificate into the OPSS keystore used by the product using Fusion Middleware Control or WLST commands. For example:
svc = getOpssService(name='KeyStoreService')
svc.importKeyStoreCertificate(appStripe='owsm', name='keystore', password='', alias='oauthkey', keypassword='', type='TrustedCertificate', filepath='<file>')
Where:
<file> | Fully qualified directory and name for PEM file. |
Enable OAuth on Product
To use OAuth within the product the following is recommended to be configured:
• Using the configureEnv.sh –a command set the following settings:
Attribute | Recommended Setting |
|---|---|
CSRF Protection for REST Services | false |
OWSM Protection for REST Services | true |
Note: Execute the initialSetup.sh utility to reflect the changes.
• The following Oracle Web Service Management Policies must be attached with Oracle Web Services Manager or within the product configuration for both REST and SOAP:
Protocol | Oracle Web Services Manager Policy |
|---|---|
SSL | oracle/multi_token_over_ssl_rest_service_policy |
Non-SSL | oracle/multi_token_rest_service_policy |
Use Oracle Web Service Manager Policies
The above Web Services policies must be configured within the product to configure OAuth2 support. This may be done at the individual service level (when part of your solution is federated) or globally for all services.
Individual Web Service Policies
To attach the token policies to individual Inbound Web Services the following process is recommended to be performed:
• If it does not already exist, create a Web Service Annotation of type Annotation for OWS Security Policy. In the uri Parameter Name, specify the appropriate policy (SSL or non-SSL outlined in the previous section.
• Attach the Web Service Annotation to the relevant services.
• Deploy/Redeploy the Inbound Web Services to implement the policy. Refer to the Server Administration Guide for more information.
Global Web Service Policies
Note: It is possible to override the global setting on individual Inbound Web Services by specifying additional annotations.
If security policies are to apply globally across all services, then the following process is recommended:
• Create or alter the F1_EMAILCFG Feature of Feature Type External Messages and specify the Default Security Type option with the relevant security policy.
• Deploy/Redeploy the Inbound Web Services to implement the policies across services. Refer to the Server Administration Guide for more information.