Configuring Requisitions in Oracle Fusion Procurement Cloud
This section focuses on integrating the data that comes as a part of the package and configuring them in the Oracle Integration Cloud environment for the integration to run successfully. Make sure to follow the package upload procedure in the same sequence for successful configuration.
Oracle Fusion Procurement Cloud has different inventory organization (single or multiple) setups depending on the organization's requirement. In the integration, single LE, BU, and Organization setup are used.
Oracle Utilities Work and Asset Cloud Service needs to map organization and Location setup as per the requirement in sync with Oracle Fusion Procurement Cloud setup.
Pre-requisites
The pre-requisites are as follows:
1. All the Oracle Utilities Work and Asset Cloud Service requisition inventory items should be synchronized with Oracle inventory cloud master/inventory organization.
2. All the Oracle Utilities Work and Asset Cloud Service supplier and supplier sites should be synchronized with Oracle Fusion Procurement Cloud suppliers.
3. Unit of Measurement should be defined and mapped as per the Oracle Utilities Work and Asset Cloud Service requirement.
Setting up Inventory Organization and Location (Delivery Location)
This section describes a sample setup for reference. The setup will depend on the customer/business implementing the integration.
Inventory Organization Name: Seattle
Organization Code: 001
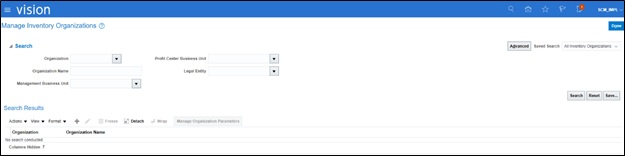
Navigate to Setup and Maintenance > Search > Manage Inventory Organization. Search for the organization.

Setting up Inventory Location
The Oracle Utilities Work and Asset Cloud Service delivery locations (store rooms) should be mapped to the inventory locations of the inventory organization.
This section describes a sample setup for reference. The setup will depend on the customer/business implementing the integration.
1. Check the ERP Value column (Inventory Cloud Organization Locations) in the following table. It shows the number of locations defined against the organization (Seattle) with the organization code “001”.
WACS Value | WACS Store Rooms | ERP Value | ERP Organization Code |
|---|---|---|---|
<452478085231> | Central Storeroom | WACS_Seattle | 001 |
<071529520446> | QC Storeroom | WACS_California | 001 |
<226353575324> | North canton Storeroom | WACS_Boston | 001 |
2. Navigate to Setup and Maintenance > Search > Manage Inventory Organization Locations.
3. Search for the code in the Code field.
4. Click + to create a new location.
5. Enter the location address details and attach the required organization.
6. Click Done.
Setting up Descriptive Flexfields (DFF)
To setup a descriptive flexfield:
1. Navigate to Setup and Maintenance > Search > Manage Requisition Descriptive Flexfields.
2. Click PO_REQUISTION_LINES and edit it.
3. Click Manage Context and add contexts with all the context sensitive segments.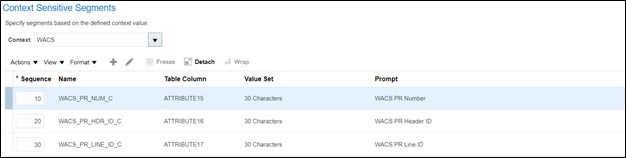
4. Click the edit icon to add segments.
5. Add the following context sensitive segments and the respective details for each segment.
WACS_PR_NUM_C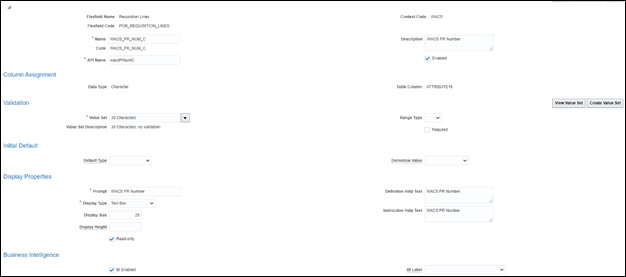
WACS_PR_HDR_ID_C
WACS_PR_LINE_ID_C
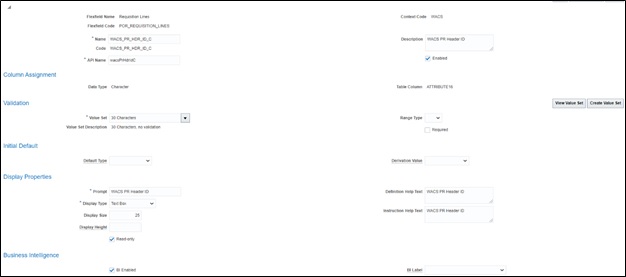
Make sure the API names (example: wacsPrNumC ) of the respective column name should be shown in the figures above. API names are referred in the REST API integration. Any mismatch in the names might lead to an error in the integration.
In context sensitive DFF, additional DFF fields under the context value are created. When the context value in the application is selected, the DFF fields are shown in the application. Else, no DFF field is shown.
POR_REQUISITION_LINES DFF Setup Details
Column Name | Data type | Size | Table column | Prompt |
|---|---|---|---|---|
WACS_PR_NUM_C | Character V.S: 30 Characters | 30 | ATTRIBUTE15 | WACS PR Number |
WACS_PR_HDR_ID_C | Character V.S: 30 Characters | 30 | ATTRIBUTE16 | WACS PR Header ID |
WACS_PR_LINE_ID_C | Character V.S: 30 Characters | 30 | ATTRIBUTE17 | WACS PR Line ID |
To setup descriptive flexfields at the requisition distribution level:
1. Navigate to Setup and Maintenance > Search > Manage Requisition Descriptive Flexfields.
2. Click POR_REQ_DISTRIBUTIONS and edit.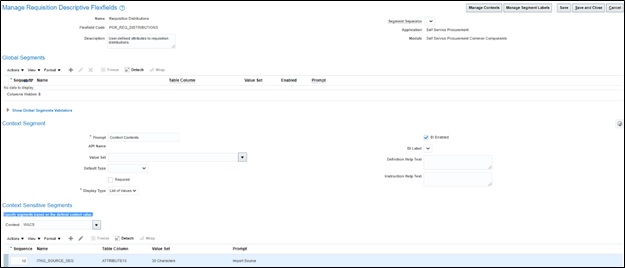
3. Click Manage Context to add the respective context.
4. Add context sensitive segments to the context.
The following figure shows the “ITNG_SOURCE_SEG” segment details.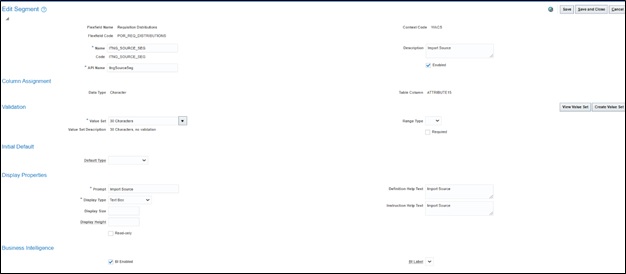
5. Click Save and Close.
Note that both requisition line and distribution (deploy flexfield) should be complied. Make sure that the deploy status is enabled.