Using the Needs Analysis Dashboard
To better understand the needs of your accounts, you can perform a needs analysis, which identifies possible sales opportunities with your utility customers. Needs analysis interviews, and the rules and questions associated with them, are defined using the Oracle Intelligent Advisor system. You use the Needs Analysis Dashboard to launch new interviews, or to access interviews that are in progress.
This image shows an example of the Needs Analysis Dashboard:
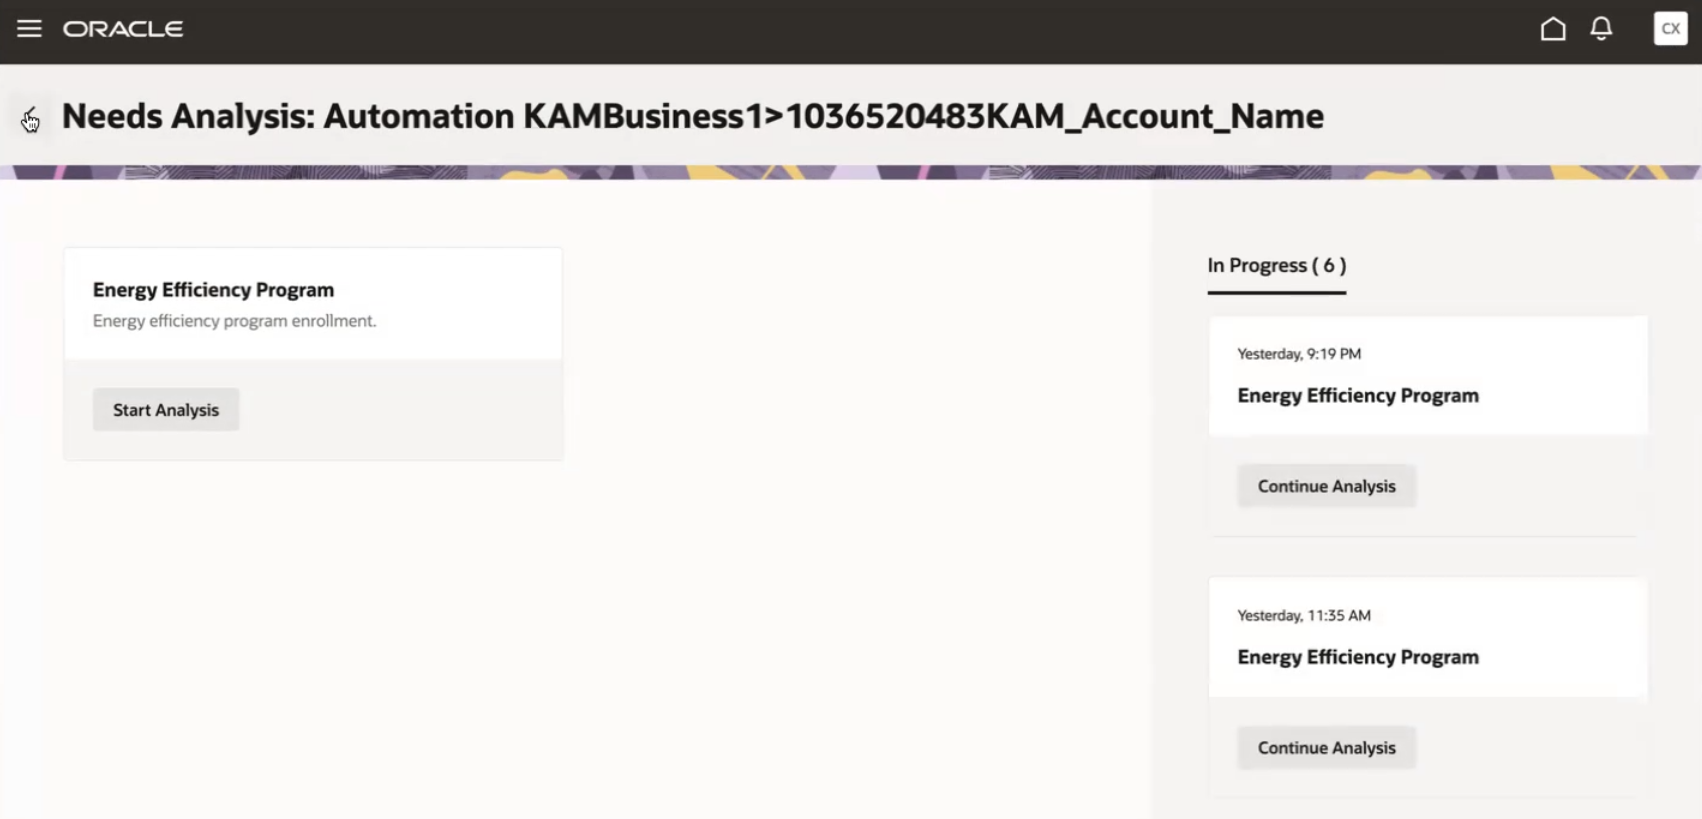
The Energy Efficiency Programs interview is delivered with CX for Utilities Sales. This interview includes questions that you can ask your contacts to help you gather information about their account. After answering the questions, the system displays a list of recommendations. You can discuss these options with your contact to determine which plan is the best fit, and then select one of these options:
-
Ready to move forward? (Create Opportunity)
-
Need more time to decide? (Create Lead)
-
Other follow up options
If you specify that the customer is ready to move forward when you save and submit the interview, the system automatically creates an opportunity that includes the products listed in the selected plan option. If you specify that the customer needs more time to decide, the system creates a lead that includes the selected plan details. And if you select the other follow up options when you save and submit the interview, the system gives you the choice of creating an appointment or a task that you can use to follow up with the customer at a later date.
You can also create leads, opportunities, notes, appointments, and tasks, or send an email, directly from the interview before completing the interview. You can then view or edit these records as needed. These options might be needed in the following scenarios:
-
Your contact asks you to call back at another time to complete the interview. In this case, you can create an appointment or a task to remind you to call them back.
-
Your contact tells you about another company that has similar needs to theirs. In this case, you can create a lead to follow up with the other company.
For additional information about creating or editing these records, see:
-
Managing Activities for information about notes, appointments, and tasks.
-
Using the Leads and Opportunities tab for information about leads and opportunities.
Be aware that once you launch an interview from the dashboard, the system immediately creates a record for that interview. If you do not complete the interview, you can exit the interview and then it will then be available in the In Progress section of the dashboard, where you can complete it at a later date. These in-progress interviews show the name of the original interview and are listed in order of the date they were last updated.
For additional information about items related to this topic, see:
-
Oracle Intelligent Advisor Implementation Tasks for details about how your implementation might vary.
-
Managing Activities for information about notes, appointments, and tasks.
-
Using the Leads and Opportunities tab for information about leads and opportunities.
Performing a Needs Analysis Interview
The following task is based on the Energy Efficiency Programs interview that was delivered with CX for Utilities Sales. If your utility updated the interview, these steps might not reflect what you see on your screen.
-
Search for and select a billing account on which you want to perform a needs analysis.
-
Click the action menu button (3 dots) at the top right, and select View Needs Analysis Dashboard.
-
On the Needs Analysis: <Account Name> screen, click the Start Analysis button on the Energy Efficiency Program card.
-
The system creates a record for your interview and opens the Energy Efficiency Program screen.
Be aware that if you exit the interview before you complete it, the interview will appear in the In Progress area of the Needs Analysis Dashboard screen. You can click the Continue Analysis button on the interview card at any time to continue with these steps.
-
The following fields are automatically populated based on your billing account details, but you can select different values for each using the drop down options:
-
Account
-
Contact
-
Billing Account
-
-
If needed, use the action menu to create additional items, such as leads, opportunities, appointments, tasks, notes, and emails. These are created in addition to any records that are created when you complete the interview process. For example, your contact might ask you to call him back tomorrow because he is not available to complete the interview right now. In this case, you could create an appointment or a task to remind you to contact the person again tomorrow.
-
Lead
-
Opportunity
-
Note
-
Appointment
-
Task
-
Email
Selecting one of these options opens a new tab in your browser where you can create your record. When you are done, return to this tab to complete your interview or exit out of the Needs Analysis Dashboard.
-
-
Complete the questions in the Energy Efficiency Program Enrollment section.
-
Click Next.
-
The system displays the recommended plans for you to discuss with your customer. Each plan option includes:
-
Plan name and description
-
List of products included in the plan
-
More details option that enables you to view additional details about each plan
-
-
If applicable, select a plan and then select one of these options:
-
Ready to move forward? (Create Opportunity): If you select this option, you must select a plan before you can complete the interview. When you complete the interview, the system automatically creates an opportunity that includes the products included in the plan. The name of the opportunity is Needs Analysis - Energy Efficiency Program <Date/Time>.
-
Need more time to decide? (Create Lead): If you select this option, you must select a plan before you can complete the interview. When you complete the interview, the system automatically creates a lead that includes the products included in the plan. The name of the lead is Needs Analysis - Energy Efficiency Program.
-
Other follow up options: If you select this option, you do not need to select a plan. However, you must select one of these sub-options:
-
Create Appointment: If you select this option, the system creates an appointment with the plan options in the Description field. The name of the appointment is Needs Analysis - Energy Efficiency Program - <Billing Account ID and Name>.
-
Create Task: If you select this option, the system creates a task with the plan options in the Description field. The name of the task is Needs Analysis - Energy Efficiency Program - <Billing Account ID and Name>.
-
-
-
Click the Accept & Submit button.
-
The system returns you to the Needs Analysis Dashboard, and a message appears at the bottom indicating what type of record was created. For example, the "Lead Created" message might appear.
-
You can then view or edit any of the records you created as needed. For additional information, see:
-
Managing Activities to view or edit appointments and tasks
-
Using the Leads and Opportunities tab to view or edit leads and opportunities
-