4 Using the Business List
The Business List is your main screen to find and manage your key accounts. You use the Business List to:
- View your assigned accounts, favorite accounts, or all accounts
- Search for specific accounts
- Access key account data in Account 360
- Create a new account
The Business List has multiple views that you can choose from to search for and display Oracle Fusion account records, which include:
- My Accounts: This view is displayed by default when you access the Business
List, and the records that appear in the work area include the following, depending on
the role of the logged in user:
- Non-manager roles must be assigned to the sales team and/or sales territory for an account in the Oracle Sales system in order for it to display.
- Supervisors will see all of the accounts for which they are designated as the owner in Oracle Sales, and also all of the accounts that would display for the employees who report to them.
- Favorites: This view displays all Oracle Fusion accounts that the logged-in user has marked as a favorite.
- All accounts: This view displays all Oracle Fusion accounts that the logged-in user has access to.
- Customized saved account searches: You can define customized searches in the Oracle Fusion Sales system and they will appear in this drop down so you can quickly search for the accounts that you access often. For additional information, see Overview of Saved Search Setup in the Oracle Sales Help Center.
The records that display in the business list can be:
- Customers: These records represent Oracle Fusion accounts that are associated with one or more utility billing accounts. These can be parent or child accounts.
- Prospects: These records represent businesses that exist as Oracle Fusion accounts, but are not connected to any utility billing accounts.
Once you have located the record you want to view or manage, you can use the Business List to:
- View the primary contact information for the account
- Access the Oracle Fusion Contact page for the primary contact
- Use the Action menu options to:
- Create a contact
- Create a service request
- Create a lead
- Create an opportunity
- Mark an account as a favorite
- Create a note
- Create an appointment
- Create a task Log a call
- Send an email
- Access Account 360 to manage data and transactions
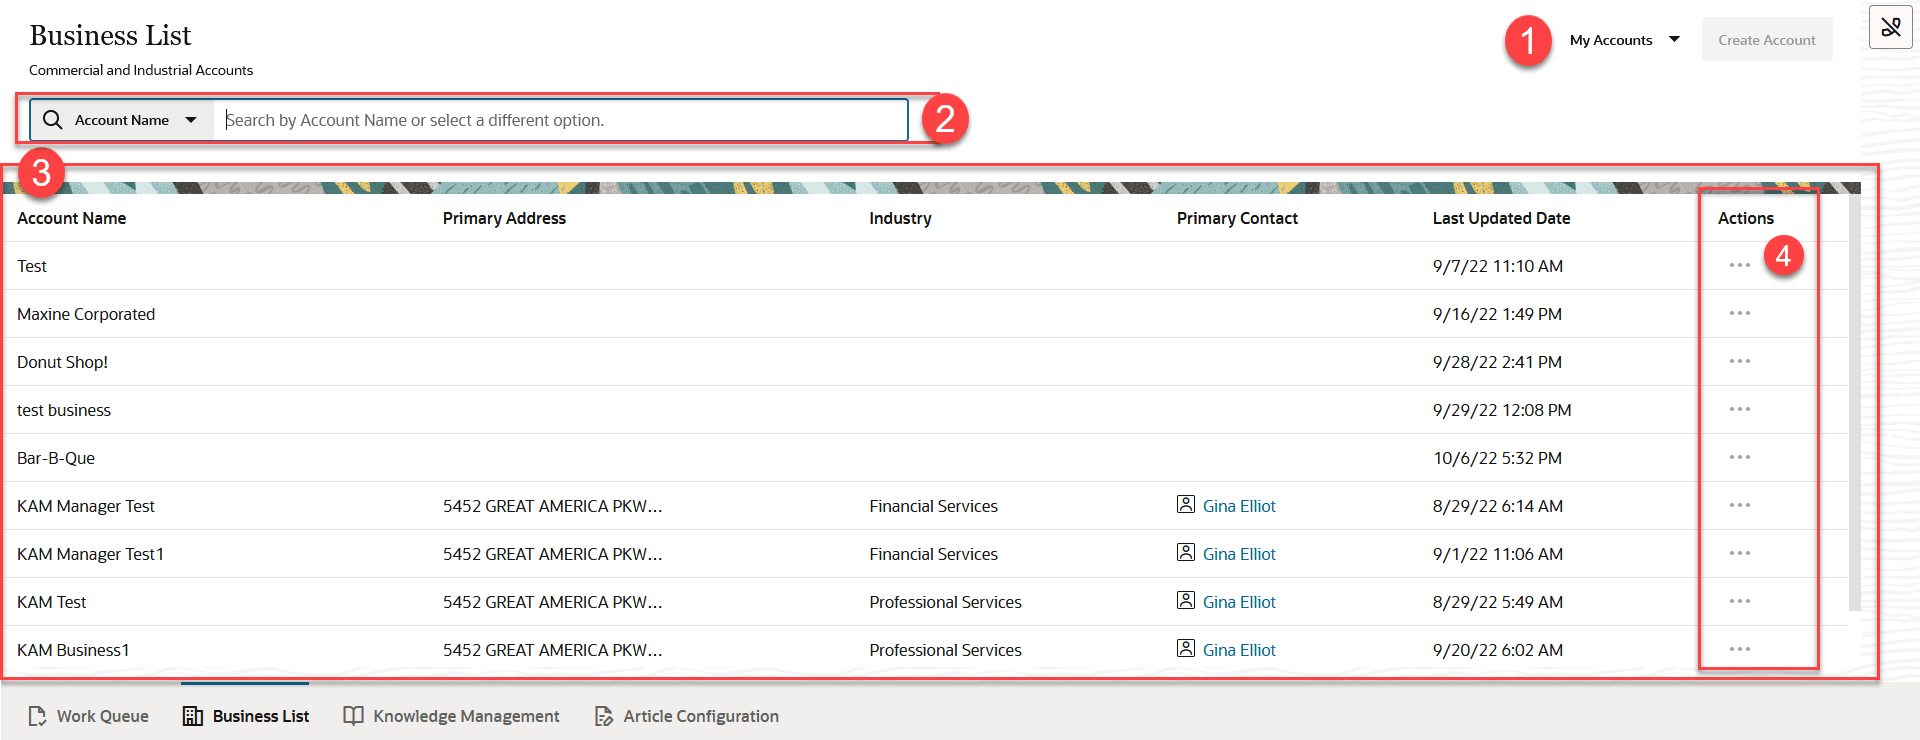
This image identifies the main areas of the Business List screen:
Figure 4-1 Business List

This table describes the main areas that appear on the Business List screen:
Table 4-1 Business List Areas
| Page Area | Description |
|---|---|
| 1. Header Actions | Use the Account View button to specify which accounts you want to view. You can choose:
Note: The selection you choose here works in conjunction with the text you enter in the search bar. For example, if you select My Accounts, and then search for a business name, it will appear in your search results only if the account is assigned to you.Use the Create Account button to create a new Oracle Fusion account record. Clicking this button opens a Redwood Sales Create Account drawer on the right side of the screen. After you create the record, the drawer closes and brings you to an additional screen where you can mark the contact as the primary contact for the account. Close the drawer to return to the Business List. |
| 2. Search Bar | Use the options in this section of the form to search for the account you
want to view. You can search by:
|
| 3. Detail Area | This section of the form displays your search results. Each record contains
the following information from the Oracle Fusion account:
You can perform the following actions on each record:
|
| 4. Action Menu | You can use the Action menu that appears on each record in the Business
List to:
When you select any of these action menu items other than the Add to Favorites, a drawer opens on the right side of the screen and displays the appropriate screen from the Oracle Redwood Sales system. When you are done creating the record, the system closes the drawer and either returns you to the Business List, or brings you to the new record you have created. |
Topics in this chapter include: